Warranty Card
Page 1
... period must send the Product in Japan For service assistance or resolution of a service problem, or for a replacement fee. Please contact Sony at no charge. 2. This warranty does not cover customer instruction, installation, set up adjustments or signal reception problems. This warranty does .... REPLACEMENT AS PROVIDED UNDER THIS WARRANTY IS THE EXCLUSIVE REMEDY OF THE CONSUMER. 3-081-170-02 ® VCR LIMITED WARRANTY Sony Electronics Inc. ("Sony") warrants this Product (including any part of the Product, including the antenna. EXCEPT TO THE EXTENT PROHIBITED BY APPLICABLE LAW, ...
... period must send the Product in Japan For service assistance or resolution of a service problem, or for a replacement fee. Please contact Sony at no charge. 2. This warranty does not cover customer instruction, installation, set up adjustments or signal reception problems. This warranty does .... REPLACEMENT AS PROVIDED UNDER THIS WARRANTY IS THE EXCLUSIVE REMEDY OF THE CONSUMER. 3-081-170-02 ® VCR LIMITED WARRANTY Sony Electronics Inc. ("Sony") warrants this Product (including any part of the Product, including the antenna. EXCEPT TO THE EXTENT PROHIBITED BY APPLICABLE LAW, ...

Dimensions Diagram
Page 1
... IN L Audio R VIDEO LINE IN LINE OUT NOTE: S-Link only on N-80 VHF/UH IN RF UNIT 3 OUT 4 NOTE: WHERE THERE ARE CLOSE TOLERANCES INVOLVED IN CABINET BUILDING OR APPLICATIONS WHICH REQUIRE A GREAT DEGREE OF PRECISION WE RECOMMEND THAT THE PRODUCT ITSELF BE USED TO MAKE THE ACTUAL MEASUREMENTS. Sony Electronics Inc...
... IN L Audio R VIDEO LINE IN LINE OUT NOTE: S-Link only on N-80 VHF/UH IN RF UNIT 3 OUT 4 NOTE: WHERE THERE ARE CLOSE TOLERANCES INVOLVED IN CABINET BUILDING OR APPLICATIONS WHICH REQUIRE A GREAT DEGREE OF PRECISION WE RECOMMEND THAT THE PRODUCT ITSELF BE USED TO MAKE THE ACTUAL MEASUREMENTS. Sony Electronics Inc...
Operating Instructions
Page 1
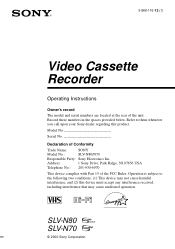
.... Model No Serial No Declaration of the FCC Rules. Refer to the following two conditions: (1) This device may not cause harmful interference, and (2) this product. SLV-N80 SLV-N70 © 2000 Sony Corporation 3-868-116-12 (1) Video Cassette Recorder Operating Instructions Owner's record The model and serial numbers are located at the rear of the unit.
.... Model No Serial No Declaration of the FCC Rules. Refer to the following two conditions: (1) This device may not cause harmful interference, and (2) this product. SLV-N80 SLV-N70 © 2000 Sony Corporation 3-868-116-12 (1) Video Cassette Recorder Operating Instructions Owner's record The model and serial numbers are located at the rear of the unit.
Operating Instructions
Page 2
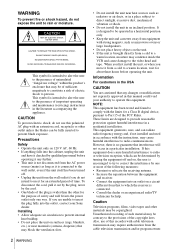
... may be of sufficient magnitude to persons. If this manual could void your Sony dealer. When you first install the unit, or when you move it out... modifications not expressly approved in a horizontal position only. • Keep the unit and cassettes away from equipment with strong magnets, such as microwave ovens or large loudspeakers. •... residential installation. Caution Television programs, films, video tapes and other materials may cause harmful interference to the presence of the copyright laws. Unauthorized recording of such material may condense inside the VCR...
... may be of sufficient magnitude to persons. If this manual could void your Sony dealer. When you first install the unit, or when you move it out... modifications not expressly approved in a horizontal position only. • Keep the unit and cassettes away from equipment with strong magnets, such as microwave ovens or large loudspeakers. •... residential installation. Caution Television programs, films, video tapes and other materials may cause harmful interference to the presence of the copyright laws. Unauthorized recording of such material may condense inside the VCR...
Operating Instructions
Page 3
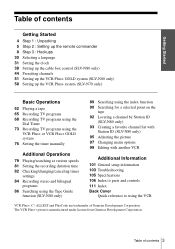
...channels 51 Setting up the VCR Plus+ GOLD system (SLV-N80 only) 58 Setting up the VCR Plus+ system (SLV-N70 only) Basic Operations 62 Playing a tape 65 Recording TV programs 68 Recording TV programs using the Dial Timer 73 Recording TV programs using the VCR Plus+ or VCR Plus... manually Additional Operations 79 Playing/searching at various speeds 81 Setting the recording duration time 82 Checking/changing/canceling timer settings 84 Recording stereo and bilingual programs 86 Searching using the Tape Guide function (SLV-N80 only) 89 Searching using the index function 90 Searching for a selected...
...channels 51 Setting up the VCR Plus+ GOLD system (SLV-N80 only) 58 Setting up the VCR Plus+ system (SLV-N70 only) Basic Operations 62 Playing a tape 65 Recording TV programs 68 Recording TV programs using the Dial Timer 73 Recording TV programs using the VCR Plus+ or VCR Plus... manually Additional Operations 79 Playing/searching at various speeds 81 Setting the recording duration time 82 Checking/changing/canceling timer settings 84 Recording stereo and bilingual programs 86 Searching using the Tape Guide function (SLV-N80 only) 89 Searching using the index function 90 Searching for a selected...

Operating Instructions
Page 4
... following items with the VCR: • Remote commander • Audio/video cable (3-phono, 1-mini to 3phono, 1-mini) (SLV-N80 only) • Size AA (R6) batteries • Audio/video cable (3-phono to 3-phono) (SLV-N70 only) • 75-ohm coaxial cable with F-type connectors Check your VCR. SLV-N80 is clearly indicated in this manual are for example...
... following items with the VCR: • Remote commander • Audio/video cable (3-phono, 1-mini to 3phono, 1-mini) (SLV-N80 only) • Size AA (R6) batteries • Audio/video cable (3-phono to 3-phono) (SLV-N70 only) • 75-ohm coaxial cable with F-type connectors Check your VCR. SLV-N80 is clearly indicated in this manual are for example...
Operating Instructions
Page 5
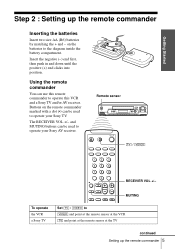
Buttons on the batteries to the diagram inside the battery compartment. MUTING To operate the VCR a Sony TV Set [TV] / [VIDEO] to operate this VCR and a Sony TV and/or AV receiver. The RECEIVER VOL +/- Remote sensor [TV] / [VIDEO] 123 456 789 0 RECEIVER VOL +/- Getting Started Step 2 : Setting up the remote commander 5 and MUTING buttons...
Buttons on the batteries to the diagram inside the battery compartment. MUTING To operate the VCR a Sony TV Set [TV] / [VIDEO] to operate this VCR and a Sony TV and/or AV receiver. The RECEIVER VOL +/- Remote sensor [TV] / [VIDEO] 123 456 789 0 RECEIVER VOL +/- Getting Started Step 2 : Setting up the remote commander 5 and MUTING buttons...
Operating Instructions
Page 6
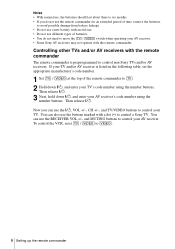
...you can use the ?/1, VOL +/-, CH +/-, and TV/VIDEO buttons to control non-Sony TVs and/or AV receivers. To control the VCR, reset [TV] / [VIDEO] to move the [TV] / [VIDEO] switch when operating your AV receiver. • Some Sony AV receivers may not operate with the remote commander The remote...not use a new battery with a dot (•) to control a Sony TV. Controlling other TVs and/or AV receivers with this remote commander. Then release ?/1. 3 Next, hold down ?/1, and enter your TV. Now you do not need to [VIDEO]. 6 Setting up the remote commander and MUTING buttons to [TV]. ...
...you can use the ?/1, VOL +/-, CH +/-, and TV/VIDEO buttons to control non-Sony TVs and/or AV receivers. To control the VCR, reset [TV] / [VIDEO] to move the [TV] / [VIDEO] switch when operating your AV receiver. • Some Sony AV receivers may not operate with the remote commander The remote...not use a new battery with a dot (•) to control a Sony TV. Controlling other TVs and/or AV receivers with this remote commander. Then release ?/1. 3 Next, hold down ?/1, and enter your TV. Now you do not need to [VIDEO]. 6 Setting up the remote commander and MUTING buttons to [TV]. ...
Operating Instructions
Page 7
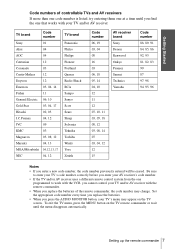
... appear on the TV remote commander or wait until you press the AUDIO MONITOR button, your TV and/or AV receiver. TV brand Code number Sony 01 Akai 04 AOC 04 Centurion 12 Coronado 03 Curtis-Mathes 12 Daytron 12 Emerson 03, 04, 14 Fisher 11 General Electric 06, 10 Gold... 04, 10 12 11 12 07, 10, 11 03, 05, 18 08, 12 03, 08, 14 07 03, 04, 12 12 15 AV receiver brand Sony Denon Kenwood Onkyo Pioneer Sansui Technics Yamaha Code number 88, 89, 91 84, 85, 86 92, 93 81, 82, 83 99 87 97, 98 94...
... appear on the TV remote commander or wait until you press the AUDIO MONITOR button, your TV and/or AV receiver. TV brand Code number Sony 01 Akai 04 AOC 04 Centurion 12 Coronado 03 Curtis-Mathes 12 Daytron 12 Emerson 03, 04, 14 Fisher 11 General Electric 06, 10 Gold... 04, 10 12 11 12 07, 10, 11 03, 05, 18 08, 12 03, 08, 14 07 03, 04, 12 12 15 AV receiver brand Sony Denon Kenwood Onkyo Pioneer Sansui Technics Yamaha Code number 88, 89, 91 84, 85, 86 92, 93 81, 82, 83 99 87 97, 98 94...
Operating Instructions
Page 8
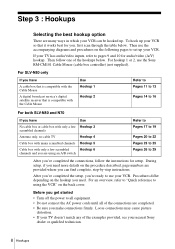
... distortion. • If your TV doesn't match any of the examples provided, see your TV has audio/video inputs, refer to pages 9 and 10 for audio/video (A/V) hookup. For SLV-N80 only If you have A cable box that is compatible with the Cable Mouse A digital broadcast service's digital ...and procedures on the hookup you make connections firmly. Then follow the instructions for you, first scan through the table below . Then use the Sony RM-CM101 Cable Mouse (cable box controller) (not supplied). Step 3 : Hookups Selecting the best hookup option There are many scrambled channels ...
... distortion. • If your TV doesn't match any of the examples provided, see your TV has audio/video inputs, refer to pages 9 and 10 for audio/video (A/V) hookup. For SLV-N80 only If you have A cable box that is compatible with the Cable Mouse A digital broadcast service's digital ...and procedures on the hookup you make connections firmly. Then follow the instructions for you, first scan through the table below . Then use the Sony RM-CM101 Cable Mouse (cable box controller) (not supplied). Step 3 : Hookups Selecting the best hookup option There are many scrambled channels ...
Operating Instructions
Page 9
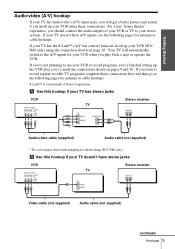
For a true "home theater" experience, you should connect the audio outputs of Sony Corporation. Your TV will get a better picture and sound if you hook up your VCR (SLVN80 only) using these connections first, and then go to ... TV has audio/video (A/V) input jacks, you will automatically switch to the A/V inputs for this hookup (SLV-N80 only). If your TV has the S-Link™ (A/V bus control) function, hook up your VCR using the connection shown on pages 9 and 10. S-Link™ is a trademark of your VCR or TV to record programs, you...
For a true "home theater" experience, you should connect the audio outputs of Sony Corporation. Your TV will get a better picture and sound if you hook up your VCR (SLVN80 only) using these connections first, and then go to ... TV has audio/video (A/V) input jacks, you will automatically switch to the A/V inputs for this hookup (SLV-N80 only). If your TV has the S-Link™ (A/V bus control) function, hook up your VCR using the connection shown on pages 9 and 10. S-Link™ is a trademark of your VCR or TV to record programs, you...
Operating Instructions
Page 10
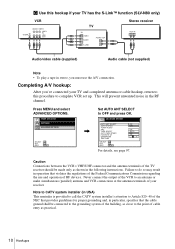
... and VCR connections at the antenna terminals of your TV has the S-Link™ function (SLV-N80 only) VCR IN S-LINK AUDIO VIDEO LINE-1 IN LINE OUT TV IN VIDEO AUDIO S-LINK AUDIO OUT Stereo receiver AUX IN Audio/video cable (supplied) Audio cable (not supplied) Note • To play a tape in stereo, you 've...
... and VCR connections at the antenna terminals of your TV has the S-Link™ function (SLV-N80 only) VCR IN S-LINK AUDIO VIDEO LINE-1 IN LINE OUT TV IN VIDEO AUDIO S-LINK AUDIO OUT Stereo receiver AUX IN Audio/video cable (supplied) Audio cable (not supplied) Note • To play a tape in stereo, you 've...
Operating Instructions
Page 11
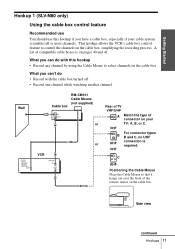
... For connector types B and C, no UHF connection is on pages 40 and 41. Getting Started Hookup 1 (SLV-N80 only) Using the cable box control feature Recommended use You should use this hookup • Record any channel by using the Cable Mouse to control the channels on the cable box. C UHF Positioning the... Cable Mouse Place the Cable Mouse so that it hangs out over the front of the remote sensor on the cable box, simplifying the recording process. Side view continued Hookups 11 This hookup allows the VCR's cable box control feature to select channels on the cable box What you...
... For connector types B and C, no UHF connection is on pages 40 and 41. Getting Started Hookup 1 (SLV-N80 only) Using the cable box control feature Recommended use You should use this hookup • Record any channel by using the Cable Mouse to control the channels on the cable box. C UHF Positioning the... Cable Mouse Place the Cable Mouse so that it hangs out over the front of the remote sensor on the cable box, simplifying the recording process. Side view continued Hookups 11 This hookup allows the VCR's cable box control feature to select channels on the cable box What you...
Operating Instructions
Page 12
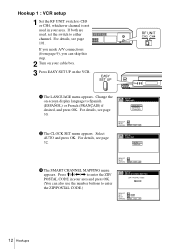
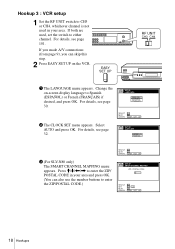
For details, see page 32. SET UP CLOCK SET AUTO MANUAL SELECT : NEXT : OK CANCEL : EASY SET UP 3 The SMART CHANNEL MAPPING menu appears. If you made A/V connections (from page 9), you can skip this step. 2 Turn on your area. For details, see page 30. EASY SET UP RF UNIT CH3 CH4 1 The LANGUAGE menu appears. Select AUTO and press OK. If both are used in your cable box. 3 Press EASY SET UP on -screen display language to either channel. Change the on the VCR. Press M/m/ For details, see page 101. SET UP LANGUAGE ENGLISH ESPAÑOL FRANÇAIS SELECT : NEXT : ...
For details, see page 32. SET UP CLOCK SET AUTO MANUAL SELECT : NEXT : OK CANCEL : EASY SET UP 3 The SMART CHANNEL MAPPING menu appears. If you made A/V connections (from page 9), you can skip this step. 2 Turn on your area. For details, see page 30. EASY SET UP RF UNIT CH3 CH4 1 The LANGUAGE menu appears. Select AUTO and press OK. If both are used in your cable box. 3 Press EASY SET UP on -screen display language to either channel. Change the on the VCR. Press M/m/ For details, see page 101. SET UP LANGUAGE ENGLISH ESPAÑOL FRANÇAIS SELECT : NEXT : ...
Operating Instructions
Page 13
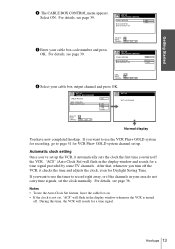
... DONE SELECT : NEXT : OK CANCEL : EASY SET UP Normal display You have now completed hookup. After that, whenever you want to use the timer to record right away, or if the channels in your area do not carry time signals, set , "ACS" will flash in the display window whenever the VCR... 5 Enter your cable box output channel and press OK. If you turn off the VCR. Notes • To use the VCR Plus+ GOLD system for recording, go to use the Auto Clock Set feature, leave the cable box on. • If the clock is turned off the VCR, it automatically sets...
... DONE SELECT : NEXT : OK CANCEL : EASY SET UP Normal display You have now completed hookup. After that, whenever you want to use the timer to record right away, or if the channels in your area do not carry time signals, set , "ACS" will flash in the display window whenever the VCR... 5 Enter your cable box output channel and press OK. If you turn off the VCR. Notes • To use the VCR Plus+ GOLD system for recording, go to use the Auto Clock Set feature, leave the cable box on. • If the clock is turned off the VCR, it automatically sets...
Operating Instructions
Page 14
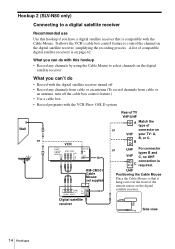
...) LINE OUT AUDIO VIDEO VHF/UHF IN OUT Digital satellite receiver Rear of TV VHF/UHF A Match the type of or connector on VHF your TV: A, B, or C. Hookup 2 (SLV-N80 only) Connecting to a digital satellite receiver Recommended use Use this hookup • Record any channels from cable... or an antenna (To record channels from cable or an antenna, turn off • Record any channels by using the Cable Mouse to control ...
...) LINE OUT AUDIO VIDEO VHF/UHF IN OUT Digital satellite receiver Rear of TV VHF/UHF A Match the type of or connector on VHF your TV: A, B, or C. Hookup 2 (SLV-N80 only) Connecting to a digital satellite receiver Recommended use Use this hookup • Record any channels from cable... or an antenna (To record channels from cable or an antenna, turn off • Record any channels by using the Cable Mouse to control ...
Operating Instructions
Page 15
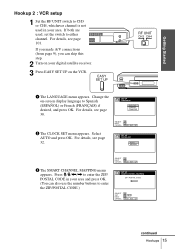
For details, see page 32. SET UP LANGUAGE ENGLISH ESPAÑOL FRANÇAIS SELECT : NEXT : OK CANCEL : EASY SET UP 2 The CLOCK SET menu appears. Select AUTO and press OK. Change the on the VCR. For details, see page 30. SET UP CLOCK SET AUTO MANUAL SELECT : NEXT : OK CANCEL : EASY SET UP 3 The SMART CHANNEL MAPPING menu appears. For details, see page 101. Press M/m/ If you made A/V connections (from page 9), you can skip this step. 2 Turn on your area. EASY SET UP RF UNIT CH3 CH4 1 The LANGUAGE menu appears. Getting Started Hookup 2 : VCR setup 1 Set the RF...
For details, see page 32. SET UP LANGUAGE ENGLISH ESPAÑOL FRANÇAIS SELECT : NEXT : OK CANCEL : EASY SET UP 2 The CLOCK SET menu appears. Select AUTO and press OK. Change the on the VCR. For details, see page 30. SET UP CLOCK SET AUTO MANUAL SELECT : NEXT : OK CANCEL : EASY SET UP 3 The SMART CHANNEL MAPPING menu appears. For details, see page 101. Press M/m/ If you made A/V connections (from page 9), you can skip this step. 2 Turn on your area. EASY SET UP RF UNIT CH3 CH4 1 The LANGUAGE menu appears. Getting Started Hookup 2 : VCR setup 1 Set the RF...
Operating Instructions
Page 16
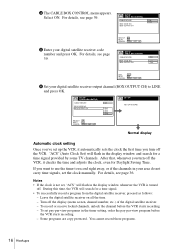
...: OK CANCEL : EASY SET UP Normal display Automatic clock setting Once you've set , "ACS" will search for a time signal. • To successfully record a program from the digital satellite receiver, proceed as follows: - Notes • If the clock is turned off the VCR, it automatically sets the clock the... provided by some TV channels. During this time, the VCR will flash in the display window and search for Daylight Saving Time. You cannot record these programs. 16 Hookups For details, see page 36. If you turn off . Leave the digital satellite receiver on all the time. -...
...: OK CANCEL : EASY SET UP Normal display Automatic clock setting Once you've set , "ACS" will search for a time signal. • To successfully record a program from the digital satellite receiver, proceed as follows: - Notes • If the clock is turned off the VCR, it automatically sets the clock the... provided by some TV channels. During this time, the VCR will flash in the display window and search for Daylight Saving Time. You cannot record these programs. 16 Hookups For details, see page 36. If you turn off . Leave the digital satellite receiver on all the time. -...
Operating Instructions
Page 17
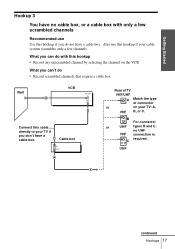
... is C required. Cable box IN OUT Rear of TV VHF/UHF A Match the type of connector or on the VCR What you can do • Record scrambled channels that require a cable box Wall VCR VHF/UHF IN OUT Connect this hookup if your cable system scrambles only a few scrambled channels Recommended... use this cable directly to your TV: A, VHF B, or C. Also use Use this hookup • Record any unscrambled channel by selecting the channel on your TV if you can 't do with only a few channels.
... is C required. Cable box IN OUT Rear of TV VHF/UHF A Match the type of connector or on the VCR What you can do • Record scrambled channels that require a cable box Wall VCR VHF/UHF IN OUT Connect this hookup if your cable system scrambles only a few scrambled channels Recommended... use this cable directly to your TV: A, VHF B, or C. Also use Use this hookup • Record any unscrambled channel by selecting the channel on your TV if you can 't do with only a few channels.
Operating Instructions
Page 18
... channel. Select AUTO and press OK. For details, see page 32. SET UP CLOCK SET AUTO MANUAL SELECT : NEXT : OK CANCEL : EASY SET UP 3 (For SLV-N80 only) The SMART CHANNEL MAPPING menu appears. EASY SET UP RF UNIT CH3 CH4 1 The LANGUAGE menu appears. For details, see page 30. Change the...
... channel. Select AUTO and press OK. For details, see page 32. SET UP CLOCK SET AUTO MANUAL SELECT : NEXT : OK CANCEL : EASY SET UP 3 (For SLV-N80 only) The SMART CHANNEL MAPPING menu appears. EASY SET UP RF UNIT CH3 CH4 1 The LANGUAGE menu appears. For details, see page 30. Change the...