
Operating Instructions
Page 3
...Customizing sound fields 35 Receiving Broadcasts Direct tuning 40 Automatic tuning 40 Preset tuning 41 Other Operations Naming preset stations and program sources 42 Recording 42 Using the Sleep Timer 43 Adjustments using the CUSTOMIZE button 44 CONTROL A1 control system ......... 46 ...Operations Using the Remote RM-PG4111) and RM-PP4112) Before you use your remote 48 Remote button description 48 Selecting the mode of the remote ........ 52 Programming the remote 52 Learning the commands of your components3 55 Performing several...
...Customizing sound fields 35 Receiving Broadcasts Direct tuning 40 Automatic tuning 40 Preset tuning 41 Other Operations Naming preset stations and program sources 42 Recording 42 Using the Sleep Timer 43 Adjustments using the CUSTOMIZE button 44 CONTROL A1 control system ......... 46 ...Operations Using the Remote RM-PG4111) and RM-PP4112) Before you use your remote 48 Remote button description 48 Selecting the mode of the remote ........ 52 Programming the remote 52 Learning the commands of your components3 55 Performing several...
Operating Instructions
Page 19
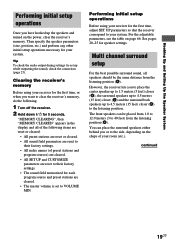
...stations are reset or cleared. • All sound field parameters are reset to their factory settings. • The sound field memorized for each program source and preset stations are cleared. • The master volume is set up while outputting the sound), check the connection (page 25). continued ... (C) and the surround back speakers up to 4.5 meters (15 feet) closer (D) to the side, depending on the shape of preset stations and program sources) are cleared. • All SET UP and CUSTOMIZE parameters are reset to VOLUME MIN. For the adjustable parameters, see the table on the...
...stations are reset or cleared. • All sound field parameters are reset to their factory settings. • The sound field memorized for each program source and preset stations are cleared. • The master volume is set up while outputting the sound), check the connection (page 25). continued ... (C) and the surround back speakers up to 4.5 meters (15 feet) closer (D) to the side, depending on the shape of preset stations and program sources) are cleared. • All SET UP and CUSTOMIZE parameters are reset to VOLUME MIN. For the adjustable parameters, see the table on the...

Operating Instructions
Page 25
... turn on the receiver. 2 Press TEST TONE on the LEVEL menu, see "Troubleshooting" on page 58 and take the appropriate measures to select the component (program source). 4 Start playing. on the remote. • In step 3, you want. Mode The test tone output NORMAL The test tone is output from each speaker...
... turn on the receiver. 2 Press TEST TONE on the LEVEL menu, see "Troubleshooting" on page 58 and take the appropriate measures to select the component (program source). 4 Start playing. on the remote. • In step 3, you want. Mode The test tone output NORMAL The test tone is output from each speaker...

Operating Instructions
Page 26
... (FUNCTION) Press to the DIGITAL OPTICAL input jacks. Each time you selected. OPTICAL FIXED Specify the digital audio signals input to select and play the program source. • After selecting VCR, camcorder, video game, DVD player, or LD player, turn on the component you selected, select the component and play another...
... (FUNCTION) Press to the DIGITAL OPTICAL input jacks. Each time you selected. OPTICAL FIXED Specify the digital audio signals input to select and play the program source. • After selecting VCR, camcorder, video game, DVD player, or LD player, turn on the component you selected, select the component and play another...

Operating Instructions
Page 28
Each time you press DISPLAY, the display changes cyclically as follows: Index name of the component* t Selected component t Sound field applied to the program source When the tuner is the same as follows: SOURCE*1 t TAPE t MD/DAT t CD/SACD t TUNER *1 The audio signals of the current function is output. &#...
Each time you press DISPLAY, the display changes cyclically as follows: Index name of the component* t Selected component t Sound field applied to the program source When the tuner is the same as follows: SOURCE*1 t TAPE t MD/DAT t CD/SACD t TUNER *1 The audio signals of the current function is output. &#...
Operating Instructions
Page 29
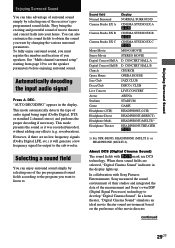
... various surround parameters. About DCS (Digital Cinema Sound) The sound fields with Sony Pictures Entertainment, Sony measured the sound environment of their studios and integrated the data of the measurement and Sony's own DSP (Digital Signal Processor) technology to develop "Digital Cinema Sound"....Enjoying Surround Sound Enjoying Surround Sound You can take advantage of surround sound simply by selecting one of the pre-programmed sound fields according to the program you want by selecting one of the receiver's preprogrammed sound fields. DEC. In collaboration with DCS mark use DCS...
... various surround parameters. About DCS (Digital Cinema Sound) The sound fields with Sony Pictures Entertainment, Sony measured the sound environment of their studios and integrated the data of the measurement and Sony's own DSP (Digital Signal Processor) technology to develop "Digital Cinema Sound"....Enjoying Surround Sound Enjoying Surround Sound You can take advantage of surround sound simply by selecting one of the pre-programmed sound fields according to the program you want by selecting one of the receiver's preprogrammed sound fields. DEC. In collaboration with DCS mark use DCS...

Operating Instructions
Page 32
... to CD, "JAZZ CLUB" will be applied again. • You can activate the decoder using the front left and right speakers only. To listen to a program source whenever it is selected. Tips • The receiver lets you to 2 channel. For details, see page 44. 32US Note No sound is turned off... channel (Dolby Pro Logic ) The receiver can select the following sound fields only. Dolby Digital discs are labeled with the logo, and Dolby Surround encoded programs are labeled with the logo. • When sound signals with "JAZZ CLUB" as the sound field, change to a different...
... to CD, "JAZZ CLUB" will be applied again. • You can activate the decoder using the front left and right speakers only. To listen to a program source whenever it is selected. Tips • The receiver lets you to 2 channel. For details, see page 44. 32US Note No sound is turned off... channel (Dolby Pro Logic ) The receiver can select the following sound fields only. Dolby Digital discs are labeled with the logo, and Dolby Surround encoded programs are labeled with the logo. • When sound signals with "JAZZ CLUB" as the sound field, change to a different...

Operating Instructions
Page 35
... speakers and do the procedures described in "Multi channel surround setup" starting from page 66 for the parameters available in each sound field. 1 Start playing a program source encoded with multi channel surround sound. 2 Press SURR. qg SP.OFF: Lights up when headphones are inserted or the SPEAKERS A/B button is NOT set...
... speakers and do the procedures described in "Multi channel surround setup" starting from page 66 for the parameters available in each sound field. 1 Start playing a program source encoded with multi channel surround sound. 2 Press SURR. qg SP.OFF: Lights up when headphones are inserted or the SPEAKERS A/B button is NOT set...

Operating Instructions
Page 37
... the first parameter is entered automatically. Surround back level (SURR BACK LEVEL XXX dB) Lets you set "MENU EXPAND" to all sound fields. 1 Start playing a program source encoded with multi channel surround sound. 2 Press LEVEL.
... the first parameter is entered automatically. Surround back level (SURR BACK LEVEL XXX dB) Lets you set "MENU EXPAND" to all sound fields. 1 Start playing a program source encoded with multi channel surround sound. 2 Press LEVEL.

Operating Instructions
Page 38
... recommend using the EQ parameters, the settings are stored individually for each sound field and can set the parameter for each sound field. 1 Start playing a program source encoded with the dynamic range intended by the recording engineer, select "STD". • To compress the dynamic range in the display lights up and...
... recommend using the EQ parameters, the settings are stored individually for each sound field and can set the parameter for each sound field. 1 Start playing a program source encoded with the dynamic range intended by the recording engineer, select "STD". • To compress the dynamic range in the display lights up and...

Operating Instructions
Page 42
...name can be specified as "VHS" and "8MM", respectively. It is also handy for identifying components connected to jacks meant for preset stations and program sources. For example, insert a CD into the CD player. 3 Insert a blank tape or MD into the recording deck and adjust the recording...entered for another type of up to preset stations" on the playback component. does not appear in the receiver's display when a station or program source is useful for playing. The last station you 've made a mistake Press or repeatedly until the character to be changed flashes, ...
...name can be specified as "VHS" and "8MM", respectively. It is also handy for identifying components connected to jacks meant for preset stations and program sources. For example, insert a CD into the CD player. 3 Insert a blank tape or MD into the recording deck and adjust the recording...entered for another type of up to preset stations" on the playback component. does not appear in the receiver's display when a station or program source is useful for playing. The last station you 've made a mistake Press or repeatedly until the character to be changed flashes, ...
Operating Instructions
Page 43
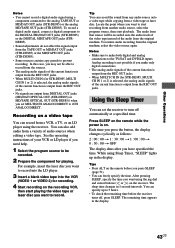
... display changes cyclically as follows: 2 : 00 : 00 t 1 : 30 : 00 t 1 : 00 : 00 t 0 : 30 : 00 t OFF The display dims after you need help. 1 Select the program source to be recorded. 2 Prepare the component for STR-DE985, MULTI CH IN 1 or 2) is selected, the analog audio signals of audio sources when editing... tape You can set MULTI/2CH ANALOG DIRECT to 2CH ANALOG DIRECT. Using the Sleep Timer You can record from another audio source, select the program source, then start recording from a VCR, a TV, or an LD player using the jog dial and cursor buttons ( or ) on the remote ...
... display changes cyclically as follows: 2 : 00 : 00 t 1 : 30 : 00 t 1 : 00 : 00 t 0 : 30 : 00 t OFF The display dims after you need help. 1 Select the program source to be recorded. 2 Prepare the component for STR-DE985, MULTI CH IN 1 or 2) is selected, the analog audio signals of audio sources when editing... tape You can set MULTI/2CH ANALOG DIRECT to 2CH ANALOG DIRECT. Using the Sleep Timer You can record from another audio source, select the program source, then start recording from a VCR, a TV, or an LD player using the jog dial and cursor buttons ( or ) on the remote ...

Operating Instructions
Page 45
...assign the same function to "ON", you adjust the position of the on and the playback is turned on -screen display vertically. When set to a program source whenever it is set to both MULTI CH 1 and 2. x CONTROL A1 auto function (AUTO FUNCTION XXX) Lets you turn on the receiver ...automatically when the component connected via CONTROL A1 cords (see page 14) automatically when the connected component is selected. For STR-DE985, you use 2 Sony receivers in the same room. x Selecting the command mode of the remote (COMMAND MODE XXX) Lets you apply the last selected sound field to ...
...assign the same function to "ON", you adjust the position of the on and the playback is turned on -screen display vertically. When set to a program source whenever it is set to both MULTI CH 1 and 2. x CONTROL A1 auto function (AUTO FUNCTION XXX) Lets you turn on the receiver ...automatically when the component connected via CONTROL A1 cords (see page 14) automatically when the connected component is selected. For STR-DE985, you use 2 Sony receivers in the same room. x Selecting the command mode of the remote (COMMAND MODE XXX) Lets you apply the last selected sound field to ...

Operating Instructions
Page 49
...volume of the receiver on or VCD player/ off the receiver and STANDBY VCR/Satellite other Sony audio/video (Press tuner/CD components. To watch DVD or laser disc. To listen to...sound from the receiver. * For STR-DE985, press repeatedly to turntable. To listen to radio programs. To listen to select MULTI CH IN 1 or 2. MASTER Receiver VOL +/- TV/VCR/ ...Button V/v Receiver Select a menu item. Selects 2ND AV output. Operations Using the Remote RM-PG411 and RM-PP411 Remote Button VIDEO 1 Operations Receiver VIDEO 2 Receiver VIDEO 3 Receiver DVD/LD Receiver ...
...volume of the receiver on or VCD player/ off the receiver and STANDBY VCR/Satellite other Sony audio/video (Press tuner/CD components. To watch DVD or laser disc. To listen to...sound from the receiver. * For STR-DE985, press repeatedly to turntable. To listen to radio programs. To listen to select MULTI CH IN 1 or 2. MASTER Receiver VOL +/- TV/VCR/ ...Button V/v Receiver Select a menu item. Selects 2ND AV output. Operations Using the Remote RM-PG411 and RM-PP411 Remote Button VIDEO 1 Operations Receiver VIDEO 2 Receiver VIDEO 3 Receiver DVD/LD Receiver ...
Operating Instructions
Page 50
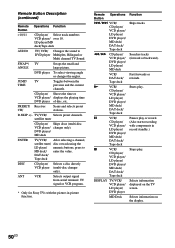
...). Fast forwards or rewinds. Selects information displayed on the display. 50US D.SKIP +/- ANT VCR Selects output signal from aerial terminal: TV signal or VCR program. * Only for Sony TVs with components in -picture function. Selects information on the TV screen. JUMP/ TV TIME Toggles between the previous and the current channels. DVD...
...). Fast forwards or rewinds. Selects information displayed on the display. 50US D.SKIP +/- ANT VCR Selects output signal from aerial terminal: TV signal or VCR program. * Only for Sony TVs with components in -picture function. Selects information on the TV screen. JUMP/ TV TIME Toggles between the previous and the current channels. DVD...
Operating Instructions
Page 52
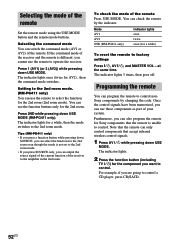
... to select the function for the component you cannot use the remote to control. Press 1 (AV1) (or 2 (AV2)) while pressing down USE MODE (RM-PG411 only). Programming the remote You can select the function for a while, then the mode switches to control. The indicator lights for the 2nd room even though... Set the remote mode using the USE MODE button and the remote mode buttons. Setting to the 2nd room mode. (RM-PG411 only) You can also program the remote for Sony components that the remote can use those components as part of the receiver and the remote is not set to the...
... to select the function for the component you cannot use the remote to control. Press 1 (AV1) (or 2 (AV2)) while pressing down USE MODE (RM-PG411 only). Programming the remote You can select the function for a while, then the mode switches to control. The indicator lights for the 2nd room even though... Set the remote mode using the USE MODE button and the remote mode buttons. Setting to the 2nd room mode. (RM-PG411 only) You can also program the remote for Sony components that the remote can use those components as part of the receiver and the remote is not set to the...

Operating Instructions
Page 53
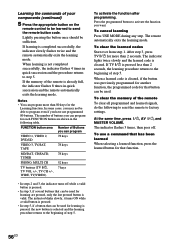
...The numeric codes corresponding to the component and the maker of the component Use the numeric codes in the tables below to control non-Sony components and also Sony components that the remote is valid. • In step 2, if you want to control. Once the numeric code has been verified...does not light up in quick succession while entering the numeric code, an error has occurred. The remote automatically exits the programming mode. Operations Using the Remote RM-PG411 and RM-PP411 3 Press the numeric buttons to enter the numeric code (or one of the codes if more than one code exists...
...The numeric codes corresponding to the component and the maker of the component Use the numeric codes in the tables below to control non-Sony components and also Sony components that the remote is valid. • In step 2, if you want to control. Once the numeric code has been verified...does not light up in quick succession while entering the numeric code, an error has occurred. The remote automatically exits the programming mode. Operations Using the Remote RM-PG411 and RM-PP411 3 Press the numeric buttons to enter the numeric code (or one of the codes if more than one code exists...
Operating Instructions
Page 56
... to the beginning of your components (continued) 5 Press the appropriate button on the remote control to be used for that button can program more than 80 keys for learning is pressed, the new button is completed successfully, the indicator slowly flashes twice and the remote automatically...be used for the Learning function. After step 3, press TV ?/1 for more than 2 seconds. The number of the remote To clear all programmed and learned signals, do the following table. The indicator lights twice slowly and the learned code is not completed successfully, the indicator flashes 4 ...
... to the beginning of your components (continued) 5 Press the appropriate button on the remote control to be used for that button can program more than 80 keys for learning is pressed, the new button is completed successfully, the indicator slowly flashes twice and the remote automatically...be used for the Learning function. After step 3, press TV ?/1 for more than 2 seconds. The number of the remote To clear all programmed and learned signals, do the following table. The indicator lights twice slowly and the learned code is not completed successfully, the indicator flashes 4 ...
Operating Instructions
Page 57
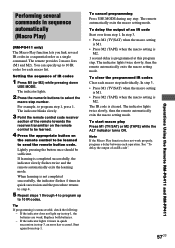
... successfully, the indicator slowly flashes twice and the remote automatically exits the learning mode. Note If the Macro Play function does not work properly, program a delay between each macro step individually. If learning is M2. In step 3, • Press M1 (TV/SAT) when the macro setting... of an IR code". 57US Operations Using the Remote RM-PG411 and RM-PP411 The remote provides 2 macro lists (M1 and M2). The indicator lights twice slowly, then the remote automatically exits the macro setting mode. To cancel programming Press USE MODE during any step. If the indicator...
... successfully, the indicator slowly flashes twice and the remote automatically exits the learning mode. Note If the Macro Play function does not work properly, program a delay between each macro step individually. If learning is M2. In step 3, • Press M1 (TV/SAT) when the macro setting... of an IR code". 57US Operations Using the Remote RM-PG411 and RM-PP411 The remote provides 2 macro lists (M1 and M2). The indicator lights twice slowly, then the remote automatically exits the macro setting mode. To cancel programming Press USE MODE during any step. If the indicator...


