
Operating Instructions
Page 3
... Recording 42 Using the Sleep Timer 43 Adjustments using the CUSTOMIZE button 44 CONTROL A1 control system ......... 46 Operations Using the Remote RM-PG4111) and RM-PP4112) Before you use your remote 48 Remote button description 48 Selecting the mode of the remote ........ 52 Programming the remote 52 Learning the commands of your components3 55 Performing several commands in... of settings using SURR, LEVEL, EQ, SET UP and CUSTOMIZE buttons 63 Adjustable parameters for each sound field 66 1) STR-DE985 only 2) STR-DE885 only 3) RM-PG411 only 3US
... Recording 42 Using the Sleep Timer 43 Adjustments using the CUSTOMIZE button 44 CONTROL A1 control system ......... 46 Operations Using the Remote RM-PG4111) and RM-PP4112) Before you use your remote 48 Remote button description 48 Selecting the mode of the remote ........ 52 Programming the remote 52 Learning the commands of your components3 55 Performing several commands in... of settings using SURR, LEVEL, EQ, SET UP and CUSTOMIZE buttons 63 Adjustable parameters for each sound field 66 1) STR-DE985 only 2) STR-DE885 only 3) RM-PG411 only 3US
Operating Instructions
Page 4
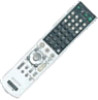
...use the controls on the supplied remote if they have the same or similar names as those on the lower portion of the rear panel (see • pages 48-57 for RM-PG411 (STR-DE985 only) • pages 48-55 for RM-PP411 (STR-DE885 only) Note for the supplied remote For RM-PG411 (STR...used for illustration purpose unless stated otherwise. In this manual, the STR-DE985 is clearly indicated in this manual describe the controls on the remote are for models STR-DE985 and STR-DE885. For RM-PP411 (STR-DE885 only) The AUX, SOURCE, MPX/DUAL, 12 and ON SCREEN buttons on the receiver.
...use the controls on the supplied remote if they have the same or similar names as those on the lower portion of the rear panel (see • pages 48-57 for RM-PG411 (STR-DE985 only) • pages 48-55 for RM-PP411 (STR-DE885 only) Note for the supplied remote For RM-PG411 (STR...used for illustration purpose unless stated otherwise. In this manual, the STR-DE985 is clearly indicated in this manual describe the controls on the remote are for models STR-DE985 and STR-DE885. For RM-PP411 (STR-DE885 only) The AUX, SOURCE, MPX/DUAL, 12 and ON SCREEN buttons on the receiver.

Operating Instructions
Page 45
...screen display horizontally. For details, see page 14) is selected. x Sound field link (S.FIELD LINK XXX) Lets you use 2 Sony receivers in the same room. x CONTROL A1 power save the power consumption of the on-screen display vertically. Other Operations 45US When set this receiver to play mode. ...STADIUM will be applied again. For STR-DE985, you assign a function to both MULTI CH 1 and 2. x Selecting the command mode of the remote (COMMAND MODE XXX) Lets you adjust the position of the receiver during standby mode. You cannot assign TUNER or PHONO. x Color of the on...
...screen display horizontally. For details, see page 14) is selected. x Sound field link (S.FIELD LINK XXX) Lets you use 2 Sony receivers in the same room. x CONTROL A1 power save the power consumption of the on-screen display vertically. Other Operations 45US When set this receiver to play mode. ...STADIUM will be applied again. For STR-DE985, you assign a function to both MULTI CH 1 and 2. x Selecting the command mode of the remote (COMMAND MODE XXX) Lets you adjust the position of the receiver during standby mode. You cannot assign TUNER or PHONO. x Color of the on...
Operating Instructions
Page 46
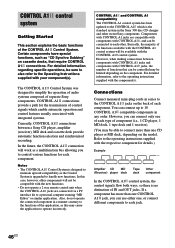
... jacks and components with the new functions. • Do not operate a 2 way remote control unit when the CONTROL A1 jacks are compatible with components with your component(s). CONTROL A1 control system Getting Started This section explains the basic functions of separate Sony components. CONTROL A1 connections provide a path for the transmission of the functions available with the...
... jacks and components with the new functions. • Do not operate a 2 way remote control unit when the CONTROL A1 jacks are compatible with components with your component(s). CONTROL A1 control system Getting Started This section explains the basic functions of separate Sony components. CONTROL A1 connections provide a path for the transmission of the functions available with the...
Operating Instructions
Page 52
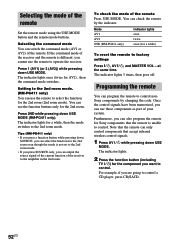
... system. Mode AV1 AV2 2ND (RM-PG411 only) Indicator lights once twice once (for a while) To reset the remote to the 2nd room mode. Once the control signals have been memorized, you can also program the remote for Sony components that accept infrared wireless control signals. 1 Press AV ?/1 while... pressing down SOURCE, you can select the function for the 2nd room (2nd room mode). Press 1 (AV1) (or 2 (AV2)) while pressing down USE MODE (RM-PG411 only). at the ...
... system. Mode AV1 AV2 2ND (RM-PG411 only) Indicator lights once twice once (for a while) To reset the remote to the 2nd room mode. Once the control signals have been memorized, you can also program the remote for Sony components that accept infrared wireless control signals. 1 Press AV ?/1 while... pressing down SOURCE, you can select the function for the 2nd room (2nd room mode). Press 1 (AV1) (or 2 (AV2)) while pressing down USE MODE (RM-PG411 only). at the ...

Operating Instructions
Page 53
... returns to the beginning of the component Use the numeric codes in the tables below to control non-Sony components and also Sony components that the remote is unsuccessful, check the following to reset the remote to factory settings. To activate the function after programming. Start again from step 1. Notes...mode. See the tables on pages 54 and 55 for information on the latest information available for each brand. Operations Using the Remote RM-PG411 and RM-PP411 3 Press the numeric buttons to enter the numeric code (or one of the codes if more than one numeric code may...
... returns to the beginning of the component Use the numeric codes in the tables below to control non-Sony components and also Sony components that the remote is unsuccessful, check the following to reset the remote to factory settings. To activate the function after programming. Start again from step 1. Notes...mode. See the tables on pages 54 and 55 for information on the latest information available for each brand. Operations Using the Remote RM-PG411 and RM-PP411 3 Press the numeric buttons to enter the numeric code (or one of the codes if more than one numeric code may...

Operating Instructions
Page 55
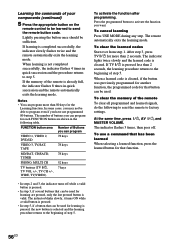
...539 535, 540, 541 542, 543 To control a satellite tuner or cable box Maker SONY JERROLD/G.I. P Learning the commands of the presets stored in the remote When a remote control code is not one of your components (RM-PG411 only) By using the Learning function. ...1 Press TV ?/1 while pressing down USE MODE. The indicator lights. 2 Press the function button (including TV ?/1) for the remote to be learned. 5-10 cm continued 55US Operations Using the Remote RM-PG411 and RM-PP411...
...539 535, 540, 541 542, 543 To control a satellite tuner or cable box Maker SONY JERROLD/G.I. P Learning the commands of the presets stored in the remote When a remote control code is not one of your components (RM-PG411 only) By using the Learning function. ...1 Press TV ?/1 while pressing down USE MODE. The indicator lights. 2 Press the function button (including TV ?/1) for the remote to be learned. 5-10 cm continued 55US Operations Using the Remote RM-PG411 and RM-PP411...
Operating Instructions
Page 56
... activate the function you can program more than 2 seconds. Learning the commands of your components (continued) 5 Press the appropriate button on the remote control to be able to program even if you have not programmed 80 buttons. When learning is pressed. • In step 3, if several buttons...for the Learning function. To activate the function after programming. When a learned code is selected and the learning procedure returns to send the remote button code. Lightly pressing the button once should be used for that can be sufficient. The indiactor blinks slowly, it turns ON while ...
... activate the function you can program more than 2 seconds. Learning the commands of your components (continued) 5 Press the appropriate button on the remote control to be able to program even if you have not programmed 80 buttons. When learning is pressed. • In step 3, if several buttons...for the Learning function. To activate the function after programming. When a learned code is selected and the learning procedure returns to send the remote button code. Lightly pressing the button once should be used for that can be sufficient. The indiactor blinks slowly, it turns ON while ...
Operating Instructions
Page 57
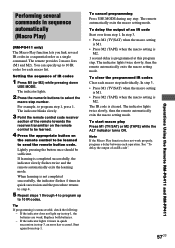
...or M2) while pressing down USE MODE. Setting the sequence of an IR code". 57US Operations Using the Remote RM-PG411 and RM-PP411 The indicator lights. 2 Press the numeric buttons to send the remote button code. Tip If programming is cleared. If the indicator lights 4 times in quick succession in a ...M1. • Press M2 (TAPE) when the macro setting is programmed at this program step. The indicator blinks slowly. 3 Point the remote control code receiver section of an IR code Start over from step 1. When learning is completed successfully, the indicator slowly flashes twice and the...
...or M2) while pressing down USE MODE. Setting the sequence of an IR code". 57US Operations Using the Remote RM-PG411 and RM-PP411 The indicator lights. 2 Press the numeric buttons to send the remote button code. Tip If programming is cleared. If the indicator lights 4 times in quick succession in a ...M1. • Press M2 (TAPE) when the macro setting is programmed at this program step. The indicator blinks slowly. 3 Point the remote control code receiver section of an IR code Start over from step 1. When learning is completed successfully, the indicator slowly flashes twice and the...
Operating Instructions
Page 62
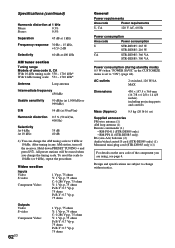
... (Approx.) 9.5 kg (20 lb 16 oz) Supplied accessories FM wire antenna (1) AM loop antenna (1) Remote commander (1) • RM-PG411 (STR-DE985 only) • RM-PP411 (STR-DE885 only) R6 (size-AA) batteries (2) Audio/video/control S cord (STR-DE985 only) (1) Monaural mini-plug cord (STR-DE985 only) (1) For details on the area code of area code...
... (Approx.) 9.5 kg (20 lb 16 oz) Supplied accessories FM wire antenna (1) AM loop antenna (1) Remote commander (1) • RM-PG411 (STR-DE985 only) • RM-PP411 (STR-DE885 only) R6 (size-AA) batteries (2) Audio/video/control S cord (STR-DE985 only) (1) Monaural mini-plug cord (STR-DE985 only) (1) For details on the area code of area code...
C.Mode Operation Sheet
Page 1
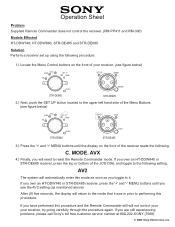
... until you see figure below ) LEVEL SURR EQ . . MODE. AVX 4.) Finally, you toggle to reset the Remote Commander mode. ENTER STR-DE685 SET UP NAME + < > - Operation Sheet Problem Supplied Remote Commander does not control the receiver. (RM-PP411 and RM-306) Models Effected HT-DDW740; ENTER STR-DE685 STR-DE485 2.) Next, push the SET UP button.... (see the AV2 setting (as you will need to it was in prior to performing this procedure. If you are still experiencing problems, please call Sony's toll free customer service number at 800-222...
... until you see figure below ) LEVEL SURR EQ . . MODE. AVX 4.) Finally, you toggle to reset the Remote Commander mode. ENTER STR-DE685 SET UP NAME + < > - Operation Sheet Problem Supplied Remote Commander does not control the receiver. (RM-PP411 and RM-306) Models Effected HT-DDW740; ENTER STR-DE685 STR-DE485 2.) Next, push the SET UP button.... (see the AV2 setting (as you will need to it was in prior to performing this procedure. If you are still experiencing problems, please call Sony's toll free customer service number at 800-222...


