Primary User Manual
Page 1
4-227-953-14(1) Remote Commander Operating Instructions RM-LP204 RM-LP204M © 2000 by Sony Corporation
4-227-953-14(1) Remote Commander Operating Instructions RM-LP204 RM-LP204M © 2000 by Sony Corporation
Primary User Manual
Page 2
... an extended period of abrasive pad, scouring powder or solvent such as alcohol or benzine. Check your nearest Sony dealer. Conventions The following item with the remote: LR6 (size-AA) alkaline batteries (3) Inserting batteries into the cabinet, unplug the receiver and have any question or... liquid fall into the remote Insert three LR6 (size-AA) alkaline batteries with the + and - If you received the following icon is designed for illustration purposes unless stated otherwise. Any difference in operation is used in the text, for models RM-LP204 and RM-LP204M. z When to...
... an extended period of abrasive pad, scouring powder or solvent such as alcohol or benzine. Check your nearest Sony dealer. Conventions The following item with the remote: LR6 (size-AA) alkaline batteries (3) Inserting batteries into the cabinet, unplug the receiver and have any question or... liquid fall into the remote Insert three LR6 (size-AA) alkaline batteries with the + and - If you received the following icon is designed for illustration purposes unless stated otherwise. Any difference in operation is used in the text, for models RM-LP204 and RM-LP204M. z When to...
Primary User Manual
Page 3
TABLE OF CONTENTS Location of Parts and Basic Remote Operations 4 Parts Description 4 Using the Lists 12 Chart of Lists 13 Selecting a Component 14 Selecting a Sound Field 15 Programming the Remote 16 Performing Several Commands in Sequence Automatically (Macro Play) 17 Other Operations 18 Additional Information 20 Troubleshooting 20 Specifications 21 3
TABLE OF CONTENTS Location of Parts and Basic Remote Operations 4 Parts Description 4 Using the Lists 12 Chart of Lists 13 Selecting a Component 14 Selecting a Sound Field 15 Programming the Remote 16 Performing Several Commands in Sequence Automatically (Macro Play) 17 Other Operations 18 Additional Information 20 Troubleshooting 20 Specifications 21 3
Primary User Manual
Page 4
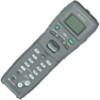
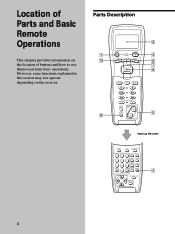
... SOUND FIELD FUNCTION ?/1 SET UP PUSH ENTER 6 h SUB H X x . > m M CH/PRESET/D.SKIP - + BASS BOOST MASTER VOL + MUTING - 2 3 8 7 9 5 v Open up the cover. Location of Parts and Basic Remote Operations This chapter provides information on the receiver. LEVEL 2 3 + + REAR CENTER 5 6 - - TEST TONE EQ/TONE 8 9 CURSOR D.TUNING MODE SLEEP 0 ENTER EXIT/RETURN EXECUTE 4 4 However, some...
... SOUND FIELD FUNCTION ?/1 SET UP PUSH ENTER 6 h SUB H X x . > m M CH/PRESET/D.SKIP - + BASS BOOST MASTER VOL + MUTING - 2 3 8 7 9 5 v Open up the cover. Location of Parts and Basic Remote Operations This chapter provides information on the receiver. LEVEL 2 3 + + REAR CENTER 5 6 - - TEST TONE EQ/TONE 8 9 CURSOR D.TUNING MODE SLEEP 0 ENTER EXIT/RETURN EXECUTE 4 4 However, some...
Primary User Manual
Page 5
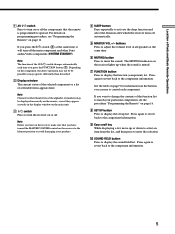
...have turned the MASTER VOLUME control on the receiver to the leftmost position to avoid damaging your particular components, do the procedure "Programming the Remote" on page 16. 8 SET UP button Press to turn the receiver on or off. The MUTING indicator on the receiver, make sure that...back to the component information. 9 Easy scroll key While displaying a list, move up list. If you can use to operate. Note Characters other Sony audio/video components (SYSTEM STANDBY). Press again to revert back to display the sound field list. Depending on the component, the above operation may ...
...have turned the MASTER VOLUME control on the receiver to the leftmost position to avoid damaging your particular components, do the procedure "Programming the Remote" on page 16. 8 SET UP button Press to turn the receiver on or off. The MUTING indicator on the receiver, make sure that...back to the component information. 9 Easy scroll key While displaying a list, move up list. If you can use to operate. Note Characters other Sony audio/video components (SYSTEM STANDBY). Press again to revert back to display the sound field list. Depending on the component, the above operation may ...
Primary User Manual
Page 6
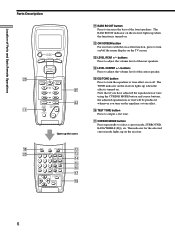
... on the receiver. 6 Location of the rear speakers. wa ws v Open up on -screen function, press to adjust the volume level of Parts and Basic Remote Operations Parts Description w; qj CURSOR MODE button Press repeatedly to select a cursor mode, SURROUND, BASS/TREBLE (EQ), etc.
... on the receiver. 6 Location of the rear speakers. wa ws v Open up on -screen function, press to adjust the volume level of Parts and Basic Remote Operations Parts Description w; qj CURSOR MODE button Press repeatedly to select a cursor mode, SURROUND, BASS/TREBLE (EQ), etc.

Primary User Manual
Page 7
... or rewinds Searches tracks in Step 1, then press the key to the Operating Instructions supplied with VCR 1 after you have selected VCR, the remote is displayed on the TV screen. buttons Press repeatedly to the component information. w; For details refer to enter the selection. CURSOR TYPE list ...select the operation, and then press the key to control each button and the function of the buttons. Location of Parts and Basic Remote Operations qk MENU button When you press the MENU button. To perform menu operations on the receiver, use to enter the selection. ...
... or rewinds Searches tracks in Step 1, then press the key to the Operating Instructions supplied with VCR 1 after you have selected VCR, the remote is displayed on the TV screen. buttons Press repeatedly to the component information. w; For details refer to enter the selection. CURSOR TYPE list ...select the operation, and then press the key to control each button and the function of the buttons. Location of Parts and Basic Remote Operations qk MENU button When you press the MENU button. To perform menu operations on the receiver, use to enter the selection. ...
Primary User Manual
Page 8
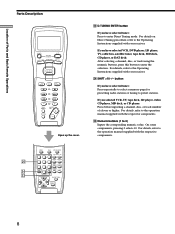
..., TV, tape deck, LD player, video CD player, MD deck, or CD player: Press before inputting a channel, disc, or track number of Parts and Basic Remote Operations Parts Description AV ?/1 SYSTEM STANDBY SOUND FIELD FUNCTION ?/1 SET UP PUSH ENTER h SUB H X x . > m M CH/PRESET/D.SKIP - + BASS BOOST MASTER VOL + MUTING - For details, refer...
..., TV, tape deck, LD player, video CD player, MD deck, or CD player: Press before inputting a channel, disc, or track number of Parts and Basic Remote Operations Parts Description AV ?/1 SYSTEM STANDBY SOUND FIELD FUNCTION ?/1 SET UP PUSH ENTER h SUB H X x . > m M CH/PRESET/D.SKIP - + BASS BOOST MASTER VOL + MUTING - For details, refer...

Primary User Manual
Page 9
... that become available when you can use the buttons on page 10. 2) Deck B only. 3) Multi disc changer only. 4) RMS/START. Component VCR Satellite DVD LD TV Cable Tuner Video CD CD MD tuner player player box player player deck Button AV ?/1 SUB1... Cursor buttons z z z MENU z z z Numeric buttons z z z z z z z z z SHIFT z >10 z z z z z -/-- Location of Parts and Basic Remote Operations Table of buttons used to control each component When you program the remote to control the following Sony or non-Sony components, you press the button, see the table on the...
... that become available when you can use the buttons on page 10. 2) Deck B only. 3) Multi disc changer only. 4) RMS/START. Component VCR Satellite DVD LD TV Cable Tuner Video CD CD MD tuner player player box player player deck Button AV ?/1 SUB1... Cursor buttons z z z MENU z z z Numeric buttons z z z z z z z z z SHIFT z >10 z z z z z -/-- Location of Parts and Basic Remote Operations Table of buttons used to control each component When you program the remote to control the following Sony or non-Sony components, you press the button, see the table on the...
Primary User Manual
Page 10
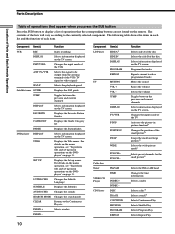
... Selects Program Play Selects Repeat Play 10 FM/AM TIME INDEX + INDEX - Parts Description Location of Parts and Basic Remote Operations Table of operations that the corresponding buttons are not found on the remote. For details on the manu operation, see "To perform title and set up menu. The contents of the...
... Selects Program Play Selects Repeat Play 10 FM/AM TIME INDEX + INDEX - Parts Description Location of Parts and Basic Remote Operations Table of operations that the corresponding buttons are not found on the remote. For details on the manu operation, see "To perform title and set up menu. The contents of the...
Primary User Manual
Page 11
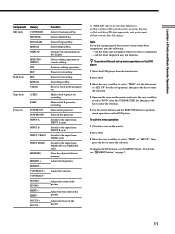
... operation 1 Close the cover on the remote. 2 Press SUB. 3 Move the easy scroll key to select "TITLE" or "SET UP", then press the key to control non-Sony components, note the following: - Location of the picture a) "SIDE A/B" appears for non-Sony LD players. Makes deck A pause for... with the picture-in the program etc. CONTRAST + CONTRAST - ZOOM + ZOOM - SHIFT + SHIFT - c) Only with Sony TVs that supports the wide-picture mode. All the items displayed may not appear when you have programmed the remote to enter the selection. To display the DVD menu, use the MENU button.
... operation 1 Close the cover on the remote. 2 Press SUB. 3 Move the easy scroll key to select "TITLE" or "SET UP", then press the key to control non-Sony components, note the following: - Location of the picture a) "SIDE A/B" appears for non-Sony LD players. Makes deck A pause for... with the picture-in the program etc. CONTRAST + CONTRAST - ZOOM + ZOOM - SHIFT + SHIFT - c) Only with Sony TVs that supports the wide-picture mode. All the items displayed may not appear when you have programmed the remote to enter the selection. To display the DVD menu, use the MENU button.

Primary User Manual
Page 14
A display example < CD > CD Sony Selected component Category Maker of the component connected to the MD/TAPE jacks on the receiver to both the TAPE and the MD function on the remote. For details, see "Additional procedures after you have to do an additional procedure, or you may ... component is actually connected to the jacks on the receiver. z When selecting the MD/TAPE function on the receiver using RM-LP204M You can set the remote to enter the selection. 14 Additional procedures after selecting a component If you have selected tuner Do the procedure below to ...
A display example < CD > CD Sony Selected component Category Maker of the component connected to the MD/TAPE jacks on the receiver to both the TAPE and the MD function on the remote. For details, see "Additional procedures after you have to do an additional procedure, or you may ... component is actually connected to the jacks on the receiver. z When selecting the MD/TAPE function on the receiver using RM-LP204M You can set the remote to enter the selection. 14 Additional procedures after selecting a component If you have selected tuner Do the procedure below to ...
Primary User Manual
Page 15
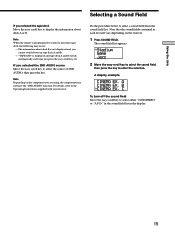
... the easy scroll key to display the information about deck B is not displayed and you cannot switch between tape deck A and B. - Note When the remote is displayed and tape deck A and B switch automatically each list will vary depending on the component you selected the 2ND AUDIO source Move the easy... scroll key to control a non-Sony tape deck, the following may not have the "2ND AUDIO" function. C To turn off the sound field Move the easy scroll key to the ...
... the easy scroll key to display the information about deck B is not displayed and you cannot switch between tape deck A and B. - Note When the remote is displayed and tape deck A and B switch automatically each list will vary depending on the component you selected the 2ND AUDIO source Move the easy... scroll key to control a non-Sony tape deck, the following may not have the "2ND AUDIO" function. C To turn off the sound field Move the easy scroll key to the ...
Primary User Manual
Page 16
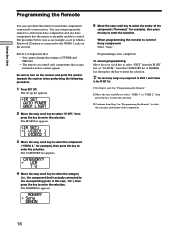
...corresponding jacks; Before you begin note that accept infrared wireless control signals. z You can customize the remote to match the components connected to your receiver. The CATEGORY list appears. Sony DENON 5 Move the easy scroll key to select the maker of TUNER and PHONO. - Programming ...key to the VIDEO 2 jacks on the receiver and point the remote towards the receiver when performing the following procedure. 1 Press SET UP. The remote can even program the remote to control non-Sony components and also Sony components that is connected to enter the selection. IR SET AUTO...
...corresponding jacks; Before you begin note that accept infrared wireless control signals. z You can customize the remote to match the components connected to your receiver. The CATEGORY list appears. Sony DENON 5 Move the easy scroll key to select the maker of TUNER and PHONO. - Programming ...key to the VIDEO 2 jacks on the receiver and point the remote towards the receiver when performing the following procedure. 1 Press SET UP. The remote can even program the remote to control non-Sony components and also Sony components that is connected to enter the selection. IR SET AUTO...
Primary User Manual
Page 17
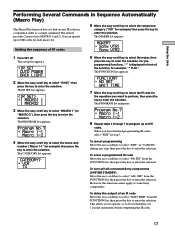
... want to perform, then press the key to enter the selection. However, this function cannot apply to enter the selection. The FUNCTION list appears. Sony VTR1 Sony VTR2 1 Press SET UP. The CATEGORY list appears. VCR TV 6 Move the easy scroll key to select the maker, then press the key... a programmed IR code Move the easy scroll key to select "NO SET" from the FUNCTION list, then press the key to enter the selection. The remote provides 2 macro lists (MACRO 1 and 2). Program No.? Setting the sequence of the function, for example) then press the key to enter the selection....
... want to perform, then press the key to enter the selection. However, this function cannot apply to enter the selection. The FUNCTION list appears. Sony VTR1 Sony VTR2 1 Press SET UP. The CATEGORY list appears. VCR TV 6 Move the easy scroll key to select the maker, then press the key... a programmed IR code Move the easy scroll key to select "NO SET" from the FUNCTION list, then press the key to enter the selection. The remote provides 2 macro lists (MACRO 1 and 2). Program No.? Setting the sequence of the function, for example) then press the key to enter the selection....
Primary User Manual
Page 18
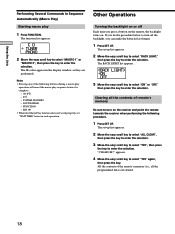
... (i.e., all the contents of the following procedure. 1 Press SET UP. Notes • Pressing any of remote's memory Be sure to turn off Each time you can make the batteries last longer. 1 Press SET UP. FUNCTION - SET UP • When the Macro ... the key to enter the selection. Other Operations Turning the backlight on or off the backlight, you press a button on the remote, the backlight turns on the receiver and point the remote towards the receiver when performing the following buttons during a macro play operation will cancel the macro play 1 Press FUNCTION. The...
... (i.e., all the contents of the following procedure. 1 Press SET UP. Notes • Pressing any of remote's memory Be sure to turn off Each time you can make the batteries last longer. 1 Press SET UP. FUNCTION - SET UP • When the Macro ... the key to enter the selection. Other Operations Turning the backlight on or off the backlight, you press a button on the remote, the backlight turns on the receiver and point the remote towards the receiver when performing the following buttons during a macro play operation will cancel the macro play 1 Press FUNCTION. The...
Primary User Manual
Page 19
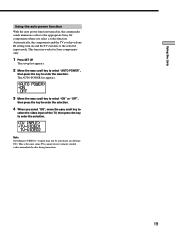
... to the selected input mode. Automatically, the components and the TV you have done IR setting turn on and the TV switches to the appropriate Sony AV components when you select "ON", move the easy scroll key to select the video input of the TV, then press the key to VIDEO... 1~4 input may not be automatic on . 19 This function works for Sony components only. 1 Press SET UP. The set up list appears. 2 Move the easy scroll key to select "AUTO POWER", then press the key to enter...
... to the selected input mode. Automatically, the components and the TV you have done IR setting turn on and the TV switches to the appropriate Sony AV components when you select "ON", move the easy scroll key to select the video input of the TV, then press the key to VIDEO... 1~4 input may not be automatic on . 19 This function works for Sony components only. 1 Press SET UP. The set up list appears. 2 Move the easy scroll key to select "AUTO POWER", then press the key to enter...
Primary User Manual
Page 20
... Troubleshooting If you experience any of the remote. , The batteries are different. , Select the correct function using the remote, use this troubleshooting guide to help you operate a programmed non-Sony component, the remote may not function properly depending on the remote. , When you remedy the problem. ...the model and the make of the receiver and the remote are running out. The remote does not function. , Point the remote at the remote sensor on the receiver. , Remove any problem persist, consult your nearest Sony dealer. The function names that appear in the display window...
... Troubleshooting If you experience any of the remote. , The batteries are different. , Select the correct function using the remote, use this troubleshooting guide to help you operate a programmed non-Sony component, the remote may not function properly depending on the remote. , When you remedy the problem. ...the model and the make of the receiver and the remote are running out. The remote does not function. , Point the remote at the remote sensor on the receiver. , Remove any problem persist, consult your nearest Sony dealer. The function names that appear in the display window...
Primary User Manual
Page 21
Additional Information 21 Specifications General Remote control system Infrared control Power requirements 4.5 V DC with three LR6 (sizeAA) alkaline batteries Dimensions 175 × 62 × 33 mm Mass (approx.) 135 g excluding batteries Design and specifications are subject to change without notice.
Additional Information 21 Specifications General Remote control system Infrared control Power requirements 4.5 V DC with three LR6 (sizeAA) alkaline batteries Dimensions 175 × 62 × 33 mm Mass (approx.) 135 g excluding batteries Design and specifications are subject to change without notice.

