Operating Instructions
Page 2
...cabinet, panel and controls with a soft cloth slightly moistened with new ones. Check your nearest Sony dealer. z When to avoid possible damage from battery leakage and corrosion. 2 Before You Use Your Remote Check that you received the following icon is designed for use the remote for an extended...If you don't use with the alkaline batteries only. • Do not expose the remote sensor of batteries. This remote is used in this manual: z Indicates hints and tips for model RM-LJ302. On operation Before connecting other kinds of the receiver to turn off and unplug the ...
...cabinet, panel and controls with a soft cloth slightly moistened with new ones. Check your nearest Sony dealer. z When to avoid possible damage from battery leakage and corrosion. 2 Before You Use Your Remote Check that you received the following icon is designed for use the remote for an extended...If you don't use with the alkaline batteries only. • Do not expose the remote sensor of batteries. This remote is used in this manual: z Indicates hints and tips for model RM-LJ302. On operation Before connecting other kinds of the receiver to turn off and unplug the ...
Operating Instructions
Page 3
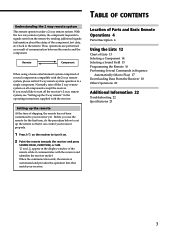
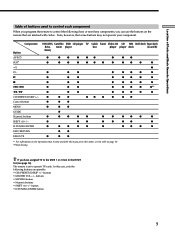
... below to your receiver. TABLE OF CONTENTS Understanding the 2 way remote system This remote operates under a 2 way remote system. Thus, operations are performed as a result of the remote while it can control your receiver properly. 1 Press 1/u on all components except the receiver. Setting up the remote At the time of the component, text data, etc.) back...
... below to your receiver. TABLE OF CONTENTS Understanding the 2 way remote system This remote operates under a 2 way remote system. Thus, operations are performed as a result of the remote while it can control your receiver properly. 1 Press 1/u on all components except the receiver. Setting up the remote At the time of the component, text data, etc.) back...
Operating Instructions
Page 5
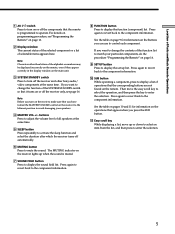
...operations that appear when you want to enter the selection. Press again to revert back to control each component. Note Characters other than letters of the alphabet or numbers may be displayed incorrectly on the remote, even if they appear correctly in the display window on the main unit. 3 SYSTEM... STANDBY switch Press to turn off the receiver and other Sony audio/ video components at the same time. 5 SLEEP button Press ...
...operations that appear when you want to enter the selection. Press again to revert back to control each component. Note Characters other than letters of the alphabet or numbers may be displayed incorrectly on the remote, even if they appear correctly in the display window on the main unit. 3 SYSTEM... STANDBY switch Press to turn off the receiver and other Sony audio/ video components at the same time. 5 SLEEP button Press ...

Operating Instructions
Page 6
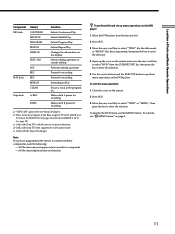
...LEVEL 2 3 + + CENTER REAR 5 6 - - buttons Press repeatedly to adjust the volume level of the rear speakers. 6 buttons Press to control each component. !£ CH/PRESET/D.SKIP +/- Button(s) Component(s) Function · VCR, DVD player, Starts play of the LD player, video CD playback ...recording standby DAT deck p VCR, DVD player, Stops play on the buttons that you can use to adjust the volume level of Parts and Basic Remote Operations Parts Description AV 1/u SYSTEM STANDBY SOUND FIELD FUNCTION SET UP PUSH ENTER ª SUB · P p = + 0 ) CH/...
...LEVEL 2 3 + + CENTER REAR 5 6 - - buttons Press repeatedly to adjust the volume level of the rear speakers. 6 buttons Press to control each component. !£ CH/PRESET/D.SKIP +/- Button(s) Component(s) Function · VCR, DVD player, Starts play of the LD player, video CD playback ...recording standby DAT deck p VCR, DVD player, Stops play on the buttons that you can use to adjust the volume level of Parts and Basic Remote Operations Parts Description AV 1/u SYSTEM STANDBY SOUND FIELD FUNCTION SET UP PUSH ENTER ª SUB · P p = + 0 ) CH/...

Operating Instructions
Page 8
... function is set the VCR input mode to display the SAT guide. Then use the cursor buttons to increase the bass of Parts and Basic Remote Operations Parts Description AV 1/u SYSTEM STANDBY SOUND FIELD FUNCTION SET UP PUSH ENTER @¢ ª SUB · P p = + 0 ) CH/PRESET/D.SKIP - + BASS...button. Note When you have selected the VCR, DVD player, or SAT tuner, press this buton to control the VCR that corresponds with VCR 1 after you have selected VCR, the remote is turned on the TV screen. Before pressing the button, make sure to set to display VCR, ...
... function is set the VCR input mode to display the SAT guide. Then use the cursor buttons to increase the bass of Parts and Basic Remote Operations Parts Description AV 1/u SYSTEM STANDBY SOUND FIELD FUNCTION SET UP PUSH ENTER @¢ ª SUB · P p = + 0 ) CH/PRESET/D.SKIP - + BASS...button. Note When you have selected the VCR, DVD player, or SAT tuner, press this buton to control the VCR that corresponds with VCR 1 after you have selected VCR, the remote is turned on the TV screen. Before pressing the button, make sure to set to display VCR, ...
Operating Instructions
Page 9
...Sony or non-Sony components, you can use the buttons on page 10. **Deck B only. button • D.TUNING ENTER button 9 Component Button AV 1/u SUB* ª · P p =/+ 0/) CH/PRESET/D.SKIP +/- z If you have assigned TV to the USER 1 or 2 item in the IR SET list (see the table on the remote...some buttons may not operate your component. Note, however, that become available when you press the button, see page 16) The remote is set to control the following buttons are marked with circles. buttons • MASTER VOL +/- buttons • MUTING button • Numeric buttons •...
...Sony or non-Sony components, you can use the buttons on page 10. **Deck B only. button • D.TUNING ENTER button 9 Component Button AV 1/u SUB* ª · P p =/+ 0/) CH/PRESET/D.SKIP +/- z If you have assigned TV to the USER 1 or 2 item in the IR SET list (see the table on the remote...some buttons may not operate your component. Note, however, that become available when you press the button, see page 16) The remote is set to control the following buttons are marked with circles. buttons • MASTER VOL +/- buttons • MUTING button • Numeric buttons •...
Operating Instructions
Page 11
...the cover on the DVD player. To exit the menu operation 1 Close the cover on the remote. 2 Press SUB. 3 Move the easy scroll key to select "TITLE" or "MENU," then press the ...key to perform menu operations on the remote and move the easy scroll key to select "DVD" from the CURSOR TYPE list, then press...the items displayed may not appear when you have assigned TV to control non-Sony components, note the following: - Note If you select a component. - d) Only with Sony TVs that supports the wide-picture mode. For details, see page ...
...the cover on the DVD player. To exit the menu operation 1 Close the cover on the remote. 2 Press SUB. 3 Move the easy scroll key to select "TITLE" or "MENU," then press the ...key to perform menu operations on the remote and move the easy scroll key to select "DVD" from the CURSOR TYPE list, then press...the items displayed may not appear when you have assigned TV to control non-Sony components, note the following: - Note If you select a component. - d) Only with Sony TVs that supports the wide-picture mode. For details, see page ...
Operating Instructions
Page 14
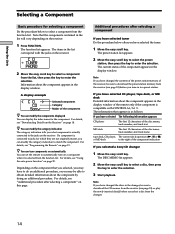
... by doing an additional procedure. z You can turn components on automatically You can set the remote to select a component from the list, then press the key to enter the selection. 3...is compatible with the jacks on the receiver. 1 Press FUNCTION. A display example < CD > CD Sony Selected component Category Maker of the disc name, track number, and track name tape deck, CD player,... MD deck to jacks for the component. Information about the component appears in the list correspond with CONTROL A1/A1 . The items in the display window of the receiver, be sure to enter the ...
... by doing an additional procedure. z You can turn components on automatically You can set the remote to select a component from the list, then press the key to enter the selection. 3...is compatible with the jacks on the receiver. 1 Press FUNCTION. A display example < CD > CD Sony Selected component Category Maker of the disc name, track number, and track name tape deck, CD player,... MD deck to jacks for the component. Information about the component appears in the list correspond with CONTROL A1/A1 . The items in the display window of the receiver, be sure to enter the ...
Operating Instructions
Page 15
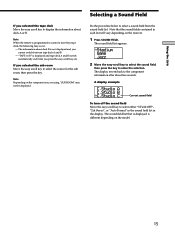
...list that the sound fields contained in the display. If you press the easy scroll key, etc. The sound field list appears. Note When the remote is different depending on the model. 15 Note Depending on the receiver. 1 Press SOUND FIELD. Using the Lists If you selected the tape deck ...OFF", "2ch Stereo", or "Auto Format" in the sound field list in each time you selected the sub room Move the easy scroll key to control a non-Sony tape deck, the following may not be displayed. The information about deck B is displayed and tape deck A and B switch automatically each list will ...
...list that the sound fields contained in the display. If you press the easy scroll key, etc. The sound field list appears. Note When the remote is different depending on the model. 15 Note Depending on the receiver. 1 Press SOUND FIELD. Using the Lists If you selected the tape deck ...OFF", "2ch Stereo", or "Auto Format" in the sound field list in each time you selected the sub room Move the easy scroll key to control a non-Sony tape deck, the following may not be displayed. The information about deck B is displayed and tape deck A and B switch automatically each list will ...

Operating Instructions
Page 16
... connected to your receiver. in "Programming the Remote" to select the category and maker of the component ("Kenwood," for example), then press the key to control Sony component Select "Sony." The MAKER list appears. Using the Lists Programming the Remote You can freely assign any component to USER ...1 and 2 items in the IR SET list 1 Do Steps 1 and 2 in "Programming the Remote" on page 15. 2 Move the...
... connected to your receiver. in "Programming the Remote" to select the category and maker of the component ("Kenwood," for example), then press the key to control Sony component Select "Sony." The MAKER list appears. Using the Lists Programming the Remote You can freely assign any component to USER ...1 and 2 items in the IR SET list 1 Do Steps 1 and 2 in "Programming the Remote" on page 15. 2 Move the...
Operating Instructions
Page 18
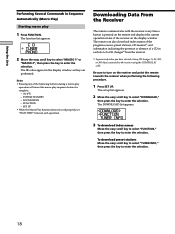
...1" or "MACRO 2", then press the key to enter the selection. Downloading Data From the Receiver The remote communicates with the receiver every time a button is complete. - The DOWNLOAD list appears. SOUND FIELD -...TIME" between each slot of a CD changer* from the receiver. * Appears only when you have selected a Sony CD changer (5, 50, 200, or 300 discs) connected to enter the selection. 18 AV 1/u - SET ... scroll key to select "TUNER INFO," then press the key to the receiver using the CONTROL A1 cable. SYSTEM STANDBY - The IR codes appear in each operation. Using the Lists ...
...1" or "MACRO 2", then press the key to enter the selection. Downloading Data From the Receiver The remote communicates with the receiver every time a button is complete. - The DOWNLOAD list appears. SOUND FIELD -...TIME" between each slot of a CD changer* from the receiver. * Appears only when you have selected a Sony CD changer (5, 50, 200, or 300 discs) connected to enter the selection. 18 AV 1/u - SET ... scroll key to select "TUNER INFO," then press the key to the receiver using the CONTROL A1 cable. SYSTEM STANDBY - The IR codes appear in each operation. Using the Lists ...
Operating Instructions
Page 19
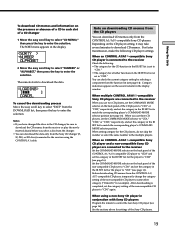
... in each slot of the CD players to "CD1" or "CD2," respectively, and set to "CD1." • The category for example). When an CONTROL A1/A1 -compatible Sony CD player is completed, set to "CD2." When you use two CD players, set the COMMAND MODE selector on the back panel of a CD... cable. Using the Lists To download CD memos and information on the second column in the display window. The remote starts to control the non-Sony CD player (see page 16). Before downloading CD memos from the DOWNLOAD list, then press the key to "CD1" (see page 16). NUMBER ALPHABET 2 Move ...
... in each slot of the CD players to "CD1" or "CD2," respectively, and set to "CD1." • The category for example). When an CONTROL A1/A1 -compatible Sony CD player is completed, set to "CD2." When you use two CD players, set the COMMAND MODE selector on the back panel of a CD... cable. Using the Lists To download CD memos and information on the second column in the display window. The remote starts to control the non-Sony CD player (see page 16). Before downloading CD memos from the DOWNLOAD list, then press the key to "CD1" (see page 16). NUMBER ALPHABET 2 Move ...
Operating Instructions
Page 20
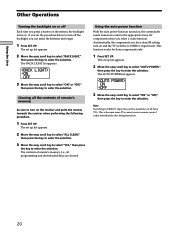
...key to enter the selection. ON OFF 3 Move the easy scroll key to select "ON" or "OFF," then press the key to the appropriate Sony AV components when you select a video function. The BACK LIGHT list appears . The set up list appears. 2 Move the easy scroll key to ... select "BACK LIGHT," then press the key to enter the selection. This is because some TVs cannot receive remote control codes immediately after being turned on the receiver and point the remote towards the receiver when performing the following procedure. 1 Press SET UP. Using the Lists Other Operations Turning the...
...key to enter the selection. ON OFF 3 Move the easy scroll key to select "ON" or "OFF," then press the key to the appropriate Sony AV components when you select a video function. The BACK LIGHT list appears . The set up list appears. 2 Move the easy scroll key to ... select "BACK LIGHT," then press the key to enter the selection. This is because some TVs cannot receive remote control codes immediately after being turned on the receiver and point the remote towards the receiver when performing the following procedure. 1 Press SET UP. Using the Lists Other Operations Turning the...
Operating Instructions
Page 23
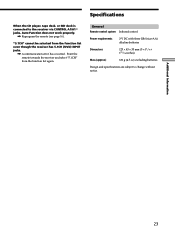
...and select "5.1CH" from the function list even though the receiver has 5.1CH (/DVD) INPUT jacks. / A communication error has occurred. General Remote control system Infrared control Power requirements Dimensions 3 V DC with three LR6 (size-AA) alkaline batteries 125 × 43 × 33 mm (5 × 13... (approx.) 130 g (4.5 oz) excluding batteries Design and specifications are subject to the receiver via CONTROL A1/A1 jacks, Auto Function does not work properly. / Reprogram the remote (see page 16). Additional Information 23 Specifications When the CD player, tape deck, or MD deck...
...and select "5.1CH" from the function list even though the receiver has 5.1CH (/DVD) INPUT jacks. / A communication error has occurred. General Remote control system Infrared control Power requirements Dimensions 3 V DC with three LR6 (size-AA) alkaline batteries 125 × 43 × 33 mm (5 × 13... (approx.) 130 g (4.5 oz) excluding batteries Design and specifications are subject to the receiver via CONTROL A1/A1 jacks, Auto Function does not work properly. / Reprogram the remote (see page 16). Additional Information 23 Specifications When the CD player, tape deck, or MD deck...


