
Instruction Manual
Page 1
Operating Instructions Getting Started Operating the Remote Commander Unit Settings Setting by On-Remote Setup Additional Information Appendix RM-AX4000 Integrated Remote Commander To go to the section you want to read, click the title in the PDF Bookmarks, the title in the "Table of Contents" of the Operating Instructions, or the page in the sentences. © 2005 Sony Corporation
Operating Instructions Getting Started Operating the Remote Commander Unit Settings Setting by On-Remote Setup Additional Information Appendix RM-AX4000 Integrated Remote Commander To go to the section you want to read, click the title in the PDF Bookmarks, the title in the "Table of Contents" of the Operating Instructions, or the page in the sentences. © 2005 Sony Corporation

Instruction Manual
Page 4
...to 16 components, including your finger" across the Remote Commander's LCD Display. Control up to 8 Timer macros can also perform an XPRESS function by pressing one key. Features The RM-AX4000 Remote Commander provides centralized control of all your AV components. The following are ...available. The AX Remote Editor software allows you can use it out of commands to 8 XPRESS keys. This function is preset at the factory to operate Sony brand components, so you can control...
...to 16 components, including your finger" across the Remote Commander's LCD Display. Control up to 8 Timer macros can also perform an XPRESS function by pressing one key. Features The RM-AX4000 Remote Commander provides centralized control of all your AV components. The following are ...available. The AX Remote Editor software allows you can use it out of commands to 8 XPRESS keys. This function is preset at the factory to operate Sony brand components, so you can control...

Instruction Manual
Page 8
...4 BACK button (page 24) Used to return to choose the XPRESS function/component/System Control/Timer/setting items, etc. When you press a component name, the operating display for the AX Remote Editor software, PDF file Operating Instructions (1) •Quick Start Guide (1) •Preset code...qj qk ql w; Getting Started Unpacking Check the contents of the package before using the Remote Commander. •Remote Commander RM-AX4000 (1) Location and function of the XPRESS function, components, System Control key and Timer as the Label keys. 3 COMPONENT button (page 27) The component ...
...4 BACK button (page 24) Used to return to choose the XPRESS function/component/System Control/Timer/setting items, etc. When you press a component name, the operating display for the AX Remote Editor software, PDF file Operating Instructions (1) •Quick Start Guide (1) •Preset code...qj qk ql w; Getting Started Unpacking Check the contents of the package before using the Remote Commander. •Remote Commander RM-AX4000 (1) Location and function of the XPRESS function, components, System Control key and Timer as the Label keys. 3 COMPONENT button (page 27) The component ...

Instruction Manual
Page 13
...settings for your PC, "AX Remote Editor," to set up the Remote Commander (On-PC Setup and On-Remote Setup) There are not available with OnRemote Setup. • On-Remote Setup "On-Remote Setup" is preset at the factory to operate most Sony brand AV components (see the ... make additional settings using the other method. Getting Started Remote Commander settings and operating procedures About the factory setting The Remote Commander (RM-AX4000) is a way of setting up directly with the Remote Commander. If you operate a non-Sony AV component, you can only delete the entire setup and...
...settings for your PC, "AX Remote Editor," to set up the Remote Commander (On-PC Setup and On-Remote Setup) There are not available with OnRemote Setup. • On-Remote Setup "On-Remote Setup" is preset at the factory to operate most Sony brand AV components (see the ... make additional settings using the other method. Getting Started Remote Commander settings and operating procedures About the factory setting The Remote Commander (RM-AX4000) is a way of setting up directly with the Remote Commander. If you operate a non-Sony AV component, you can only delete the entire setup and...

Instruction Manual
Page 16
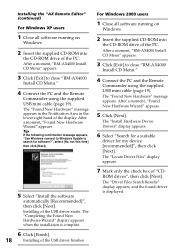
... On Windows 2000, or Windows XP, logon with a display of the PC. Notes • Do not simply copy the "AX Remote Editor" folder in "AX Remote Editor." "AX Remote Editor" makes setting up complex operations like a series of commands (a macro) easy, and also allows various other convenient functions that can... Installing the "AX Remote Editor" By installing the "AX Remote Editor" software on the supplied CD-ROM onto your PC, you can only be set up on Windows. 2 Insert the supplied CD-ROM into the CD-ROM drive of under 1,024 × 768 dots. After a moment, "RM-AX4000 Install CD Menu" ...
... On Windows 2000, or Windows XP, logon with a display of the PC. Notes • Do not simply copy the "AX Remote Editor" folder in "AX Remote Editor." "AX Remote Editor" makes setting up complex operations like a series of commands (a macro) easy, and also allows various other convenient functions that can... Installing the "AX Remote Editor" By installing the "AX Remote Editor" software on the supplied CD-ROM onto your PC, you can only be set up on Windows. 2 Insert the supplied CD-ROM into the CD-ROM drive of under 1,024 × 768 dots. After a moment, "RM-AX4000 Install CD Menu" ...
Instruction Manual
Page 18
...the USB driver finishes. After a moment, "RM-AX4000 Install CD Menu" appears. 3 Click [Exit] to close "RM-AX4000 Install CD Menu." 4 Connect the PC and the Remote Commander using the supplied USB mini cable (page 19). Installing of "CD- After a moment, "RM-AX4000 Install CD Menu" appears. 3 Click [Exit]... click [Next]. Tip If the following confirmation message appears, "Can Windows connect to Windows Update to close "RM-AX4000 Install CD Menu." 4 Connect the PC and the Remote Commander using the supplied USB mini cable (page 19). For Windows 2000 users 1 Close all software running on...
...the USB driver finishes. After a moment, "RM-AX4000 Install CD Menu" appears. 3 Click [Exit] to close "RM-AX4000 Install CD Menu." 4 Connect the PC and the Remote Commander using the supplied USB mini cable (page 19). Installing of "CD- After a moment, "RM-AX4000 Install CD Menu" appears. 3 Click [Exit]... click [Next]. Tip If the following confirmation message appears, "Can Windows connect to Windows Update to close "RM-AX4000 Install CD Menu." 4 Connect the PC and the Remote Commander using the supplied USB mini cable (page 19). For Windows 2000 users 1 Close all software running on...

Instruction Manual
Page 19
...USB connector. • Before connecting the Remote Commander to your PC, be able to download the settings correctly. 1 Connect the USB mini cable to the USB connector of the Remote Commander (RM-AX4000). 2 Connect the USB mini cable to your PC and the Remote Commander. Otherwise, you will not be... sure to install the fresh batteries in the Remote Commander. • Do not disconnect the USB mini cable from...
...USB connector. • Before connecting the Remote Commander to your PC, be able to download the settings correctly. 1 Connect the USB mini cable to the USB connector of the Remote Commander (RM-AX4000). 2 Connect the USB mini cable to your PC and the Remote Commander. Otherwise, you will not be... sure to install the fresh batteries in the Remote Commander. • Do not disconnect the USB mini cable from...

Instruction Manual
Page 21
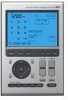
...on TV and Digital Satellite, and the display of XPRESS_VCR appears. D-SAT Turns on TV, and the display of power on the Remote Commander (RM-AX4000). • XPRESS operation: You can memorize the status of XPRESS_TV appears. How to the component's status. Also, XPRESS function ...can operate multiple AV components related to operate Sony brand components (see the table at the factory to a specific task, such as an XPRESS...
...on TV and Digital Satellite, and the display of XPRESS_VCR appears. D-SAT Turns on TV, and the display of power on the Remote Commander (RM-AX4000). • XPRESS operation: You can memorize the status of XPRESS_TV appears. How to the component's status. Also, XPRESS function ...can operate multiple AV components related to operate Sony brand components (see the table at the factory to a specific task, such as an XPRESS...
Instruction Manual
Page 29
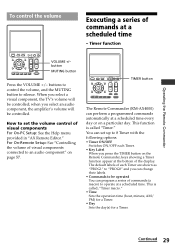
... BACK COMPONENT SYNC-UP TIMER LIGHT OFF EPG MENU VOLUME CHANNEL EXIT OK TOOLS SYSTEM CONTROL 1 2 3 MUTING RECALL 4 MORE ALL OFF TIMER button The Remote Commander (RM-AX4000) can set the volume control of visual components For On-PC Setup: See the Help menu provided in "AX... Remote Editor." This function is called "Timer." For On-Remote Setup: See "Controlling the volume of visual components connected to...
... BACK COMPONENT SYNC-UP TIMER LIGHT OFF EPG MENU VOLUME CHANNEL EXIT OK TOOLS SYSTEM CONTROL 1 2 3 MUTING RECALL 4 MORE ALL OFF TIMER button The Remote Commander (RM-AX4000) can set the volume control of visual components For On-PC Setup: See the Help menu provided in "AX... Remote Editor." This function is called "Timer." For On-Remote Setup: See "Controlling the volume of visual components connected to...

Instruction Manual
Page 31
... LEARN NG X PRESS COMMANDER BACK COMPONENT SYNC-UP TIMER LIGHT OFF EPG MENU VOLUME CHANNEL EXIT OK TOOLS SYSTEM CONTROL 1 2 3 MUTING RECALL 4 MORE ALL OFF System Control keys SYSTEM CONTROL 1-4 button MORE button The Remote Commander (RM-AX4000) has special buttons which can program a series of commands (a macro) for use the Timer function with just one...
... LEARN NG X PRESS COMMANDER BACK COMPONENT SYNC-UP TIMER LIGHT OFF EPG MENU VOLUME CHANNEL EXIT OK TOOLS SYSTEM CONTROL 1 2 3 MUTING RECALL 4 MORE ALL OFF System Control keys SYSTEM CONTROL 1-4 button MORE button The Remote Commander (RM-AX4000) has special buttons which can program a series of commands (a macro) for use the Timer function with just one...

Instruction Manual
Page 32
...this case, check the operating component's power on the LCD display. Pressing any other useful functions To operate the Remote Commander in before using the System Control function. Default backlight settings Off-time setting 10 seconds Brightness Level 15 (Max: 15) Fade effect ON On-mode...LEARN NG X PRESS COMMANDER BACK COMPONENT SYNC-UP TIMER LIGHT OFF EPG MENU VOLUME CHANNEL EXIT OK TOOLS SYSTEM CONTROL 1 2 3 MUTING RECALL 4 MORE ALL OFF LIGHT button The Remote Commander (RM-AX4000) has a backlight on /off . Or see "Setting the backlight" on page 34. 32
...this case, check the operating component's power on the LCD display. Pressing any other useful functions To operate the Remote Commander in before using the System Control function. Default backlight settings Off-time setting 10 seconds Brightness Level 15 (Max: 15) Fade effect ON On-mode...LEARN NG X PRESS COMMANDER BACK COMPONENT SYNC-UP TIMER LIGHT OFF EPG MENU VOLUME CHANNEL EXIT OK TOOLS SYSTEM CONTROL 1 2 3 MUTING RECALL 4 MORE ALL OFF LIGHT button The Remote Commander (RM-AX4000) has a backlight on /off . Or see "Setting the backlight" on page 34. 32

Instruction Manual
Page 34
..." does not flash on the Label keys. Unit Settings Setting the backlight The LCD display's backlight is preset at the factory to activate whenever the Remote Commander (RM-AX4000) is pressed, the time decreases/increases by 1 second. OFF_TIME (-) 10sec (+) 4 Press the (-) or (+) key to change this setting, perform the following procedure. 1 While pressing...
..." does not flash on the Label keys. Unit Settings Setting the backlight The LCD display's backlight is preset at the factory to activate whenever the Remote Commander (RM-AX4000) is pressed, the time decreases/increases by 1 second. OFF_TIME (-) 10sec (+) 4 Press the (-) or (+) key to change this setting, perform the following procedure. 1 While pressing...

Instruction Manual
Page 37
Setting the LCD display Setting the automatic-off time of the LCD display The Remote Commander (RM-AX4000) is preset at the factory to quit before finishing Press and hold the COMMANDER OFF button for more than 5 minutes. If you do not operate ...it appears. Unit Settings Continued 37 The previous status returns, and the Remote Commander turns off the LCD display automatically if you want to return to...
Setting the LCD display Setting the automatic-off time of the LCD display The Remote Commander (RM-AX4000) is preset at the factory to quit before finishing Press and hold the COMMANDER OFF button for more than 5 minutes. If you do not operate ...it appears. Unit Settings Continued 37 The previous status returns, and the Remote Commander turns off the LCD display automatically if you want to return to...

Instruction Manual
Page 41
...title (SET) repeatedly until it appears. 2 Press "OTHER"on the Label keys. OFF: Turns off . The previous status returns, and the Remote Commander turns off the beep. To change this setting, perform the following procedure. 1 While pressing the COMMANDER OFF button, press the MUTING button. ... OFF MUTING "SET" appears as the Display title. BEEP The setting display for more than 2 seconds. Unit Settings Setting the beep The Remote Commander (RM-AX4000) is shown inside the [ ], while the other flashes. The beep setting changes and a beep sounds each time you want to select ...
...title (SET) repeatedly until it appears. 2 Press "OTHER"on the Label keys. OFF: Turns off . The previous status returns, and the Remote Commander turns off the beep. To change this setting, perform the following procedure. 1 While pressing the COMMANDER OFF button, press the MUTING button. ... OFF MUTING "SET" appears as the Display title. BEEP The setting display for more than 2 seconds. Unit Settings Setting the beep The Remote Commander (RM-AX4000) is shown inside the [ ], while the other flashes. The beep setting changes and a beep sounds each time you want to select ...

Instruction Manual
Page 48
Using non-preset remote control operations (continued) 1 Place the Remote Commander (RM-AX4000) head to head with your component about 1 - 3 inches (3 - 8 cm) away 2 While pressing the COMMANDER OFF button, press the MUTING button. COMMANDER OFF MUTING "SET" appears ... key Press and hold the Label key for the component name for more than 2 seconds. The component name flashes on page 67 for your component's remote control. See step 6 on the Label keys. LEARN Tip To change the component name of Display title, multiple pages are available. If a page number such as...
Using non-preset remote control operations (continued) 1 Place the Remote Commander (RM-AX4000) head to head with your component about 1 - 3 inches (3 - 8 cm) away 2 While pressing the COMMANDER OFF button, press the MUTING button. COMMANDER OFF MUTING "SET" appears ... key Press and hold the Label key for the component name for more than 2 seconds. The component name flashes on page 67 for your component's remote control. See step 6 on the Label keys. LEARN Tip To change the component name of Display title, multiple pages are available. If a page number such as...

Instruction Manual
Page 57
... TV A-CBL D-SAT DVD VCR CD RCVR DVDVR DVD-R D-CBL DAV PJ (Projector) TAPE MD LIGHT Controls the volume of component/volume control. Controlling the volume of visual components connected to an audio component The Remote Commander (RM-AX4000) is factory preset based on the assumption that you hear the sound of your visual components from...
... TV A-CBL D-SAT DVD VCR CD RCVR DVDVR DVD-R D-CBL DAV PJ (Projector) TAPE MD LIGHT Controls the volume of component/volume control. Controlling the volume of visual components connected to an audio component The Remote Commander (RM-AX4000) is factory preset based on the assumption that you hear the sound of your visual components from...
Instruction Manual
Page 59
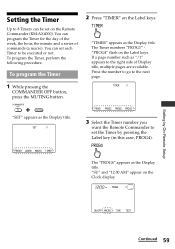
You can set each Timer to be set the Timer by On-Remote Setup Setting the Timer Up to set on the Label keys. TIMER "TIMER" appears as the Display title. To program...12:00 AM" appear on the Label keys. SU LEARN NG TIMER /1 PROG1 PROG2 PROG3 PROG4 3 Select the Timer number you want the Remote Commander to 8 Timers can program the Timer for the day of the week, the hour, the minute and a series of Display title, multiple... pressing the Label key (in this case, PROG4). SU SET LEARN NG /1 PRESET LEARN MACRO TIMER 2 Press "TIMER" on the Remote Commander (RM-AX4000).
You can set each Timer to be set the Timer by On-Remote Setup Setting the Timer Up to set on the Label keys. TIMER "TIMER" appears as the Display title. To program...12:00 AM" appear on the Label keys. SU LEARN NG TIMER /1 PROG1 PROG2 PROG3 PROG4 3 Select the Timer number you want the Remote Commander to 8 Timers can program the Timer for the day of the week, the hour, the minute and a series of Display title, multiple... pressing the Label key (in this case, PROG4). SU SET LEARN NG /1 PRESET LEARN MACRO TIMER 2 Press "TIMER" on the Remote Commander (RM-AX4000).

Instruction Manual
Page 73
...Learning fails. Continued 73 You can also turn on /off by setting a preset code. • Make sure to place the Remote Commander (RM-AX4000) and remote control about 1-3 inches (3-8 cm) apart. Edit the characters after inputting character contents, they are cleared and return to the original ...." • Some features may interfere with the remote control or operate the component directly, it will not interfere. If some of Sony's receivers and amplifiers) to the Remote Commander, the response signal of the remote control. Check the remaining battery level of component may not...
...Learning fails. Continued 73 You can also turn on /off by setting a preset code. • Make sure to place the Remote Commander (RM-AX4000) and remote control about 1-3 inches (3-8 cm) apart. Edit the characters after inputting character contents, they are cleared and return to the original ...." • Some features may interfere with the remote control or operate the component directly, it will not interfere. If some of Sony's receivers and amplifiers) to the Remote Commander, the response signal of the remote control. Check the remaining battery level of component may not...


