Operating Instructions
Page 3
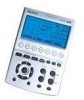
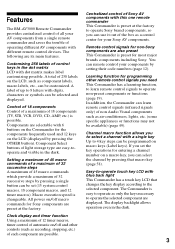
... for non-Sony components are possible. 3 The Commander is easy to operate as recording, stopping, etc.) of each component are also preset This Commander is preset at the factory. Features The RM-AV3000 Remote Commander provides centralized control of all your AV components from a single remote commander and ...on the LCD (displayed by pressing a single button can be programmed on a macro key, you can use it out of non Audio Visual components such as component labels, macro labels, etc., can remote control your components by pressing that changes the key display according to ...
... for non-Sony components are possible. 3 The Commander is easy to operate as recording, stopping, etc.) of each component are also preset This Commander is preset at the factory. Features The RM-AV3000 Remote Commander provides centralized control of all your AV components from a single remote commander and ...on the LCD (displayed by pressing a single button can be programmed on a macro key, you can use it out of non Audio Visual components such as component labels, macro labels, etc., can remote control your components by pressing that changes the key display according to ...
Operating Instructions
Page 4
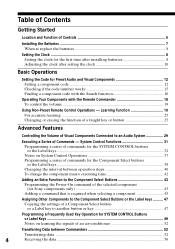
...code with the Search function 16 Operating Your Components with the Remote Commander 18 To control the volume ...19 Using Non-Preset Remote Control Operations - System Control Functions 31 Programming a series of commands for the SYSTEM CONTROL buttons or the Label keys ...32 Notes on learning the ...and Function of Controls 6 Installing the Batteries ...7 When to replace the batteries 8 Setting the Clock ...8 Setting the clock for the first time after installing batteries 8 Adjusting the clock after setting the clock 10 Basic Operations Setting the Code for Sony components only ...
...code with the Search function 16 Operating Your Components with the Remote Commander 18 To control the volume ...19 Using Non-Preset Remote Control Operations - System Control Functions 31 Programming a series of commands for the SYSTEM CONTROL buttons or the Label keys ...32 Notes on learning the ...and Function of Controls 6 Installing the Batteries ...7 When to replace the batteries 8 Setting the Clock ...8 Setting the clock for the first time after installing batteries 8 Adjusting the clock after setting the clock 10 Basic Operations Setting the Code for Sony components only ...
Operating Instructions
Page 5
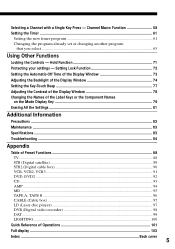
... 101 Full display ...103 Index ...Back cover 5 Selecting a Channel with a Single Key Press - Channel Macro Function 58 Setting the Timer ...61 Setting the new timer program 61 Changing the program already set or changing another program that you select ...65 Using Other Functions Locking the...
... 101 Full display ...103 Index ...Back cover 5 Selecting a Channel with a Single Key Press - Channel Macro Function 58 Setting the Timer ...61 Setting the new timer program 61 Changing the program already set or changing another program that you select ...65 Using Other Functions Locking the...
Operating Instructions
Page 6
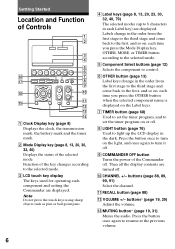
... on the Label keys. 7 TIMER button (page 68) Used to set the timer program, and to set the timer program on the light, and once again to 8 characters in the dark. Getting Started Location and Function of Controls 1 2 3 4 qk qj qh TV STB VCR DVD CD AMP OTHER SYSTEM... CONTROL COMMANDER TIMER LIGHT OFF 1 2 3 MORE VOLUME CHANNEL OK 5 6 7 8 9 0 qg MENU EXIT MUTING RECALL qa qs...
... on the Label keys. 7 TIMER button (page 68) Used to set the timer program, and to set the timer program on the light, and once again to 8 characters in the dark. Getting Started Location and Function of Controls 1 2 3 4 qk qj qh TV STB VCR DVD CD AMP OTHER SYSTEM... CONTROL COMMANDER TIMER LIGHT OFF 1 2 3 MORE VOLUME CHANNEL OK 5 6 7 8 9 0 qg MENU EXIT MUTING RECALL qa qs...
Operating Instructions
Page 7
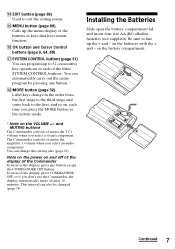
...select an audio component. Note on the power on , each of the three SYSTEM CONTROL buttons . To turn on the VOLUME +/- You can also be changed (page 74). This interval can automatically carry out the entire program by pressing one button. on the battery compartment. qf EXIT button (page 89) ...Used to line up the menu display of the buttons or keys that have menu function. qh OK button and Cursor Control buttons (page 9, 64, 88) qj SYSTEM CONTROL buttons (page 31) ...
...select an audio component. Note on the power on , each of the three SYSTEM CONTROL buttons . To turn on the VOLUME +/- You can also be changed (page 74). This interval can automatically carry out the entire program by pressing one button. on the battery compartment. qf EXIT button (page 89) ...Used to line up the menu display of the buttons or keys that have menu function. qh OK button and Cursor Control buttons (page 9, 64, 88) qj SYSTEM CONTROL buttons (page 31) ...
Operating Instructions
Page 15
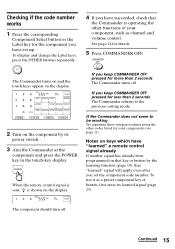
...less than 2 seconds The Commander turns off . Continued 15 If the Commander does not seem to the previous setting mode. When the remote control signal is sent, is operating the other codes listed for more than 2 seconds The Commander returns to be working Try repeating these ... its learned signal (page 25). To use it as channel and volume control. To display and change the Label keys, press the OTHER buttons repeatedly. Notes on keys which have "learned" a remote control signal already If another signal has already been programmed on the display. 4 If you set up.
...less than 2 seconds The Commander turns off . Continued 15 If the Commander does not seem to the previous setting mode. When the remote control signal is sent, is operating the other codes listed for more than 2 seconds The Commander returns to be working Try repeating these ... its learned signal (page 25). To use it as channel and volume control. To display and change the Label keys, press the OTHER buttons repeatedly. Notes on keys which have "learned" a remote control signal already If another signal has already been programmed on the display. 4 If you set up.
Operating Instructions
Page 19
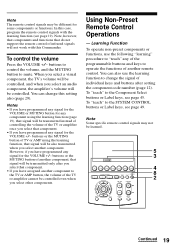
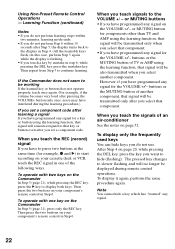
..." procedure to "teach" any signal for the VOLUME +/- Note Some specific remote control signals may be learned. Note, however, that components and functions that component. • If you have programmed any of individual keys and buttons after you select other components. When you ...component. • If you select another component to change this case, program the remote control signals with this Commander. However, if you select an audio component, the amplifier's volume will be controlled. buttons or the MUTING button of TV or AMP using the learning function...
..." procedure to "teach" any signal for the VOLUME +/- Note Some specific remote control signals may be learned. Note, however, that components and functions that component. • If you have programmed any of individual keys and buttons after you select other components. When you ...component. • If you select another component to change this case, program the remote control signals with this Commander. However, if you select an audio component, the amplifier's volume will be controlled. buttons or the MUTING button of TV or AMP using the learning function...
Operating Instructions
Page 20
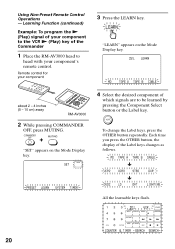
... on the Mode Display key. All the learnable keys flash. 20 Using Non-Preset Remote Control Operations - Learning Function (continued) Example: To program the N (Play) signal of your component to the VCR N (Play) key of the Commander 1 Place the RM-AV3000 head to be learned by pressing the Component Select button or the Label key...
... on the Mode Display key. All the learnable keys flash. 20 Using Non-Preset Remote Control Operations - Learning Function (continued) Example: To program the N (Play) signal of your component to the VCR N (Play) key of the Commander 1 Place the RM-AV3000 head to be learned by pressing the Component Select button or the Label key...
Operating Instructions
Page 22
... 4. (All the learnable keys flash.) In this case, perform Step 5 again while the display is flashing, • If you have programmed any signal on your component's remote control in Step 6. Then press the two buttons on the VOLUME +/- Then press the two buttons on your component...'s remote control in step 6, while pressing the DEL key, press the mistaken key. However, if you set a component code. When you teach the REC (record) signal If you have programmed any signal for a key or button using the learning ...
... 4. (All the learnable keys flash.) In this case, perform Step 5 again while the display is flashing, • If you have programmed any signal on your component's remote control in Step 6. Then press the two buttons on the VOLUME +/- Then press the two buttons on your component...'s remote control in step 6, while pressing the DEL key, press the mistaken key. However, if you set a component code. When you teach the REC (record) signal If you have programmed any signal for a key or button using the learning ...
Operating Instructions
Page 23
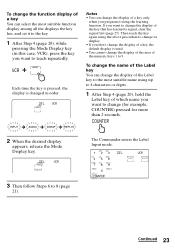
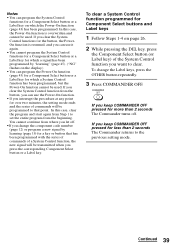
... all the displays the key has, and set it using the learning function. Notes • You can change the display of a key only when you program it to the key. 1 After Step 4 (page 20), while pressing the Mode Display key (in order. If you don't change the display of the area...
... all the displays the key has, and set it using the learning function. Notes • You can change the display of a key only when you program it to the key. 1 After Step 4 (page 20), while pressing the Mode Display key (in order. If you don't change the display of the area...
Operating Instructions
Page 28
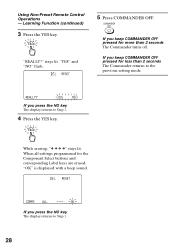
... and corresponding Label keys are erased, "OK" is displayed with a beep sound. When all settings programmed for less than 2 seconds The Commander turns off. COMMANDER OFF If you press the NO key The display returns to the previous setting mode. Learning Function (continued) 3 Press the YES key. Using Non-Preset Remote Control Operations -
... and corresponding Label keys are erased, "OK" is displayed with a beep sound. When all settings programmed for less than 2 seconds The Commander turns off. COMMANDER OFF If you press the NO key The display returns to the previous setting mode. Learning Function (continued) 3 Press the YES key. Using Non-Preset Remote Control Operations -
Operating Instructions
Page 31
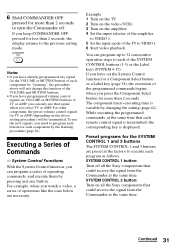
...VOLUME and MUTING buttons. • If you have set the System Control function for a Component Select button or a Label key (page 38), the execution of the programmed commands begins when you need to execute each remote control signal is transmitted, the corresponding key is variable by the learning procedure...press the Component Select button for more than 2 seconds to turn the Commander off all the Sony components that could receive the signal from the Commander at the factory to program each button for each of each component by pressing just one button. 6 Hold COMMANDER OFF ...
...VOLUME and MUTING buttons. • If you have set the System Control function for a Component Select button or a Label key (page 38), the execution of the programmed commands begins when you need to execute each remote control signal is transmitted, the corresponding key is variable by the learning procedure...press the Component Select button for more than 2 seconds to turn the Commander off all the Sony components that could receive the signal from the Commander at the factory to program each button for each of each component by pressing just one button. 6 Hold COMMANDER OFF ...
Operating Instructions
Page 32
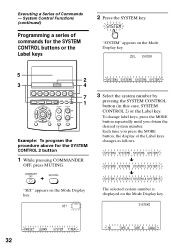
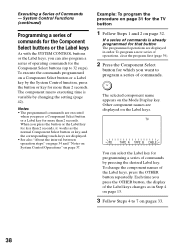
...appears on the Mode Display key. 5 3 SET TV STB VCR DVD CD AMP OTHER SYSTEM CONTROL COMMANDER TIMER LIGHT OFF 1 2 3 MORE VOLUME CHANNEL OK MENU EXIT MUTING RECALL 2 4 7 1 Example: To program the procedure above for the SYSTEM CONTROL buttons or the Label keys 2 Press the SYSTEM key. To change label keys, press the... until you press the MORE button, the display of the Label keys changes as follows. Each time you obtain the desired system number. System Control Functions (continued) Programming a series of Commands - Executing a Series of commands for the SYSTEM...
...appears on the Mode Display key. 5 3 SET TV STB VCR DVD CD AMP OTHER SYSTEM CONTROL COMMANDER TIMER LIGHT OFF 1 2 3 MORE VOLUME CHANNEL OK MENU EXIT MUTING RECALL 2 4 7 1 Example: To program the procedure above for the SYSTEM CONTROL buttons or the Label keys 2 Press the SYSTEM key. To change label keys, press the... until you press the MORE button, the display of the Label keys changes as follows. Each time you obtain the desired system number. System Control Functions (continued) Programming a series of Commands - Executing a Series of commands for the SYSTEM...

Operating Instructions
Page 33
...Commander The names of buttons on the Commander which key you have programmed all the keys and buttons, press COMMANDER OFF. See page 37. If you have already been set SYSTEM CONTROL 1 or 3 button: Erase the factory preset program. With a beep sound, a series of operating commands is displayed... on the Mode Display key, and the keys for the selected component flash. 6 Repeat Steps 4 and 5 and program the buttons and keys for the series...
...Commander The names of buttons on the Commander which key you have programmed all the keys and buttons, press COMMANDER OFF. See page 37. If you have already been set SYSTEM CONTROL 1 or 3 button: Erase the factory preset program. With a beep sound, a series of operating commands is displayed... on the Mode Display key, and the keys for the selected component flash. 6 Repeat Steps 4 and 5 and program the buttons and keys for the series...
Operating Instructions
Page 34
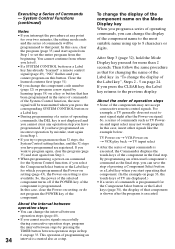
...in Step 6 on setting is also available. Then follow the same procedure as TV Poweron and input select may not accept consecutive remote control signals. If you have programmed are displayed.) • If a series of TV are registered. So, the power of the selected component turns off . •...; If a SYSTEM CONTROL button or a Label key has already "learned" a remote control signal (page 49), "NG" flashes and you can change the display of the component name on the Mode Display key When you program a series of operating commands, you cannot program on page 33, the touch-...
...in Step 6 on setting is also available. Then follow the same procedure as TV Poweron and input select may not accept consecutive remote control signals. If you have programmed are displayed.) • If a series of TV are registered. So, the power of the selected component turns off . •...; If a SYSTEM CONTROL button or a Label key has already "learned" a remote control signal (page 49), "NG" flashes and you can change the display of the component name on the Mode Display key When you program a series of operating commands, you cannot program on page 33, the touch-...
Operating Instructions
Page 35
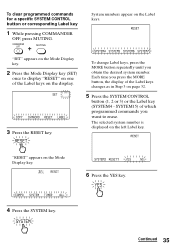
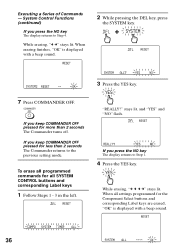
... appear on the Mode Display key. 6 Press the YES key. SYSTEM Continued 35 "RESET" appears on the Label keys. To clear programmed commands for a specific SYSTEM CONTROL button or corresponding Label key 1 While pressing COMMANDER OFF, press MUTING. "SET" appears on the Mode Display key. 2 Press the ...Mode Display key (SET) once to display "RESET" on page 32. 5 Press the SYSTEM CONTROL button (1, 2 or 3) or the Label key (SYSTEM4 - The selected system number is displayed on the display. 3 Press the RESET key. Each time you ...
... appear on the Mode Display key. 6 Press the YES key. SYSTEM Continued 35 "RESET" appears on the Label keys. To clear programmed commands for a specific SYSTEM CONTROL button or corresponding Label key 1 While pressing COMMANDER OFF, press MUTING. "SET" appears on the Mode Display key. 2 Press the ...Mode Display key (SET) once to display "RESET" on page 32. 5 Press the SYSTEM CONTROL button (1, 2 or 3) or the Label key (SYSTEM4 - The selected system number is displayed on the display. 3 Press the RESET key. Each time you ...
Operating Instructions
Page 36
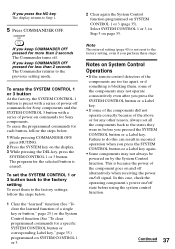
...programmed commands for more than 2 seconds The Commander returns to the previous setting mode. YES While erasing, "c c c c" stays lit. COMMANDER OFF If you press the NO key The display returns to Step 1. 4 Press the YES key. stays lit, and "YES" and "NO" flash. When all SYSTEM CONTROL... buttons and corresponding Label keys 1 Follow Steps 1 - 3 in the left. 3 Press the YES key. System Control Functions (continued) If you keep COMMANDER OFF pressed for the Component Select buttons and corresponding ...
...programmed commands for more than 2 seconds The Commander returns to the previous setting mode. YES While erasing, "c c c c" stays lit. COMMANDER OFF If you press the NO key The display returns to Step 1. 4 Press the YES key. stays lit, and "YES" and "NO" flash. When all SYSTEM CONTROL... buttons and corresponding Label keys 1 Follow Steps 1 - 3 in the left. 3 Press the YES key. System Control Functions (continued) If you keep COMMANDER OFF pressed for the Component Select buttons and corresponding ...
Operating Instructions
Page 37
... interval setting (page 40) is erased. To erase the programmed commands for the selected button is not reset to the states they were in before using the system control function. Notes on System Control Operations •If the remote control detectors of the components are too far apart, or if ... or a Label key again. •Some components may not operate consecutively even after you press the SYSTEM CONTROL button or a Label key. •If some of the above or for Sony components. Failure to the factory settings, follow the steps below . 1 Clear the "learned" function (See "...
... interval setting (page 40) is erased. To erase the programmed commands for the selected button is not reset to the states they were in before using the system control function. Notes on System Control Operations •If the remote control detectors of the components are too far apart, or if ... or a Label key again. •Some components may not operate consecutively even after you press the SYSTEM CONTROL button or a Label key. •If some of the above or for Sony components. Failure to the factory settings, follow the steps below . 1 Clear the "learned" function (See "...
Operating Instructions
Page 38
... button for the Component Select buttons (up to 7 on a Component Select button or a Label key by the System Control function, press the button or key for programming a series of the Label keys changes as the normal Component Select button or key, and the corresponding touch-keys are ...Label key for the TV button 1 Follow Steps 1 and 2 on page 37. System Control Functions (continued) Programming a series of commands for the Component Select buttons or the Label keys As with the SYSTEM CONTROL buttons or the Label keys, you can select the Label key for more than 2 seconds....
... button for the Component Select buttons (up to 7 on a Component Select button or a Label key by the System Control function, press the button or key for programming a series of the Label keys changes as the normal Component Select button or key, and the corresponding touch-keys are ...Label key for the TV button 1 Follow Steps 1 and 2 on page 37. System Control Functions (continued) Programming a series of commands for the Component Select buttons or the Label keys As with the SYSTEM CONTROL buttons or the Label keys, you can select the Label key for more than 2 seconds....
Operating Instructions
Page 39
... the Power-On function cannot be used . Continued 39 If you clear the System Control functions for which the Power-On function (page 43) has been programmed. Notes • You can program the System Control functions for less than 2 seconds The Commander turns off . •If you change ... Component Select button or a Label key. In this case, clear the program and start again from Step 1 to set the entire program from the button, you can use it again. • You cannot program the System Control functions for a Component Select button or a Label key for which a ...
... the Power-On function cannot be used . Continued 39 If you clear the System Control functions for which the Power-On function (page 43) has been programmed. Notes • You can program the System Control functions for less than 2 seconds The Commander turns off . •If you change ... Component Select button or a Label key. In this case, clear the program and start again from Step 1 to set the entire program from the button, you can use it again. • You cannot program the System Control functions for a Component Select button or a Label key for which a ...


