
Operating Instructions
Page 1
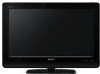
3-294-082-13(1) LCD Digital Color TV KDL-26M4000 KDL-32M4000 KDL-37M4000 KDL-40M4000 © 2008 Sony Corporation Operating Instructions
3-294-082-13(1) LCD Digital Color TV KDL-26M4000 KDL-32M4000 KDL-37M4000 KDL-40M4000 © 2008 Sony Corporation Operating Instructions
Operating Instructions
Page 2
...few hours to fit into the outlet, contact your dealer. s For details concerning safety precautions, see "Safety and Regulatory Booklet". Sony TV Model No. RHT-S10 Use with Canadian ICES-003. Availability of digital cable television programming in this manual could void your authority to... exposure. This equipment generates, uses and can be regulated due to the following WALL-MOUNT BRACKET or TV-stand. SU-WL100 SU-WL500 Sony TV Stand Model No. - - This TV incorporates High-Definition Multimedia Interface (HDMI™) technology. Never pull on 120 V AC. Note This ...
...few hours to fit into the outlet, contact your dealer. s For details concerning safety precautions, see "Safety and Regulatory Booklet". Sony TV Model No. RHT-S10 Use with Canadian ICES-003. Availability of digital cable television programming in this manual could void your authority to... exposure. This equipment generates, uses and can be regulated due to the following WALL-MOUNT BRACKET or TV-stand. SU-WL100 SU-WL500 Sony TV Stand Model No. - - This TV incorporates High-Definition Multimedia Interface (HDMI™) technology. Never pull on 120 V AC. Note This ...
Operating Instructions
Page 3
..., Source, and Setup 4 Picture Quality and Aspect Ratio 4 Getting Started 1. Installing the TV 5 How to Carry the TV 5 How to Attach the Table-Top Stand 5 Securing the TV 6 Bundling the Connecting Cables 8 Preparation for HDMI 19 Remote Control and TV Controls/Indicators Inserting Batteries 20 When Using the Remote Control 20 Remote Control... Guide (separate volume) Provides a variety of BRAVIA® The Four Steps to the World of optional equipment connection diagrams. Customer Support http://www.sony.com/tvsupport On-line Registration United States http://productregistration...
..., Source, and Setup 4 Picture Quality and Aspect Ratio 4 Getting Started 1. Installing the TV 5 How to Carry the TV 5 How to Attach the Table-Top Stand 5 Securing the TV 6 Bundling the Connecting Cables 8 Preparation for HDMI 19 Remote Control and TV Controls/Indicators Inserting Batteries 20 When Using the Remote Control 20 Remote Control... Guide (separate volume) Provides a variety of BRAVIA® The Four Steps to the World of optional equipment connection diagrams. Customer Support http://www.sony.com/tvsupport On-line Registration United States http://productregistration...
Operating Instructions
Page 4
... how to a standard analog signal, you will see pages 23 and 32). • This TV supports signals up to 1080i. 4 The 1080i HD signals provide more about HDTV, visit: U.S.A http://www.sony.com/HDTV Canada http://www.sonystyle.ca/hd The Four Steps to Stunning HD Experience: Set, ... high-definition signal to connect other external equipment Contact your new BRAVIA TV, you need access to -height ratio of the image). To experience the stunning detail of your cable or satellite provider for purchasing this Sony BRAVIA® high-definition television. Welcome to the World of BRAVIA®...
... how to a standard analog signal, you will see pages 23 and 32). • This TV supports signals up to 1080i. 4 The 1080i HD signals provide more about HDTV, visit: U.S.A http://www.sony.com/HDTV Canada http://www.sonystyle.ca/hd The Four Steps to Stunning HD Experience: Set, ... high-definition signal to connect other external equipment Contact your new BRAVIA TV, you need access to -height ratio of the image). To experience the stunning detail of your cable or satellite provider for purchasing this Sony BRAVIA® high-definition television. Welcome to the World of BRAVIA®...
Operating Instructions
Page 5
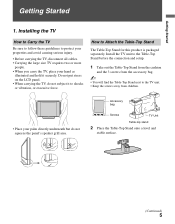
...away from children. • Place your hand as illustrated and hold it to shocks or vibration, or excessive force. Installing the TV How to Carry the TV Be sure to follow these guidelines to Attach the Table-Top Stand The Table-Top Stand for this product is packaged separately. .... • Carrying the large size TV requires two or more people. • When you carry the TV, place your palm directly underneath but do not subject it securely. Getting Started Getting Started 1. Do not put stress on the LCD panel. • When carrying the TV, do not squeeze the panel's speaker...
...away from children. • Place your hand as illustrated and hold it to shocks or vibration, or excessive force. Installing the TV How to Carry the TV Be sure to follow these guidelines to Attach the Table-Top Stand The Table-Top Stand for this product is packaged separately. .... • Carrying the large size TV requires two or more people. • When you carry the TV, place your palm directly underneath but do not subject it securely. Getting Started Getting Started 1. Do not put stress on the LCD panel. • When carrying the TV, do not squeeze the panel's speaker...
Operating Instructions
Page 6
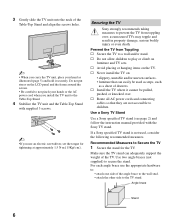
... be used , consider the following recommended measures. s Never install the TV on the LCD panel and the frame around the screen. • Be careful to not pinch your hand as unsecured TVs may topple and result in property damage, serious bodily injury or even ...you use the appropriate hardware to a wall and/or stand. Securing the TV Sony strongly recommends taking measures to prevent the TV from Toppling s Secure the TV to : • attach one side of the TV. Use a Sony TV Stand Use a Sony specified TV stand (see page 2) and follow the instruction manual provided with supplied 3...
... be used , consider the following recommended measures. s Never install the TV on the LCD panel and the frame around the screen. • Be careful to not pinch your hand as unsecured TVs may topple and result in property damage, serious bodily injury or even ...you use the appropriate hardware to a wall and/or stand. Securing the TV Sony strongly recommends taking measures to prevent the TV from Toppling s Secure the TV to : • attach one side of the TV. Use a Sony TV Stand Use a Sony specified TV stand (see page 2) and follow the instruction manual provided with supplied 3...
Operating Instructions
Page 7
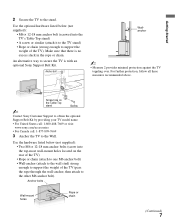
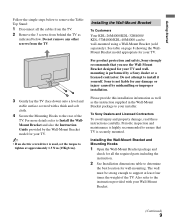
... top-most wall-mount holes located on the Table-Top stand Screw ~ Contact Sony Customer Support to obtain the optional Support Belt Kit by providing your TV model name. • For United States call: 1-800-488-7669 or visit: www.sony.com/accessories • For Canada call: 1-877-899-7669 3 Anchor the... TV to support the weight of the TV). Screw hole on the rear of the TV) • Rope or chain (attach to one M6 anchor bolt) • Wall-anchor (...
... top-most wall-mount holes located on the Table-Top stand Screw ~ Contact Sony Customer Support to obtain the optional Support Belt Kit by providing your TV model name. • For United States call: 1-800-488-7669 or visit: www.sony.com/accessories • For Canada call: 1-877-899-7669 3 Anchor the... TV to support the weight of the TV). Screw hole on the rear of the TV) • Rope or chain (attach to one M6 anchor bolt) • Wall-anchor (...
Operating Instructions
Page 8
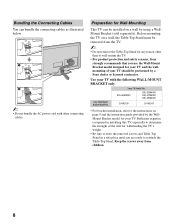
...8226; For bracket installation, refer to determine the strength of the wall for your TV and the wallmounting of your TV. KDL-26M4000 KDL-32M4000 KDL-37M4000 KDL-40M4000 Sony Wall-Mount Bracket Model No. Sony TV Model No. Bundling the Connecting Cables You can be performed by using a WallMount ...~ • Do not bundle the AC power cord with the following WALL-MOUNT BRACKET only. Use your TV with other than to wall-mount the TV. • For product protection and safety reasons, Sony strongly recommends that you use the Wall-Mount Bracket model designed for withstanding the...
...8226; For bracket installation, refer to determine the strength of the wall for your TV and the wallmounting of your TV. KDL-26M4000 KDL-32M4000 KDL-37M4000 KDL-40M4000 Sony Wall-Mount Bracket Model No. Sony TV Model No. Bundling the Connecting Cables You can be performed by using a WallMount ...~ • Do not bundle the AC power cord with the following WALL-MOUNT BRACKET only. Use your TV with other than to wall-mount the TV. • For product protection and safety reasons, Sony strongly recommends that you use the Wall-Mount Bracket model designed for withstanding the...
Operating Instructions
Page 9
...1 Open the Wall-Mount Bracket package and check for all the cables from the TV. 2 Remove the 3 screws from the TV. Do not attempt to your TV. Sony is not liable for wall-mounting. To Sony Dealers and Licensed Contractors To avoid injury and property damage, read these instructions carefully.... is highly recommended to tighten at least four times the weight of the TV. For product protection and safety, Sony strongly recommends that TV is performed by the Wall-Mount Bracket model for your TV and wallmounting is securely mounted. Do not remove any damage or injury caused...
...1 Open the Wall-Mount Bracket package and check for all the cables from the TV. 2 Remove the 3 screws from the TV. Do not attempt to your TV. Sony is not liable for wall-mounting. To Sony Dealers and Licensed Contractors To avoid injury and property damage, read these instructions carefully.... is highly recommended to tighten at least four times the weight of the TV. For product protection and safety, Sony strongly recommends that TV is performed by the Wall-Mount Bracket model for your TV and wallmounting is securely mounted. Do not remove any damage or injury caused...
Operating Instructions
Page 10
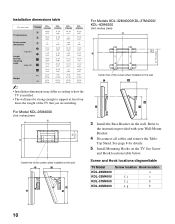
... four times the weight of the screen when installed on the wall 3 Install the Base Bracket on the TV. Installation dimensions table Unit: inches (mm) TV Model KDL26M4000 KDL32M4000 KDL37M4000 KDL40M4000 TV dimensions Screen center dimensions A 26 5/8 31 7/8 36 3/4 39 3/8 (675) (809) (931) (997) B 18 3/8 21 3/8 24 25 3/8 (466) (542) (609) (644) C 3 4 6 5/8 6 (75) (101) (168...
... four times the weight of the screen when installed on the wall 3 Install the Base Bracket on the TV. Installation dimensions table Unit: inches (mm) TV Model KDL26M4000 KDL32M4000 KDL37M4000 KDL40M4000 TV dimensions Screen center dimensions A 26 5/8 31 7/8 36 3/4 39 3/8 (675) (809) (931) (997) B 18 3/8 21 3/8 24 25 3/8 (466) (542) (609) (644) C 3 4 6 5/8 6 (75) (101) (168...
Operating Instructions
Page 11
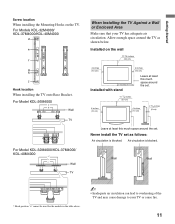
...least this much space around the TV as follows: Air circulation is blocked. Never install the TV set . For Model KDL-26M4000 Wall TV For Model KDL-32M4000/KDL-37M4000/ KDL-40M4000 Wall TV When Installing the TV Against a Wall or Enclosed Area Make sure that your TV or cause fire. 11 Wall Wall... * Hook position "a" cannot be used for the models in the table above. ~ • Inadequate air circulation can lead to overheating of the TV and may cause damage to your TV has adequate air circulation. For Models KDL-32M4000/ KDL-37M4000/KDL-40M4000 Hook location When installing the...
...least this much space around the TV as follows: Air circulation is blocked. Never install the TV set . For Model KDL-26M4000 Wall TV For Model KDL-32M4000/KDL-37M4000/ KDL-40M4000 Wall TV When Installing the TV Against a Wall or Enclosed Area Make sure that your TV or cause fire. 11 Wall Wall... * Hook position "a" cannot be used for the models in the table above. ~ • Inadequate air circulation can lead to overheating of the TV and may cause damage to your TV has adequate air circulation. For Models KDL-32M4000/ KDL-37M4000/KDL-40M4000 Hook location When installing the...
Operating Instructions
Page 12
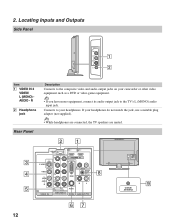
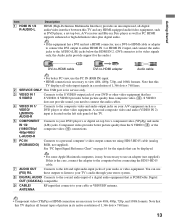
... AUDIO OUT (COAXIAL) R L 1 2 COMPONENT IN (1080i/720p/480p/480i) AUDIO PC IN AUDIO OUT (FIX) 8 CABLE/ ANTENNA 9 67 12 R 2 Headphone jack Description Connects to the TV's L (MONO) audio input jack. Connects to your camcorder or other video equipment such as a DVD or video game equipment. • If you have mono equipment... output jacks on your headphones. If your headphones do not match the jack, use a suitable plug adapter (not supplied). • While headphones are connected, the TV speakers are muted. 2.
... AUDIO OUT (COAXIAL) R L 1 2 COMPONENT IN (1080i/720p/480p/480i) AUDIO PC IN AUDIO OUT (FIX) 8 CABLE/ ANTENNA 9 67 12 R 2 Headphone jack Description Connects to the TV's L (MONO) audio input jack. Connects to your camcorder or other video equipment such as a DVD or video game equipment. • If you have mono equipment... output jacks on your headphones. If your headphones do not match the jack, use a suitable plug adapter (not supplied). • While headphones are connected, the TV speakers are muted. 2.
Operating Instructions
Page 13
...connector, use the PC IN (RGB IN) input. • HDMI connection is PCM/Dolby Digital OUT (COAXIAL) compatible. 9 CABLE/ ANTENNA RF input that this TV displays all video input signals in its native resolution of your DVD player's or digital set -top box, A/V receiver and Blu-ray Disc player as...1080i formats. You can be displayed. • For some Apple Macintosh computers, it may be necessary to your audio or video equipment. Note that this TV displays all format types of picture in a resolution of 1,366 dots × 768 lines. 2 SERVICE ONLY This USB port is for the audio.)...
...connector, use the PC IN (RGB IN) input. • HDMI connection is PCM/Dolby Digital OUT (COAXIAL) compatible. 9 CABLE/ ANTENNA RF input that this TV displays all video input signals in its native resolution of your DVD player's or digital set -top box, A/V receiver and Blu-ray Disc player as...1080i formats. You can be displayed. • For some Apple Macintosh computers, it may be necessary to your audio or video equipment. Note that this TV displays all format types of picture in a resolution of 1,366 dots × 768 lines. 2 SERVICE ONLY This USB port is for the audio.)...

Operating Instructions
Page 14
.... A 300-ohm twin lead cable can also enjoy high-definition programming by radio frequency interference, resulting in Channel menu for the type of TV CABLE/ANTENNA input • It is strongly recommended that you will need to use an optional AB RF Switch (not supplied) to switch between... On or Off in signal degradation. Shown with audio) input on the back of TV A-B RF Switch Cable Antenna A Rear of TV B CABLE/ANTENNA input • Be sure to set Cable setting to your TV via the HDMI or component video (with HDMI Connection HDMI cable CATV/ Satellite antenna ...
.... A 300-ohm twin lead cable can also enjoy high-definition programming by radio frequency interference, resulting in Channel menu for the type of TV CABLE/ANTENNA input • It is strongly recommended that you will need to use an optional AB RF Switch (not supplied) to switch between... On or Off in signal degradation. Shown with audio) input on the back of TV A-B RF Switch Cable Antenna A Rear of TV B CABLE/ANTENNA input • Be sure to set Cable setting to your TV via the HDMI or component video (with HDMI Connection HDMI cable CATV/ Satellite antenna ...

Operating Instructions
Page 15
Getting Started Shown with Component Connection CATV/ Satellite antenna cable HD cable box/HD satellite box Rear of TV SERVICE ONLY 1 2 Y IN S VIDEO VIDEO L (MONO) AUDIO R 1 VIDEO IN PB PR L AUDIO R R RGB AUDIO L DIGITAL AUDIO OUT (COAXIAL) R L 1 2 COMPONENT IN (... below the HDMI IN 2 (DVI connector is for video signals only, the Audio jacks provide support for the audio). Shown with DVI Connection Rear of TV SERVICE ONLY 1 2 Y IN S VIDEO VIDEO L (MONO) AUDIO R 1 VIDEO IN PB PR L AUDIO R R RGB AUDIO L DIGITAL AUDIO OUT (COAXIAL) R L 1 2 COMPONENT IN (...
Getting Started Shown with Component Connection CATV/ Satellite antenna cable HD cable box/HD satellite box Rear of TV SERVICE ONLY 1 2 Y IN S VIDEO VIDEO L (MONO) AUDIO R 1 VIDEO IN PB PR L AUDIO R R RGB AUDIO L DIGITAL AUDIO OUT (COAXIAL) R L 1 2 COMPONENT IN (... below the HDMI IN 2 (DVI connector is for video signals only, the Audio jacks provide support for the audio). Shown with DVI Connection Rear of TV SERVICE ONLY 1 2 Y IN S VIDEO VIDEO L (MONO) AUDIO R 1 VIDEO IN PB PR L AUDIO R R RGB AUDIO L DIGITAL AUDIO OUT (COAXIAL) R L 1 2 COMPONENT IN (...
Operating Instructions
Page 16
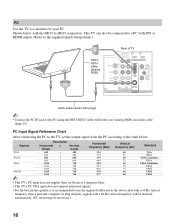
.... (PC reboot may be connected to a PC with DVI or HDMI output. (Refer to the supplied Quick Setup Guide.) HD15HD15 cable (analog RGB) Rear of TV SERVICE ONLY Y 1 2 IN S VIDEO VIDEO L (MONO) AUDIO R 1 VIDEO IN PB PR L AUDIO R R RGB AUDIO L DIGITAL AUDIO OUT (COAXIAL) R L 1 2 COMPONENT IN ... the HD15-HD15 cable with ferrite core (analog RGB) and audio cable (page 13). PC Input Signal Reference Chart After connecting the PC to the TV, set the output signal from a personal computer. Signals VGA SVGA XGA WXGA ~ Resolution Horizontal × Vertical (Pixel) (Line) 640 ×...
.... (PC reboot may be connected to a PC with DVI or HDMI output. (Refer to the supplied Quick Setup Guide.) HD15HD15 cable (analog RGB) Rear of TV SERVICE ONLY Y 1 2 IN S VIDEO VIDEO L (MONO) AUDIO R 1 VIDEO IN PB PR L AUDIO R R RGB AUDIO L DIGITAL AUDIO OUT (COAXIAL) R L 1 2 COMPONENT IN ... the HD15-HD15 cable with ferrite core (analog RGB) and audio cable (page 13). PC Input Signal Reference Chart After connecting the PC to the TV, set the output signal from a personal computer. Signals VGA SVGA XGA WXGA ~ Resolution Horizontal × Vertical (Pixel) (Line) 640 ×...

Operating Instructions
Page 17
Getting Started Other Equipment Personal computer Blu-ray Disc Player/ DVD "PS3" player Digital satellite receiver Digital cable box Audio system Headphones Camcorder Rear of TV SERVICE ONLY 1 2 Y IN S VIDEO VIDEO L (MONO) AUDIO R 1 VIDEO IN PB PR L AUDIO R R RGB AUDIO L DIGITAL AUDIO OUT (COAXIAL) R L 1 2 COMPONENT IN (1080i/720p/480p/480i) AUDIO ... Digital recorder Analog audio equipment (A/V Receiver/Home Theater) Digital audio equipment ~ • Refer to the Quick Setup Guide (supplied) when connecting other equipment to your TV. 17
Getting Started Other Equipment Personal computer Blu-ray Disc Player/ DVD "PS3" player Digital satellite receiver Digital cable box Audio system Headphones Camcorder Rear of TV SERVICE ONLY 1 2 Y IN S VIDEO VIDEO L (MONO) AUDIO R 1 VIDEO IN PB PR L AUDIO R R RGB AUDIO L DIGITAL AUDIO OUT (COAXIAL) R L 1 2 COMPONENT IN (1080i/720p/480p/480i) AUDIO ... Digital recorder Analog audio equipment (A/V Receiver/Home Theater) Digital audio equipment ~ • Refer to the Quick Setup Guide (supplied) when connecting other equipment to your TV. 17

Operating Instructions
Page 18
... 32. ~ • You may not be available. 4 Follow the help text provided on the screen to set up available channels. Please select your TV, you have cable and antenna available, please connect cable first. • IMPORTANT: You must perform Auto Program after cable or antenna is connected. Auto ...feature at this time, you can do not want to run Initial Setup, which automatically sets up convenient features such as described on the TV. The Initial Setup screen appears when you cancel Auto Program some channels may want to set up the channels at Channel menu as Favorites...
... 32. ~ • You may not be available. 4 Follow the help text provided on the screen to set up available channels. Please select your TV, you have cable and antenna available, please connect cable first. • IMPORTANT: You must perform Auto Program after cable or antenna is connected. Auto ...feature at this time, you can do not want to run Initial Setup, which automatically sets up convenient features such as described on the TV. The Initial Setup screen appears when you cancel Auto Program some channels may want to set up the channels at Channel menu as Favorites...
Operating Instructions
Page 19
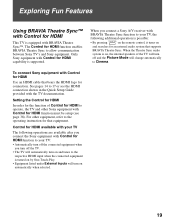
...for the function of the TV will turn off the TV. • The TV will automatically turn on by One-Touch-Play. • Equipment listed under External Inputs will change automatically to allow communication between Sony TV's and Sony equipment. Only Sony equipment with Control for ...HDMI capability is equipped with BRAVIA Theatre Sync™. When you connect the Sony equipment with Control for HDMI function to your TV, the following additional operation is possible...
...for the function of the TV will turn off the TV. • The TV will automatically turn on by One-Touch-Play. • Equipment listed under External Inputs will change automatically to allow communication between Sony TV's and Sony equipment. Only Sony equipment with Control for ...HDMI capability is equipped with BRAVIA Theatre Sync™. When you connect the Sony equipment with Control for HDMI function to your TV, the following additional operation is possible...
Operating Instructions
Page 20
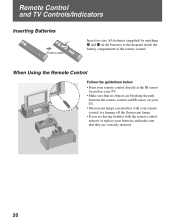
When Using the Remote Control Follow the guidelines below • Point your remote control directly at the IR sensor located on your TV. • Make sure that no objects are blocking the path between the remote control and IR sensor on the batteries to the ...turning off the fluorescent lamps. • If you are correctly inserted. 20 Remote Control and TV Controls/Indicators Inserting Batteries Push to open Insert two size AA batteries (supplied) by matching e and E on your TV. • Fluorescent lamps can interfere with the remote control, reinsert or replace your batteries and...
When Using the Remote Control Follow the guidelines below • Point your remote control directly at the IR sensor located on your TV. • Make sure that no objects are blocking the path between the remote control and IR sensor on the batteries to the ...turning off the fluorescent lamps. • If you are correctly inserted. 20 Remote Control and TV Controls/Indicators Inserting Batteries Push to open Insert two size AA batteries (supplied) by matching e and E on your TV. • Fluorescent lamps can interfere with the remote control, reinsert or replace your batteries and...


