Operating Instructions
Page 2
... it checked by qualified service personnel before turning on the TV. Manufactured under license from that face the screen with the instructions, may cause undesired operation. s Use the AC power cord specified by Sony and suitable for several days, disconnect the power by your Sony dealer regarding this product contains mercury. s When disconnecting AC...
... it checked by qualified service personnel before turning on the TV. Manufactured under license from that face the screen with the instructions, may cause undesired operation. s Use the AC power cord specified by Sony and suitable for several days, disconnect the power by your Sony dealer regarding this product contains mercury. s When disconnecting AC...
Operating Instructions
Page 3
...the Remote Control 20 Remote Control 21 TV Controls/Indicators 25 Using TV Menus Navigating through TV Menus 27 Menu Descriptions 27 Using the Shortcuts Menu 28 Using the Picture Menu 30 Using the Sound Menu 31 Using the Screen Menu 32 Using the Channel Menu ... to the World of optional equipment connection diagrams. Customer Support http://www.sony.com/tvsupport On-line Registration United States http://productregistration.sony.com Canada http://www.sonystyle.ca/registration 3 Installing the TV 5 How to Carry the TV 5 How to Stunning HD Experience: Set, Sound, Source, and Setup...
...the Remote Control 20 Remote Control 21 TV Controls/Indicators 25 Using TV Menus Navigating through TV Menus 27 Menu Descriptions 27 Using the Shortcuts Menu 28 Using the Picture Menu 30 Using the Sound Menu 31 Using the Screen Menu 32 Using the Channel Menu ... to the World of optional equipment connection diagrams. Customer Support http://www.sony.com/tvsupport On-line Registration United States http://productregistration.sony.com Canada http://www.sonystyle.ca/registration 3 Installing the TV 5 How to Carry the TV 5 How to Stunning HD Experience: Set, Sound, Source, and Setup...
Operating Instructions
Page 4
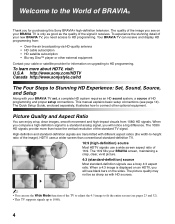
...compare a high-definition signal to connect other external equipment Contact your BRAVIA TV set, a complete HD system requires an HD sound system, a source of the TV to adjust the 4:3 image to fit the entire screen (see black bars on upgrading to HD programming. Picture Quality and Aspect...HDTV uses a wider screen than twice the vertical resolution of the image you will see pages 23 and 32). • This TV supports signals up to Stunning HD Experience: Set, Sound, Source, and Setup Along with your cable or satellite provider for purchasing this Sony BRAVIA® high-definition...
...compare a high-definition signal to connect other external equipment Contact your BRAVIA TV set, a complete HD system requires an HD sound system, a source of the TV to adjust the 4:3 image to fit the entire screen (see black bars on upgrading to HD programming. Picture Quality and Aspect...HDTV uses a wider screen than twice the vertical resolution of the image you will see pages 23 and 32). • This TV supports signals up to Stunning HD Experience: Set, Sound, Source, and Setup Along with your cable or satellite provider for purchasing this Sony BRAVIA® high-definition...
Operating Instructions
Page 6
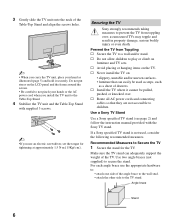
... Securing the TV Sony strongly recommends taking measures to prevent the TV from Toppling s Secure the TV to the TV stand. s Do not allow children to the Table-Top Stand. 4 Stabilize the TV unit and the Table-Top Stand with the Sony TV stand. s Never install the TV on the LCD panel and the frame around the screen. •... Be careful to not pinch your hands or the AC power cord when you install the TV unit to play or climb on the TV. as a chest of the Table...
... Securing the TV Sony strongly recommends taking measures to prevent the TV from Toppling s Secure the TV to the TV stand. s Do not allow children to the Table-Top Stand. 4 Stabilize the TV unit and the Table-Top Stand with the Sony TV stand. s Never install the TV on the LCD panel and the frame around the screen. •... Be careful to not pinch your hands or the AC power cord when you install the TV unit to play or climb on the TV. as a chest of the Table...
Operating Instructions
Page 10
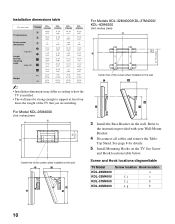
... KDL-26M4000 KDL-32M4000 KDL-37M4000 KDL-40M4000 Screw location Hook location - Top Stand. Installation dimensions table Unit: inches (mm) TV Model KDL26M4000 KDL32M4000 KDL37M4000 KDL40M4000 TV dimensions Screen center dimensions A 26 5/8 31 7/8 36 3/4 39 3/8 (675) (809) (931) (997) B 18 3/8 21 3/8 24 25 3/8 (466) (542) (609) (644) C 3 4 6 5/8 6 (75) (101) (168) (151) D Angle (0°) E Length for...
... KDL-26M4000 KDL-32M4000 KDL-37M4000 KDL-40M4000 Screw location Hook location - Top Stand. Installation dimensions table Unit: inches (mm) TV Model KDL26M4000 KDL32M4000 KDL37M4000 KDL40M4000 TV dimensions Screen center dimensions A 26 5/8 31 7/8 36 3/4 39 3/8 (675) (809) (931) (997) B 18 3/8 21 3/8 24 25 3/8 (466) (542) (609) (644) C 3 4 6 5/8 6 (75) (101) (168) (151) D Angle (0°) E Length for...

Operating Instructions
Page 18
... and 32. ~ • You may not be available. 4 Follow the help text provided on page 33. The Initial Setup screen appears when you turn on the TV. Initial Setup Press to run Initial Setup, which automatically sets up the channels at Channel menu as described on your language: 2...is connected. If you finish connecting your preferred aspect ratio ❑ Select the proper Wide Mode as described on the screen to choose a language. Please select your TV for available channels from signal source directly connected to run Auto Program. Auto Program will scan for the first time. ...
... and 32. ~ • You may not be available. 4 Follow the help text provided on page 33. The Initial Setup screen appears when you turn on the TV. Initial Setup Press to run Initial Setup, which automatically sets up the channels at Channel menu as described on your language: 2...is connected. If you finish connecting your preferred aspect ratio ❑ Select the proper Wide Mode as described on the screen to choose a language. Please select your TV for available channels from signal source directly connected to run Auto Program. Auto Program will scan for the first time. ...
Operating Instructions
Page 21
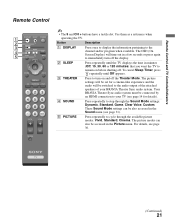
... Press repeatedly until Off appears. 3 THEATER Press to the channel and/or program when available. To cancel Sleep Timer, press repeatedly until the TV displays the time in a few seconds or press again to immediately turn on before shutting off. Your BRAVIA Theatre Sync audio system must be connected... time out in minutes (Off, 15, 30, 60 or 120 minutes) that you want the TV to cycle through the Sound Mode settings: Dynamic, Standard, Game, Clear Voice, Custom. The OSD (On Screen Display) will be set for details). 4 SOUND Press repeatedly to the audio output of the attached...
... Press repeatedly until Off appears. 3 THEATER Press to the channel and/or program when available. To cancel Sleep Timer, press repeatedly until the TV displays the time in a few seconds or press again to immediately turn on before shutting off. Your BRAVIA Theatre Sync audio system must be connected... time out in minutes (Off, 15, 30, 60 or 120 minutes) that you want the TV to cycle through the Sound Mode settings: Dynamic, Standard, Game, Clear Voice, Custom. The OSD (On Screen Display) will be set for details). 4 SOUND Press repeatedly to the audio output of the attached...
Operating Instructions
Page 22
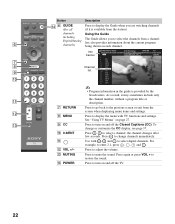
...CH-41 • Program information in the guide is available from a channel list; qd 9 CC Press to the previous screen or exit from the screen when displaying menu items and settings. the channel changes after few seconds. SOUND GUIDE TOOLS MENU Button Description qf 6 GUIDE (...For all channels including Digital/Analog channels) Press to display the Guide when you to display the menu with - See "Using TV Menus"...
...CH-41 • Program information in the guide is available from a channel list; qd 9 CC Press to the previous screen or exit from the screen when displaying menu items and settings. the channel changes after few seconds. SOUND GUIDE TOOLS MENU Button Description qf 6 GUIDE (...For all channels including Digital/Analog channels) Press to display the Guide when you to display the menu with - See "Using TV Menus"...
Operating Instructions
Page 23
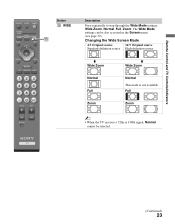
Remote Control and TV Controls/Indicators SOUND GUIDE Button qg WIDE qg TOOLS MENU Description Press repeatedly to step through the Wide Mode settings: Wide Zoom, Normal, Full, Zoom. Changing the Wide Screen Mode 4:3 Original source 16:9 Original source Standard-definition source High-definition source m Wide Zoom Normal Full Zoom m Wide Zoom Normal This mode is not available Full Zoom ~ • When the TV receives a 720p or 1080i signal, Normal cannot be also accessed in the Screen menu (see page 32). The Wide Mode settings can be selected. (Continued) 23
Remote Control and TV Controls/Indicators SOUND GUIDE Button qg WIDE qg TOOLS MENU Description Press repeatedly to step through the Wide Mode settings: Wide Zoom, Normal, Full, Zoom. Changing the Wide Screen Mode 4:3 Original source 16:9 Original source Standard-definition source High-definition source m Wide Zoom Normal Full Zoom m Wide Zoom Normal This mode is not available Full Zoom ~ • When the TV receives a 720p or 1080i signal, Normal cannot be also accessed in the Screen menu (see page 32). The Wide Mode settings can be selected. (Continued) 23
Operating Instructions
Page 24
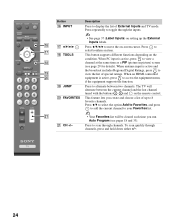
...Inputs labels. This button supports different functions depending on the remote control. The TV will be cleared each time you create and choose a list of special ratings. FAVORITES • See page 37 (Label Inputs) on -screen cursor. When antenna input is active, press to scan through channels. wa ...channel and the last channel tuned with the buttons - Press to view a channel at the same time as a PIP (picture in picture) screen (see pages 18 and 33). When PC input is active and the broadcast includes Regional Digital Ratings, press to your Favorites list. qj ...
...Inputs labels. This button supports different functions depending on the remote control. The TV will be cleared each time you create and choose a list of special ratings. FAVORITES • See page 37 (Label Inputs) on -screen cursor. When antenna input is active, press to scan through channels. wa ...channel and the last channel tuned with the buttons - Press to view a channel at the same time as a PIP (picture in picture) screen (see pages 18 and 33). When PC input is active and the broadcast includes Regional Digital Ratings, press to your Favorites list. qj ...
Operating Instructions
Page 25
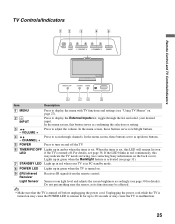
... Description 1 MENU 2 INPUT 3 - In the menu screen, this may indicate the TV needs servicing (see "Using TV Menus" on . 9 (IR) Infrared Receiver Light Sensor Receives IR signals from the remote control. Press to display the menu with TV functions and settings (see contacting Sony information on may cause the TV to remain lit for details). When...
... Description 1 MENU 2 INPUT 3 - In the menu screen, this may indicate the TV needs servicing (see "Using TV Menus" on . 9 (IR) Infrared Receiver Light Sensor Receives IR signals from the remote control. Press to display the menu with TV functions and settings (see contacting Sony information on may cause the TV to remain lit for details). When...

Operating Instructions
Page 27
...Skip Treble, Bass, Balance, Speakers, Backlight, Alt. Navigating through TV Menus SOUND GUIDE TOOLS 1 Press on the remote control Mode, Backlight, Picture, to the channel options. MENU Menu Descriptions Shortcuts Picture Sound Screen The Shortcuts menu lets you select: The Channel menu is used...an option press or b. 4 Press V/v to block programs customize several parameters for HDMI, Reset. The Screen menu allows you to to set up the TV to select or adjust your TV. Select from : Favorites, Cable, Add Clock/Timers, Parental Lock, Closed Captions (CC) and Cable;...
...Skip Treble, Bass, Balance, Speakers, Backlight, Alt. Navigating through TV Menus SOUND GUIDE TOOLS 1 Press on the remote control Mode, Backlight, Picture, to the channel options. MENU Menu Descriptions Shortcuts Picture Sound Screen The Shortcuts menu lets you select: The Channel menu is used...an option press or b. 4 Press V/v to block programs customize several parameters for HDMI, Reset. The Screen menu allows you to to set up the TV to select or adjust your TV. Select from : Favorites, Cable, Add Clock/Timers, Parental Lock, Closed Captions (CC) and Cable;...
Operating Instructions
Page 28
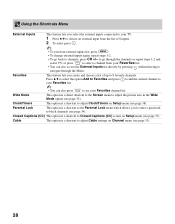
... select press . or press FAVORITES to your Favorites channel list. Clock/Timers This option is a shortcut to adjust Cable settings on Setup menu (see your TV. 1 Press V/v to choose an external input from the list of up to navigate through the channels or repeat steps 1-2 and select... option Add to Favorites and press to add the current channel to your Favorites list. • You can also press FAVORITES to Closed Captions (CC) screen on Channel menu (see page 32). Parental Lock This option is a shortcut to see page 37). Closed Captions (CC) This option is a shortcut to the...
... select press . or press FAVORITES to your Favorites channel list. Clock/Timers This option is a shortcut to adjust Cable settings on Setup menu (see your TV. 1 Press V/v to choose an external input from the list of up to navigate through the channels or repeat steps 1-2 and select... option Add to Favorites and press to add the current channel to your Favorites list. • You can also press FAVORITES to Closed Captions (CC) screen on Channel menu (see page 32). Parental Lock This option is a shortcut to see page 37). Closed Captions (CC) This option is a shortcut to the...

Operating Instructions
Page 29
... Captions (CC) is selected with a Sub Window to use PC-PIP function. • To turn on or off the Sub Window on the screen press from the remote control while using the - Press MENU , select External Inputs, then select PC input from the External Inputs list. Main Window...numeric buttons. to change channels in the Sub Window, a padlock will appear on the Shortcuts menu. 2 From External Inputs list, select TV input to return to view two pictures simultaneously. other external inputs are not available for this feature from your Favorites channels list on the Shortcuts...
... Captions (CC) is selected with a Sub Window to use PC-PIP function. • To turn on or off the Sub Window on the screen press from the remote control while using the - Press MENU , select External Inputs, then select PC input from the External Inputs list. Main Window...numeric buttons. to change channels in the Sub Window, a padlock will appear on the Shortcuts menu. 2 From External Inputs list, select TV input to return to view two pictures simultaneously. other external inputs are not available for this feature from your Favorites channels list on the Shortcuts...

Operating Instructions
Page 30
...factory default values. 30 Reset • Be sure not to On. Resets the current Picture Mode setting to enable the automatic picture (screen) brightness control. Press B/b to increase or decrease picture contrast, then press to set to put anything around the sensor, as its.... Press B/b to sharpen or soften the picture, then press to set . The light sensor measures the room brightness which allows the TV to set. Standard For standard picture settings. Press B/b to brighten or darken the picture, then press to automatically adjust the backlight brightness...
...factory default values. 30 Reset • Be sure not to On. Resets the current Picture Mode setting to enable the automatic picture (screen) brightness control. Press B/b to increase or decrease picture contrast, then press to set to put anything around the sensor, as its.... Press B/b to sharpen or soften the picture, then press to set . The light sensor measures the room brightness which allows the TV to set. Standard For standard picture settings. Press B/b to brighten or darken the picture, then press to automatically adjust the backlight brightness...
Operating Instructions
Page 32
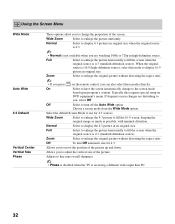
... to fine tune overall sharpness. • Phase is disabled when the TV is receiving a different video input than PC. 32 Typically this mode to display 16:9 picture in high-definition source. Select the default Screen Mode to use for 4:3. Off To turn off the Auto Wide option...Wide 4:3 Default Vertical Center Vertical Size Phase These options allow you to change to the screen mode based upon program's content. Zoom Select to enlarge the picture uniformly. If frequent screen changes are watching 1080i or 720p in original size. Full Select to enlarge the picture horizontally...
... to fine tune overall sharpness. • Phase is disabled when the TV is receiving a different video input than PC. 32 Typically this mode to display 16:9 picture in high-definition source. Select the default Screen Mode to use for 4:3. Off To turn off the Auto Wide option...Wide 4:3 Default Vertical Center Vertical Size Phase These options allow you to change to the screen mode based upon program's content. Zoom Select to enlarge the picture uniformly. If frequent screen changes are watching 1080i or 720p in original size. Full Select to enlarge the picture horizontally...
Operating Instructions
Page 33
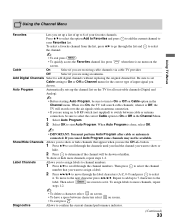
... repeat steps 1-2. Cable On Select if you are using an A-B RF switch (not supplied) to switch between characters select on the screen. Using the Channel Menu Using TV Menus Favorites Lets you set up a list of up to 8 of input signal you choose. Be sure to set it is connected.... channel numbers. 1 Press V/v to scroll through the label characters (A-Z, 0-9) and press to select it is Off, the TV will be sure to turn to On or Off on screen to set Cable setting to show or hide more channels, repeat steps 1-2. Press V/v to select the option Add to Favorites...
... repeat steps 1-2. Cable On Select if you are using an A-B RF switch (not supplied) to switch between characters select on the screen. Using the Channel Menu Using TV Menus Favorites Lets you set up a list of up to 8 of input signal you choose. Be sure to set it is connected.... channel numbers. 1 Press V/v to scroll through the label characters (A-Z, 0-9) and press to select it is Off, the TV will be sure to turn to On or Off on screen to set Cable setting to show or hide more channels, repeat steps 1-2. Press V/v to select the option Add to Favorites...
Operating Instructions
Page 37
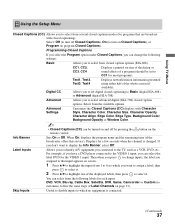
... the displayed labels, then press to select it. Text1, Text2, Text3, Text4 Displays network/station information presented using either half of Label Channels on screen. 1 Press V/v to highlight the input (from 1 to 6) to which no equipment is changed. Label Inputs Allows you to identify A/V equipment ... the cc button on Closed Captions), or Program (to program Closed Captions). Digital CC Allows you connected to the TV, such as a VCR, DVD, etc. Using TV Menus Using the Setup Menu Closed Captions (CC) Allows you to select from several closed captions modes (for most ...
... the displayed labels, then press to select it. Text1, Text2, Text3, Text4 Displays network/station information presented using either half of Label Channels on screen. 1 Press V/v to highlight the input (from 1 to 6) to which no equipment is changed. Label Inputs Allows you to identify A/V equipment ... the cc button on Closed Captions), or Program (to program Closed Captions). Digital CC Allows you connected to the TV, such as a VCR, DVD, etc. Using TV Menus Using the Setup Menu Closed Captions (CC) Allows you to select from several closed captions modes (for most ...
Operating Instructions
Page 38
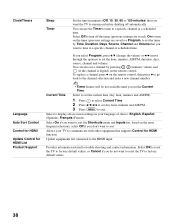
..., minutes and AM/PM. 3 Press MENU to set the hour, minutes, AM/PM, duration, days, source, channel and volume. Select to display all on-screen settings in minutes (Off, 15, 30, 60 or 120 minutes) that you want to tune to a specific channel at a scheduled time. Clock/Timers Sleep Timer...off the timer (previous settings are saved) or Program, to set a channel by Time, Duration, Days, Source, Channel and Volume that you want the TV to a specific channel at scheduled time. You can use the Timer to tune to remain on the timer (previous settings are saved). To replace a ...
..., minutes and AM/PM. 3 Press MENU to set the hour, minutes, AM/PM, duration, days, source, channel and volume. Select to display all on-screen settings in minutes (Off, 15, 30, 60 or 120 minutes) that you want to tune to a specific channel at a scheduled time. Clock/Timers Sleep Timer...off the timer (previous settings are saved) or Program, to set a channel by Time, Duration, Days, Source, Channel and Volume that you want the TV to a specific channel at scheduled time. You can use the Timer to tune to remain on the timer (previous settings are saved). To replace a ...

Operating Instructions
Page 39
...or select channels. ❑ To receive or select cable channels, make sure that are not presently in the TV's memory (page 33). No picture from some channels may not be available. the screen. ❑ Check if the antenna has reached the end of Timer (page 38). ❑ If there...75 ohm coaxial cable instead. (Continued) 39 See page 28 for Canadian Support Condition Explanation/Solution No picture No picture. ❑ Confirm your Sony TV, please visit our website or call one channel. ❑ Perform Auto Program to add receivable channels that are not presently in the...
...or select channels. ❑ To receive or select cable channels, make sure that are not presently in the TV's memory (page 33). No picture from some channels may not be available. the screen. ❑ Check if the antenna has reached the end of Timer (page 38). ❑ If there...75 ohm coaxial cable instead. (Continued) 39 See page 28 for Canadian Support Condition Explanation/Solution No picture No picture. ❑ Confirm your Sony TV, please visit our website or call one channel. ❑ Perform Auto Program to add receivable channels that are not presently in the...


