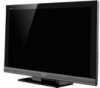

Child Safety: It Makes A Difference Where Your TV Stands
Page 1
... components). 2 Use appropriate angle braces, straps and anchors to secure your furniture to the wall (but never screw anything directly into the TV). 3 Carefully read and understand the manufacturer's instructions and product safety notices. 4 Don't allow children to advocate children's safety and educate ...customers and their families about television safety. As a result, TV sets may fall over . 7 Share our safety message on this hidden hazard of the home with furniture and television sets. 5 Avoid placing...
... components). 2 Use appropriate angle braces, straps and anchors to secure your furniture to the wall (but never screw anything directly into the TV). 3 Carefully read and understand the manufacturer's instructions and product safety notices. 4 Don't allow children to advocate children's safety and educate ...customers and their families about television safety. As a result, TV sets may fall over . 7 Share our safety message on this hidden hazard of the home with furniture and television sets. 5 Avoid placing...
Safety and Regulatory Booklet
Page 1
...AC power cord. ☐ Consult your electrician to have it checked by Sony and to certify that the TV is intended to alert the user to the presence of uninsulated "dangerous voltage" within the TV's enclosure that adequate replacement parts with high-precision technology and has effective ...especializado. SERVICING Do not use a damaged or poorly fitting AC power outlet as audio and video) connected. ☐ Use only an original Sony AC power cord with any items susceptible to dangerous voltage levels or other vessel ☐ Excessive bumping motion of children's reach. La lame...
...AC power cord. ☐ Consult your electrician to have it checked by Sony and to certify that the TV is intended to alert the user to the presence of uninsulated "dangerous voltage" within the TV's enclosure that adequate replacement parts with high-precision technology and has effective ...especializado. SERVICING Do not use a damaged or poorly fitting AC power outlet as audio and video) connected. ☐ Use only an original Sony AC power cord with any items susceptible to dangerous voltage levels or other vessel ☐ Excessive bumping motion of children's reach. La lame...

Operating Instructions
Page 1
LCD Digital Color TV Operating Instructions 4-188-040-11(1) Introducing Your New BRAVIA® Getting Started Operating the TV Using Features Using the Menus Other Information KDL-46EX600 / 40EX600 / 32EX600 Sony Customer Support U.S.A.: www.sony.com/tvsupport Canada: www.sony.ca/support United States 1.800.222.SONY Canada 1.877.899.SONY Please Do Not Return the Product to the Store
LCD Digital Color TV Operating Instructions 4-188-040-11(1) Introducing Your New BRAVIA® Getting Started Operating the TV Using Features Using the Menus Other Information KDL-46EX600 / 40EX600 / 32EX600 Sony Customer Support U.S.A.: www.sony.com/tvsupport Canada: www.sony.ca/support United States 1.800.222.SONY Canada 1.877.899.SONY Please Do Not Return the Product to the Store

Operating Instructions
Page 2
... logo and High-Definition Multimedia Interface are trademarks or registered trademarks of these numbers in the "Home" mode. Your BRAVIA TV is ENERGY STAR® qualified in the spaces provided below 41°F (5°C). It meets strict energy efficiency guidelines...141 Manufactured under license from Dolby Laboratories. ENERGY STAR is a trademark of Sony Corporation. Depending upon your Sony dealer regarding this TV (i.e. Refer to promote energy efficient products and practices. "BRAVIA" and , BRAVIA Sync, and are trademarks of Apple Inc., registered in the "Home" ...
... logo and High-Definition Multimedia Interface are trademarks or registered trademarks of these numbers in the "Home" mode. Your BRAVIA TV is ENERGY STAR® qualified in the spaces provided below 41°F (5°C). It meets strict energy efficiency guidelines...141 Manufactured under license from Dolby Laboratories. ENERGY STAR is a trademark of Sony Corporation. Depending upon your Sony dealer regarding this TV (i.e. Refer to promote energy efficient products and practices. "BRAVIA" and , BRAVIA Sync, and are trademarks of Apple Inc., registered in the "Home" ...
Operating Instructions
Page 3
... BRAVIA 4 Experiencing Stunning HD with Your BRAVIA 4 The Four Steps to a Stunning HD Experience 5 TV Feature Highlights 5 Getting Started Setting Up Your TV 7 Locating Inputs and Outputs 8 Adjusting the viewing angle of the TV. . . . . . 10 Connecting the TV 10 Connecting Other Equipment 14 When Installing the TV ...PC and HDMI IN 1/2/3/4 46 Using a Wall-Mount Bracket 47 Installing the Wall-Mount Bracket 47 Troubleshooting 52 Important Notices 56 Specifications 57 Index 58 Customer Support United States http://www.sony.com/tvsupport Canada http://www.sony.ca/support On-line ...
... BRAVIA 4 Experiencing Stunning HD with Your BRAVIA 4 The Four Steps to a Stunning HD Experience 5 TV Feature Highlights 5 Getting Started Setting Up Your TV 7 Locating Inputs and Outputs 8 Adjusting the viewing angle of the TV. . . . . . 10 Connecting the TV 10 Connecting Other Equipment 14 When Installing the TV ...PC and HDMI IN 1/2/3/4 46 Using a Wall-Mount Bracket 47 Installing the Wall-Mount Bracket 47 Troubleshooting 52 Important Notices 56 Specifications 57 Index 58 Customer Support United States http://www.sony.com/tvsupport Canada http://www.sony.ca/support On-line ...
Operating Instructions
Page 4
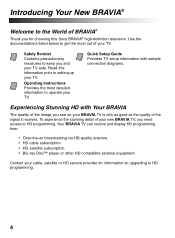
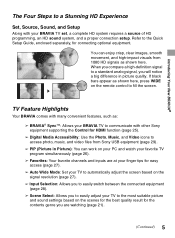
... stunning detail of the signal it receives. Quick Setup Guide Provides TV setup information with sample connection diagrams. Experiencing Stunning HD with Your BRAVIA The quality of the image you and your new BRAVIA TV, you need access to setting up your TV. Your BRAVIA TV can receive and display HD programming from: • Over-the-air...; player or other HD compatible external equipment Contact your cable, satellite or HD service provider for choosing this information prior to HD programming. Read this Sony BRAVIA® high-definition television.
... stunning detail of the signal it receives. Quick Setup Guide Provides TV setup information with sample connection diagrams. Experiencing Stunning HD with Your BRAVIA The quality of the image you and your new BRAVIA TV, you need access to setting up your TV. Your BRAVIA TV can receive and display HD programming from: • Over-the-air...; player or other HD compatible external equipment Contact your cable, satellite or HD service provider for choosing this information prior to HD programming. Read this Sony BRAVIA® high-definition television.
Operating Instructions
Page 5
..., and high-impact visuals from Sony USB equipment (page 29). ➢ PIP (Picture in picture quality. TV Feature Highlights Your BRAVIA comes with many convenient features, such as: ➢ BRAVIA® SyncTM: Allows your BRAVIA TV to communicate with your BRAVIA TV set, a complete HD system requires...Select: Allows you are watching (page 21). (Continued) 5 Introducing Your New BRAVIA® The Four Steps to a Stunning HD Experience Set, Source, Sound, and Setup Along with other Sony equipment supporting the Control for HDMI function (page 25). ➢ Digital Media Accessibility...
..., and high-impact visuals from Sony USB equipment (page 29). ➢ PIP (Picture in picture quality. TV Feature Highlights Your BRAVIA comes with many convenient features, such as: ➢ BRAVIA® SyncTM: Allows your BRAVIA TV to communicate with your BRAVIA TV set, a complete HD system requires...Select: Allows you are watching (page 21). (Continued) 5 Introducing Your New BRAVIA® The Four Steps to a Stunning HD Experience Set, Source, Sound, and Setup Along with other Sony equipment supporting the Control for HDMI function (page 25). ➢ Digital Media Accessibility...

Operating Instructions
Page 7
...For best picture quality, do not expose the screen to direct illumination or sunlight. • Avoid installing the TV in a room with the TV. Sudden room temperature changes may cause the TV to show poor picture and/or poor color. Should this occur, allow moisture to complete the task. This ...may cause moisture condensation. Getting Started Getting Started Setting Up Your TV Some TV models are not mounting the TV to a wall, you will need to attach the Table-Top Stand. If you are packaged with the adequate number of...
...For best picture quality, do not expose the screen to direct illumination or sunlight. • Avoid installing the TV in a room with the TV. Sudden room temperature changes may cause the TV to show poor picture and/or poor color. Should this occur, allow moisture to complete the task. This ...may cause moisture condensation. Getting Started Getting Started Setting Up Your TV Some TV models are not mounting the TV to a wall, you will need to attach the Table-Top Stand. If you are packaged with the adequate number of...
Operating Instructions
Page 8
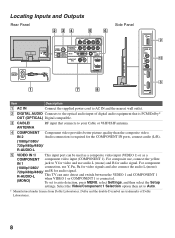
R-AUDIO-L (MONO) This TV can be used as a composite video input (VIDEO 1) or as a COMPONENT component video input (COMPONENT 1). Locating Inputs and Outputs Rear Panel 2 34 5 6 AC IN AUDIO R L (...
R-AUDIO-L (MONO) This TV can be used as a composite video input (VIDEO 1) or as a COMPONENT component video input (COMPONENT 1). Locating Inputs and Outputs Rear Panel 2 34 5 6 AC IN AUDIO R L (...
Operating Instructions
Page 9
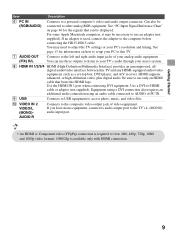
...VIDEO IN 2 VIDEO/L (MONO)AUDIO-R Connects to the left and right audio input jacks of video equipment. See "PC Input Signal Reference Chart" on page 46 for information on how to setup your analog audio equipment. You can be displayed. Use the HDMI IN 1 port when connecting DVI equipment. Getting Started... to view 480i, 480p, 720p, 1080i and 1080p video formats. 1080/24p is available only with HDMI connection. 9 You may be connected to this TV and any HDMI-equipped audio/video equipment, such as a set-top box, DVD player, and A/V receiver. See page 13 for the signals that bears...
...VIDEO IN 2 VIDEO/L (MONO)AUDIO-R Connects to the left and right audio input jacks of video equipment. See "PC Input Signal Reference Chart" on page 46 for information on how to setup your analog audio equipment. You can be displayed. Use the HDMI IN 1 port when connecting DVI equipment. Getting Started... to view 480i, 480p, 720p, 1080i and 1080p video formats. 1080/24p is available only with HDMI connection. 9 You may be connected to this TV and any HDMI-equipped audio/video equipment, such as a set-top box, DVD player, and A/V receiver. See page 13 for the signals that bears...

Operating Instructions
Page 10
... analog programming. Adjust the angle left and right (swivel) Top view 20° 20° 20° 20° Front Connecting the TV Cable System or VHF/UHF Antenna System You can enjoy high-definition and standard-definition digital programming (if available in signal degradation. 10 Cable or... VHF/UHF (or VHF only) 75-ohm coaxial cable Rear of TV CABLE/ANTENNA • It is capable of the TV This TV can easily be adjusted within the angle shown below. This TV is strongly recommended that you connect the CABLE/ANTENNA input using a 75-ohm coaxial ...
... analog programming. Adjust the angle left and right (swivel) Top view 20° 20° 20° 20° Front Connecting the TV Cable System or VHF/UHF Antenna System You can enjoy high-definition and standard-definition digital programming (if available in signal degradation. 10 Cable or... VHF/UHF (or VHF only) 75-ohm coaxial cable Rear of TV CABLE/ANTENNA • It is capable of the TV This TV can easily be adjusted within the angle shown below. This TV is strongly recommended that you connect the CABLE/ANTENNA input using a 75-ohm coaxial ...
Operating Instructions
Page 11
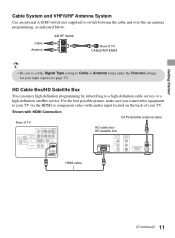
HD Cable Box/HD Satellite Box You can enjoy high-definition programming by subscribing to your TV via the HDMI or component video (with HDMI Connection Rear of TV AUDIO R L (MONO) 1 AUDIO PR CABLE/ ANTENNA COMPONENT IN (1080p/1080i/ 720p/480p/480i) 2 R L RGB DIGITAL PC IN AUDIO OUT (...connect this equipment to a high-definition cable service or a high-definition satellite service. Shown with audio) input located on the back of TV CABLE/ANTENNA • Be sure to set the Signal Type setting to switch between the cable and over-the-air antenna programming, as indicated...
HD Cable Box/HD Satellite Box You can enjoy high-definition programming by subscribing to your TV via the HDMI or component video (with HDMI Connection Rear of TV AUDIO R L (MONO) 1 AUDIO PR CABLE/ ANTENNA COMPONENT IN (1080p/1080i/ 720p/480p/480i) 2 R L RGB DIGITAL PC IN AUDIO OUT (...connect this equipment to a high-definition cable service or a high-definition satellite service. Shown with audio) input located on the back of TV CABLE/ANTENNA • Be sure to set the Signal Type setting to switch between the cable and over-the-air antenna programming, as indicated...

Operating Instructions
Page 12
For details, see page 9. 12 Shown with DVI Connection Rear of TV AUDIO R L (MONO) 1 AUDIO PR CABLE/ ANTENNA COMPONENT IN (1080p/1080i/ 720p/480p/480i) 2 R L RGB DIGITAL PC IN AUDIO OUT (OPTICAL) AUDIO AUDIO OUT (FIX) R L VIDEO ... HD cable box/ HD satellite box Audio cable (stereo mini plugs) CATV/Satellite antenna cable Shown with Component Connection CATV/Satellite antenna cable Rear of TV AUDIO R L (MONO) 1 AUDIO PR CABLE/ ANTENNA COMPONENT IN (1080p/1080i/ 720p/480p/480i) 2 R L RGB DIGITAL PC IN AUDIO OUT (OPTICAL) AUDIO AUDIO OUT (FIX) R L VIDEO...
For details, see page 9. 12 Shown with DVI Connection Rear of TV AUDIO R L (MONO) 1 AUDIO PR CABLE/ ANTENNA COMPONENT IN (1080p/1080i/ 720p/480p/480i) 2 R L RGB DIGITAL PC IN AUDIO OUT (OPTICAL) AUDIO AUDIO OUT (FIX) R L VIDEO ... HD cable box/ HD satellite box Audio cable (stereo mini plugs) CATV/Satellite antenna cable Shown with Component Connection CATV/Satellite antenna cable Rear of TV AUDIO R L (MONO) 1 AUDIO PR CABLE/ ANTENNA COMPONENT IN (1080p/1080i/ 720p/480p/480i) 2 R L RGB DIGITAL PC IN AUDIO OUT (OPTICAL) AUDIO AUDIO OUT (FIX) R L VIDEO...

Operating Instructions
Page 13
PC Use the TV as a monitor for your PC by connecting an HD15-HD15 cable connection as shown below. Getting Started 13 This TV can also be connected to a PC with a DVI or HDMI output. (Refer to the separate Quick Setup Guide.) HD15-HD15 cable (analog RGB) Audio cable ...(stereo mini plugs) Rear of TV AUDIO R L (MONO) 1 AUDIO PR CABLE/ ANTENNA COMPONENT IN (1080p/1080i/ 720p/480p/480i) 2 R L RGB DIGITAL PC IN AUDIO OUT (OPTICAL) AUDIO AUDIO OUT (FIX) R L ...
PC Use the TV as a monitor for your PC by connecting an HD15-HD15 cable connection as shown below. Getting Started 13 This TV can also be connected to a PC with a DVI or HDMI output. (Refer to the separate Quick Setup Guide.) HD15-HD15 cable (analog RGB) Audio cable ...(stereo mini plugs) Rear of TV AUDIO R L (MONO) 1 AUDIO PR CABLE/ ANTENNA COMPONENT IN (1080p/1080i/ 720p/480p/480i) 2 R L RGB DIGITAL PC IN AUDIO OUT (OPTICAL) AUDIO AUDIO OUT (FIX) R L ...

Operating Instructions
Page 14
... Player/ player "PS3" Digital satellite receiver Digital Audio cable box system • Refer to the Quick Setup Guide (supplied) when connecting other equipment to your TV. 14
... Player/ player "PS3" Digital satellite receiver Digital Audio cable box system • Refer to the Quick Setup Guide (supplied) when connecting other equipment to your TV. 14
Operating Instructions
Page 15
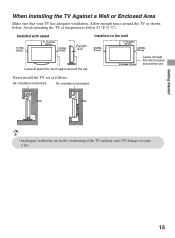
... (10 cm) 2 3/8 inches (6 cm) Leave at least this much space around the TV as follows: Air circulation is blocked. Wall Wall • Inadequate ventilation can lead to overheating of the TV and may cause TV damage or cause a fire. 15 Installed on the wall 4 inches (10 cm) 11 ... Leave at temperatures below . Getting Started When Installing the TV Against a Wall or Enclosed Area Make sure that your TV has adequate ventilation. Avoid operating the TV at least this much space around the set. Never install the TV set . Allow enough space around the set as shown ...
... (10 cm) 2 3/8 inches (6 cm) Leave at least this much space around the TV as follows: Air circulation is blocked. Wall Wall • Inadequate ventilation can lead to overheating of the TV and may cause TV damage or cause a fire. 15 Installed on the wall 4 inches (10 cm) 11 ... Leave at temperatures below . Getting Started When Installing the TV Against a Wall or Enclosed Area Make sure that your TV has adequate ventilation. Avoid operating the TV at least this much space around the set. Never install the TV set . Allow enough space around the set as shown ...
Operating Instructions
Page 16
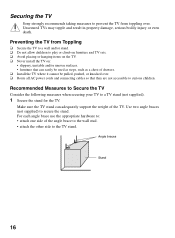
...support the weight of the TV. Angle braces Stand 16 Make sure the TV stand can easily be used as steps, such as a chest of the angle brace to the wall stud. • attach the other side to secure the stand. Securing the TV Sony strongly recommends taking measures to a TV stand (not supplied). ...1 Secure the stand for the TV. Use two angle...
...support the weight of the TV. Angle braces Stand 16 Make sure the TV stand can easily be used as steps, such as a chest of the angle brace to the wall stud. • attach the other side to secure the stand. Securing the TV Sony strongly recommends taking measures to a TV stand (not supplied). ...1 Secure the stand for the TV. Use two angle...

Operating Instructions
Page 17
... the wall-anchor, then attach to the wall. Anchor bolts Wall-mount holes Rope or chain Wall-anchor • Contact Sony Customer Support to secure the TV is with an optional Sony Support Belt Kit. Use the optional hardware listed below (not supplied). • Two anchor bolts, size M6 × ... used, set the torque to the stand. For United States call: 1-800-488-7669 or visit: www.sony.com/accessories For Canada call: 1-877-899-7669 • Measure 2 provides minimal protection against the TV toppling over. An alternative way to obtain the optional Support Belt Kit by providing your...
... the wall-anchor, then attach to the wall. Anchor bolts Wall-mount holes Rope or chain Wall-anchor • Contact Sony Customer Support to secure the TV is with an optional Sony Support Belt Kit. Use the optional hardware listed below (not supplied). • Two anchor bolts, size M6 × ... used, set the torque to the stand. For United States call: 1-800-488-7669 or visit: www.sony.com/accessories For Canada call: 1-877-899-7669 • Measure 2 provides minimal protection against the TV toppling over. An alternative way to obtain the optional Support Belt Kit by providing your...
Operating Instructions
Page 18
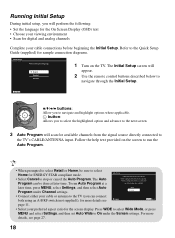
... aspect ratio for ENERGY STAR compliant mode. • Select Cancel to run Auto Program at later time. Follow the help text provided on the TV. "Home" optimizes the picture for store display. Press WIDE to select Wide Mode, or press MENU and select Settings, and then set Auto...MENU, select Settings, and then select Auto Retail Program under the Screen settings. button: Allows you to the Quick Setup Guide (supplied) for this TV. The Auto Program can connect both using an A-B RF switch (not supplied)); For more details see page 27. 18 for available channels from the ...
... aspect ratio for ENERGY STAR compliant mode. • Select Cancel to run Auto Program at later time. Follow the help text provided on the TV. "Home" optimizes the picture for store display. Press WIDE to select Wide Mode, or press MENU and select Settings, and then set Auto...MENU, select Settings, and then select Auto Retail Program under the Screen settings. button: Allows you to the Quick Setup Guide (supplied) for this TV. The Auto Program can connect both using an A-B RF switch (not supplied)); For more details see page 27. 18 for available channels from the ...

Operating Instructions
Page 19
...; Make sure that they are blocking the path between the remote control and the IR sensor on your remote control; Operating the TV Operating the TV Using the Remote Control To Insert Batteries into the Remote Control Insert two size AAA batteries (supplied) by matching e and E on the ...batteries to follow • Point your remote control directly at the IR sensor located on your TV. • Fluorescent lamps can interfere with the remote control, reinsert or replace your batteries and make sure that no objects are correctly inserted. 19
...; Make sure that they are blocking the path between the remote control and the IR sensor on your remote control; Operating the TV Operating the TV Using the Remote Control To Insert Batteries into the Remote Control Insert two size AAA batteries (supplied) by matching e and E on the ...batteries to follow • Point your remote control directly at the IR sensor located on your TV. • Fluorescent lamps can interfere with the remote control, reinsert or replace your batteries and make sure that no objects are correctly inserted. 19


