Operating Instructions
Page 5
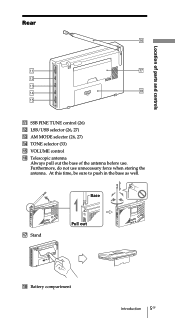
Base qj Stand Pull out qk Battery compartment Introduction 5GB Furthermore, do not use . At this time, be sure to push in the base as well. Rear Location of parts and controls qa SSB FINE TUNE control (26) qs LSB/USB selector (26, 27) qd AM MODE selector (26, 27) qf TONE selector (33) qg VOLUME control qh Telescopic antenna Always pull out the base of the antenna before use unnecessary force when storing the antenna.
Base qj Stand Pull out qk Battery compartment Introduction 5GB Furthermore, do not use . At this time, be sure to push in the base as well. Rear Location of parts and controls qa SSB FINE TUNE control (26) qs LSB/USB selector (26, 27) qd AM MODE selector (26, 27) qf TONE selector (33) qg VOLUME control qh Telescopic antenna Always pull out the base of the antenna before use unnecessary force when storing the antenna.
Operating Instructions
Page 28
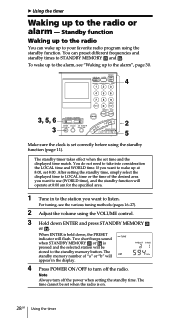
...display. 4 Press POWER ON/OFF to take into consideration the LOCAL time and WORLD time. If you want to wake up to your favorite radio program using the VOLUME control. 3 Hold down , the PRESET indicator will appear in to the station you want to use (WORLD time), and the standby function will ...number of the desired area you want to listen. You do not need to turn off the radio. To wake up to the alarm, see the various tuning methods (pages 16-27). 2 Adjust the volume using the standby function. After setting the standby time, simply select the displayed time to LOCAL ...
...display. 4 Press POWER ON/OFF to take into consideration the LOCAL time and WORLD time. If you want to wake up to your favorite radio program using the VOLUME control. 3 Hold down , the PRESET indicator will appear in to the station you want to use (WORLD time), and the standby function will ...number of the desired area you want to listen. You do not need to turn off the radio. To wake up to the alarm, see the various tuning methods (pages 16-27). 2 Adjust the volume using the standby function. After setting the standby time, simply select the displayed time to LOCAL ...
Operating Instructions
Page 30
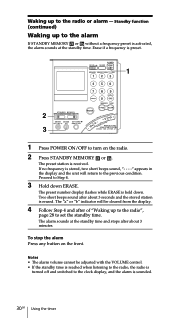
...short beeps sound, "- - - -" appears in the display and the unit will be adjusted with the VOLUME control. • If the standby time is reached when listening to the radio, the radio is turned off and switched to the clock display, and the alarm is received. The preset number display ...will return to the previous condition. Standby function (continued) Waking up to the radio or alarm - The alarm sounds at the standby time. The preset station is sounded. 30GB Using the timer Notes • The alarm volume cannot be cleared from the display. 4 Follow Step 4 and after about 3 ...
...short beeps sound, "- - - -" appears in the display and the unit will be adjusted with the VOLUME control. • If the standby time is reached when listening to the radio, the radio is turned off and switched to the clock display, and the alarm is received. The preset number display ...will return to the previous condition. Standby function (continued) Waking up to the radio or alarm - The alarm sounds at the standby time. The preset station is sounded. 30GB Using the timer Notes • The alarm volume cannot be cleared from the display. 4 Follow Step 4 and after about 3 ...

Operating Instructions
Page 33
... the type of cassette recorder. Otherwise, both channels will be sure to NEWS or MUSIC as necessary. 3 Record on the recording. Tip Adjusting the VOLUME control on the radio has no effect on the cassette recorder. When recording on a stereo cassette recorder Both channels will be recorded in stereo, be recorded in to...
... the type of cassette recorder. Otherwise, both channels will be sure to NEWS or MUSIC as necessary. 3 Record on the recording. Tip Adjusting the VOLUME control on the radio has no effect on the cassette recorder. When recording on a stereo cassette recorder Both channels will be recorded in stereo, be recorded in to...

Operating Instructions
Page 39
...scan. The HOLD function is turned down completely. ATT switch is only one preset. c Set ATT switch to press STANDBY MEMORY or . Symptom The radio does not turn on at the standby time. c Press STANDBY MEMORY or (page 29). c Set the correct time. There are stored in the ...direction opposite the arrow (to scan, or there is set to replace the batteries. c Adjust the volume. Cause and remedies You forgot to OFF, or adjust the ATT control. c Preset 2 or more than 60 seconds to ON. c Store a frequency in the STANDBY MEMORY (page 28).
...scan. The HOLD function is turned down completely. ATT switch is only one preset. c Set ATT switch to press STANDBY MEMORY or . Symptom The radio does not turn on at the standby time. c Press STANDBY MEMORY or (page 29). c Set the correct time. There are stored in the ...direction opposite the arrow (to scan, or there is set to replace the batteries. c Adjust the volume. Cause and remedies You forgot to OFF, or adjust the ATT control. c Preset 2 or more than 60 seconds to ON. c Store a frequency in the STANDBY MEMORY (page 28).
Service Manual
Page 3
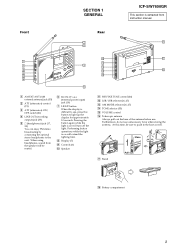
Front SECTION 1 GENERAL Rear ICF-SW7600GR This section is extracted from the speaker will be muted. 6 DC IN 6V !...the lighting time. 8 Display (7) 9 Controls (6) 0 Speaker qa SSB FINE TUNE control (26) qs LSB/USB selector (26, 27) qd AM MODE selector (26, 27) qf TONE selector (33) qg VOLUME control qh Telescopic antenna Always pull out the base...off the light. When using headphones, sound from instruction manual. 1 AM EXT ANT (AM external antenna) jack (35) 2 ATT (attenuator) control (21) 3 ATT (attenuator) ON/ OFF switch (21) 4 LINE OUT (recording output) jack (33) 5 2 (headphones) jack (...
Front SECTION 1 GENERAL Rear ICF-SW7600GR This section is extracted from the speaker will be muted. 6 DC IN 6V !...the lighting time. 8 Display (7) 9 Controls (6) 0 Speaker qa SSB FINE TUNE control (26) qs LSB/USB selector (26, 27) qd AM MODE selector (26, 27) qf TONE selector (33) qg VOLUME control qh Telescopic antenna Always pull out the base...off the light. When using headphones, sound from instruction manual. 1 AM EXT ANT (AM external antenna) jack (35) 2 ATT (attenuator) control (21) 3 ATT (attenuator) ON/ OFF switch (21) 4 LINE OUT (recording output) jack (33) 5 2 (headphones) jack (...


