Operating Instructions
Page 2
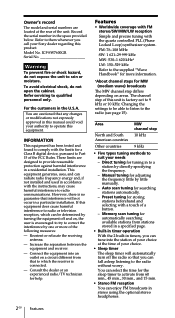
ICF-SW7600GR Serial No Warning To prevent fire or shock hazard,...tuning in a residential installation. Increase the separation between the equipment and receiver. - Consult the dealer or an experienced radio/TV technician for searching stations automatically. - Changing the settings to be determined by little manually. - Auto scan tuning ...for help. Preset tuning for a Class B digital device, pursuant to the radio without worry. Refer to suit your Sony dealer regarding this equipment. If this unit is no guarantee that interference will automatically turn off...
ICF-SW7600GR Serial No Warning To prevent fire or shock hazard,...tuning in a residential installation. Increase the separation between the equipment and receiver. - Consult the dealer or an experienced radio/TV technician for searching stations automatically. - Changing the settings to be determined by little manually. - Auto scan tuning ...for help. Preset tuning for a Class B digital device, pursuant to the radio without worry. Refer to suit your Sony dealer regarding this equipment. If this unit is no guarantee that interference will automatically turn off...
Operating Instructions
Page 3
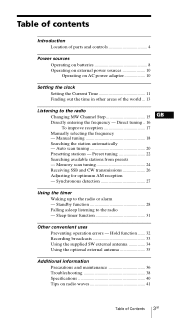
... controls 4 Power sources Operating on batteries 8 Operating on external power sources 10 Operating on radio waves 41 Table of the world ... 13 Listening to the radio or alarm - Synchronous detection 27 Using the timer Waking up to the radio Changing MW Channel Step 15 GB Directly entering the frequency - Manual tuning 18 Searching...
... controls 4 Power sources Operating on batteries 8 Operating on external power sources 10 Operating on radio waves 41 Table of the world ... 13 Listening to the radio or alarm - Synchronous detection 27 Using the timer Waking up to the radio Changing MW Channel Step 15 GB Directly entering the frequency - Manual tuning 18 Searching...
Operating Instructions
Page 6
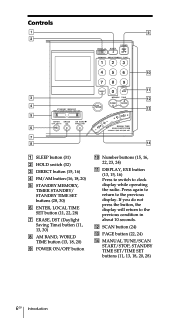
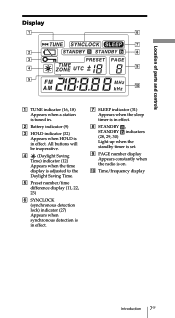
... START/STOP, STANDBY TIME SET/TIME SET buttons (11, 13, 18, 20, 28) 6GB Introduction Press again to return to clock display while operating the radio. If you do not press the button, the display will return to the previous condition in about 10 seconds.
... START/STOP, STANDBY TIME SET/TIME SET buttons (11, 13, 18, 20, 28) 6GB Introduction Press again to return to clock display while operating the radio. If you do not press the button, the display will return to the previous condition in about 10 seconds.
Operating Instructions
Page 7
... timer is in effect. 8 STANDBY , STANDBY indicators (28, 29, 30) Light up when the standby timer is set. 9 PAGE number display Appears constantly when the radio is in . 2 Battery indicator (9) 3 HOLD indicator (32) Appears when HOLD is on. 0 Time/frequency display Introduction 7GB
... timer is in effect. 8 STANDBY , STANDBY indicators (28, 29, 30) Light up when the standby timer is set. 9 PAGE number display Appears constantly when the radio is in . 2 Battery indicator (9) 3 HOLD indicator (32) Appears when HOLD is on. 0 Time/frequency display Introduction 7GB
Operating Instructions
Page 10
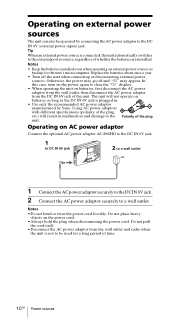
Do not pull the cord itself. •Disconnect the AC power adaptor from the wall outlet and radio when the unit is plugged in malfunction and damage to clear the "E" display. • When operating the unit on batteries, first disconnect the AC power ... 2 to a wall outlet 1 Connect the AC power adaptor securely to the DC IN 6V jack. 2 Connect the AC power adaptor securely to be operated by Sony. Otherwise, the power may go off the unit when connecting or disconnecting external power sources. In this case, turn on external power sources as the...
Do not pull the cord itself. •Disconnect the AC power adaptor from the wall outlet and radio when the unit is plugged in malfunction and damage to clear the "E" display. • When operating the unit on batteries, first disconnect the AC power ... 2 to a wall outlet 1 Connect the AC power adaptor securely to the DC IN 6V jack. 2 Connect the AC power adaptor securely to be operated by Sony. Otherwise, the power may go off the unit when connecting or disconnecting external power sources. In this case, turn on external power sources as the...
Operating Instructions
Page 11
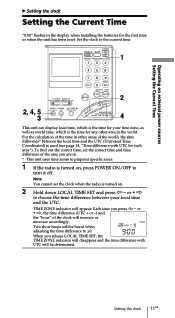
... time, which is used (see page 14, "Time difference with UTC will be determined. To find out the correct time, set the clock when the radio is turned on . 2 Hold down LOCAL TIME SET and press K - Each time you are in. * This unit uses time zones to pinpoint specific areas. 1 If... the radio is turned on , press POWER ON/OFF to the current time. 1 2 2, 4, 5 3 4 This unit can display local time, which is the time for the first time...
... time, which is used (see page 14, "Time difference with UTC will be determined. To find out the correct time, set the clock when the radio is turned on . 2 Hold down LOCAL TIME SET and press K - Each time you are in. * This unit uses time zones to pinpoint specific areas. 1 If... the radio is turned on , press POWER ON/OFF to the current time. 1 2 2, 4, 5 3 4 This unit can display local time, which is the time for the first time...
Operating Instructions
Page 12
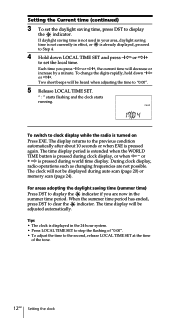
... k?+, the current time will not be displayed during world time display. When the summer time period has ended, press DST to clock display while the radio is displayed in the summer time period. Setting the Current time (continued) 3 To set the local time. Each time you are not possible. Two..., daylight saving time is not currently in effect, or is pressed during auto scan (page 20) or memory scan (page 24). During clock display, radio operations such as changing frequencies are now in the 24 hour system. • Press LOCAL TIME SET to stop the flashing of "0:00". • ...
... k?+, the current time will not be displayed during world time display. When the summer time period has ended, press DST to clock display while the radio is displayed in the summer time period. Setting the Current time (continued) 3 To set the local time. Each time you are not possible. Two..., daylight saving time is not currently in effect, or is pressed during auto scan (page 20) or memory scan (page 24). During clock display, radio operations such as changing frequencies are now in the 24 hour system. • Press LOCAL TIME SET to stop the flashing of "0:00". • ...
Operating Instructions
Page 13
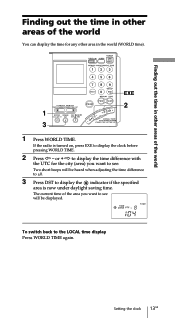
... TIME. The current time of the world You can display the time for the city (area) you want to see will be displayed. If the radio is now under daylight saving time.
... TIME. The current time of the world You can display the time for the city (area) you want to see will be displayed. If the radio is now under daylight saving time.
Operating Instructions
Page 15
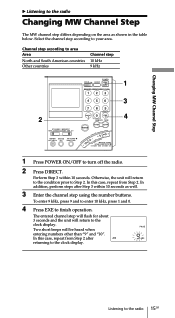
... countries Other countries Channel step 10 kHz 9 kHz 1 3 2 4 1 Press POWER ON/OFF to the radio 15GB Otherwise, the unit will return to the clock display. Listening to turn off the radio. 2 Press DIRECT. Perform Step 3 within 10 seconds as shown in the table below. In this case, ... to your area. Two short beeps will be heard when entering numbers other than "9" and "10". Changing MW Channel Step B Listening to the radio Changing MW Channel Step The MW channel step differs depending on the area as well. 3 Enter the channel step using the number buttons. Select the...
... countries Other countries Channel step 10 kHz 9 kHz 1 3 2 4 1 Press POWER ON/OFF to the radio 15GB Otherwise, the unit will return to the clock display. Listening to turn off the radio. 2 Press DIRECT. Perform Step 3 within 10 seconds as shown in the table below. In this case, ... to your area. Two short beeps will be heard when entering numbers other than "9" and "10". Changing MW Channel Step B Listening to the radio Changing MW Channel Step The MW channel step differs depending on the area as well. 3 Enter the channel step using the number buttons. Select the...
Operating Instructions
Page 16
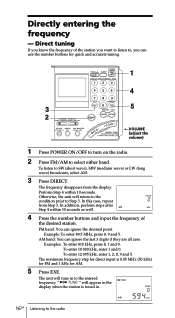
... (50 kHz) for FM and 1 kHz for quick and accurate tuning. 1 4 3 5 2 TVOLUME (adjust the volume) 1 Press POWER ON/OFF to turn on the radio. 2 Press FM/AM to the entered frequency. In this case, repeat from the display. The minimum frequency step for direct input is tuned in to...Examples: To enter 810 kHz, press 8, 1 and 0. To enter 12 095 kHz, enter 1, 2, 0, 9 and 5. The unit will return to the condition prior to the radio Otherwise, the unit will tune in . 16GB Listening to Step 3. Perform Step 4 within 10 seconds as well. 4 Press the number buttons and input the frequency...
... (50 kHz) for FM and 1 kHz for quick and accurate tuning. 1 4 3 5 2 TVOLUME (adjust the volume) 1 Press POWER ON/OFF to turn on the radio. 2 Press FM/AM to the entered frequency. In this case, repeat from the display. The minimum frequency step for direct input is tuned in to...Examples: To enter 810 kHz, press 8, 1 and 0. To enter 12 095 kHz, enter 1, 2, 0, 9 and 5. The unit will return to the condition prior to the radio Otherwise, the unit will tune in . 16GB Listening to Step 3. Perform Step 4 within 10 seconds as well. 4 Press the number buttons and input the frequency...
Operating Instructions
Page 17
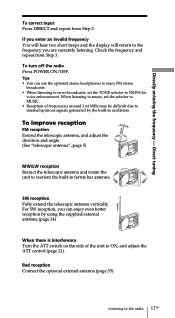
... and angle. (See "telescopic antenna", page 5) MW/LW reception Retract the telescopic antenna and rotate the unit to the radio 17GB For SW reception, you are currently listening. To turn off the radio Press POWER ON/OFF. Direct tuning To correct input Press DIRECT and repeat from Step 3. SW reception Fully extend...
... and angle. (See "telescopic antenna", page 5) MW/LW reception Retract the telescopic antenna and rotate the unit to the radio 17GB For SW reception, you are currently listening. To turn off the radio Press POWER ON/OFF. Direct tuning To correct input Press DIRECT and repeat from Step 3. SW reception Fully extend...
Operating Instructions
Page 18
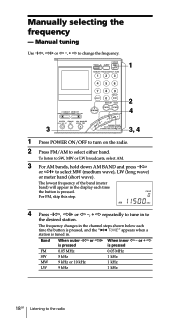
... pressed, and the " TUNE " appears when a station is pressed. Manual tuning Use -?K, k?+ or K -, + k to change the frequency. 1 2 4 3 3, 4 1 Press POWER ON/OFF to turn on the radio. 2 Press FM/AM to the...
... pressed, and the " TUNE " appears when a station is pressed. Manual tuning Use -?K, k?+ or K -, + k to change the frequency. 1 2 4 3 3, 4 1 Press POWER ON/OFF to turn on the radio. 2 Press FM/AM to the...
Operating Instructions
Page 19
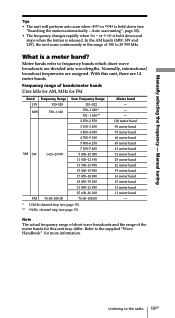
... which short wave broadcasts are 14 meter bands. or + k is held down and stops when the button is a meter band? Meter bands refer to the radio 19GB Frequency range of the meter bands for FM Band Frequency Range Scan Frequency Range LW 150-529 MW 530-1 620 AM SW 1 621-29...
... which short wave broadcasts are 14 meter bands. or + k is held down and stops when the button is a meter band? Meter bands refer to the radio 19GB Frequency range of the meter bands for FM Band Frequency Range Scan Frequency Range LW 150-529 MW 530-1 620 AM SW 1 621-29...
Operating Instructions
Page 20
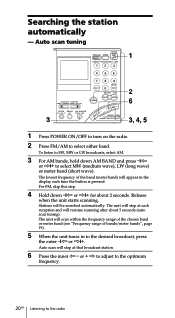
...). The unit will stop at each time the button is pressed. Auto scan tuning 1 2 6 3 3, 4, 5 1 Press POWER ON/OFF to turn on the radio. 2 Press FM/AM to the radio or + k to adjust to the optimum frequency. 20GB Listening to select either band. Searching the station automatically - To listen to the desired broadcast...
...). The unit will stop at each time the button is pressed. Auto scan tuning 1 2 6 3 3, 4, 5 1 Press POWER ON/OFF to turn on the radio. 2 Press FM/AM to the radio or + k to adjust to the optimum frequency. 20GB Listening to select either band. Searching the station automatically - To listen to the desired broadcast...

Operating Instructions
Page 21
... direction, hold down either -?K or k?+ opposite to the previous reception after the unit has resumed scanning. Under normal conditions, set the ATT switch to the radio 21GB Turn the ATT control toward MAX, the unit will skip weaker signals and stop at night when reception is turned too much toward MAX...
... direction, hold down either -?K or k?+ opposite to the previous reception after the unit has resumed scanning. Under normal conditions, set the ATT switch to the radio 21GB Turn the ATT control toward MAX, the unit will skip weaker signals and stop at night when reception is turned too much toward MAX...
Operating Instructions
Page 22
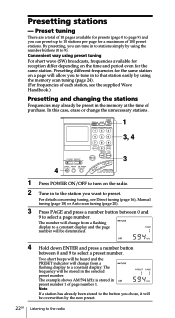
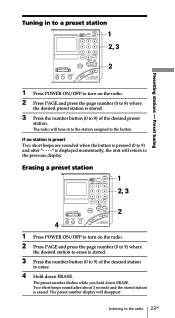
... of purchase. The frequency will be heard and the PRESET indicator will change the unnecessary stations. 1 3, 4 3 4 1 Press POWER ON/OFF to turn on the radio. 2 Tune in to the station you can tune in the memory at the time of 100 preset stations. Two short beeps will be preset in...to stations simply by using preset tuning For short wave (SW) broadcasts, frequencies available for presets (page 0 to page 9) and you want to the radio The example shows AM 594 kHz is stored in the selected preset number. In this case, erase or change from a flashing display to a constant ...
... of purchase. The frequency will be heard and the PRESET indicator will change the unnecessary stations. 1 3, 4 3 4 1 Press POWER ON/OFF to turn on the radio. 2 Tune in to the station you can tune in the memory at the time of 100 preset stations. Two short beeps will be preset in...to stations simply by using preset tuning For short wave (SW) broadcasts, frequencies available for presets (page 0 to page 9) and you want to the radio The example shows AM 594 kHz is stored in the selected preset number. In this case, erase or change from a flashing display to a constant ...
Operating Instructions
Page 23
...station to erase is stored. 3 Press the number button (0 to the previous display. The preset number flashes while you hold down ERASE. Presetting stations - The radio will disappear. Two short beeps sound after "- - - -" is erased. The preset number display will tune in to a preset station 1 2, 3 2 1... Press POWER ON/OFF to turn on the radio. 2 Press PAGE and press the page number (0 to 9) where the desired preset station is stored. 3 Press the number button (0 to 9) of the desired station...
...station to erase is stored. 3 Press the number button (0 to the previous display. The preset number flashes while you hold down ERASE. Presetting stations - The radio will disappear. Two short beeps sound after "- - - -" is erased. The preset number display will tune in to a preset station 1 2, 3 2 1... Press POWER ON/OFF to turn on the radio. 2 Press PAGE and press the page number (0 to 9) where the desired preset station is stored. 3 Press the number button (0 to 9) of the desired station...
Operating Instructions
Page 24
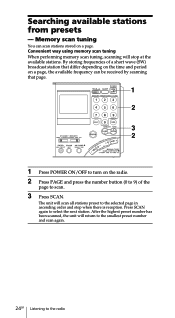
... of a short wave (SW) broadcast station that differ depending on the time and period on a page, the available frequency can scan stations stored on the radio. 2 Press PAGE and press the number button (0 to 9) of the page to turn on a page. Press SCAN again to the...
... of a short wave (SW) broadcast station that differ depending on the time and period on a page, the available frequency can scan stations stored on the radio. 2 Press PAGE and press the number button (0 to 9) of the page to turn on a page. Press SCAN again to the...
Operating Instructions
Page 25
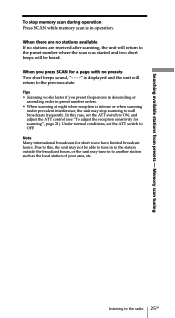
When you preset frequencies in descending or ascending order in preset number orders. • When scanning at night when reception is in to the radio 25GB Note Many international broadcasts for scanning", page 21). When there are no stations available If no presets Two short beeps sound, "- - - -" is displayed and ...
When you preset frequencies in descending or ascending order in preset number orders. • When scanning at night when reception is in to the radio 25GB Note Many international broadcasts for scanning", page 21). When there are no stations available If no presets Two short beeps sound, "- - - -" is displayed and ...

Operating Instructions
Page 26
... FM/AM to select AM. 3 Set the AM MODE selector to SSB. 4 Set the LSB/USB selector to the radio Receiving SSB and CW transmissions You can fine tune the received frequency in to a frequency where you have the best reception. You can receive SSB (... 20). 6 Use SSB FINE TUNE control to fine tune in a range of about ±1.5 kHz. During this unit. 1 6 4 3 2 1 Press POWER ON/OFF to turn on radio waves", page 41. 26GB Listening to either LSB or USB.
... FM/AM to select AM. 3 Set the AM MODE selector to SSB. 4 Set the LSB/USB selector to the radio Receiving SSB and CW transmissions You can fine tune the received frequency in to a frequency where you have the best reception. You can receive SSB (... 20). 6 Use SSB FINE TUNE control to fine tune in a range of about ±1.5 kHz. During this unit. 1 6 4 3 2 1 Press POWER ON/OFF to turn on radio waves", page 41. 26GB Listening to either LSB or USB.


