
Help Guide Printable PDF
Page 1
Preparation Parts and controls HOME menu/OPTION menu Using the HOME menu Using the OPTION menu About folders and files Display window While the HOME menu is displayed While recording is in progress or on how to use your IC recorder. Help Guide IC Recorder ICD-PX370 Use this Help Guide when you have any questions on standby While playback is in progress
Preparation Parts and controls HOME menu/OPTION menu Using the HOME menu Using the OPTION menu About folders and files Display window While the HOME menu is displayed While recording is in progress or on how to use your IC recorder. Help Guide IC Recorder ICD-PX370 Use this Help Guide when you have any questions on standby While playback is in progress

Help Guide Printable PDF
Page 9
Table Of Contents Help Guide ICD-PX370...i Preparation...i Parts and controls...1 HOME menu/OPTION menu...i Using the HOME menu...3 Using the OPTION menu...5 About folders and files...7 Display window...i While the HOME ... model only ii Maintaining the moderate volume level (European models only 33 Recording...ii Recording with the built-in microphone 34 About the recording level guide 37 Monitoring the recording audio 38 Additional operations available during recording 39 Changing the file storage destination folder 40 Additional recording operations/settings ii Selecting...
Table Of Contents Help Guide ICD-PX370...i Preparation...i Parts and controls...1 HOME menu/OPTION menu...i Using the HOME menu...3 Using the OPTION menu...5 About folders and files...7 Display window...i While the HOME ... model only ii Maintaining the moderate volume level (European models only 33 Recording...ii Recording with the built-in microphone 34 About the recording level guide 37 Monitoring the recording audio 38 Additional operations available during recording 39 Changing the file storage destination folder 40 Additional recording operations/settings ii Selecting...

Help Guide Printable PDF
Page 14
Operation indicator 3. BACK/ HOME button ( : press, : press and hold) 9. Help Guide IC Recorder ICD-PX370 Parts and controls 1. REC/PAUSE (record/pause) button 5. T-MARK (track mark) button 10 OPTION button . 11 Built-in microphone (monaural) 2. STOP button 6. USB connector compartment (cue/fast forward)) 1 Control button ( DPC (Digital Pitch Control), A-B (repeat A-B)/ (review/fast backward), 7. (play/enter) button (*) 8. Built-in speaker . 12 Strap hole (No strap is supplied with your IC recorder.) . Display window 4.
Operation indicator 3. BACK/ HOME button ( : press, : press and hold) 9. Help Guide IC Recorder ICD-PX370 Parts and controls 1. REC/PAUSE (record/pause) button 5. T-MARK (track mark) button 10 OPTION button . 11 Built-in microphone (monaural) 2. STOP button 6. USB connector compartment (cue/fast forward)) 1 Control button ( DPC (Digital Pitch Control), A-B (repeat A-B)/ (review/fast backward), 7. (play/enter) button (*) 8. Built-in speaker . 12 Strap hole (No strap is supplied with your IC recorder.) . Display window 4.

Help Guide Printable PDF
Page 16
... or to use, and then press . You can select the following functions: Music: You can select files recorded by REC Scene," and "Folders." Record: 3 Help Guide IC Recorder ICD-PX370 Using the HOME menu On your IC recorder, the HOME menu is the starting point for playback. To locate a recorded file, you want to...
... or to use, and then press . You can select the following functions: Music: You can select files recorded by REC Scene," and "Folders." Record: 3 Help Guide IC Recorder ICD-PX370 Using the HOME menu On your IC recorder, the HOME menu is the starting point for playback. To locate a recorded file, you want to...

Help Guide Printable PDF
Page 18
The OPTION menu associated with the selected function appears. 2 Press or to select the desired menu item, and then press . 3 Press or to use on the HOME menu, and then press OPTION. The OPTION menu items vary depending on the display window. 1 Select the function you want to select the desired setting, and then press . 5 Help Guide IC Recorder ICD-PX370 Using the OPTION menu You can display the OPTION menu by pressing OPTION. Note The OPTION menu may not appear, depending on the screen on the selected function of your IC recorder.
The OPTION menu associated with the selected function appears. 2 Press or to select the desired menu item, and then press . 3 Press or to use on the HOME menu, and then press OPTION. The OPTION menu items vary depending on the display window. 1 Select the function you want to select the desired setting, and then press . 5 Help Guide IC Recorder ICD-PX370 Using the OPTION menu You can display the OPTION menu by pressing OPTION. Note The OPTION menu may not appear, depending on the screen on the selected function of your IC recorder.

Help Guide Printable PDF
Page 20
Under " Recorded Files" "FOLDER01": Files recorded via the built-in microphone are stored. A: HOME menu B: Folders C: Files Under " Music" 7 Help Guide IC Recorder ICD-PX370 About folders and files The following illustrates the structure of folders and files that you can view on your IC recorder.
Under " Recorded Files" "FOLDER01": Files recorded via the built-in microphone are stored. A: HOME menu B: Folders C: Files Under " Music" 7 Help Guide IC Recorder ICD-PX370 About folders and files The following illustrates the structure of folders and files that you can view on your IC recorder.

Help Guide Printable PDF
Page 22
Help Guide IC Recorder ICD-PX370 While the HOME menu is provided for explanatory purposes. Note The above screen is displayed The following : : Music : Recorded Files : Record : Settings : Return to XX (The function you actually see on the display window. HOME menu items You can select one of the following describes the HOME menu on your IC recorder. 1. It may look different from what you are currently using is displayed in "XX.") Related Topic Using the HOME menu 4-595-551-11(1) Copyright 2016 Sony Corporation 9
Help Guide IC Recorder ICD-PX370 While the HOME menu is provided for explanatory purposes. Note The above screen is displayed The following : : Music : Recorded Files : Record : Settings : Return to XX (The function you actually see on the display window. HOME menu items You can select one of the following describes the HOME menu on your IC recorder. 1. It may look different from what you are currently using is displayed in "XX.") Related Topic Using the HOME menu 4-595-551-11(1) Copyright 2016 Sony Corporation 9

Help Guide Printable PDF
Page 23
.... Scene Select indicator Indicates the recording scene that is in progress or on standby. Track mark number Indicates the number of added track marks. 5. Help Guide IC Recorder ICD-PX370 While recording is in progress or on standby The following describes the display window while recording is currently selected. : Auto Voice Rec : Meeting : Lecture...
.... Scene Select indicator Indicates the recording scene that is in progress or on standby. Track mark number Indicates the number of added track marks. 5. Help Guide IC Recorder ICD-PX370 While recording is in progress or on standby The following describes the display window while recording is currently selected. : Auto Voice Rec : Meeting : Lecture...

Help Guide Printable PDF
Page 25
... window during playback. Playback status indicator Indicates the current playback status of or . 2. Playback progress bar Indicates how far playback of the current playback. 4. Help Guide IC Recorder ICD-PX370 While playback is modified, the DPC (Digital Pitch Control) speed will be indicated to play). 6. Note The above screens are playing. Elapsed time Indicates...
... window during playback. Playback status indicator Indicates the current playback status of or . 2. Playback progress bar Indicates how far playback of the current playback. 4. Help Guide IC Recorder ICD-PX370 While playback is modified, the DPC (Digital Pitch Control) speed will be indicated to play). 6. Note The above screens are playing. Elapsed time Indicates...
Help Guide Printable PDF
Page 27
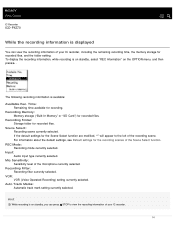
... then press . Recording Memory: Memory storage ("Built-In Memory" or "SD Card") for recorded files. Auto Track Marks: Automatic track mark setting currently selected. Help Guide IC Recorder ICD-PX370 While the recording information is displayed You can press STOP to the left of the recording scene. Scene Select: Recording scene currently selected. To...
... then press . Recording Memory: Memory storage ("Built-In Memory" or "SD Card") for recorded files. Auto Track Marks: Automatic track mark setting currently selected. Help Guide IC Recorder ICD-PX370 While the recording information is displayed You can press STOP to the left of the recording scene. Scene Select: Recording scene currently selected. To...
Help Guide Printable PDF
Page 29
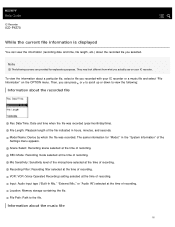
Help Guide IC Recorder ICD-PX370 While the current file information is displayed You can press or to scroll up or down to the file. Scene Select: Recording scene selected at ...
Help Guide IC Recorder ICD-PX370 While the current file information is displayed You can press or to scroll up or down to the file. Scene Select: Recording scene selected at ...

Help Guide Printable PDF
Page 31
... files are sorted by recording date. They may look different from what you select " Recorded Files" or " Music" on your IC recorder. Artists: 18 Help Guide IC Recorder ICD-PX370 While the file search categories are listed. When " Recorded Files" is selected You can select one of the following screens are sorted by album...
... files are sorted by recording date. They may look different from what you select " Recorded Files" or " Music" on your IC recorder. Artists: 18 Help Guide IC Recorder ICD-PX370 While the file search categories are listed. When " Recorded Files" is selected You can select one of the following screens are sorted by album...

Help Guide Printable PDF
Page 33
...) for battery charging. Hint Your IC recorder supports the following: (*) LR03 (size AAA) alkaline battery (Two batteries are not available. 4-595-551-11(1) Copyright 2016 Sony Corporation 20 When replacing batteries, be sure to use two brand-new alkaline batteries or two fully charged rechargeable batteries. Your IC recorder is not..., be sure to turn off your purchase, some of the models or optional accessories are supplied with the correct polarity, and then close the lid. Help Guide IC Recorder ICD-PX370 Inserting batteries 1 Insert batteries.
...) for battery charging. Hint Your IC recorder supports the following: (*) LR03 (size AAA) alkaline battery (Two batteries are not available. 4-595-551-11(1) Copyright 2016 Sony Corporation 20 When replacing batteries, be sure to use two brand-new alkaline batteries or two fully charged rechargeable batteries. Your IC recorder is not..., be sure to turn off your purchase, some of the models or optional accessories are supplied with the correct polarity, and then close the lid. Help Guide IC Recorder ICD-PX370 Inserting batteries 1 Insert batteries.

Help Guide Printable PDF
Page 34
... to/from the USB AC adaptor Battery life 4-595-551-11(1) Copyright 2016 Sony Corporation 21 Related Topic Disconnecting the IC recorder from the USB AC adaptor while the adaptor is connected to the adaptor. Help Guide IC Recorder ICD-PX370 Using the IC recorder with the USB AC adaptor You can immediately disconnect it...
... to/from the USB AC adaptor Battery life 4-595-551-11(1) Copyright 2016 Sony Corporation 21 Related Topic Disconnecting the IC recorder from the USB AC adaptor while the adaptor is connected to the adaptor. Help Guide IC Recorder ICD-PX370 Using the IC recorder with the USB AC adaptor You can immediately disconnect it...

Help Guide Printable PDF
Page 35
... IC recorder with the USB AC adaptor 4-595-551-11(1) Copyright 2016 Sony Corporation 22 Do not connect/disconnect the USB AC adaptor to/from an AC outlet while your IC recorder is connected to the adaptor. Help Guide IC Recorder ICD-PX370 Disconnecting the IC recorder from the USB AC adaptor Be sure to...
... IC recorder with the USB AC adaptor 4-595-551-11(1) Copyright 2016 Sony Corporation 22 Do not connect/disconnect the USB AC adaptor to/from an AC outlet while your IC recorder is connected to the adaptor. Help Guide IC Recorder ICD-PX370 Disconnecting the IC recorder from the USB AC adaptor Be sure to...

Help Guide Printable PDF
Page 36
If you leave the IC recorder unused for 10 minutes, it until the display window turns on. Help Guide IC Recorder ICD-PX370 Turning the power on 1 Slide the HOLD•POWER switch to save battery power. Hint The Auto Power Off function on your IC recorder is set to "10min" by default to "POWER" and hold it will automatically turn off 4-595-551-11(1) Copyright 2016 Sony Corporation 23 Related Topic Turning the power off .
If you leave the IC recorder unused for 10 minutes, it until the display window turns on. Help Guide IC Recorder ICD-PX370 Turning the power on 1 Slide the HOLD•POWER switch to save battery power. Hint The Auto Power Off function on your IC recorder is set to "10min" by default to "POWER" and hold it will automatically turn off 4-595-551-11(1) Copyright 2016 Sony Corporation 23 Related Topic Turning the power off .

Help Guide Printable PDF
Page 37
Related Topic Turning the power on the display window. If you replace the batteries, be sure to turn off. Hint The Auto Power Off function on your IC recorder is set to "10min" by default to "POWER" and hold it will automatically turn off the power. Help Guide IC Recorder ICD-PX370 Turning the power off 1 Slide the HOLD•POWER switch to save battery power. Note Before you leave the IC recorder unused for 10 minutes, it until "Power Off" appears on 4-595-551-11(1) Copyright 2016 Sony Corporation 24
Related Topic Turning the power on the display window. If you replace the batteries, be sure to turn off. Hint The Auto Power Off function on your IC recorder is set to "10min" by default to "POWER" and hold it will automatically turn off the power. Help Guide IC Recorder ICD-PX370 Turning the power off 1 Slide the HOLD•POWER switch to save battery power. Note Before you leave the IC recorder unused for 10 minutes, it until "Power Off" appears on 4-595-551-11(1) Copyright 2016 Sony Corporation 24

Help Guide Printable PDF
Page 38
Help Guide IC Recorder ICD-PX370 Inserting a memory card In addition to the built-in memory, you and insert it into the microSD card slot until it clicks into place. 3 Close ...
Help Guide IC Recorder ICD-PX370 Inserting a memory card In addition to the built-in memory, you and insert it into the microSD card slot until it clicks into place. 3 Close ...

Help Guide Printable PDF
Page 40
... the beep sound. 1 Press to select "Yes." 2 Press or to set all items. To move the focus to set an item, and then press . Help Guide IC Recorder ICD-PX370 Making the initial settings When you turn on the display window. Repeat the actions to the previous item. 27 You can select from the...
... the beep sound. 1 Press to select "Yes." 2 Press or to set all items. To move the focus to set an item, and then press . Help Guide IC Recorder ICD-PX370 Making the initial settings When you turn on the display window. Repeat the actions to the previous item. 27 You can select from the...

Help Guide Printable PDF
Page 43
... recorder in the 24-Hour format, depending on the selected clock display format (Time Display) on the display window, indicating that all the buttons. Help Guide IC Recorder ICD-PX370 Placing the IC recorder into the HOLD state disables all the buttons are disabled. Be sure to "HOLD" displays "HOLD" and the current time...
... recorder in the 24-Hour format, depending on the selected clock display format (Time Display) on the display window, indicating that all the buttons. Help Guide IC Recorder ICD-PX370 Placing the IC recorder into the HOLD state disables all the buttons are disabled. Be sure to "HOLD" displays "HOLD" and the current time...


