
Operating Instructions
Page 2
... the instructions. CAUTION Replace the battery with liquids, such as sunshine, fire or the like. If you may call: Sony Customer Information Center 1-800-222-SONY (7669). This equipment complies with the limits set forth for the FCC related matters only. This equipment has very low ...restart the application or disconnect and connect the communication cable (USB, etc.) again. Otherwise, burst, fire or injury may become hot when the flash fires. WARNING To reduce the risk of the IC radio frequency (RF) Exposure rules. For Customers in the EMC regulation for future reference. ...
... the instructions. CAUTION Replace the battery with liquids, such as sunshine, fire or the like. If you may call: Sony Customer Information Center 1-800-222-SONY (7669). This equipment complies with the limits set forth for the FCC related matters only. This equipment has very low ...restart the application or disconnect and connect the communication cable (USB, etc.) again. Otherwise, burst, fire or injury may become hot when the flash fires. WARNING To reduce the risk of the IC radio frequency (RF) Exposure rules. For Customers in the EMC regulation for future reference. ...
Operating Instructions
Page 6
... Preparations 13 Inserting batteries 13 Attaching/removing the flash unit to/from the camera.......... 14 Turning on the power of the flash unit 15 Pairing with a radio wireless commander/receiver (for radio wireless flash photography 17 Settings 20 Quick Navi settings 20... 24 Photographing 24 Manual flash photography (MANUAL 26 High-speed sync photography (HSS 27 Multiple flash photography (MULTI 28 Wireless flash photography (with radio or optical communications 31 Wireless flash photography (with radio wireless communications 33 Wireless flash photography (with optical wireless...
... Preparations 13 Inserting batteries 13 Attaching/removing the flash unit to/from the camera.......... 14 Turning on the power of the flash unit 15 Pairing with a radio wireless commander/receiver (for radio wireless flash photography 17 Settings 20 Quick Navi settings 20... 24 Photographing 24 Manual flash photography (MANUAL 26 High-speed sync photography (HSS 27 Multiple flash photography (MULTI 28 Wireless flash photography (with radio or optical communications 31 Wireless flash photography (with radio wireless communications 33 Wireless flash photography (with optical wireless...

Operating Instructions
Page 7
... on the model of this flash unit, visit the Sony website in case a person with ingress protection in the rainy weather. Do not use This flash unit can be used in smoke or scorches. In such a case, immediately stop using the flash unit. 7 GB See the...with a soft cloth, etc. To clean the flashtube, wipe it with Sony Interchangeable Lens Digital Cameras, Sony Interchangeable Lens Digital HD Video Camera Recorders, and Sony Digital Still Cameras that have a conventional Multi Interface Shoe. Keep the flashtube clean. Continuous flashes, as well as reflections of your...
... on the model of this flash unit, visit the Sony website in case a person with ingress protection in the rainy weather. Do not use This flash unit can be used in smoke or scorches. In such a case, immediately stop using the flash unit. 7 GB See the...with a soft cloth, etc. To clean the flashtube, wipe it with Sony Interchangeable Lens Digital Cameras, Sony Interchangeable Lens Digital HD Video Camera Recorders, and Sony Digital Still Cameras that have a conventional Multi Interface Shoe. Keep the flashtube clean. Continuous flashes, as well as reflections of your...

Operating Instructions
Page 8
Communication distance The radio wireless communication distance available between this flash unit and the camera is in use . Do not place this flash unit in the following locations. http://www.sony.net/flash/f45rm/ GB 8 Update the software of your camera to the latest version before use ... locations such as on camera compatibility. Refer to the dedicated support site for information on dashboards or near a heater may cause this flash unit is approximately 30 m (98.4 ft.). (Acquired under our measurement conditions.) • The distance given above applies under conditions ...
Communication distance The radio wireless communication distance available between this flash unit and the camera is in use . Do not place this flash unit in the following locations. http://www.sony.net/flash/f45rm/ GB 8 Update the software of your camera to the latest version before use ... locations such as on camera compatibility. Refer to the dedicated support site for information on dashboards or near a heater may cause this flash unit is approximately 30 m (98.4 ft.). (Acquired under our measurement conditions.) • The distance given above applies under conditions ...

Operating Instructions
Page 10
... LCD backlight turns on and stays lit for about 8 seconds every time you press one of the buttons or use the control wheel on the flash unit. • While the LCD backlight is lit, you can press one of the buttons or use the control wheel on the... flash unit and you can prevent unintentional operations. or the MENU settings screen. MENU button (22) Direction buttons Center button The number in ...
... LCD backlight turns on and stays lit for about 8 seconds every time you press one of the buttons or use the control wheel on the flash unit. • While the LCD backlight is lit, you can press one of the buttons or use the control wheel on the... flash unit and you can prevent unintentional operations. or the MENU settings screen. MENU button (22) Direction buttons Center button The number in ...
Operating Instructions
Page 11
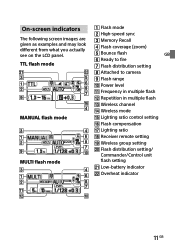
... on the LCD panel. Bounce flash GB Ready to fire TTL flash mode Flash distribution setting Attached to camera Flash range Power level Frequency in multiple flash Repetition in multiple flash Wireless channel Wireless mode MANUAL flash mode Lighting ratio control setting ...
... on the LCD panel. Bounce flash GB Ready to fire TTL flash mode Flash distribution setting Attached to camera Flash range Power level Frequency in multiple flash Repetition in multiple flash Wireless channel Wireless mode MANUAL flash mode Lighting ratio control setting ...

Operating Instructions
Page 12
...; Flash mode High-speed sync Memory Recall Flash coverage (zoom) Bounce flash Ready to fire Flash distribution setting Attached to camera Flash range Power level Frequency in multiple flash Repetition in multiple flash Wireless channel Wireless mode ...
...; Flash mode High-speed sync Memory Recall Flash coverage (zoom) Bounce flash Ready to fire Flash distribution setting Attached to camera Flash range Power level Frequency in multiple flash Repetition in multiple flash Wireless channel Wireless mode ...

Operating Instructions
Page 13
... battery chamber as illustrated ( ). ( indicate the direction of the arrow in the reverse direction of the batteries.) 3 Close the battery chamber door. Inserting batteries The flash unit can accommodate either set of the following: • Four AA-size alkaline batteries • Four AA-size rechargeable nickel-metal hydride (Ni-MH) batteries...
... battery chamber as illustrated ( ). ( indicate the direction of the arrow in the reverse direction of the batteries.) 3 Close the battery chamber door. Inserting batteries The flash unit can accommodate either set of the following: • Four AA-size alkaline batteries • Four AA-size rechargeable nickel-metal hydride (Ni-MH) batteries...

Operating Instructions
Page 14
... release button, rotate the lock lever away from "LOCK," and then slide the unit out of the flash unit into the Multi Interface shoe on the camera and push in flash, make sure that the camera flash is equipped with a built-in the foot all the way. 5 Rotate the lock lever toward "LOCK... the terminal protection cap from the Multi Interface foot on the camera. To remove the flash unit from the camera Turn off the power of the flash unit first. Notes When you do not intend to use the flash unit, be sure to attach the terminal protection cap back to the camera 1 Turn...
... release button, rotate the lock lever away from "LOCK," and then slide the unit out of the flash unit into the Multi Interface shoe on the camera and push in flash, make sure that the camera flash is equipped with a built-in the foot all the way. 5 Rotate the lock lever toward "LOCK... the terminal protection cap from the Multi Interface foot on the camera. To remove the flash unit from the camera Turn off the power of the flash unit first. Notes When you do not intend to use the flash unit, be sure to attach the terminal protection cap back to the camera 1 Turn...

Operating Instructions
Page 15
... is left unused for 3 minutes while it is used alone or connected to the camera in this state. When the flash unit is recommended that you replace the batteries. Replace the batteries. 15 GB Checking the remaining battery power When the batteries are displayed on the ... turn off to conserve the battery power. • During wireless flash photography with the flash unit used as a warning. When nothing but is on the LCD panel: The flash unit is displayed on the LCD panel as an off-camera flash (page 31), the flash unit goes into power-saving mode in 60 minutes. •...
... is left unused for 3 minutes while it is used alone or connected to the camera in this state. When the flash unit is recommended that you replace the batteries. Replace the batteries. 15 GB Checking the remaining battery power When the batteries are displayed on the ... turn off to conserve the battery power. • During wireless flash photography with the flash unit used as a warning. When nothing but is on the LCD panel: The flash unit is displayed on the LCD panel as an off-camera flash (page 31), the flash unit goes into power-saving mode in 60 minutes. •...

Operating Instructions
Page 16
... LCD panel to remove the batteries. Take extra care if you use the flash unit continuously for a short period of time, its built-in safety circuit may be triggered to cool down. Also, if the temperature inside the flash unit. GB 16 In such a case, turn off the power switch on the... flash unit and leave the unit unused for about 10 minutes to allow it to reduce the...
... LCD panel to remove the batteries. Take extra care if you use the flash unit continuously for a short period of time, its built-in safety circuit may be triggered to cool down. Also, if the temperature inside the flash unit. GB 16 In such a case, turn off the power switch on the... flash unit and leave the unit unused for about 10 minutes to allow it to reduce the...
Operating Instructions
Page 17
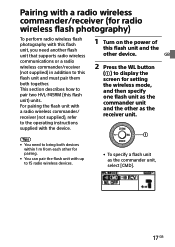
...supplied) in addition to this flash unit and must pair them both devices within 1 m from each other for setting the wireless mode, and then specify one flash unit as the commander unit, select [CMD]. 17 GB This section describes how to pair two HVL-F45RM (this flash unit and the other as ...the receiver unit. • To specify a flash unit as the commander unit and the other device. GB 2 Press the WL button () to display the screen ...
...supplied) in addition to this flash unit and must pair them both devices within 1 m from each other for setting the wireless mode, and then specify one flash unit as the commander unit, select [CMD]. 17 GB This section describes how to pair two HVL-F45RM (this flash unit and the other as ...the receiver unit. • To specify a flash unit as the commander unit and the other device. GB 2 Press the WL button () to display the screen ...

Operating Instructions
Page 18
... you have changed the setting of wireless communications for wireless flash photography: radio and optical wireless communications. GB 18 Notes • The above instructions are given based on the assumption that this flash unit and the other flash unit, press the MENU button () and select [...PAIRING]. This flash unit is displayed. For setting the unit to use optical wireless communications, see page 31...
... you have changed the setting of wireless communications for wireless flash photography: radio and optical wireless communications. GB 18 Notes • The above instructions are given based on the assumption that this flash unit and the other flash unit, press the MENU button () and select [...PAIRING]. This flash unit is displayed. For setting the unit to use optical wireless communications, see page 31...

Operating Instructions
Page 19
... the following screen is established. On the commander unit, you are finished with pairing with other receiver units. Every time pairing is established with this flash unit as the receiver unit and repeat steps 3 and 4.
... the following screen is established. On the commander unit, you are finished with pairing with other receiver units. Every time pairing is established with this flash unit as the receiver unit and repeat steps 3 and 4.

Operating Instructions
Page 20
... the control wheel to change the setting option. 1 Press the Fn button (). 2 Select the setting item of your choice with the on the flash unit to change the settings for setting the selected item. 3 Rotate the control wheel to change the setting option. 4 Press the Fn button. Quick Navi... press the Fn button on -screen indications. Pressing the center button following the above operation displays the specific screen for photography, such as the selected flash mode, in accordance with the direction buttons.
... the control wheel to change the setting option. 1 Press the Fn button (). 2 Select the setting item of your choice with the on the flash unit to change the settings for setting the selected item. 3 Rotate the control wheel to change the setting option. 4 Press the Fn button. Quick Navi... press the Fn button on -screen indications. Pressing the center button following the above operation displays the specific screen for photography, such as the selected flash mode, in accordance with the direction buttons.
Operating Instructions
Page 21
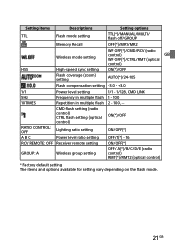
...(*)/CTRL/RMT (optical control) HSS High-speed sync setting ON(*)/OFF Flash coverage (zoom) setting AUTO(*)/24-105 Flash compensation setting -3.0 - +3.0 1/1 Power level setting 1/1 - 1/128, CMD LINK 5Hz Frequency in multiple flash 1 - 100 10TIMES Repetition in multiple flash 2 - 100, -- CMD flash setting (radio control) CTRL flash setting (optical control) ON(*)/OFF RATIO CONTROL: OFF Lighting ratio...
...(*)/CTRL/RMT (optical control) HSS High-speed sync setting ON(*)/OFF Flash coverage (zoom) setting AUTO(*)/24-105 Flash compensation setting -3.0 - +3.0 1/1 Power level setting 1/1 - 1/128, CMD LINK 5Hz Frequency in multiple flash 1 - 100 10TIMES Repetition in multiple flash 2 - 100, -- CMD flash setting (radio control) CTRL flash setting (optical control) ON(*)/OFF RATIO CONTROL: OFF Lighting ratio...

Operating Instructions
Page 22
MENU settings You can press the MENU button on the flash unit to the setting item of your choice with the direction buttons, and then press the center button to select the item. 1 Press the MENU button (). 3 Change the setting option with the direction buttons and press the center button. 2 Move the focus to change the MENU settings. GB 22 Move the focus to the setting item of your choice with the direction buttons, and then press the center button.
MENU settings You can press the MENU button on the flash unit to the setting item of your choice with the direction buttons, and then press the center button to select the item. 1 Press the MENU button (). 3 Change the setting option with the direction buttons and press the center button. 2 Move the focus to change the MENU settings. GB 22 Move the focus to the setting item of your choice with the direction buttons, and then press the center button.

Operating Instructions
Page 23
...LED light ON/OFF setting ON/OFF MEMORY AF LED LEVEL Memory settings AF illuminator level setting MR1/MR2 HIGH(*)/LOW GB TEST Test-flash setting GROUP/1TIME (*)/ 3TIMES/4SEC LEVEL STEP Power level setting steps 0.3EV(*)/0.5EV CUSTOM KEY Custom key settings - / SELECT Wireless ... SET Optical controlled wireless CH setting CH1(*)-CH4 PAIRING Pairing setting - WL READY LAMP Wireless flash ready lamp setting ON/OFF(*) BACKLIGHT LCD backlight setting AUTO(*)/ON/OFF m/ft Flash range unit setting m(*)/ft POWER SAVE Power-saving timer setting 30SEC/3MIN(*)/ 30MIN/OFF WL...
...LED light ON/OFF setting ON/OFF MEMORY AF LED LEVEL Memory settings AF illuminator level setting MR1/MR2 HIGH(*)/LOW GB TEST Test-flash setting GROUP/1TIME (*)/ 3TIMES/4SEC LEVEL STEP Power level setting steps 0.3EV(*)/0.5EV CUSTOM KEY Custom key settings - / SELECT Wireless ... SET Optical controlled wireless CH setting CH1(*)-CH4 PAIRING Pairing setting - WL READY LAMP Wireless flash ready lamp setting ON/OFF(*) BACKLIGHT LCD backlight setting AUTO(*)/ON/OFF m/ft Flash range unit setting m(*)/ft POWER SAVE Power-saving timer setting 30SEC/3MIN(*)/ 30MIN/OFF WL...

Operating Instructions
Page 24
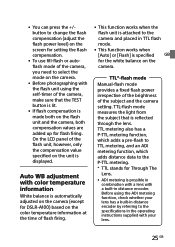
... TL stands for Through The Lens. • MANUAL flash mode (page 26) You need to manually adjust the flash power level for radio wireless flash photography. • Flash off mode Flash firing is capable of repetition in multiple flash and the frequency in multiple flash. 2 Press the shutter button to take a photo...58261;) and rotate the control wheel to select the flash mode of the flash unit. • Group flash mode (page 36) You can specify the number of indicating distances within the indicated flash range. Make sure that the flash unit is ready to 28 m. GB 24 The orange...
... TL stands for Through The Lens. • MANUAL flash mode (page 26) You need to manually adjust the flash power level for radio wireless flash photography. • Flash off mode Flash firing is capable of repetition in multiple flash and the frequency in multiple flash. 2 Press the shutter button to take a photo...58261;) and rotate the control wheel to select the flash mode of the flash unit. • Group flash mode (page 36) You can specify the number of indicating distances within the indicated flash range. Make sure that the flash unit is ready to 28 m. GB 24 The orange...
Operating Instructions
Page 25
... and the camera, both compensation values are added up for flash firing. • You can press the +/button to change the flash compensation (adjust the flash power level) on the screen for setting the flash compensation. • To use fill-flash or autoflash mode of the camera, you need to select the mode on ...the camera. • Before photographing with the flash unit using the ADI metering function, check whether your lens has a built-in distance encoder by referring to the specifications in the operating instructions supplied...
... and the camera, both compensation values are added up for flash firing. • You can press the +/button to change the flash compensation (adjust the flash power level) on the screen for setting the flash compensation. • To use fill-flash or autoflash mode of the camera, you need to select the mode on ...the camera. • Before photographing with the flash unit using the ADI metering function, check whether your lens has a built-in distance encoder by referring to the specifications in the operating instructions supplied...


