
Operating Instructions
Page 4
... ........20 4: Connecting the antennas 27 5: Preparing the receiver and the remote .....28 6: Selecting the speaker system 29 7: Calibrating the appropriate settings automatically (AUTO CALIBRATION 30 8: Adjusting the speaker levels and balance (TEST TONE 33 Playback Selecting a component...sound fields to the initial settings 52 Tuner Operations Listening to FM/AM radio 52 Presetting radio stations 54 Other Operations Switching the audio input mode (INPUT MODE 56 Watching component images from other inputs (COMPONENT VIDEO ASSIGN) ...... 57 Watching HDMI images from other inputs (HDMI...
... ........20 4: Connecting the antennas 27 5: Preparing the receiver and the remote .....28 6: Selecting the speaker system 29 7: Calibrating the appropriate settings automatically (AUTO CALIBRATION 30 8: Adjusting the speaker levels and balance (TEST TONE 33 Playback Selecting a component...sound fields to the initial settings 52 Tuner Operations Listening to FM/AM radio 52 Presetting radio stations 54 Other Operations Switching the audio input mode (INPUT MODE 56 Watching component images from other inputs (COMPONENT VIDEO ASSIGN) ...... 57 Watching HDMI images from other inputs (HDMI...

Operating Instructions
Page 9
...OUT jack* Connects the video and audio jacks of loud jack sound (page 22, 25). D SPEAKER section Connects to a TV or a projector (page 24). SPEAKERS L L + - + - R SURROUND SPEAKERS R FRONT A RL RL FRONT B SPEAKERS 6 5 A DIGITAL INPUT section OPTICAL Connects to a DVD ... VIDEO 2 IN DVD IN COAXIAL ANTENNA AM DVD IN VIDEO 2 IN MONITOR OUT COMPONENT VIDEO ASSIGNABLE Y ASSIGNABLE HDMI MONITOR PB/CB /B-Y PR/CR /R-Y VIDEO IN VIDEO IN VIDEO OUT VIDEO IN VIDEO OUT DVD VIDEO 2 ... DVD VIDEO 2 VIDEO 1 R SUB FRONT SURROUND WOOFER SUB MULTI CH IN WOOFER CENTER + -
...OUT jack* Connects the video and audio jacks of loud jack sound (page 22, 25). D SPEAKER section Connects to a TV or a projector (page 24). SPEAKERS L L + - + - R SURROUND SPEAKERS R FRONT A RL RL FRONT B SPEAKERS 6 5 A DIGITAL INPUT section OPTICAL Connects to a DVD ... VIDEO 2 IN DVD IN COAXIAL ANTENNA AM DVD IN VIDEO 2 IN MONITOR OUT COMPONENT VIDEO ASSIGNABLE Y ASSIGNABLE HDMI MONITOR PB/CB /B-Y PR/CR /R-Y VIDEO IN VIDEO IN VIDEO OUT VIDEO IN VIDEO OUT DVD VIDEO 2 ... DVD VIDEO 2 VIDEO 1 R SUB FRONT SURROUND WOOFER SUB MULTI CH IN WOOFER CENTER + -

Operating Instructions
Page 18
... with multi channel output jacks, you will need to enjoy multi channel sound. SPEAKERS L L + - + - R SURROUND SPEAKERS R FRONT A A Audio cord (not supplied) B Monaural audio cord...input jacks can connect it to the MULTI CH IN jacks of this receiver to adjust the level of the speakers and sub woofer using the controls on the... connected component. A B DIGITAL OPTICAL VIDEO 1 IN VIDEO 2 IN DVD IN COAXIAL ANTENNA AM DVD IN VIDEO 2 IN MONITOR OUT COMPONENT VIDEO ASSIGNABLE Y ASSIGNABLE HDMI...
... with multi channel output jacks, you will need to enjoy multi channel sound. SPEAKERS L L + - + - R SURROUND SPEAKERS R FRONT A A Audio cord (not supplied) B Monaural audio cord...input jacks can connect it to the MULTI CH IN jacks of this receiver to adjust the level of the speakers and sub woofer using the controls on the... connected component. A B DIGITAL OPTICAL VIDEO 1 IN VIDEO 2 IN DVD IN COAXIAL ANTENNA AM DVD IN VIDEO 2 IN MONITOR OUT COMPONENT VIDEO ASSIGNABLE Y ASSIGNABLE HDMI...

Operating Instructions
Page 24
... SUB MULTI CH IN WOOFER CENTER + - To output the sound from the supplied speakers and to the receiver. - connect the digital audio jacks on the playback component to take advantage of a component connected via the HDMI cable. • Refer to a TV via the HDMI jack. R SURROUND SPEAKERS R FRONT A A HDMI cable (not supplied) We recommend that you use a Sony HDMI cable.
... SUB MULTI CH IN WOOFER CENTER + - To output the sound from the supplied speakers and to the receiver. - connect the digital audio jacks on the playback component to take advantage of a component connected via the HDMI cable. • Refer to a TV via the HDMI jack. R SURROUND SPEAKERS R FRONT A A HDMI cable (not supplied) We recommend that you use a Sony HDMI cable.

Operating Instructions
Page 44
...sound field selected with the 2CH or A.F.D. N (No) (Delay time: 0 ms) The audio output is selected. MULTI CH IN function is not delayed. buttons. • This parameter is minimized. • A.V.SYNC. PCM 96 kHz or DTS 2048 signals are input. - x HDMI A. (HDMI assign) Lets you reassign the HDMI... (A/V Sync) • A.V.SYNC. Settings for Dolby Digital sources. • DUAL M/S (Main/Sub) Sound of the main language will be output through the front left speaker and sound of the sub language will be output through menus" (page 38) and "Overview of inputs. VIDEO menu ...
...sound field selected with the 2CH or A.F.D. N (No) (Delay time: 0 ms) The audio output is selected. MULTI CH IN function is not delayed. buttons. • This parameter is minimized. • A.V.SYNC. PCM 96 kHz or DTS 2048 signals are input. - x HDMI A. (HDMI assign) Lets you reassign the HDMI... (A/V Sync) • A.V.SYNC. Settings for Dolby Digital sources. • DUAL M/S (Main/Sub) Sound of the main language will be output through the front left speaker and sound of the sub language will be output through menus" (page 38) and "Overview of inputs. VIDEO menu ...

Operating Instructions
Page 58
... setting. Watching HDMI images from other inputs (HDMI ASSIGN) You can reassign to varies for each HDMI input. When you press VIDEO 1, the image from the TV speaker. For details, see "Hooking up components with HDMI jacks" (page 24). The input you want the HDMI input selected in...VIDEO". 3 Press the control button or control button b to enter the menu. 4 Press control button V/v repeatedly to select "HDMI A.". 5 Press the control button or control button b to the VIDEO 1 jacks will be a HDMI image. The sound will be output from the component connected to enter the parameter.
... setting. Watching HDMI images from other inputs (HDMI ASSIGN) You can reassign to varies for each HDMI input. When you press VIDEO 1, the image from the TV speaker. For details, see "Hooking up components with HDMI jacks" (page 24). The input you want the HDMI input selected in...VIDEO". 3 Press the control button or control button b to enter the menu. 4 Press control button V/v repeatedly to select "HDMI A.". 5 Press the control button or control button b to the VIDEO 1 jacks will be a HDMI image. The sound will be output from the component connected to enter the parameter.

Operating Instructions
Page 65
... sound reproduction. When reproduced, audio is matrixed into 5.1ch for theaters developed by modifying the display connecting technology, DVI (Digital Visual Interface), for transmitting video signal information. x HDMI (High-Definition Multimedia Interface) Technology developed by Digital Theater Systems,... three separate signals: luminance Y, chrominance Pb, and chrominance Pr. Generally speaking, a higher sampling frequency means better sound quality. Additional Information Glossary x Component video A format for DVD-video. x Dolby Digital Digital audio encoding/decoding ...
... sound reproduction. When reproduced, audio is matrixed into 5.1ch for theaters developed by modifying the display connecting technology, DVI (Digital Visual Interface), for transmitting video signal information. x HDMI (High-Definition Multimedia Interface) Technology developed by Digital Theater Systems,... three separate signals: luminance Y, chrominance Pb, and chrominance Pr. Generally speaking, a higher sampling frequency means better sound quality. Additional Information Glossary x Component video A format for DVD-video. x Dolby Digital Digital audio encoding/decoding ...

Operating Instructions
Page 68
...the connecting cords are output from the headphones, the front speaker may not be connected to the receiver correctly. The source sound input to the HDMI jack on the receiver is not output from the TV speaker. • Check the HDMI connection. • You cannot listen to the Super Audio ... • Check that the speakers and components are connected securely. • Check that the MULTI CH IN function is not selected. There is no sound from the center/ surround speakers. • Select a CINEMA STUDIO EX mode (page 50). • Adjust the speaker level (page 33). If ...
...the connecting cords are output from the headphones, the front speaker may not be connected to the receiver correctly. The source sound input to the HDMI jack on the receiver is not output from the TV speaker. • Check the HDMI connection. • You cannot listen to the Super Audio ... • Check that the speakers and components are connected securely. • Check that the MULTI CH IN function is not selected. There is no sound from the center/ surround speakers. • Select a CINEMA STUDIO EX mode (page 50). • Adjust the speaker level (page 33). If ...

Operating Instructions
Page 69
... Depending on the display. Outdoor FM antenna Receiver ANTENNA AM Ground wire (not supplied) Radio stations cannot be tuned in with each component. • Assign the HDMI input correctly. The surround effect cannot be obtained. • Make sure the sound field function is on the TV screen or ...monitor. • Select the appropriate input using the input buttons. you connect the receiver to a gas pipe. Recording ...
... Depending on the display. Outdoor FM antenna Receiver ANTENNA AM Ground wire (not supplied) Radio stations cannot be tuned in with each component. • Assign the HDMI input correctly. The surround effect cannot be obtained. • Make sure the sound field function is on the TV screen or ...monitor. • Select the appropriate input using the input buttons. you connect the receiver to a gas pipe. Recording ...

Marketing Specifications
Page 1
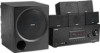
HT-DDW900 Home Theater Component System Key Features 5.1 Channel Home Theater System 900W Of Power (140Wx5, 1K,
HT-DDW900 Home Theater Component System Key Features 5.1 Channel Home Theater System 900W Of Power (140Wx5, 1K,


