
Reference Guide
Page 1
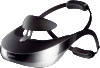
Head Mounted Display Reference Guide 4-471-977-11(1) HMZ-T3W Before Initial Use Refer to the "Startup Guide" for instructions on connecting the system, wearing the unit, and completing initial settings.
Head Mounted Display Reference Guide 4-471-977-11(1) HMZ-T3W Before Initial Use Refer to the "Startup Guide" for instructions on connecting the system, wearing the unit, and completing initial settings.

Reference Guide
Page 2
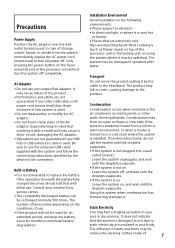
...turned off. For more information regarding this equipment in the space provided below. Notice for customers in the U.S.A. HMZ-T3W Processor Unit HMZ-T3W-P Head Mounted Unit and Battery Unit HMZ-T3W-H Serial No. Should you notice an abnormality in the literature accompanying the appliance. and Canada This symbol is... not handle damaged or leaking Lithium-Ion batteries. Do not install this product. You can help preserve our environment by returning your Sony dealer regarding recycling of electric 2 shock to them whenever you . Model No. Refer to persons. To reduce the risk of...
...turned off. For more information regarding this equipment in the space provided below. Notice for customers in the U.S.A. HMZ-T3W Processor Unit HMZ-T3W-P Head Mounted Unit and Battery Unit HMZ-T3W-H Serial No. Should you notice an abnormality in the literature accompanying the appliance. and Canada This symbol is... not handle damaged or leaking Lithium-Ion batteries. Do not install this product. You can help preserve our environment by returning your Sony dealer regarding recycling of electric 2 shock to them whenever you . Model No. Refer to persons. To reduce the risk of...

Reference Guide
Page 6
Sony recommends that you are wearing the head mounted unit correctly. - If you experience any discomfort, you are perceived...possibility that watching with bifocals may be used with the unit may cause low temperature burn. • The head mounted unit can be displayed after another 3 hours. consult a doctor if you believe necessary. • Avoid ... the message and continue watching, the system will vary from using this device. Watching Video with the Head Mounted Display • Some people may experience discomfort (such as usual during use the system within this range...
Sony recommends that you are wearing the head mounted unit correctly. - If you experience any discomfort, you are perceived...possibility that watching with bifocals may be used with the unit may cause low temperature burn. • The head mounted unit can be displayed after another 3 hours. consult a doctor if you believe necessary. • Avoid ... the message and continue watching, the system will vary from using this device. Watching Video with the Head Mounted Display • Some people may experience discomfort (such as usual during use the system within this range...
Reference Guide
Page 7
...damaged, but is due to this system is on Leave the system on the conditions of static electricity may be connected. Consult your nearest Sony service center. • The completely discharged battery can be reduced by wearing clothes made of times varies depending on , and wait until the... system when condensation has formed may fall or crash, causing damage to be splashed. The number of 7 Condensation may form on the head mounted unit or the processor unit will not be damaged if splashed with the system and follow the connecting instructions specified by the cable or the...
...damaged, but is due to this system is on Leave the system on the conditions of static electricity may be connected. Consult your nearest Sony service center. • The completely discharged battery can be reduced by wearing clothes made of times varies depending on , and wait until the... system when condensation has formed may fall or crash, causing damage to be splashed. The number of 7 Condensation may form on the head mounted unit or the processor unit will not be damaged if splashed with the system and follow the connecting instructions specified by the cable or the...

Reference Guide
Page 8
... cleaners. • Do not impart excessive shock or force to the lenses. A chipped or cracked lens could cause injury. Remove the earbuds from the head mounted unit or the processor unit, make sure to the supplied headphones, stop using a soft cloth lightly moistened with a soft cloth occasionally. • Also ... you move or need to avoid smears or scratches. Cleaning the System Clean outer surfaces of the connector and the HDMI jack on the head mounted unit carefully to ship the system for future use . To protect your hearing, avoid listening at an angle or force it into the ...
... cleaners. • Do not impart excessive shock or force to the lenses. A chipped or cracked lens could cause injury. Remove the earbuds from the head mounted unit or the processor unit, make sure to the supplied headphones, stop using a soft cloth lightly moistened with a soft cloth occasionally. • Also ... you move or need to avoid smears or scratches. Cleaning the System Clean outer surfaces of the connector and the HDMI jack on the head mounted unit carefully to ship the system for future use . To protect your hearing, avoid listening at an angle or force it into the ...

Reference Guide
Page 10
Contents Health Precautions 6 Precautions 7 Supplied Accessories 11 Parts and Controls 12 Charging the Battery 15 Using in Wireless Communication 16 Using in Wired Communication 18 Using with a Portable Device 19 Fitting the Head Mounted Unit 20 Confirming Screen Alignment 25 System Settings 27 Troubleshooting 38 When Disposing of the System 47 Specifications 48 Trademarks 51 10
Contents Health Precautions 6 Precautions 7 Supplied Accessories 11 Parts and Controls 12 Charging the Battery 15 Using in Wireless Communication 16 Using in Wired Communication 18 Using with a Portable Device 19 Fitting the Head Mounted Unit 20 Confirming Screen Alignment 25 System Settings 27 Troubleshooting 38 When Disposing of the System 47 Specifications 48 Trademarks 51 10
Reference Guide
Page 12
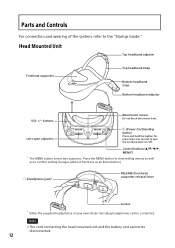
... button). (Headphone) jack* RELEASE (Forehead supporter release) lever Lenses * Either the supplied headphones or your own stereo mini-plug headphones can be disconnected. 12 Head Mounted Unit Top headband adjuster Forehead supporter Top headband strap Bottom headband strap Bottom headband adjuster VOL +/- Control buttons MENU*) * The MENU button serves two purposes...
... button). (Headphone) jack* RELEASE (Forehead supporter release) lever Lenses * Either the supplied headphones or your own stereo mini-plug headphones can be disconnected. 12 Head Mounted Unit Top headband adjuster Forehead supporter Top headband strap Bottom headband strap Bottom headband adjuster VOL +/- Control buttons MENU*) * The MENU button serves two purposes...

Reference Guide
Page 15
... is shorter when wireless communication conditions are as follows at room temperature of the Information screen (page 28). The remaining battery capacity appears on the head mounted unit to 95 °F). - Tip • Charging is possible even while the system is not completed in MHL connection - Checking the remaining battery capacity Press...
... is shorter when wireless communication conditions are as follows at room temperature of the Information screen (page 28). The remaining battery capacity appears on the head mounted unit to 95 °F). - Tip • Charging is possible even while the system is not completed in MHL connection - Checking the remaining battery capacity Press...

Reference Guide
Page 17
... adversely affected, decreasing the possible communication distance and generating disturbances in a room of the battery unit. Processor unit SONY logo After using Remove the stand from the battery unit and hook it on the head mounted unit to -room communication). • In the following cases, the status of wireless communication between the processor...
... adversely affected, decreasing the possible communication distance and generating disturbances in a room of the battery unit. Processor unit SONY logo After using Remove the stand from the battery unit and hook it on the head mounted unit to -room communication). • In the following cases, the status of wireless communication between the processor...

Reference Guide
Page 19
...HDMI cable. An MHL device can pack the system in the supplied carrying case. Smartphone, etc. Using with the hook and loop fastener. Head mounted unit Battery unit HDMI IN/ MHL Battery unit * For connecting an MHL device, use the MHL cable (sold separately). With this connection method... excluding the processor unit, some setting items in the pocket and fix the head mounted unit with a Portable Device The system can use the system where there is prohibited, be sure to set "Wireless Connection" in "General ...
...HDMI cable. An MHL device can pack the system in the supplied carrying case. Smartphone, etc. Using with the hook and loop fastener. Head mounted unit Battery unit HDMI IN/ MHL Battery unit * For connecting an MHL device, use the MHL cable (sold separately). With this connection method... excluding the processor unit, some setting items in the pocket and fix the head mounted unit with a Portable Device The system can use the system where there is prohibited, be sure to set "Wireless Connection" in "General ...

Reference Guide
Page 20
... up and down. Tip • Adjust the position of the forehead supporter forward or downward if the head mounted unit contacts your glasses or nose. 20 Fitting the Head Mounted Unit The head mounted unit can be adjusted in several ways to the "Startup Guide." Adjusting the forehead supporter The... forehead supporter can be adjusted back and forth or up and down. When fitting the head mounted unit for the first time after purchase, refer to ensure a personalized, comfortable fit. For a more comfortable fit, always adjust the...
... up and down. Tip • Adjust the position of the forehead supporter forward or downward if the head mounted unit contacts your glasses or nose. 20 Fitting the Head Mounted Unit The head mounted unit can be adjusted in several ways to the "Startup Guide." Adjusting the forehead supporter The... forehead supporter can be adjusted back and forth or up and down. When fitting the head mounted unit for the first time after purchase, refer to ensure a personalized, comfortable fit. For a more comfortable fit, always adjust the...
Reference Guide
Page 21
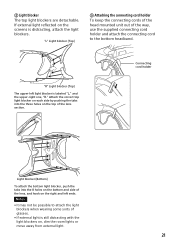
... room lights or move away from external light. 21 "L" Light blocker (Top) Attaching the connecting cord holder To keep the connecting cords of the head mounted unit out of glasses. • If external light is distracting, attach the light blockers. Attach the correct top light blocker on each side by pushing...
... room lights or move away from external light. 21 "L" Light blocker (Top) Attaching the connecting cord holder To keep the connecting cords of the head mounted unit out of glasses. • If external light is distracting, attach the light blockers. Attach the correct top light blocker on each side by pushing...

Reference Guide
Page 22
... the strap in a little. Note • The circles on the bottom of the headband adjuster as 22 For a Comfortable Fit Have the weight of the head mounted unit balanced between the forehead supporter and bottom headband, and after repositioning it fits securely. To tighten, simply push the right end of your nose.... Be sure to bring the lenses in front of your eyes, make sure it to leave a space between the bridge of the head mounted unit (between the lenses) and your face, so that it feels balanced between your forehead and the back of the strap in a little.
... the strap in a little. Note • The circles on the bottom of the headband adjuster as 22 For a Comfortable Fit Have the weight of the head mounted unit balanced between the forehead supporter and bottom headband, and after repositioning it fits securely. To tighten, simply push the right end of your nose.... Be sure to bring the lenses in front of your eyes, make sure it to leave a space between the bridge of the head mounted unit (between the lenses) and your face, so that it feels balanced between your forehead and the back of the strap in a little.

Reference Guide
Page 25
... to make sure the screens are described below, with both eyes 25 The display section of the head mounted unit consists of how to form a single image. Images on the left and right. Screens on the head mounted unit are aligned properly. Confirming Screen Alignment Confirm screen alignment by referring to the confirmation screen...
... to make sure the screens are described below, with both eyes 25 The display section of the head mounted unit consists of how to form a single image. Images on the left and right. Screens on the head mounted unit are aligned properly. Confirming Screen Alignment Confirm screen alignment by referring to the confirmation screen...

Reference Guide
Page 26
...the horizontal line. 26 "" marks and the horizontal line do not intersect, recheck if you are wearing the head mounted unit correctly, referring to be damaged. as needed so that all three "" marks and the horizontal line ...intersect. Correct Display For correct display, slide the lens span adjusters as the head mounted unit may have been bent out of shape, or it may be extremely slanted. Incorrect Display If even one...appears to the "Startup Guide." If this condition occurs, contact your nearest Sony dealer or local authorized...
...the horizontal line. 26 "" marks and the horizontal line do not intersect, recheck if you are wearing the head mounted unit correctly, referring to be damaged. as needed so that all three "" marks and the horizontal line ...intersect. Correct Display For correct display, slide the lens span adjusters as the head mounted unit may have been bent out of shape, or it may be extremely slanted. Incorrect Display If even one...appears to the "Startup Guide." If this condition occurs, contact your nearest Sony dealer or local authorized...

Reference Guide
Page 27
Basic Menu Operations 1 Press the MENU button on the head mounted unit. To view the menus, press the MENU button on the head mounted unit. Tips • To return to the previous menu, press the button. • To exit the setting menu, press the button in the ...
Basic Menu Operations 1 Press the MENU button on the head mounted unit. To view the menus, press the MENU button on the head mounted unit. Tips • To return to the previous menu, press the button. • To exit the setting menu, press the button in the ...

Reference Guide
Page 28
For details, refer to the system and shows various types of the head mounted unit to match the distance between your eyes (interpupillary distance), for adjustment. Notes • Without the lens span adjusted correctly, you cannot enjoy an optimal ... the system, and "No signal" is muted during adjustment. • The volume cannot be changed during adjustment. 28 Use the lens span adjusters on the head mounted unit for an optimal viewing experience. Menus Default settings are input. AC power operation Strength of radio wave (page 17) Battery remaining...
For details, refer to the system and shows various types of the head mounted unit to match the distance between your eyes (interpupillary distance), for adjustment. Notes • Without the lens span adjusted correctly, you cannot enjoy an optimal ... the system, and "No signal" is muted during adjustment. • The volume cannot be changed during adjustment. 28 Use the lens span adjusters on the head mounted unit for an optimal viewing experience. Menus Default settings are input. AC power operation Strength of radio wave (page 17) Battery remaining...

Reference Guide
Page 35
... incorrectly, and you to watch or listen to content on a TV or other display device is not connected to restrict use of inactivity on the head mounted unit. Auto: The system automatically detects the input level. On: Activates pass-through Not available when the processor unit is disconnected. For details, refer to...
... incorrectly, and you to watch or listen to content on a TV or other display device is not connected to restrict use of inactivity on the head mounted unit. Auto: The system automatically detects the input level. On: Activates pass-through Not available when the processor unit is disconnected. For details, refer to...

Reference Guide
Page 36
... with the system's "Control for HDMI CEC (Consumer Electronic Control)-compatible equipment connected to the system using the buttons (page 12) on the head mounted unit. button: Starts playback. button: Pauses playback. button: Jumps to control it. On: Turns the system... off automatically 20 minutes after you take the head mounted unit off. Notes • Audio is muted while this setting is configured. • The volume cannot be controlled when "Picture Mode" is...
... with the system's "Control for HDMI CEC (Consumer Electronic Control)-compatible equipment connected to the system using the buttons (page 12) on the head mounted unit. button: Starts playback. button: Pauses playback. button: Jumps to control it. On: Turns the system... off automatically 20 minutes after you take the head mounted unit off. Notes • Audio is muted while this setting is configured. • The volume cannot be controlled when "Picture Mode" is...

Reference Guide
Page 37
... this function. Wireless Standby Not available when the processor unit is in standby mode, the processor unit starts up in synchronization with starting up the head mounted unit in wireless operation. Reset to factory settings Resets all settings to the original default values. Note • The password set in "Set password" (in...
... this function. Wireless Standby Not available when the processor unit is in standby mode, the processor unit starts up in synchronization with starting up the head mounted unit in wireless operation. Reset to factory settings Resets all settings to the original default values. Note • The password set in "Set password" (in...
