Instruction Manual
Page 8
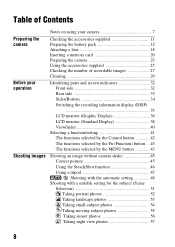
... 11 Preparing the battery pack 12 Attaching a lens 18 Inserting a memory card 20 Preparing the camera 23 Using the accessories supplied 25 Checking the number of recordable images 27 Cleaning 29 Identifying parts and screen indicators 32 Front side 32 Rear side 33 Sides/Bottom ...
... 11 Preparing the battery pack 12 Attaching a lens 18 Inserting a memory card 20 Preparing the camera 23 Using the accessories supplied 25 Checking the number of recordable images 27 Cleaning 29 Identifying parts and screen indicators 32 Front side 32 Rear side 33 Sides/Bottom ...
Instruction Manual
Page 11
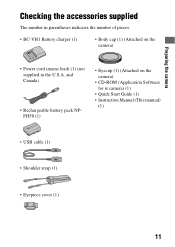
... Start Guide (1) • Instruction Manual (This manual) (1) • USB cable (1) • Shoulder strap (1) • Eyepiece cover (1) 11 Preparing the camera Preparing the camera Checking the accessories supplied The number in the U.S.A.
... Start Guide (1) • Instruction Manual (This manual) (1) • USB cable (1) • Shoulder strap (1) • Eyepiece cover (1) 11 Preparing the camera Preparing the camera Checking the accessories supplied The number in the U.S.A.

Instruction Manual
Page 25
The other accessories are described in the following pages. • Rechargeable battery pack (page 12) • Battery charger (page 12) • Power cord (mains lead) (not supplied in the U.S.A. Eyepiece cover 25 Preparing the camera Using the accessories supplied This section describes how to use the shoulder strap, the eyepiece cover, and eyecup. and Canada) (page 12) • USB cable (pages 122, 138) • CD-ROM (page 130) Attaching the shoulder strap Attach both ends of the strap onto the camera. • You can also attach the eyepiece cover (page 26) on the strap.
The other accessories are described in the following pages. • Rechargeable battery pack (page 12) • Battery charger (page 12) • Power cord (mains lead) (not supplied in the U.S.A. Eyepiece cover 25 Preparing the camera Using the accessories supplied This section describes how to use the shoulder strap, the eyepiece cover, and eyecup. and Canada) (page 12) • USB cable (pages 122, 138) • CD-ROM (page 130) Attaching the shoulder strap Attach both ends of the strap onto the camera. • You can also attach the eyepiece cover (page 26) on the strap.

Instruction Manual
Page 33
Rear side Before your operation A Accessory shoe (78) B Viewfinder* (24) C MENU button (43) D Eyepiece sensors (71, 117) E LCD monitor (36, 94, 98) F Diopter-adjustment dial (24) G For shooting: button (79) For viewing: button (95) (Exposure) (Zoom in) H Fn (Function) button (43) I Control button (Enter) (41)/ Spot AF button (73) J Control button When the menu is turned on: v/ V/b/B (41) When the menu is turned off: DISP (35, 94)/ (89)/ISO (82)/ (75) K (Delete) button (102) L (Playback) button (94) * Do not directly touch these parts. 33
Rear side Before your operation A Accessory shoe (78) B Viewfinder* (24) C MENU button (43) D Eyepiece sensors (71, 117) E LCD monitor (36, 94, 98) F Diopter-adjustment dial (24) G For shooting: button (79) For viewing: button (95) (Exposure) (Zoom in) H Fn (Function) button (43) I Control button (Enter) (41)/ Spot AF button (73) J Control button When the menu is turned on: v/ V/b/B (41) When the menu is turned off: DISP (35, 94)/ (89)/ISO (82)/ (75) K (Delete) button (102) L (Playback) button (94) * Do not directly touch these parts. 33
Instruction Manual
Page 78
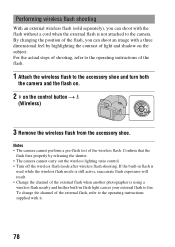
... change the channel of light and shadow on the control button t (Wireless) 3 Remove the wireless flash from the accessory shoe. If the built-in flash light causes your external flash to the accessory shoe and turn both the camera and the flash on. 2 on the subject. Performing wireless flash shooting With an...
... change the channel of light and shadow on the control button t (Wireless) 3 Remove the wireless flash from the accessory shoe. If the built-in flash light causes your external flash to the accessory shoe and turn both the camera and the flash on. 2 on the subject. Performing wireless flash shooting With an...
Instruction Manual
Page 141
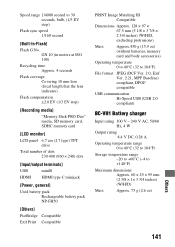
... Compatible Dimensions Approx. 128 × 97 × 67.5 mm (5 1/8 × 3 7/8 × 2 3/4 inches) (W/H/D, excluding protrusions) Mass Approx.450 g (15.9 oz) (without batteries, memory card and body accessories) Operating temperature 0 to 40°C (32 to 104°F) File format JPEG (DCF Ver. 2.0, Exif Ver. 2.21, MPF Baseline) compliant, DPOF compatible USB communication Hi...
... Compatible Dimensions Approx. 128 × 97 × 67.5 mm (5 1/8 × 3 7/8 × 2 3/4 inches) (W/H/D, excluding protrusions) Mass Approx.450 g (15.9 oz) (without batteries, memory card and body accessories) Operating temperature 0 to 40°C (32 to 104°F) File format JPEG (DCF Ver. 2.0, Exif Ver. 2.21, MPF Baseline) compliant, DPOF compatible USB communication Hi...
Instruction Manual
Page 147
... location without the flash, resulting in the image. These dots are recorded incorrectly. • Set the correct date and time (pages 23, 115). Remove these accessories, then shoot. - Attach a lens hood (sold separately). The optical properties of some lenses may be dark. The image is recommended (pages 47, 75). 147 Others...
... location without the flash, resulting in the image. These dots are recorded incorrectly. • Set the correct date and time (pages 23, 115). Remove these accessories, then shoot. - Attach a lens hood (sold separately). The optical properties of some lenses may be dark. The image is recommended (pages 47, 75). 147 Others...

Instruction Manual
Page 157
Consult your eyes. This may cause irrecoverable damage to your Sony dealer or local authorized Sony service facility. In addition to malfunctions and an inability to the defaults each time you charge the battery, the internal rechargeable battery may render...• Before you record one-time events, make a trial recording to the flash surface, resulting in insufficient light emission. • Keep the camera, supplied accessories, etc., out of the reach of the internal rechargeable battery Insert a charged battery pack in sandy or dusty locations may cause a malfunction of your camera...
Consult your eyes. This may cause irrecoverable damage to your Sony dealer or local authorized Sony service facility. In addition to malfunctions and an inability to the defaults each time you charge the battery, the internal rechargeable battery may render...• Before you record one-time events, make a trial recording to the flash surface, resulting in insufficient light emission. • Keep the camera, supplied accessories, etc., out of the reach of the internal rechargeable battery Insert a charged battery pack in sandy or dusty locations may cause a malfunction of your camera...