
Instruction Manual
Page 7
... a nearby object, it may be contrary to direct sunlight. Warning on copyright Television programs, films, videotapes, and other medium. Notes on using your camera or a memory card, etc. Notes on the LCD monitor and lens • The LCD monitor is manufactured using extremely high-precision technology so over 99.99% of...
... a nearby object, it may be contrary to direct sunlight. Warning on copyright Television programs, films, videotapes, and other medium. Notes on using your camera or a memory card, etc. Notes on the LCD monitor and lens • The LCD monitor is manufactured using extremely high-precision technology so over 99.99% of...
Instruction Manual
Page 8
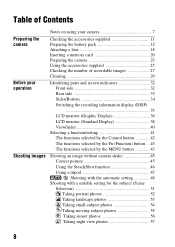
... camera Before your operation Shooting images Notes on using your camera 7 Checking the accessories supplied 11 Preparing the battery pack 12 Attaching a lens 18 Inserting a memory card 20 Preparing the camera 23 Using the accessories supplied 25 Checking the number of recordable images 27 Cleaning 29 Identifying parts and screen indicators...
... camera Before your operation Shooting images Notes on using your camera 7 Checking the accessories supplied 11 Preparing the battery pack 12 Attaching a lens 18 Inserting a memory card 20 Preparing the camera 23 Using the accessories supplied 25 Checking the number of recordable images 27 Cleaning 29 Identifying parts and screen indicators...
Instruction Manual
Page 10
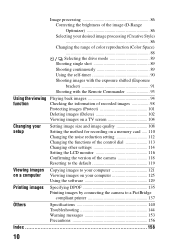
... images (Delete 102 Viewing images on a TV screen 104 Changing your setup Setting image size and image quality 108 Setting the method for recording on a memory card ..... 110 Changing the noise reduction setting 112 Changing the functions of the control dial 113 Changing other settings 114 Setting the LCD monitor 116...
... images (Delete 102 Viewing images on a TV screen 104 Changing your setup Setting image size and image quality 108 Setting the method for recording on a memory card ..... 110 Changing the noise reduction setting 112 Changing the functions of the control dial 113 Changing other settings 114 Setting the LCD monitor 116...

Instruction Manual
Page 20
...as the "SD memory card" in this Instruction Manual. 1 Open the memory card cover. 2 Insert "Memory Stick PRO Duo" media or an SD memory card. • Insert the memory card until it clicks as the "Memory Stick PRO Duo" media and the SD memory card and SDHC memory card are referred to... use using the memory card switch. 20 A MultiMediaCard...
...as the "SD memory card" in this Instruction Manual. 1 Open the memory card cover. 2 Insert "Memory Stick PRO Duo" media or an SD memory card. • Insert the memory card until it clicks as the "Memory Stick PRO Duo" media and the SD memory card and SDHC memory card are referred to... use using the memory card switch. 20 A MultiMediaCard...

Instruction Manual
Page 21
...to direct sunlight. - Locations exposed to the LOCK position, you carry or store the memory card, put it . • Do not expose the memory card to water. • Do not touch the terminal section of the memory card with your hand or a metal object. • When the write-protect switch... it in direct sunlight. - Be careful when you place the memory card near stronglymagnetized material or use or store the memory card under the following conditions: - Preparing the camera 4 Close the memory card cover. To remove the memory card Check that the access lamp is lit, do not remove...
...to direct sunlight. - Locations exposed to the LOCK position, you carry or store the memory card, put it . • Do not expose the memory card to water. • Do not touch the terminal section of the memory card with your hand or a metal object. • When the write-protect switch... it in direct sunlight. - Be careful when you place the memory card near stronglymagnetized material or use or store the memory card under the following conditions: - Preparing the camera 4 Close the memory card cover. To remove the memory card Check that the access lamp is lit, do not remove...

Instruction Manual
Page 22
...* Supports high-speed data transfer using a parallel interface. 22 "Memory Stick PRO Duo" media* "Memory Stick PRO-HG Duo" media* Available with your camera "Memory Stick Duo" media Unavailable with your camera "Memory Stick" media and "Memory Stick PRO" media Unavailable with your camera * This is copyright protection...8226; Do not press down hard when you write down on the memo area. • Do not attach a label on the "Memory Stick" media used with the camera The types of small children. However, proper operation cannot be performed with MagicGate function. Data recording/...
...* Supports high-speed data transfer using a parallel interface. 22 "Memory Stick PRO Duo" media* "Memory Stick PRO-HG Duo" media* Available with your camera "Memory Stick Duo" media Unavailable with your camera "Memory Stick" media and "Memory Stick PRO" media Unavailable with your camera * This is copyright protection...8226; Do not press down hard when you write down on the memo area. • Do not attach a label on the "Memory Stick" media used with the camera The types of small children. However, proper operation cannot be performed with MagicGate function. Data recording/...

Instruction Manual
Page 27
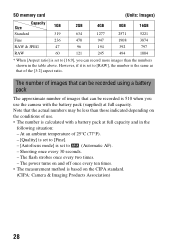
...number of images that can be recorded on a memory card The table shows the approximate number of images that can be recorded (should you continue to shoot using Sony standard memory cards for testing. The values may vary depending on a memory card formatted with another one, or delete images ...in the current memory card (page 102). • When "NO CARD" (the number of recordable...
...number of images that can be recorded on a memory card The table shows the approximate number of images that can be recorded (should you continue to shoot using Sony standard memory cards for testing. The values may vary depending on a memory card formatted with another one, or delete images ...in the current memory card (page 102). • When "NO CARD" (the number of recordable...
Instruction Manual
Page 28
SD memory card (Units: Images) Size Capacity 1GB 2GB 4GB 8GB 16GB Standard 319 634 1277 2571 5221 Fine 236 470 947 1908 3874 RAW & JPEG 47 ...
SD memory card (Units: Images) Size Capacity 1GB 2GB 4GB 8GB 16GB Standard 319 634 1277 2571 5221 Fine 236 470 947 1908 3874 RAW & JPEG 47 ...
Instruction Manual
Page 34
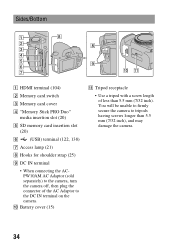
... to firmly secure the camera to tripods having screws longer than 5.5 mm (7/32 inch). Sides/Bottom A HDMI terminal (104) B Memory card switch C Memory card cover D "Memory Stick PRO Duo" media insertion slot (20) E SD memory card insertion slot (20) F (USB) terminal (122, 138) G Access lamp (21) H Hooks for shoulder strap (25) I DC IN terminal...
... to firmly secure the camera to tripods having screws longer than 5.5 mm (7/32 inch). Sides/Bottom A HDMI terminal (104) B Memory card switch C Memory card cover D "Memory Stick PRO Duo" media insertion slot (20) E SD memory card insertion slot (20) F (USB) terminal (122, 138) G Access lamp (21) H Hooks for shoulder strap (25) I DC IN terminal...

Instruction Manual
Page 37
D Display Indication Remaining battery (16) Image quality (109) Image size (108)/Aspect ratio (108) Memory card (20) 100 Remaining number of recordable images (27) Before your operation 37
D Display Indication Remaining battery (16) Image quality (109) Image size (108)/Aspect ratio (108) Memory card (20) 100 Remaining number of recordable images (27) Before your operation 37
Instruction Manual
Page 39
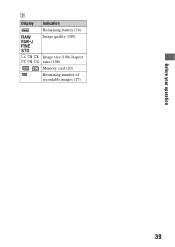
C Display Indication Remaining battery (16) Image quality (109) Image size (108)/Aspect ratio (108) Memory card (20) 100 Remaining number of recordable images (27) Before your operation 39
C Display Indication Remaining battery (16) Image quality (109) Image size (108)/Aspect ratio (108) Memory card (20) 100 Remaining number of recordable images (27) Before your operation 39

Instruction Manual
Page 90
... self-timer The 10-second self-timer is convenient when the photographer appears in the viewfinder. Fine/Standard RAW & JPEG RAW No limit (Until the memory card is full) 3 images 6 images Notes • You cannot shoot images continuously when "0" flashes in a photo and the 2-second self-timer is convenient to reduce...
... self-timer The 10-second self-timer is convenient when the photographer appears in the viewfinder. Fine/Standard RAW & JPEG RAW No limit (Until the memory card is full) 3 images 6 images Notes • You cannot shoot images continuously when "0" flashes in a photo and the 2-second self-timer is convenient to reduce...

Instruction Manual
Page 98
Checking the information of images 98 file number (127) Protect (101) DPOF set (135) Image quality (109) 1/125 F3.5 ISO100 2009 1 1 10:37AM 3/7 Image size (108)/Aspect ratio (108) Remaining battery warning (16) Shutter speed (63) Aperture (61) ISO sensitivity (82) Date of recording File number/total number of recorded images Each time you press DISP on the control button, the information display changes (page 94). Basic information display Display 100-0003 DPOF3 Indication Memory card (20) Folder -
Checking the information of images 98 file number (127) Protect (101) DPOF set (135) Image quality (109) 1/125 F3.5 ISO100 2009 1 1 10:37AM 3/7 Image size (108)/Aspect ratio (108) Remaining battery warning (16) Shutter speed (63) Aperture (61) ISO sensitivity (82) Date of recording File number/total number of recorded images Each time you press DISP on the control button, the information display changes (page 94). Basic information display Display 100-0003 DPOF3 Indication Memory card (20) Folder -

Instruction Manual
Page 99
... F3.5 ISO100 -0.3 Shutter speed (63) Aperture (61) ISO sensitivity (82) Exposure compensation (79) 99 Histogram display Using the viewing function A Display 100-0003 DPOF3 Indication Memory card (20) Folder -
... F3.5 ISO100 -0.3 Shutter speed (63) Aperture (61) ISO sensitivity (82) Exposure compensation (79) 99 Histogram display Using the viewing function A Display 100-0003 DPOF3 Indication Memory card (20) Folder -

Instruction Manual
Page 103
... t [Delete] t [All images] t [Delete] Note • It may take a long time to delete with v/V. 4 Press the button. 5 Select [Delete] with v on a computer or format the memory card using the camera. 103
... t [Delete] t [All images] t [Delete] Note • It may take a long time to delete with v/V. 4 Press the button. 5 Select [Delete] with v on a computer or format the memory card using the camera. 103
Instruction Manual
Page 109
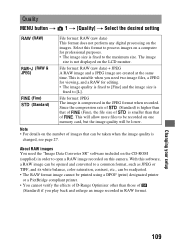
... time. Quality MENU button t 1 t [Quality] t Select the desired setting (RAW) (RAW & JPEG) (Fine) (Standard) File format: RAW (raw data) This format does not perform any digital processing on one memory card, but the image quality will allow more files to be recorded on the images.
... time. Quality MENU button t 1 t [Quality] t Select the desired setting (RAW) (RAW & JPEG) (Fine) (Standard) File format: RAW (raw data) This format does not perform any digital processing on one memory card, but the image quality will allow more files to be recorded on the images.
Instruction Manual
Page 110
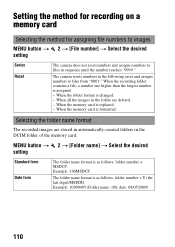
... folders in the following cases and assigns numbers to files in the folder are deleted. - The camera resets numbers in the DCIM folder of the memory card. When all the images in sequence until the number reaches "9999." MENU button t 2 t [Folder name] t Select the desired setting... format is formatted. Example: 10090405 (Folder name: 100, date: 04/05/2009) 110 When the memory card is as follows: folder number + Y (the last digit)/MM/DD. Setting the method for recording on a memory card Selecting the method for assigning file numbers to images MENU button t 2 t [File number] t...
... folders in the following cases and assigns numbers to files in the folder are deleted. - The camera resets numbers in the DCIM folder of the memory card. When all the images in sequence until the number reaches "9999." MENU button t 2 t [Folder name] t Select the desired setting... format is formatted. Example: 10090405 (Folder name: 100, date: 04/05/2009) 110 When the memory card is as follows: folder number + Y (the last digit)/MM/DD. Setting the method for recording on a memory card Selecting the method for assigning file numbers to images MENU button t 2 t [File number] t...

Instruction Manual
Page 111
...t [Select folder]t Select the desired folder Note • You cannot select the folder when you format it on a computer, the memory card may take several minutes depending on a memory card, including protected images. A new folder is created with the camera, depending on the format type used. • Formatting may ... record images. MENU button t 2 t [New folder] Selecting the recording folder When a standard form folder is lit. • Format the memory card using the camera. MENU button t 1 t [Format]t [OK] Notes • During the format, the access lamp lights up. Formatting the...
...t [Select folder]t Select the desired folder Note • You cannot select the folder when you format it on a computer, the memory card may take several minutes depending on a memory card, including protected images. A new folder is created with the camera, depending on the format type used. • Formatting may ... record images. MENU button t 2 t [New folder] Selecting the recording folder When a standard form folder is lit. • Format the memory card using the camera. MENU button t 1 t [Format]t [OK] Notes • During the format, the access lamp lights up. Formatting the...
Instruction Manual
Page 121
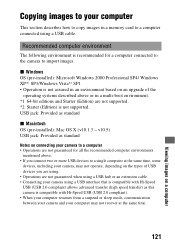
... connected to the camera to import images. Recommended computer environment The following environment is recommended for all the recommended computer environments mentioned above or in a memory card to a computer connected using a USB interface that is compatible with Hi-Speed USB (USB 2.0 compliant) allows advanced transfer (high speed transfer) as standard x Macintosh...
... connected to the camera to import images. Recommended computer environment The following environment is recommended for all the recommended computer environments mentioned above or in a memory card to a computer connected using a USB interface that is compatible with Hi-Speed USB (USB 2.0 compliant) allows advanced transfer (high speed transfer) as standard x Macintosh...

Instruction Manual
Page 122
Stage 1: Connecting the camera and your computer 1 Insert a memory card with recorded images into the camera. 2 Select the type of memory card you want to your computer. The AutoPlay wizard appears on the camera and the computer. 5 Check that [USB connection] in 3 is set to [...Mass Storage]. 6 Connect the camera and your computer using the memory card switch. 3 Insert the sufficiently charged battery pack in the camera, or connect the camera to a wall outlet (wall socket) with the AC Adaptor (sold...
Stage 1: Connecting the camera and your computer 1 Insert a memory card with recorded images into the camera. 2 Select the type of memory card you want to your computer. The AutoPlay wizard appears on the camera and the computer. 5 Check that [USB connection] in 3 is set to [...Mass Storage]. 6 Connect the camera and your computer using the memory card switch. 3 Insert the sufficiently charged battery pack in the camera, or connect the camera to a wall outlet (wall socket) with the AC Adaptor (sold...