
Instruction Manual
Page 10
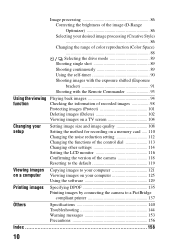
... 89 Shooting single shot 89 Shooting continuously 89 Using the self-timer 90 Shooting images with the exposure shifted (Exposure bracket 91 Shooting with the Remote Commander 93 Using the viewing Playing back images 94 function Checking the information of recorded images 98 Protecting images (Protect 101 Deleting images (Delete 102...
... 89 Shooting single shot 89 Shooting continuously 89 Using the self-timer 90 Shooting images with the exposure shifted (Exposure bracket 91 Shooting with the Remote Commander 93 Using the viewing Playing back images 94 function Checking the information of recorded images 98 Protecting images (Protect 101 Deleting images (Delete 102...

Instruction Manual
Page 32
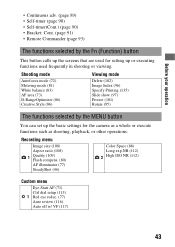
Before your operation Identifying parts and screen indicators See the pages in flash* (75) J Image sensor position mark (71) K Mode dial (48 - 68) L Lens release button (19) 32 M Focus mode switch (69, 74) * Do not directly touch these parts. Front side A Shutter button (48) B Power switch (23) C Control dial (62, 113) D Self-timer lamp (90) E Lens contacts* F Remote sensor G Mirror* H Mount I Built-in parentheses for details of operation.
Before your operation Identifying parts and screen indicators See the pages in flash* (75) J Image sensor position mark (71) K Mode dial (48 - 68) L Lens release button (19) 32 M Focus mode switch (69, 74) * Do not directly touch these parts. Front side A Shutter button (48) B Power switch (23) C Control dial (62, 113) D Self-timer lamp (90) E Lens contacts* F Remote sensor G Mirror* H Mount I Built-in parentheses for details of operation.
Instruction Manual
Page 43
.... Before your operation • Continuous adv. (page 89) • Self-timer (page 90) • Self-timer(Cont.) (page 90) • Bracket: Cont. (page 91) • Remote Commander (page 93) The functions selected by the MENU button You can set up or executing functions used for setting up the basic settings for...
.... Before your operation • Continuous adv. (page 89) • Self-timer (page 90) • Self-timer(Cont.) (page 90) • Bracket: Cont. (page 91) • Remote Commander (page 93) The functions selected by the MENU button You can set up or executing functions used for setting up the basic settings for...
Instruction Manual
Page 68
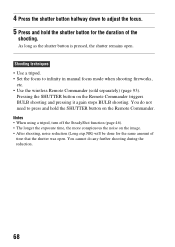
.... Shooting techniques • Use a tripod. • Set the focus to infinity in manual focus mode when shooting fireworks, etc. • Use the wireless Remote Commander (sold separately) (page 93). You do any further shooting during the reduction. 68 As long as the shutter button is pressed, the shutter remains ... for the same amount of the shooting. 4 Press the shutter button halfway down to adjust the focus. 5 Press and hold the SHUTTER button on the Remote Commander triggers BULB shooting and pressing it again stops BULB shooting.
.... Shooting techniques • Use a tripod. • Set the focus to infinity in manual focus mode when shooting fireworks, etc. • Use the wireless Remote Commander (sold separately) (page 93). You do any further shooting during the reduction. 68 As long as the shutter button is pressed, the shutter remains ... for the same amount of the shooting. 4 Press the shutter button halfway down to adjust the focus. 5 Press and hold the SHUTTER button on the Remote Commander triggers BULB shooting and pressing it again stops BULB shooting.

Instruction Manual
Page 93
Note • Use the eyepiece cover (page 26). Shooting with the Wireless Remote Commander. 1 on the control button t (Remote Commander) 2 Focus on the RMT-DSLR1 Wireless Remote Commander (sold separately). Also, refer to the operating instructions supplied with the Remote Commander You can shoot using the SHUTTER and 2SEC (the shutter is released after 2 seconds) buttons on the subject, point the transmitter of the Remote Commander to the remote sensor, and shoot the image. Using the shooting function 93
Note • Use the eyepiece cover (page 26). Shooting with the Wireless Remote Commander. 1 on the control button t (Remote Commander) 2 Focus on the RMT-DSLR1 Wireless Remote Commander (sold separately). Also, refer to the operating instructions supplied with the Remote Commander You can shoot using the SHUTTER and 2SEC (the shutter is released after 2 seconds) buttons on the subject, point the transmitter of the Remote Commander to the remote sensor, and shoot the image. Using the shooting function 93

Instruction Manual
Page 106
...the camera is automatically switched and the image shot with the camera appears on the TV screen. 2 Press the LINK MENU button on the TV Remote Control. 3 Operate with the control button on all the images (page 101). Plays back images automatically (page 97). For details, refer to ...the operating instructions supplied with the TV Remote Control. 1 Connect a TV that support "BRAVIA" Sync can operate the camera with the TV. 106 Returns to the image index screen. The ...
...the camera is automatically switched and the image shot with the camera appears on the TV screen. 2 Press the LINK MENU button on the TV Remote Control. 3 Operate with the control button on all the images (page 101). Plays back images automatically (page 97). For details, refer to ...the operating instructions supplied with the TV Remote Control. 1 Connect a TV that support "BRAVIA" Sync can operate the camera with the TV. 106 Returns to the image index screen. The ...

Instruction Manual
Page 107
Using the viewing function • If the camera performs unnecessary operations in response to the TV Remote Control when the camera is connected to another manufacturer's TV using an HDMI connection, set [CTRL FOR HDMI] in the Setup menu to [Off]. 107
Using the viewing function • If the camera performs unnecessary operations in response to the TV Remote Control when the camera is connected to another manufacturer's TV using an HDMI connection, set [CTRL FOR HDMI] in the Setup menu to [Off]. 107
Instruction Manual
Page 114
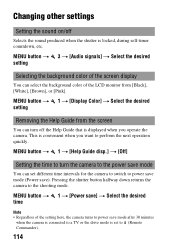
... after 30 minutes when the camera is connected to a TV or the drive mode is set different time intervals for the camera to switch to (Remote Commander). 114 This is convenient when you operate the camera. MENU button t 1 t [Power save] t Select the desired time Note • Regardless of the LCD monitor...
... after 30 minutes when the camera is connected to a TV or the drive mode is set different time intervals for the camera to switch to (Remote Commander). 114 This is convenient when you operate the camera. MENU button t 1 t [Power save] t Select the desired time Note • Regardless of the LCD monitor...

Instruction Manual
Page 160
... 49 Print 135, 137 Program auto 60 Protect 101 Q Quality 109 R RAW 109, 132 Rear sync 75 Red eye reduc 77 Reducing camera shake 45 Remote Commander 93 Reset 119 Rotate 95 S Saturation 86 Scene Selection 51 SD memory card 20 Select folder 111 Self-timer 90 Set the clock 23...
... 49 Print 135, 137 Program auto 60 Protect 101 Q Quality 109 R RAW 109, 132 Rear sync 75 Red eye reduc 77 Reducing camera shake 45 Remote Commander 93 Reset 119 Rotate 95 S Saturation 86 Scene Selection 51 SD memory card 20 Select folder 111 Self-timer 90 Set the clock 23...