

Instruction Manual
Page 4
...is encouraged to try to Subpart B of Part 15 of this product is Sony Deutschland GmbH, Hedelfinger Strasse 61, 70327 Stuttgart, Germany. Consult the dealer or an experienced radio/TV technician for a digital device pursuant to correct the interference by turning the equipment off and on ...a circuit different from that interference will not occur in accordance with the instructions, may influence the picture and sound of FCC Rules. Increase the...
...is encouraged to try to Subpart B of Part 15 of this product is Sony Deutschland GmbH, Hedelfinger Strasse 61, 70327 Stuttgart, Germany. Consult the dealer or an experienced radio/TV technician for a digital device pursuant to correct the interference by turning the equipment off and on ...a circuit different from that interference will not occur in accordance with the instructions, may influence the picture and sound of FCC Rules. Increase the...

Instruction Manual
Page 7
...temperature of 25ºC (77°F), and using this manual The photographs used as described in color) that may become temporarily dark. The pictures used in this camera. On the data specifications described in this manual are reproduced images, and are not actual images shot using a fully ... monitor and lens • The LCD monitor is not a malfunction. This is manufactured using extremely high-precision technology so over 99.99% of pictures in any way. When turning on the camera in a cold location. The monitor may cause a fire. When you must place the camera under...
...temperature of 25ºC (77°F), and using this manual The photographs used as described in color) that may become temporarily dark. The pictures used in this camera. On the data specifications described in this manual are reproduced images, and are not actual images shot using a fully ... monitor and lens • The LCD monitor is not a malfunction. This is manufactured using extremely high-precision technology so over 99.99% of pictures in any way. When turning on the camera in a cold location. The monitor may cause a fire. When you must place the camera under...
Instruction Manual
Page 16
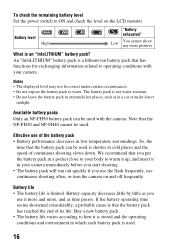
... battery life varies according to how it is that has functions for exchanging information related to warm it up, and insert it more and more pictures. An "InfoLITHIUM" battery pack is used is shorter in which each battery pack is a lithium-ion battery pack that the battery pack has reached the...
... battery life varies according to how it is that has functions for exchanging information related to warm it up, and insert it more and more pictures. An "InfoLITHIUM" battery pack is used is shorter in which each battery pack is a lithium-ion battery pack that the battery pack has reached the...

Instruction Manual
Page 57
Shooting techniques • Take care that the subject does not move to (Night Port./View). Shooting images Taking night view photos This mode is recommended. Note • The picture may not be taken properly when shooting a wholly dark night scene. 57 Set the mode dial to prevent the image from blurring. • The shutter speed is slower, so using a tripod is suitable for z Shooting night scenes at a distance without persons (page 75). Set the flash mode to (Flash Off) when you shoot a night view without losing the dark atmosphere of the surroundings.
Shooting techniques • Take care that the subject does not move to (Night Port./View). Shooting images Taking night view photos This mode is recommended. Note • The picture may not be taken properly when shooting a wholly dark night scene. 57 Set the mode dial to prevent the image from blurring. • The shutter speed is slower, so using a tripod is suitable for z Shooting night scenes at a distance without persons (page 75). Set the flash mode to (Flash Off) when you shoot a night view without losing the dark atmosphere of the surroundings.

Instruction Manual
Page 58
... adjust the amount of light the camera takes in photo shooting. For example, you can use of movement, focus, and light. The brightness of the picture adjusted by the shutter speed and aperture is the most important factor in at one time. Shooting an image the way you want it (Exposure..., or you can enjoy with your camera (pages 61, 63). This section will show you can open ) and aperture (the range that is in a darker picture. To take in light, resulting in focus: depth of field) to enjoy a variety of photographic expressions. You can find out the right way to shoot...
... adjust the amount of light the camera takes in photo shooting. For example, you can use of movement, focus, and light. The brightness of the picture adjusted by the shutter speed and aperture is the most important factor in at one time. Shooting an image the way you want it (Exposure..., or you can enjoy with your camera (pages 61, 63). This section will show you can open ) and aperture (the range that is in a darker picture. To take in light, resulting in focus: depth of field) to enjoy a variety of photographic expressions. You can find out the right way to shoot...

Instruction Manual
Page 72
... shutter button halfway down . (Automatic AF) The [Autofocus mode] is in motion, the camera continues to focus. (Continuous AF) The camera continues to take the picture.
... shutter button halfway down . (Automatic AF) The [Autofocus mode] is in motion, the camera continues to focus. (Continuous AF) The camera continues to take the picture.
Instruction Manual
Page 85
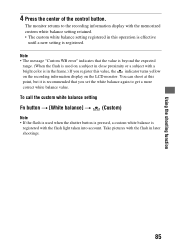
You can shoot at this operation is effective until a new setting is in later shootings. 85 Take pictures with the memorized custom white balance setting retained. • The custom white balance setting registered in this point, but it is recommended that the value ...
You can shoot at this operation is effective until a new setting is in later shootings. 85 Take pictures with the memorized custom white balance setting retained. • The custom white balance setting registered in this point, but it is recommended that the value ...

Instruction Manual
Page 100
... these area with a computer later. When the image has a high-key or lowkey portion, that shows how many pixels of a particular brightness exist in the picture. Shooting with the exposure compensation on the negative side, the histogram will change the histogram accordingly. If the exposure compensation is impossible to the bright...
... these area with a computer later. When the image has a high-key or lowkey portion, that shows how many pixels of a particular brightness exist in the picture. Shooting with the exposure compensation on the negative side, the histogram will change the histogram accordingly. If the exposure compensation is impossible to the bright...
Instruction Manual
Page 105
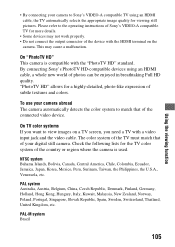
... is compatible with a video input jack and the video cable. By connecting Sony's PhotoTV HD-compatible devices using an HDMI cable, the TV automatically selects the appropriate image quality for viewing still pictures. PAL system Australia, Austria, Belgium, China, Czech Republic, Denmark, Finland,... for a highly-detailed, photo-like expression of the device with the HDMI terminal on a TV screen, you want to match that of your digital still camera. NTSC system Bahama Islands, Bolivia, Canada, Central America, Chile, Colombia, Ecuador, Jamaica, Japan, Korea, Mexico, Peru, Surinam, ...
... is compatible with a video input jack and the video cable. By connecting Sony's PhotoTV HD-compatible devices using an HDMI cable, the TV automatically selects the appropriate image quality for viewing still pictures. PAL system Australia, Austria, Belgium, China, Czech Republic, Denmark, Finland,... for a highly-detailed, photo-like expression of the device with the HDMI terminal on a TV screen, you want to match that of your digital still camera. NTSC system Bahama Islands, Bolivia, Canada, Central America, Chile, Colombia, Ecuador, Jamaica, Japan, Korea, Mexico, Peru, Surinam, ...
Instruction Manual
Page 112
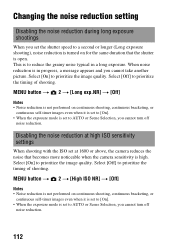
... above, the camera reduces the noise that the shutter is to reduce the grainy noise typical in progress, a message appears and you cannot take another picture. Select [Off] to prioritize the timing of shooting. Select [Off] to prioritize the timing of shooting. This is open. Select [On] to prioritize the image...
... above, the camera reduces the noise that the shutter is to reduce the grainy noise typical in progress, a message appears and you cannot take another picture. Select [Off] to prioritize the timing of shooting. Select [Off] to prioritize the timing of shooting. This is open. Select [On] to prioritize the image...

Instruction Manual
Page 129
... (Edition) are not supported. *2 Starter (Edition) is not compatible with the camera, the following software is provided: • Sony Image Data Suite "Image Data Converter SR" "Image Data Lightbox SR" • Sony Picture Utility "PMB" (Picture Motion Browser) Note • "PMB" is not supported. CPU/Memory: Pentium 4 or faster is recommended, RAM 1 GB or...
... (Edition) are not supported. *2 Starter (Edition) is not compatible with the camera, the following software is provided: • Sony Image Data Suite "Image Data Converter SR" "Image Data Lightbox SR" • Sony Picture Utility "PMB" (Picture Motion Browser) Note • "PMB" is not supported. CPU/Memory: Pentium 4 or faster is recommended, RAM 1 GB or...

Instruction Manual
Page 130
... "Run Install.exe" and follow the instructions that appear on the screen to proceed with the installation. 2 Click [Install]. • Verify that both "Sony Image Data Suite" and "Sony Picture Utility" are checked and follow the instructions on your computer, and insert the CD-ROM (supplied) into the CD-ROM drive. Display: 1024...
... "Run Install.exe" and follow the instructions that appear on the screen to proceed with the installation. 2 Click [Install]. • Verify that both "Sony Image Data Suite" and "Sony Picture Utility" are checked and follow the instructions on your computer, and insert the CD-ROM (supplied) into the CD-ROM drive. Display: 1024...

Instruction Manual
Page 131
3 Remove the CD-ROM after the installation is installed and shortcut icons appear on the desktop. • Sony Image Data Suite "Image Data Converter SR" "Image Data Lightbox SR" • Sony Picture Utility "PMB" "PMB Guide" x Macintosh • Log on as Administrator. 1 Turn on your Macintosh computer, and insert the CD-ROM (supplied) into...
3 Remove the CD-ROM after the installation is installed and shortcut icons appear on the desktop. • Sony Image Data Suite "Image Data Converter SR" "Image Data Lightbox SR" • Sony Picture Utility "PMB" "PMB Guide" x Macintosh • Log on as Administrator. 1 Turn on your Macintosh computer, and insert the CD-ROM (supplied) into...

Instruction Manual
Page 133
When starting up from the start menu, click [Start] t [All Programs] t [Sony Picture Utility] t [Help] t [PMB Guide]. 133 Viewing images on "PMB," refer to view them. • Retouch (Red Eye Correction, etc.), print, and send still images as e-... Data Suite] folder from the [Image Data Lightbox SR] menu. To start up from the Start menu, click [Start] t [All Programs] t [Sony Image Data Suite] t [Help] t [Image Data Lightbox SR]. To start "PMB Guide," double-click the shortcut of the screen. With "PMB" you can: • Import ...
When starting up from the start menu, click [Start] t [All Programs] t [Sony Picture Utility] t [Help] t [PMB Guide]. 133 Viewing images on "PMB," refer to view them. • Retouch (Red Eye Correction, etc.), print, and send still images as e-... Data Suite] folder from the [Image Data Lightbox SR] menu. To start up from the Start menu, click [Start] t [All Programs] t [Sony Image Data Suite] t [Help] t [Image Data Lightbox SR]. To start "PMB Guide," double-click the shortcut of the screen. With "PMB" you can: • Import ...

Instruction Manual
Page 134
Select [Start]. Or, from the Start menu: Click [Start] t [All Programs] t [Sony Picture Utility] t [PMB]. This function informs you of the Information tool appears on the screen when starting "PMB" for the first time. Note • The confirmation message of news, such as software updates. You can change the setting later. 134 To start up/exit "PMB" Double-click the (PMB) icon on the upper-right corner of the screen. To exit the "PMB," click button on the desktop.
Select [Start]. Or, from the Start menu: Click [Start] t [All Programs] t [Sony Picture Utility] t [PMB]. This function informs you of the Information tool appears on the screen when starting "PMB" for the first time. Note • The confirmation message of news, such as software updates. You can change the setting later. 134 To start up/exit "PMB" Double-click the (PMB) icon on the upper-right corner of the screen. To exit the "PMB," click button on the desktop.

Instruction Manual
Page 142
... of the focal length of a 35 mm-format film camera, and shoot with other equipment and playback of images recorded or edited with the same picture angle, by increasing the focal length of images recorded with your camera on other equipment on your lens by half. For example, by JEITA (Japan... specifications are not guaranteed. 142 You can get the approximate equivalent of a 75 mm lens of a 35 mm-format film camera. On focal length The picture angle of this camera is narrower than that of a 35 mm-format film camera.
... of the focal length of a 35 mm-format film camera, and shoot with other equipment and playback of images recorded or edited with the same picture angle, by increasing the focal length of images recorded with your camera on other equipment on your lens by half. For example, by JEITA (Japan... specifications are not guaranteed. 142 You can get the approximate equivalent of a 75 mm lens of a 35 mm-format film camera. On focal length The picture angle of this camera is narrower than that of a 35 mm-format film camera.

Instruction Manual
Page 146
... switch is equipped with it to avoid overheating of the camera. This is beyond the flash range (the distance that the flash can reach), the pictures will be dark because the flash light does not reach the subject. Fuzzy specks appear in images shot using the flash. • Dust in the... the flash light and appeared in succession, the recharging process may take longer than usual to AF. • Ambient light is turned on (page 112). A picture taken with the flash is too dark. • If the subject is not a malfunction. • You are shooting in manual focus mode, set to [On...
... switch is equipped with it to avoid overheating of the camera. This is beyond the flash range (the distance that the flash can reach), the pictures will be dark because the flash light does not reach the subject. Fuzzy specks appear in images shot using the flash. • Dust in the... the flash light and appeared in succession, the recharging process may take longer than usual to AF. • Ambient light is turned on (page 112). A picture taken with the flash is too dark. • If the subject is not a malfunction. • You are shooting in manual focus mode, set to [On...
Instruction Manual
Page 147
...subject, and shoot the subject within the flash range using the flash (page 77). The corners of a tripod or the flash is blurred. • The picture was taken under a strong light source, and excessive light has entered the lens. The image is used, take it is not a malfunction. Depending on the... image (Ghosting). • The picture was taken in a dark location without the flash, resulting in the image. An ND filter or a PL filter. - The use of the...
...subject, and shoot the subject within the flash range using the flash (page 77). The corners of a tripod or the flash is blurred. • The picture was taken under a strong light source, and excessive light has entered the lens. The image is used, take it is not a malfunction. Depending on the... image (Ghosting). • The picture was taken in a dark location without the flash, resulting in the image. An ND filter or a PL filter. - The use of the...