

Instruction Manual
Page 1
Digital Single Lens Reflex Camera Instruction Manual DSLR-A230 Preparing the camera Before your operation Shooting images Using the shooting function Using the viewing function Changing your setup Viewing images on this product and answers to frequently asked questions can be found at our Customer Support Website. Additional information on a computer Printing images Printed using VOC (Volatile Organic Compound)-free vegetable oil based ink.
Digital Single Lens Reflex Camera Instruction Manual DSLR-A230 Preparing the camera Before your operation Shooting images Using the shooting function Using the viewing function Changing your setup Viewing images on this product and answers to frequently asked questions can be found at our Customer Support Website. Additional information on a computer Printing images Printed using VOC (Volatile Organic Compound)-free vegetable oil based ink.

Instruction Manual
Page 7
... and/or bright points (white, red, blue or green in this Instruction Manual The data on the LCD monitor and lens • The LCD monitor is defined under direct sunlight, attach the lens cap. • Images may trail across on a nearby object, it may be copyrighted. The monitor may cause a malfunction. 7 Notes...
... and/or bright points (white, red, blue or green in this Instruction Manual The data on the LCD monitor and lens • The LCD monitor is defined under direct sunlight, attach the lens cap. • Images may trail across on a nearby object, it may be copyrighted. The monitor may cause a malfunction. 7 Notes...
Instruction Manual
Page 8
... Contents Preparing the camera Before your operation Shooting images Notes on using your camera 7 Checking the accessories supplied 11 Preparing the battery pack 12 Attaching a lens 18 Inserting a memory card 20 Preparing the camera 23 Using the accessories supplied 25 Checking the number of recordable images 27 Cleaning 29 Identifying parts...
... Contents Preparing the camera Before your operation Shooting images Notes on using your camera 7 Checking the accessories supplied 11 Preparing the battery pack 12 Attaching a lens 18 Inserting a memory card 20 Preparing the camera 23 Using the accessories supplied 25 Checking the number of recordable images 27 Cleaning 29 Identifying parts...

Instruction Manual
Page 18
...with the DT 18-55mm F3.5-5.6 SAM Lens Kit. Attaching a lens 1 Remove the body cap from the camera and the packaging lid from the rear of the lens. • When changing the lens, quickly change the lens away from getting inside the camera. 2 Mount the lens by aligning the orange index marks on ...the lens and camera. 3 Turn the lens clockwise until it to keep dust or debris from dusty ...
...with the DT 18-55mm F3.5-5.6 SAM Lens Kit. Attaching a lens 1 Remove the body cap from the camera and the packaging lid from the rear of the lens. • When changing the lens, quickly change the lens away from getting inside the camera. 2 Mount the lens by aligning the orange index marks on ...the lens and camera. 3 Turn the lens clockwise until it to keep dust or debris from dusty ...

Instruction Manual
Page 19
...on the image, depending on the image sensor. If dust or debris lands on the lens and attach the body cap to prevent dust from dusty locations when attaching/removing a lens. However, quickly change the lens away from landing on the shooting environment. The camera is equipped with an anti-dust ... remove dust from them. • When you purchase the DT 18 - 55 mm F3.5 - 5.6 SAM Lens Kit, purchase the Rear Lens Cap ALC-R55 also. Lens release button Note on changing the lens When changing the lens, if dust or debris gets inside the camera and lands on the surface of the image sensor...
...on the image, depending on the image sensor. If dust or debris lands on the lens and attach the body cap to prevent dust from dusty locations when attaching/removing a lens. However, quickly change the lens away from landing on the shooting environment. The camera is equipped with an anti-dust ... remove dust from them. • When you purchase the DT 18 - 55 mm F3.5 - 5.6 SAM Lens Kit, purchase the Rear Lens Cap ALC-R55 also. Lens release button Note on changing the lens When changing the lens, if dust or debris gets inside the camera and lands on the surface of the image sensor...

Instruction Manual
Page 29
...wipe the surface with a commercially available LCD cleaning kit to the outside. Do not use a cleaning solution containing organic solvents, such as lens contacts, or the mirror. Turn the camera to clean the inside of the camera, such as thinner, or benzine. If dust lands on...; Chemical products such as thinner, benzine, alcohol, disposable cloths, insect repellent, sunscreen or insecticide, etc. • Do not touch the camera with lens cleaning solution. Do not use the following as they may cause a malfunction. • Do not use a spray blower to the cleaning mode, then...
...wipe the surface with a commercially available LCD cleaning kit to the outside. Do not use a cleaning solution containing organic solvents, such as lens contacts, or the mirror. Turn the camera to clean the inside of the camera, such as thinner, or benzine. If dust lands on...; Chemical products such as thinner, benzine, alcohol, disposable cloths, insect repellent, sunscreen or insecticide, etc. • Do not touch the camera with lens cleaning solution. Do not use the following as they may cause a malfunction. • Do not use a spray blower to the cleaning mode, then...

Instruction Manual
Page 31
... and the surrounding area. • Do not touch the image sensor with the tip of a blower into the cavity beyond the mount. 7 Attach the lens and turn the camera off . Stop cleaning immediately and turn the camera off . 31 Note • The camera starts beeping if the battery pack becomes... low during cleaning. Preparing the camera 5 Detach the lens (page 19). 6 Use the blower to prevent the dust from resettling in the camera. • When cleaning the image sensor, do not put the tip...
... and the surrounding area. • Do not touch the image sensor with the tip of a blower into the cavity beyond the mount. 7 Attach the lens and turn the camera off . Stop cleaning immediately and turn the camera off . 31 Note • The camera starts beeping if the battery pack becomes... low during cleaning. Preparing the camera 5 Detach the lens (page 19). 6 Use the blower to prevent the dust from resettling in the camera. • When cleaning the image sensor, do not put the tip...

Instruction Manual
Page 32
Before your operation Identifying parts and screen indicators See the pages in flash* (75) J Image sensor position mark (71) K Mode dial (48 - 68) L Lens release button (19) 32 M Focus mode switch (69, 74) * Do not directly touch these parts. Front side A Shutter button (48) B Power switch (23) C Control dial (62, 113) D Self-timer lamp (90) E Lens contacts* F Remote sensor G Mirror* H Mount I Built-in parentheses for details of operation.
Before your operation Identifying parts and screen indicators See the pages in flash* (75) J Image sensor position mark (71) K Mode dial (48 - 68) L Lens release button (19) 32 M Focus mode switch (69, 74) * Do not directly touch these parts. Front side A Shutter button (48) B Power switch (23) C Control dial (62, 113) D Self-timer lamp (90) E Lens contacts* F Remote sensor G Mirror* H Mount I Built-in parentheses for details of operation.
Instruction Manual
Page 45
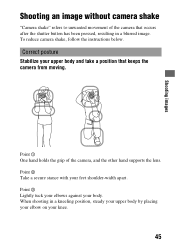
.... Shooting images Shooting images Shooting an image without camera shake "Camera shake" refers to unwanted movement of the camera, and the other hand supports the lens. To reduce camera shake, follow the instructions below. Point 1 One hand holds the grip of the camera that keeps the camera from moving. Point 3 Lightly...
.... Shooting images Shooting images Shooting an image without camera shake "Camera shake" refers to unwanted movement of the camera, and the other hand supports the lens. To reduce camera shake, follow the instructions below. Point 1 One hand holds the grip of the camera that keeps the camera from moving. Point 3 Lightly...

Instruction Manual
Page 47
Note • When using a tripod, deactivate the SteadyShot function because there is a potential for malfunction of the SteadyShot function (page 46). 47 Shooting images Using a tripod In the following cases, we recommend that you mount the camera on a tripod. • Shooting without a flash under dark conditions. • Shooting with slow shutter speeds, which are typically used in night-time shooting. • Shooting a close subject, such as in macro shooting. • Shooting with a telescopic lens.
Note • When using a tripod, deactivate the SteadyShot function because there is a potential for malfunction of the SteadyShot function (page 46). 47 Shooting images Using a tripod In the following cases, we recommend that you mount the camera on a tripod. • Shooting without a flash under dark conditions. • Shooting with slow shutter speeds, which are typically used in night-time shooting. • Shooting a close subject, such as in macro shooting. • Shooting with a telescopic lens.

Instruction Manual
Page 49
4 When using a zoom lens, turn the zoom ring, then decide on your shot. 5 Press the shutter button halfway down to focus. Zoom ring Shooting images 6 Press the shutter button fully down to shoot. • Pressing the shutter button after the (SteadyShot scale) indicator becomes low makes the SteadyShot function more effective. Focus indicator (SteadyShot scale) indicator 49 When the focus is confirmed, z or (Focus indicator) lights up (page 70).
4 When using a zoom lens, turn the zoom ring, then decide on your shot. 5 Press the shutter button halfway down to focus. Zoom ring Shooting images 6 Press the shutter button fully down to shoot. • Pressing the shutter button after the (SteadyShot scale) indicator becomes low makes the SteadyShot function more effective. Focus indicator (SteadyShot scale) indicator 49 When the focus is confirmed, z or (Focus indicator) lights up (page 70).
Instruction Manual
Page 52
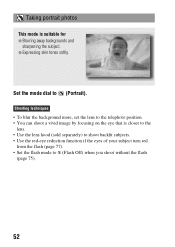
... mode dial to (Flash Off) when you shoot without the flash (page 75). 52 Taking portrait photos This mode is closer to the lens. • Use the lens hood (sold separately) to shoot backlit subjects. • Use the red-eye reduction function if the eyes of your subject turn red from... the flash (page 77). • Set the flash mode to (Portrait). Shooting techniques • To blur the background more, set the lens to the telephoto position. • You can shoot a vivid image by focusing on the eye that is suitable for z Blurring away backgrounds and sharpening the...
... mode dial to (Flash Off) when you shoot without the flash (page 75). 52 Taking portrait photos This mode is closer to the lens. • Use the lens hood (sold separately) to shoot backlit subjects. • Use the red-eye reduction function if the eyes of your subject turn red from... the flash (page 77). • Set the flash mode to (Portrait). Shooting techniques • To blur the background more, set the lens to the telephoto position. • You can shoot a vivid image by focusing on the eye that is suitable for z Blurring away backgrounds and sharpening the...
Instruction Manual
Page 53
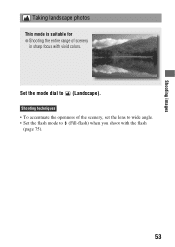
Set the mode dial to (Fill-flash) when you shoot with vivid colors. Shooting techniques • To accentuate the openness of scenery in sharp focus with the flash (page 75). 53 Shooting images Taking landscape photos This mode is suitable for z Shooting the entire range of the scenery, set the lens to wide angle. • Set the flash mode to (Landscape).
Set the mode dial to (Fill-flash) when you shoot with vivid colors. Shooting techniques • To accentuate the openness of scenery in sharp focus with the flash (page 75). 53 Shooting images Taking landscape photos This mode is suitable for z Shooting the entire range of the scenery, set the lens to wide angle. • Set the flash mode to (Landscape).
Instruction Manual
Page 54
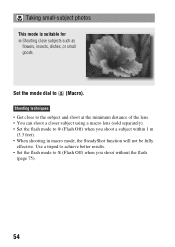
... goods. Taking small-subject photos This mode is suitable for z Shooting close to the subject and shoot at the minimum distance of the lens. • You can shoot a closer subject using a macro lens (sold separately). • Set the flash mode to (Flash Off) when you shoot without the flash (page 75). 54
... goods. Taking small-subject photos This mode is suitable for z Shooting close to the subject and shoot at the minimum distance of the lens. • You can shoot a closer subject using a macro lens (sold separately). • Set the flash mode to (Flash Off) when you shoot without the flash (page 75). 54

Instruction Manual
Page 58
Shooting an image the way you want it (Exposure mode) With a single lens reflex camera, you can adjust the shutter speed (how long the shutter is open the aperture (the hole through which the light passes) to some ...
Shooting an image the way you want it (Exposure mode) With a single lens reflex camera, you can adjust the shutter speed (how long the shutter is open the aperture (the hole through which the light passes) to some ...

Instruction Manual
Page 62
... the selected aperture value, the shutter speed flashes. When the shutter speed is slower, use a tripod. • To blur the background more, use a telephoto lens or a lens that the proper exposure is equipped with a smaller diaphragm (bright lens). • Set the flash mode to the aperture value. number) with the flash (page 75).
... the selected aperture value, the shutter speed flashes. When the shutter speed is slower, use a tripod. • To blur the background more, use a telephoto lens or a lens that the proper exposure is equipped with a smaller diaphragm (bright lens). • Set the flash mode to the aperture value. number) with the flash (page 75).
Instruction Manual
Page 69
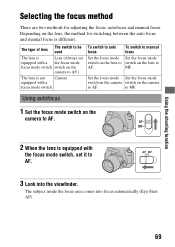
... two methods for switching between the auto focus and manual focus is not Camera equipped with a the focus mode focus mode switch switch on the lens to AF. 3 Look into focus automatically (Eye-Start AF). 69 MF. to AF. Set the focus mode Set the focus mode switch on the camera... switch on the camera to MF. Using autofocus 1 Set the focus mode switch on the camera to AF. 2 When the lens is equipped with the focus mode switch, set equipped with a focus mode switch To switch to auto focus To switch to manual focus Set the...
... two methods for switching between the auto focus and manual focus is not Camera equipped with a the focus mode focus mode switch switch on the lens to AF. 3 Look into focus automatically (Eye-Start AF). 69 MF. to AF. Set the focus mode Set the focus mode switch on the camera... switch on the camera to MF. Using autofocus 1 Set the focus mode switch on the camera to AF. 2 When the lens is equipped with the focus mode switch, set equipped with a focus mode switch To switch to auto focus To switch to manual focus Set the...

Instruction Manual
Page 71
... the focus mode switch on the camera is set to MF, the correct focus is not achieved, even if the focus mode switch on the lens is recommended because the eyepiece sensors located below the viewfinder may be confirmed. To deactivate the Eye-Start AF function MENU button t 1 t [Eye-Start AF... shooting function To measure the exact distance to the subject The mark located on the top of the camera shows the location of the attached lens, the focus cannot be activated.
... the focus mode switch on the camera is set to MF, the correct focus is not achieved, even if the focus mode switch on the lens is recommended because the eyepiece sensors located below the viewfinder may be confirmed. To deactivate the Eye-Start AF function MENU button t 1 t [Eye-Start AF... shooting function To measure the exact distance to the subject The mark located on the top of the camera shows the location of the attached lens, the focus cannot be activated.

Instruction Manual
Page 74
... autofocus mode, the z indicator lights up in the viewfinder when the focus is confirmed. Focusing ring Notes • In the case of the lens to MF. 2 When the lens is not equipped with the focus mode switch, set the focus mode switch on this camera. 74 Adjusting the focus manually (Manual focus... available on the camera to MF. 3 Rotate the focusing ring of a subject that can adjust the focus manually. 1 Set the focus mode switch on the lens to achieve a sharp focus.
... autofocus mode, the z indicator lights up in the viewfinder when the focus is confirmed. Focusing ring Notes • In the case of the lens to MF. 2 When the lens is not equipped with the focus mode switch, set the focus mode switch on this camera. 74 Adjusting the focus manually (Manual focus... available on the camera to MF. 3 Rotate the focusing ring of a subject that can adjust the focus manually. 1 Set the focus mode switch on the lens to achieve a sharp focus.

Instruction Manual
Page 76
... and (Wireless) items cannot be selected. 76 Shooting techniques • The lens hood (sold separately) that is off the camera and away from appearing on an image vary, depending on the... lens. • When the exposure mode is completed everytime you trigger the shutter. Notes •...; Do not hold the camera by slowing the shutter speed. Fires every time you trigger the shutter. Remove the lens hood when using the flash. • When using the flash, shoot the subject at a distance of 1 m (3.3 ...
... and (Wireless) items cannot be selected. 76 Shooting techniques • The lens hood (sold separately) that is off the camera and away from appearing on an image vary, depending on the... lens. • When the exposure mode is completed everytime you trigger the shutter. Notes •...; Do not hold the camera by slowing the shutter speed. Fires every time you trigger the shutter. Remove the lens hood when using the flash. • When using the flash, shoot the subject at a distance of 1 m (3.3 ...


