Instruction Manual
Page 8
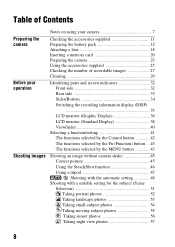
... 11 Preparing the battery pack 12 Attaching a lens 18 Inserting a memory card 20 Preparing the camera 23 Using the accessories supplied 25 Checking the number of recordable images 27 Cleaning 29 Identifying parts and screen indicators 32 Front side 32 Rear side 33 Sides...the Control button 42 The functions selected by the Fn (Function) button ... 43 The functions selected by the MENU button 43 Shooting an image without camera shake 45 Correct posture 45 Using the SteadyShot function 46 Using a tripod 47 / Shooting with the automatic setting 48 Shooting with a suitable setting ...
... 11 Preparing the battery pack 12 Attaching a lens 18 Inserting a memory card 20 Preparing the camera 23 Using the accessories supplied 25 Checking the number of recordable images 27 Cleaning 29 Identifying parts and screen indicators 32 Front side 32 Rear side 33 Sides...the Control button 42 The functions selected by the Fn (Function) button ... 43 The functions selected by the MENU button 43 Shooting an image without camera shake 45 Correct posture 45 Using the SteadyShot function 46 Using a tripod 47 / Shooting with the automatic setting 48 Shooting with a suitable setting ...
Instruction Manual
Page 11
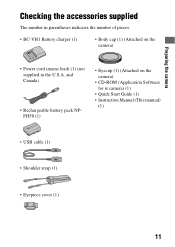
Preparing the camera Preparing the camera Checking the accessories supplied The number in the U.S.A. and Canada) • Rechargeable battery pack NPFH50 (1) • Eyecup (1) (Attached on the camera) • Power cord (mains lead) (1) (not supplied in parentheses indicates the number of pieces. • BC-VH1 Battery charger (1) • Body cap (1) (Attached on the camera) • CD-ROM...
Preparing the camera Preparing the camera Checking the accessories supplied The number in the U.S.A. and Canada) • Rechargeable battery pack NPFH50 (1) • Eyecup (1) (Attached on the camera) • Power cord (mains lead) (1) (not supplied in parentheses indicates the number of pieces. • BC-VH1 Battery charger (1) • Body cap (1) (Attached on the camera) • CD-ROM...

Instruction Manual
Page 25
The other accessories are described in the following pages. • Rechargeable battery pack (page 12) • Battery charger (page 12) • Power cord (mains lead) (not supplied in the U.S.A. Eyepiece cover 25 Preparing the camera Using the accessories supplied This section describes how to use the shoulder strap, the eyepiece cover, and eyecup. and Canada) (page 12) • USB cable (pages 122, 138) • CD-ROM (page 130) Attaching the shoulder strap Attach both ends of the strap onto the camera. • You can also attach the eyepiece cover (page 26) on the strap.
The other accessories are described in the following pages. • Rechargeable battery pack (page 12) • Battery charger (page 12) • Power cord (mains lead) (not supplied in the U.S.A. Eyepiece cover 25 Preparing the camera Using the accessories supplied This section describes how to use the shoulder strap, the eyepiece cover, and eyecup. and Canada) (page 12) • USB cable (pages 122, 138) • CD-ROM (page 130) Attaching the shoulder strap Attach both ends of the strap onto the camera. • You can also attach the eyepiece cover (page 26) on the strap.
Instruction Manual
Page 78
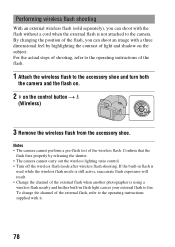
... operating instructions of the flash. 1 Attach the wireless flash to the accessory shoe and turn both the camera and the flash on. 2 on the subject. To change the channel of the wireless flash. Notes • The camera cannot perform a pre-flash test of the external flash, refer to ... By changing the position of the flash, you can shoot an image with a three dimensional feel by releasing the shutter. • The camera cannot carry out the wireless lighting ratio control. • Turn off the wireless flash mode after wireless flash shooting. Performing wireless flash shooting With...
... operating instructions of the flash. 1 Attach the wireless flash to the accessory shoe and turn both the camera and the flash on. 2 on the subject. To change the channel of the wireless flash. Notes • The camera cannot perform a pre-flash test of the external flash, refer to ... By changing the position of the flash, you can shoot an image with a three dimensional feel by releasing the shutter. • The camera cannot carry out the wireless lighting ratio control. • Turn off the wireless flash mode after wireless flash shooting. Performing wireless flash shooting With...
Instruction Manual
Page 147
... a strong light source, and excessive light has entered the lens. Blurring of the hood, the filter or the hood may partially appear in camera shake. Depending on the thickness of the filter and improper attachment of light appears on the LCD monitor. • This is recommended (pages 47... properties of some lenses may be dark. An ND filter or a PL filter. - The date and time are not recorded (page 7). Remove these accessories, then shoot. - The aperture value and/or shutter speed flashes when you press the shutter button halfway down. • Since the subject is too ...
... a strong light source, and excessive light has entered the lens. Blurring of the hood, the filter or the hood may partially appear in camera shake. Depending on the thickness of the filter and improper attachment of light appears on the LCD monitor. • This is recommended (pages 47... properties of some lenses may be dark. An ND filter or a PL filter. - The date and time are not recorded (page 7). Remove these accessories, then shoot. - The aperture value and/or shutter speed flashes when you press the shutter button halfway down. • Since the subject is too ...

Instruction Manual
Page 157
... you record one-time events, make a trial recording to the flash surface, resulting in insufficient light emission. • Keep the camera, supplied accessories, etc., out of the reach of the internal rechargeable battery Insert a charged battery pack in sandy or dusty locations may be dead...) using the camera (page 156). • Do not shake or strike the camera. In this rechargeable battery before use the camera at the sun or a strong light through a removed lens or the viewfinder. This may cause a malfunction of your Sony dealer or local authorized Sony service facility. This...
... you record one-time events, make a trial recording to the flash surface, resulting in insufficient light emission. • Keep the camera, supplied accessories, etc., out of the reach of the internal rechargeable battery Insert a charged battery pack in sandy or dusty locations may be dead...) using the camera (page 156). • Do not shake or strike the camera. In this rechargeable battery before use the camera at the sun or a strong light through a removed lens or the viewfinder. This may cause a malfunction of your Sony dealer or local authorized Sony service facility. This...


