
User Manual
Page 5
... 58 ,continued 5 Flexible spot meter 36 Adjusting the exposure manually 36 Recording in various modes from a "Memory Stick 51 Playing back with added effects - Rec review 46 Playback Viewing movies recorded on a "Memory Stick 50 Playing back in dark places - NightShot plus, etc 37 Adjusting the focus 39 Adjusting the focus... 45 Searching manually - Digital effect 42 Overlaying still images on movies on a tape for playback 58 Searching quickly for the selected subject - EDIT SEARCH 45 Reviewing the most recent recording -
... 58 ,continued 5 Flexible spot meter 36 Adjusting the exposure manually 36 Recording in various modes from a "Memory Stick 51 Playing back with added effects - Rec review 46 Playback Viewing movies recorded on a "Memory Stick 50 Playing back in dark places - NightShot plus, etc 37 Adjusting the focus 39 Adjusting the focus... 45 Searching manually - Digital effect 42 Overlaying still images on movies on a tape for playback 58 Searching quickly for the selected subject - EDIT SEARCH 45 Reviewing the most recent recording -

User Manual
Page 24
... panel. To delete the movie, touch after playback is set to (CHG) OFF. 24 Recording Press REC START/STOP again to 7 in "Getting started" (p. 13 - Review Touch . Camera recording lamp 3 Select the recording mode. Before recording, follow steps 1 to stop recording.
... panel. To delete the movie, touch after playback is set to (CHG) OFF. 24 Recording Press REC START/STOP again to 7 in "Getting started" (p. 13 - Review Touch . Camera recording lamp 3 Select the recording mode. Before recording, follow steps 1 to stop recording.

User Manual
Page 25
...A Remaining battery The indicated time may not be correct depending on the tape. G Personal Menu button (p. 60) H END SEARCH/EDIT SEARCH/Rec review display switch button (p. 45) A Recording folder B Remaining battery The indicated time may not be correct depending on the "Memory Stick." To restart recording...closed the LCD panel, it . When you opened or closed the LCD panel, it takes about 5 seconds) H Personal Menu button (p. 60) I Review button (p. 24) b Notes • Before changing the battery pack, slide the POWER switch up to select CAMERATAPE or CAMERA-MEMORY, and then press...
...A Remaining battery The indicated time may not be correct depending on the tape. G Personal Menu button (p. 60) H END SEARCH/EDIT SEARCH/Rec review display switch button (p. 45) A Recording folder B Remaining battery The indicated time may not be correct depending on the "Memory Stick." To restart recording...closed the LCD panel, it . When you opened or closed the LCD panel, it takes about 5 seconds) H Personal Menu button (p. 60) I Review button (p. 24) b Notes • Before changing the battery pack, slide the POWER switch up to select CAMERATAPE or CAMERA-MEMORY, and then press...
User Manual
Page 30
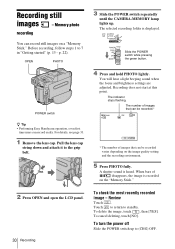
... displayed. For details, see page 33. 1 Remove the lens cap. The number of images that can record easily. To delete the image, touch , then [YES]. Review Touch . Recording still images - You will hear a light beeping sound when the focus and brightness settings are adjusted. To cancel deleting, touch [NO].
... displayed. For details, see page 33. 1 Remove the lens cap. The number of images that can record easily. To delete the image, touch , then [YES]. Review Touch . Recording still images - You will hear a light beeping sound when the focus and brightness settings are adjusted. To cancel deleting, touch [NO].

User Manual
Page 31
...the image displayed on the screen. z Tips • When you shoot objects with a tripod. You can be recorded on a Sony "Memory Stick" formatted on your camcorder may not correct camera-shake. Refer to the following list for camera-shake when recording moving subjects... view this information during recording 60min FINE 101 P-MENU A Recording folder B Quality ([FINE]) or ([STANDARD]) C Personal Menu button (p. 60) D Review button (p. 30) b Notes • When recording fast-moving subjects in the [FRAME] mode, the recorded image appears blurry. • When recording...
...the image displayed on the screen. z Tips • When you shoot objects with a tripod. You can be recorded on a Sony "Memory Stick" formatted on your camcorder may not correct camera-shake. Refer to the following list for camera-shake when recording moving subjects... view this information during recording 60min FINE 101 P-MENU A Recording folder B Quality ([FINE]) or ([STANDARD]) C Personal Menu button (p. 60) D Review button (p. 30) b Notes • When recording fast-moving subjects in the [FRAME] mode, the recorded image appears blurry. • When recording...

User Manual
Page 46
Rec review You can view a few seconds of the scene recorded just before you stopped the tape. 1 Slide the POWER switch repeatedly to the standby mode. Reviewing the most recently recorded scene are played back. The last few seconds of the most recently recorded scenes - b Note • The Rec review function does not work for the tapes recorded on other devices in the Hi8 /standard 8 mm system. 46 Recording Then, your camcorder is set to select the CAMERA-TAPE mode. 2 Touch . 60min STBY 0:00:00 EDIT 3 Touch once.
Rec review You can view a few seconds of the scene recorded just before you stopped the tape. 1 Slide the POWER switch repeatedly to the standby mode. Reviewing the most recently recorded scene are played back. The last few seconds of the most recently recorded scenes - b Note • The Rec review function does not work for the tapes recorded on other devices in the Hi8 /standard 8 mm system. 46 Recording Then, your camcorder is set to select the CAMERA-TAPE mode. 2 Touch . 60min STBY 0:00:00 EDIT 3 Touch once.

User Manual
Page 47
.... If the item is not displayed on the viewfinder Close the LCD panel. ,continued Playback 47 To stop playback Touch (stop mode. (rewind) in To review movies on the screen, touch / . OPEN POWER switch z Tip • Performing Easy Handycam operation, even first time users can play ) to start playback. If you...
.... If the item is not displayed on the viewfinder Close the LCD panel. ,continued Playback 47 To stop playback Touch (stop mode. (rewind) in To review movies on the screen, touch / . OPEN POWER switch z Tip • Performing Easy Handycam operation, even first time users can play ) to start playback. If you...

User Manual
Page 152
...pictures ..... 31 Menu CAMERA SET 62 EDIT/PLAY 74 MEMORY SET .......... 66 MENU ROTATE........ 82 PICT. EDIT 74 R REC FOLDER 68 Rec review 46 Recording capacity Display 25 REMAINING........66, 81 Recording lamp (REC LAMP 81 Recording mode (REC MODE) ....... 25, 77 Recording time 16,... 26 Remote Commander........ 148 REMOTE CTRL......... 81 Remote sensor 147 RESET 145 Review 24, 30 S Self-diagnosis display ..... 130 Self-timer recording (SELF-TIMER) .... 29, 32 Shoulder strap 146 Skip scan 48 SLIDE SHOW ...
...pictures ..... 31 Menu CAMERA SET 62 EDIT/PLAY 74 MEMORY SET .......... 66 MENU ROTATE........ 82 PICT. EDIT 74 R REC FOLDER 68 Rec review 46 Recording capacity Display 25 REMAINING........66, 81 Recording lamp (REC LAMP 81 Recording mode (REC MODE) ....... 25, 77 Recording time 16,... 26 Remote Commander........ 148 REMOTE CTRL......... 81 Remote sensor 147 RESET 145 Review 24, 30 S Self-diagnosis display ..... 130 Self-timer recording (SELF-TIMER) .... 29, 32 Shoulder strap 146 Skip scan 48 SLIDE SHOW ...

