Operating Instructions
Page 14
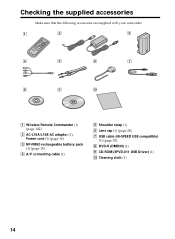
Cleaning cloth (1) 14 Checking the supplied accessories Make sure that the following accessories are supplied with your camcorder. 1 2 3 4 5 6 7 8 9 0 1 Wireless Remote Commander (1) (page 142) 2 AC-L15A/L15B AC adaptor (1), Power cord (1) (page 16) 3 NP-FM50 rechargeable battery pack (1) (page 15) 4 A/V connecting cable (1) 5 Shoulder strap (1) 6 Lens cap (1) (page 28) 7 USB cable (Hi-SPEED USB compatible) (1) (page 92) 8 DVD-R (DMR30) (1) 9 CD-ROM (SPVD-011 USB Driver) (1) q;
Cleaning cloth (1) 14 Checking the supplied accessories Make sure that the following accessories are supplied with your camcorder. 1 2 3 4 5 6 7 8 9 0 1 Wireless Remote Commander (1) (page 142) 2 AC-L15A/L15B AC adaptor (1), Power cord (1) (page 16) 3 NP-FM50 rechargeable battery pack (1) (page 15) 4 A/V connecting cable (1) 5 Shoulder strap (1) 6 Lens cap (1) (page 28) 7 USB cable (Hi-SPEED USB compatible) (1) (page 92) 8 DVD-R (DMR30) (1) 9 CD-ROM (SPVD-011 USB Driver) (1) q;
Operating Instructions
Page 31
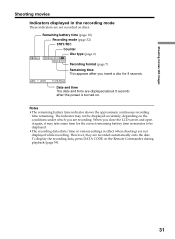
Shooting movies/still images Shooting movies Indicators displayed in the recording mode These indicators are not recorded on the Remote Commander during playback (page 59). 31 Notes •The remaining battery time indicator shows the approximate continuous recording time remaining. When you close the LCD ...
Shooting movies/still images Shooting movies Indicators displayed in the recording mode These indicators are not recorded on the Remote Commander during playback (page 59). 31 Notes •The remaining battery time indicator shows the approximate continuous recording time remaining. When you close the LCD ...
Operating Instructions
Page 36
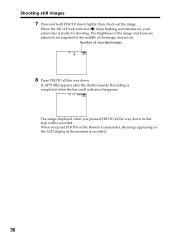
... displayed when you press PHOTO of recorded images FINE 0 -R VIDEO 8 Press PHOTO all the way down . [CAPTURE] appears after the shutter sounds. Number of the Remote Commander, the image appearing on , your camcorder is completed when the bar scroll indicator disappears. Shooting still images 7 Press and hold PHOTO down lightly, then...
... displayed when you press PHOTO of recorded images FINE 0 -R VIDEO 8 Press PHOTO all the way down . [CAPTURE] appears after the shutter sounds. Number of the Remote Commander, the image appearing on , your camcorder is completed when the bar scroll indicator disappears. Shooting still images 7 Press and hold PHOTO down lightly, then...
Operating Instructions
Page 37
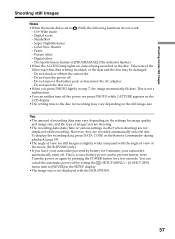
... do not work. - 16:9 Wide mode - To display the recording data, press DATA CODE on the Remote Commander during playback (page 59). •The angle of the movie (DCR-DVD201 only). •If you leave your camcorder powered by battery for still images is slightly wider compared with the DCR-DVD101. 37 Fader - You can...
... do not work. - 16:9 Wide mode - To display the recording data, press DATA CODE on the Remote Commander during playback (page 59). •The angle of the movie (DCR-DVD201 only). •If you leave your camcorder powered by battery for still images is slightly wider compared with the DCR-DVD101. 37 Fader - You can...
Operating Instructions
Page 42
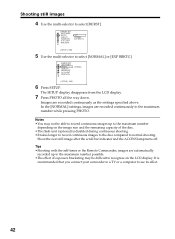
... that you connect your camcorder to a TV or a computer to the maximum number while pressing PHOTO. Tips •Shooting with the self-timer or the Remote Commander, images are automatically recorded up to the maximum number possible. •The effect of exposure bracketing may not be difficult to normal shooting. CAMERA...
... that you connect your camcorder to a TV or a computer to the maximum number while pressing PHOTO. Tips •Shooting with the self-timer or the Remote Commander, images are automatically recorded up to the maximum number possible. •The effect of exposure bracketing may not be difficult to normal shooting. CAMERA...
Operating Instructions
Page 56
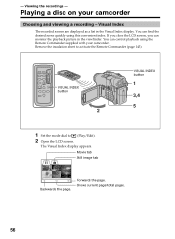
... 56 Remove the insulation sheet to (Play/Edit). 2 Open the LCD screen. - You can find the desired scene quickly using the Remote Commander supplied with your camcorder Choosing and viewing a recording - The Visual Index display appears. Forwards the page. Playing a disc on your camcorder...scenes are displayed as a list in the viewfinder. VISUAL INDEX button 2 VISUAL INDEX button 1 3,4 5 1 Set the mode dial to activate the Remote Commander (page 143). Viewing the recordings - Movie tab Still image tab 001 JAN 1 03 1/2 6:00PM Backwards the page. You can control playback ...
... 56 Remove the insulation sheet to (Play/Edit). 2 Open the LCD screen. - You can find the desired scene quickly using the Remote Commander supplied with your camcorder Choosing and viewing a recording - The Visual Index display appears. Forwards the page. Playing a disc on your camcorder...scenes are displayed as a list in the viewfinder. VISUAL INDEX button 2 VISUAL INDEX button 1 3,4 5 1 Set the mode dial to activate the Remote Commander (page 143). Viewing the recordings - Movie tab Still image tab 001 JAN 1 03 1/2 6:00PM Backwards the page. You can control playback ...

Operating Instructions
Page 58
... vice versa. 58 repeatedly during playback. To resume normal playback, release the button. On the Remote Commander, press or .* Pressing or repeatedly switches the playback speed from playback to the beginning of the Remote Commander: N Playback N Playback X Pause X Pause x Stop x Stop > Next > Next...the reverse direction moves in the various playback modes. To view the picture at slow speed (slow playback) Press on the Remote Commander during playback. To advance the scene Press > during playback pause.* For slow playback in the reverse direction, press ...
... vice versa. 58 repeatedly during playback. To resume normal playback, release the button. On the Remote Commander, press or .* Pressing or repeatedly switches the playback speed from playback to the beginning of the Remote Commander: N Playback N Playback X Pause X Pause x Stop x Stop > Next > Next...the reverse direction moves in the various playback modes. To view the picture at slow speed (slow playback) Press on the Remote Commander during playback. To advance the scene Press > during playback pause.* For slow playback in the reverse direction, press ...
Operating Instructions
Page 59
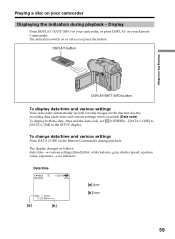
...:18 -R VIDEO JAN 1 2004 11:23:45AM [a] [b] [a] date [b] time 59 To change date/time and various settings Press DATA CODE on the Remote Commander during playback - Playing a disc on your Remote Commander. The indicators switch on the disc but also the recording data (date/time and various settings when recorded) (Data code).
...:18 -R VIDEO JAN 1 2004 11:23:45AM [a] [b] [a] date [b] time 59 To change date/time and various settings Press DATA CODE on the Remote Commander during playback - Playing a disc on your Remote Commander. The indicators switch on the disc but also the recording data (date/time and various settings when recorded) (Data code).
Operating Instructions
Page 107
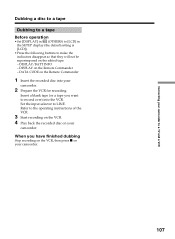
...When you want to LINE. Insert a blank tape (or a tape you have finished dubbing Stop recording on the VCR, then press x on the Remote Commander 1 Insert the recorded disc into the VCR. Set the input selector to record over) into your camcorder. 2 Prepare the VCR for recording.... Refer to make the indicators disappear so that they will not be superimposed on the edited tape: - DISPLAY on the Remote Commander - DISPLAY/BATT INFO - Connecting your camcorder to a TV and a VCR Dubbing a disc to a tape Dubbing to a tape Before operation •Set...
...When you want to LINE. Insert a blank tape (or a tape you have finished dubbing Stop recording on the VCR, then press x on the Remote Commander 1 Insert the recorded disc into the VCR. Set the input selector to record over) into your camcorder. 2 Prepare the VCR for recording.... Refer to make the indicators disappear so that they will not be superimposed on the edited tape: - DISPLAY on the Remote Commander - DISPLAY/BATT INFO - Connecting your camcorder to a TV and a VCR Dubbing a disc to a tape Dubbing to a tape Before operation •Set...
Operating Instructions
Page 116
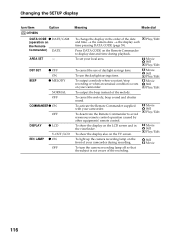
...display in the viewfinder. To use of daylight savings time. To cancel the melody, beep sound and shutter sound. To deactivate the Remote Commander to display date and time during recording. To set your camcorder. Press DATA CODE on the front of the date and ... To light up the camera recording lamp on the Remote Commander to avoid erroneous remote control operation caused by other equipments' remote control. To activate the Remote Commander supplied with your local area. To show the display also on the Remote Commander) DATE AREA SET - To output the beep...
...display in the viewfinder. To use of daylight savings time. To cancel the melody, beep sound and shutter sound. To deactivate the Remote Commander to display date and time during recording. To set your camcorder. Press DATA CODE on the front of the date and ... To light up the camera recording lamp on the Remote Commander to avoid erroneous remote control operation caused by other equipments' remote control. To activate the Remote Commander supplied with your local area. To show the display also on the Remote Commander) DATE AREA SET - To output the beep...
Operating Instructions
Page 118
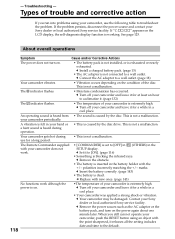
... is inserted in your camcorder and leave it . (page 132) The indicator flashes. • The temperature of the disc. marks. your Sony dealer or local authorized Sony service facility. c Replace with the +/- c Turn off your hand or a faint sound is heard during use the following table to [ON... you still can not operate your camcorder, push the RESET button using your camcorder does not work although the power is working. The Remote Commander supplied with the point sharpened, it releases all the setting includes date and time to a wall outlet. An operating sound is ...
... is inserted in your camcorder and leave it . (page 132) The indicator flashes. • The temperature of the disc. marks. your Sony dealer or local authorized Sony service facility. c Replace with the +/- c Turn off your hand or a faint sound is heard during use the following table to [ON... you still can not operate your camcorder, push the RESET button using your camcorder does not work although the power is working. The Remote Commander supplied with the point sharpened, it releases all the setting includes date and time to a wall outlet. An operating sound is ...
Operating Instructions
Page 135
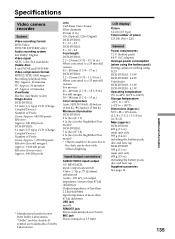
... Laboratories. Lens Carl Zeiss Vario-Tessar Filter diameter: 25 mm (1 in.) 10× (Optical), 120× (Digital) DCR-DVD101: F = 1.7 - 2.3 DCR-DVD201: F = 1.8 - 2.3 Focal length DCR-DVD101: 2.3 ...REMOTE jack Stereo mini-minijack (ø 2.5 mm) MIC jack Stereo minijack (ø 3.5 mm) LCD display Picture 6.2 cm (2.5 type) Total number of pixels 123 200 (560 × 220) General Power requirements 7.2 V (battery pack) 8.4 V (AC adaptor) Average power consumption (when using the battery pack) During camera recording using LCD DCR-DVD101: 3.9 W DCR-DVD201: 4.4 W Viewfinder DCR-DVD101: 3.6 W DCR...
... Laboratories. Lens Carl Zeiss Vario-Tessar Filter diameter: 25 mm (1 in.) 10× (Optical), 120× (Digital) DCR-DVD101: F = 1.7 - 2.3 DCR-DVD201: F = 1.8 - 2.3 Focal length DCR-DVD101: 2.3 ...REMOTE jack Stereo mini-minijack (ø 2.5 mm) MIC jack Stereo minijack (ø 3.5 mm) LCD display Picture 6.2 cm (2.5 type) Total number of pixels 123 200 (560 × 220) General Power requirements 7.2 V (battery pack) 8.4 V (AC adaptor) Average power consumption (when using the battery pack) During camera recording using LCD DCR-DVD101: 3.9 W DCR-DVD201: 4.4 W Viewfinder DCR-DVD101: 3.6 W DCR...

Operating Instructions
Page 138
Identifying parts and controls q; qh qa qs qj qd qf qg qk q; Otherwise, you cannot attach the tripod securely, and the screw may damage your camcorder. 138 qd Viewfinder lens adjustment dial (page 22) qf POWER button (page 19) qg BATT (battery) release button (page 15) qh DC IN jack (page 16) qj Lens cap (page 28) qk Tripod receptacle Make sure that the length of the tripod screw is less than 5.5 mm (7/32 inch). Mode dial (page 19) qa POWER/CHG lamp (page 16) qs REMOTE jack Use to connect to optional accessories.
Identifying parts and controls q; qh qa qs qj qd qf qg qk q; Otherwise, you cannot attach the tripod securely, and the screw may damage your camcorder. 138 qd Viewfinder lens adjustment dial (page 22) qf POWER button (page 19) qg BATT (battery) release button (page 15) qh DC IN jack (page 16) qj Lens cap (page 28) qk Tripod receptacle Make sure that the length of the tripod screw is less than 5.5 mm (7/32 inch). Mode dial (page 19) qa POWER/CHG lamp (page 16) qs REMOTE jack Use to connect to optional accessories.

Operating Instructions
Page 139
Shoe cover wa Lens ws Remote sensor/Infrared ray emitter wd MIC (PLUG IN POWER) jack Connect an external microphone (optional). When an external microphone is connected, it to the operating ...
Shoe cover wa Lens ws Remote sensor/Infrared ray emitter wd MIC (PLUG IN POWER) jack Connect an external microphone (optional). When an external microphone is connected, it to the operating ...
Operating Instructions
Page 142
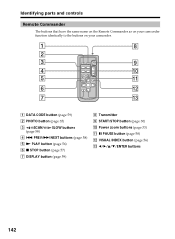
... The buttons that have the same name on the Remote Commander as on your camcorder function identically to the buttons on your camcorder. 1 8 2 3 9 4 q; 5 qa 6 qs 7 qd 1 DATA CODE button (page 59) 2 PHOTO button (page 35) 3 ...
... The buttons that have the same name on the Remote Commander as on your camcorder function identically to the buttons on your camcorder. 1 8 2 3 9 4 q; 5 qa 6 qs 7 qd 1 DATA CODE button (page 59) 2 PHOTO button (page 35) 3 ...

Operating Instructions
Page 143
... fire. terminals in the Remote Commander. Notes On the Remote Commander •The button-type battery CR2025 is recommended that you use a battery other than the CR2025. •Point the remote sensor away from other Sony DVD players to avoid erroneous remote control operation. on the... battery to activate the Remote Commander. Do not use another Sony DVD player in the DVD 2 Commander mode. Parts and controls...
... fire. terminals in the Remote Commander. Notes On the Remote Commander •The button-type battery CR2025 is recommended that you use a battery other than the CR2025. •Point the remote sensor away from other Sony DVD players to avoid erroneous remote control operation. on the... battery to activate the Remote Commander. Do not use another Sony DVD player in the DVD 2 Commander mode. Parts and controls...
Operating Instructions
Page 145
...17 Playlist 76 PORTRAIT 51 PROGRAM AE 51 R Recording format 7 Recording time 17 Remaining battery time indicator 31 Remaining time 117 Remote Commander 142 REMOTE jack 138 RESET 114, 141 Review 55 S Self-diagnosis display .......... 125 Self-timer recording 47 SEPIA 54 SETUP display 110 ... 12, 131 Unfinalize 72 USB jack 94 VCR 106 VIDEO mode 7 Viewfinder 22 Viewfinder lens adjustment 22 Visual Index 56 VR mode 7 W, X, Y, Z Warning indicators 126 Warning messages 127 White balance 50 Wide-angle 33 Wide mode 48 WIPE 53 Zoom 33, 61 Parts and controls/Index 145
...17 Playlist 76 PORTRAIT 51 PROGRAM AE 51 R Recording format 7 Recording time 17 Remaining battery time indicator 31 Remaining time 117 Remote Commander 142 REMOTE jack 138 RESET 114, 141 Review 55 S Self-diagnosis display .......... 125 Self-timer recording 47 SEPIA 54 SETUP display 110 ... 12, 131 Unfinalize 72 USB jack 94 VCR 106 VIDEO mode 7 Viewfinder 22 Viewfinder lens adjustment 22 Visual Index 56 VR mode 7 W, X, Y, Z Warning indicators 126 Warning messages 127 White balance 50 Wide-angle 33 Wide mode 48 WIPE 53 Zoom 33, 61 Parts and controls/Index 145