

Limited Warranty (US Only)
Page 1
...legal rights, and you . ACCESSORIES: Parts and labor for all accessories are for product information or operation, call : 1-800-488-SONY (7669) Printed in Japan This warranty does not cover customer instruction, installation, set up adjustments or signal reception problems. This warranty... period must pay the labor charges to any authorized Sony service facility. 4-557-172-02 General Stereo/Hifi Components/Tape Decks ® CD Players/Mini Disc Players/Audio Systems Hifi Audio LIMITED WARRANTY Sony Electronics Inc. ("Sony") warrants this Product is invalid if the factory applied...
...legal rights, and you . ACCESSORIES: Parts and labor for all accessories are for product information or operation, call : 1-800-488-SONY (7669) Printed in Japan This warranty does not cover customer instruction, installation, set up adjustments or signal reception problems. This warranty... period must pay the labor charges to any authorized Sony service facility. 4-557-172-02 General Stereo/Hifi Components/Tape Decks ® CD Players/Mini Disc Players/Audio Systems Hifi Audio LIMITED WARRANTY Sony Electronics Inc. ("Sony") warrants this Product is invalid if the factory applied...
Operating Instructions
Page 5
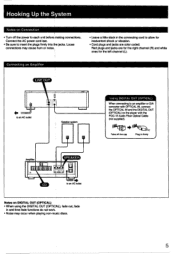
CD to an AC outlet Notes on the player with OPTICAL IN, connect the OPTICAL IN and the DIGITAL OUT (OPTICAL) on DIGITAL OUT (OPTICAL) • When using the DIGITAL OUT (OPTICAL), fade out, ...
CD to an AC outlet Notes on the player with OPTICAL IN, connect the OPTICAL IN and the DIGITAL OUT (OPTICAL) on DIGITAL OUT (OPTICAL) • When using the DIGITAL OUT (OPTICAL), fade out, ...
Operating Instructions
Page 7
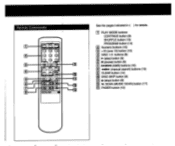
SCAN (MUSIC SCAN) button (17) E1 FADER button (12) El PLAY MODE buttons CONTINUE button (8) SHUFFLE button (13) PROGRAM button (14) El Numeric buttons (10) El >10 (over 10) button (10) ID DISC 1-5 buttons (8) • (play) button (8) El II (pause) button (8) 07 144/NI (AMS) buttons (10) 141i1► (manual search) buttons (10) El CLEAR button (14) E ■ g DISC SKIP button (8) (stop) button (8) g M. Remote Commander 0 0 0 0 0 0 • I° 5 ,t4 • a 6.1 oa I CD PLAYER IN See the pages indicated in ( ) for details.
SCAN (MUSIC SCAN) button (17) E1 FADER button (12) El PLAY MODE buttons CONTINUE button (8) SHUFFLE button (13) PROGRAM button (14) El Numeric buttons (10) El >10 (over 10) button (10) ID DISC 1-5 buttons (8) • (play) button (8) El II (pause) button (8) 07 144/NI (AMS) buttons (10) 141i1► (manual search) buttons (10) El CLEAR button (14) E ■ g DISC SKIP button (8) (stop) button (8) g M. Remote Commander 0 0 0 0 0 0 • I° 5 ,t4 • a 6.1 oa I CD PLAYER IN See the pages indicated in ( ) for details.
Operating Instructions
Page 8
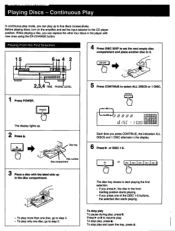
...lights up. 2 Press &. .6. °PEW:LOSE riyyyww,w. ., Disc tray Disc number Disc compartment 3 Place a disc with the label side up to the CD player position. DUEIMI _ ; If you press CONTINUE, the indication ALL DISCS and 1 DISC alternate in the display. 6 Press IP. Playing Discs - Playing From the... First Selection 15 6 n. 4 2 4 Press DISC SKIP to set the input selector to five discs consecutively. To play up in the player with new ones using the EX-CHANGE button. Press► orII to step 5. i - "sc LAuxecs449 VS J 49 0 MUM! To stop play To...
...lights up. 2 Press &. .6. °PEW:LOSE riyyyww,w. ., Disc tray Disc number Disc compartment 3 Place a disc with the label side up to the CD player position. DUEIMI _ ; If you press CONTINUE, the indication ALL DISCS and 1 DISC alternate in the display. 6 Press IP. Playing Discs - Playing From the... First Selection 15 6 n. 4 2 4 Press DISC SKIP to set the input selector to five discs consecutively. To play up in the player with new ones using the EX-CHANGE button. Press► orII to step 5. i - "sc LAuxecs449 VS J 49 0 MUM! To stop play To...
Operating Instructions
Page 9
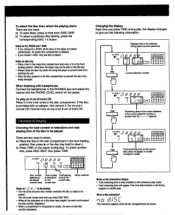
... When listening with headphones Connect the headphones to be played. LID r -el I s k EIDEIDE1 ODnoon) MEI L3. a. Do not put a normal CD (12cm/5-inch) on the player. b) Press TIME on "(9 ,V..." It the current selection number is this indication? _ r U U I II Disc number selected to the PHONES jack ...and adjust the volume with an adaptor, first remove it is ready to close the disc tray when not using the player to prevent dust from entering the unit. • Place the disc properly in the front loading position. uu a mil INIFIKIEI MCKIE...
... When listening with headphones Connect the headphones to be played. LID r -el I s k EIDEIDE1 ODnoon) MEI L3. a. Do not put a normal CD (12cm/5-inch) on the player. b) Press TIME on "(9 ,V..." It the current selection number is this indication? _ r U U I II Disc number selected to the PHONES jack ...and adjust the volume with an adaptor, first remove it is ready to close the disc tray when not using the player to prevent dust from entering the unit. • Place the disc properly in the front loading position. uu a mil INIFIKIEI MCKIE...


