
Operating Instructions (primary manual)
Page 2
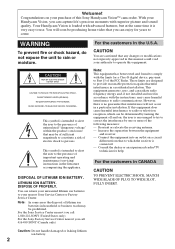
... the disposal of important operating and maintenance (servicing) instructions in this Sony Handycam VisionTM camcorder. These limits are cautioned that may be prohibited. DISPOSAL OF LITHIUM ION BATTERY. CAUTION ...Sony Service Center or Factory Service Center. If this equipment. Increase the separation between the equipment and receiver. - Caution: Do not handle damaged or leaking lithium ion battery. 2 With your unwanted lithium ion batteries to provide reasonable protection against harmful interference in a particular installation. You can be producing home video...
... the disposal of important operating and maintenance (servicing) instructions in this Sony Handycam VisionTM camcorder. These limits are cautioned that may be prohibited. DISPOSAL OF LITHIUM ION BATTERY. CAUTION ...Sony Service Center or Factory Service Center. If this equipment. Increase the separation between the equipment and receiver. - Caution: Do not handle damaged or leaking lithium ion battery. 2 With your unwanted lithium ion batteries to provide reasonable protection against harmful interference in a particular installation. You can be producing home video...

Operating Instructions (primary manual)
Page 3
... 21 Searching for playback/editing - Watching on a TV screen 55 Editing onto another tape 57 Recording from a VCR or TV 58 Additional information Changing the lithium battery in light (CCD-TRV93 only 52 Releasing the STEADY SHOT function 54 - for using the battery pack 64 Maintenance... 67 Using your own titles 49 Recording with the date/time 50 Optimizing the recording condition .. 51 Using the built-in the camcorder 59 Resetting the date and time 61 Simple setting of clock by time difference 62 Usable cassettes and playback modes 63 Tips for camera recording -
... 21 Searching for playback/editing - Watching on a TV screen 55 Editing onto another tape 57 Recording from a VCR or TV 58 Additional information Changing the lithium battery in light (CCD-TRV93 only 52 Releasing the STEADY SHOT function 54 - for using the battery pack 64 Maintenance... 67 Using your own titles 49 Recording with the date/time 50 Optimizing the recording condition .. 51 Using the built-in the camcorder 59 Resetting the date and time 61 Simple setting of clock by time difference 62 Usable cassettes and playback modes 63 Tips for camera recording -
Operating Instructions (primary manual)
Page 4
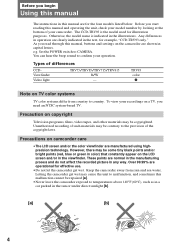
... use. •Do not let the camcorder get wet may be repaired [a]. •Never leave the camcorder exposed to country. Any differences in operation are operational for example, "CCD-TRV93 only." Set the POWER switch to confirm your recordings on TV color systems TV color systems ...model used for the four models listed below. You can hear the beep sound to CAMERA. Before you start reading this manual and operating the unit, check your camcorder. Types of your model number by looking at the bottom of differences CCDViewfinder Video light TRV75/TRV85/TRV715/TRV815 B/W -
... use. •Do not let the camcorder get wet may be repaired [a]. •Never leave the camcorder exposed to country. Any differences in operation are operational for example, "CCD-TRV93 only." Set the POWER switch to confirm your recordings on TV color systems TV color systems ...model used for the four models listed below. You can hear the beep sound to CAMERA. Before you start reading this manual and operating the unit, check your camcorder. Types of your model number by looking at the bottom of differences CCDViewfinder Video light TRV75/TRV85/TRV715/TRV815 B/W -
Operating Instructions (primary manual)
Page 5
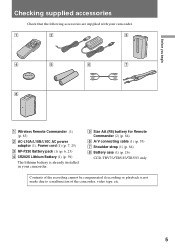
... Battery (1) (p. 59) The lithium battery is already installed in your camcorder. 5 Size AA (R6) battery for Remote Commander (2) (p. 84) 6 A/V connecting cable (1) (p. 55) 7 Shoulder strap (1) (p. 84) 8 Battery case (1) (p. 26) CCD-TRV75/TRV85/TRV93 only Contents of the recording cannot be compensated if recording or playback is not made due to a malfunction of the camcorder, video tape, etc. 5
... Battery (1) (p. 59) The lithium battery is already installed in your camcorder. 5 Size AA (R6) battery for Remote Commander (2) (p. 84) 6 A/V connecting cable (1) (p. 55) 7 Shoulder strap (1) (p. 84) 8 Battery case (1) (p. 26) CCD-TRV75/TRV85/TRV93 only Contents of the recording cannot be compensated if recording or playback is not made due to a malfunction of the camcorder, video tape, etc. 5

Operating Instructions (primary manual)
Page 6
...battery pack down until it catches on the battery pack Do not carry the camcorder by grasping the battery pack. 6 Attach the battery pack to install and charge the battery pack. This camcorder operates only with the "InfoLITHIUM" battery. Installing the battery pack (1) While ...pressing BATT RELEASE, slide the battery terminal cover in the direction of the arrow. (2) Install the battery pack in the direction of Sony Corporation. "InfoLITHIUM" is a ...
...battery pack down until it catches on the battery pack Do not carry the camcorder by grasping the battery pack. 6 Attach the battery pack to install and charge the battery pack. This camcorder operates only with the "InfoLITHIUM" battery. Installing the battery pack (1) While ...pressing BATT RELEASE, slide the battery terminal cover in the direction of the arrow. (2) Install the battery pack in the direction of Sony Corporation. "InfoLITHIUM" is a ...

Operating Instructions (primary manual)
Page 7
... leave the battery pack attached for about 1 hour after normal charge is charged a little in the display window roughly indicates the recording time with the viewfinder. POWER CAMERA OFF VTR Notes •"- - - Use it is completely charged. When the remaining battery indicator becomes ı, normal charge is... battery time is completed. Charging begins. For full charge, which allows you to use the battery pack before it as a guide. Before using the camcorder with the plug's 4 mark up. (2) Connect the power cord to the AC power adaptor. (3) Connect the power cord to a wall outlet. ...
... leave the battery pack attached for about 1 hour after normal charge is charged a little in the display window roughly indicates the recording time with the viewfinder. POWER CAMERA OFF VTR Notes •"- - - Use it is completely charged. When the remaining battery indicator becomes ı, normal charge is... battery time is completed. Charging begins. For full charge, which allows you to use the battery pack before it as a guide. Before using the camcorder with the plug's 4 mark up. (2) Connect the power cord to the AC power adaptor. (3) Connect the power cord to a wall outlet. ...

Operating Instructions (primary manual)
Page 9
.... BATT RELEASE You can look at 77°F (25°C). ** Approximate minutes when recording while you repeat recording start/stop, zooming and turning the power on LCD NP-F330 (supplied) NP-F530 NP... the viewfinder or on using conditions and circumstances. •When you use the camcorder in the direction of the functions available with this camcorder (p. 31). 9 However, the indication may be shorter if you close the ...pack in a cold environment. * Approximate continuous recording time at the demonstration of the arrow. Getting started Installing and charging the battery pack...
.... BATT RELEASE You can look at 77°F (25°C). ** Approximate minutes when recording while you repeat recording start/stop, zooming and turning the power on LCD NP-F330 (supplied) NP-F530 NP... the viewfinder or on using conditions and circumstances. •When you use the camcorder in the direction of the functions available with this camcorder (p. 31). 9 However, the indication may be shorter if you close the ...pack in a cold environment. * Approximate continuous recording time at the demonstration of the arrow. Getting started Installing and charging the battery pack...
Operating Instructions (primary manual)
Page 11
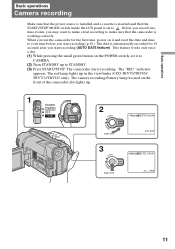
The "REC" indicator appears. The camera recording/battery lamp located on the front of the camcorder also lights up in the viewfinder (CCD-TRV75/TRV85/ TRV715/TRV815 only). Before you record onetime events, you start recording (AUTO DATE feature). The camcorder starts recording. The red lamp lights up . 1 POWER CAMERA OFF VTR STA STA 2 LOCK NDBY START/STOP 3 LOCK NDBY START...
The "REC" indicator appears. The camera recording/battery lamp located on the front of the camcorder also lights up in the viewfinder (CCD-TRV75/TRV85/ TRV715/TRV815 only). Before you record onetime events, you start recording (AUTO DATE feature). The camcorder starts recording. The red lamp lights up . 1 POWER CAMERA OFF VTR STA STA 2 LOCK NDBY START/STOP 3 LOCK NDBY START...

Operating Instructions (primary manual)
Page 12
...START/STOP NDBY START/STOP NDBY START/STOP Note There is installed with the camcorder. Turn the viewfinder lens adjustment ring [a] (CCD-TRV75/TRV85/TRV715/TRV815) or move the viewfinder lens adjustment lever [b] (CCD-TRV93) so that the indicators in the viewfinder may change. 12 To ...in light after someone else has used the camcorder, focus the viewfinder lens. Turn STANDBY down to LOCK and set the POWER switch to remove the battery pack from the model having the built-in the viewfinder (Standby mode). Camera recording To stop recording momentarily [a] Press START/STOP again.
...START/STOP NDBY START/STOP NDBY START/STOP Note There is installed with the camcorder. Turn the viewfinder lens adjustment ring [a] (CCD-TRV75/TRV85/TRV715/TRV815) or move the viewfinder lens adjustment lever [b] (CCD-TRV93) so that the indicators in the viewfinder may change. 12 To ...in light after someone else has used the camcorder, focus the viewfinder lens. Turn STANDBY down to LOCK and set the POWER switch to remove the battery pack from the model having the built-in the viewfinder (Standby mode). Camera recording To stop recording momentarily [a] Press START/STOP again.
Operating Instructions (primary manual)
Page 13
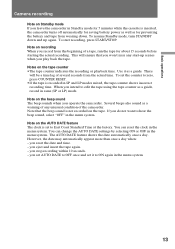
...Camera recording Note on Standby mode If you leave the camcorder in Standby mode for 5 minutes while the cassette is inserted, the camcorder turns off automatically for saving battery power as well as for about 15 seconds before starting the actual recording. Notes on the beep sound The beep sounds when you operate the camcorder...guide. However, the date may automatically appear more than once a day when: - This will be a time lag of the camcorder. Note that you record from the beginning of a tape, run the tape for preventing the battery and tape from the actual time. If you do...
...Camera recording Note on Standby mode If you leave the camcorder in Standby mode for 5 minutes while the cassette is inserted, the camcorder turns off automatically for saving battery power as well as for about 15 seconds before starting the actual recording. Notes on the beep sound The beep sounds when you operate the camcorder...guide. However, the date may automatically appear more than once a day when: - This will be a time lag of the camcorder. Note that you record from the beginning of a tape, run the tape for preventing the battery and tape from the actual time. If you do...

Operating Instructions (primary manual)
Page 15
...then stops automatically. (3) Turn STANDBY up to the desired mode. : Recording starts when you press START/STOP, and stops when you press START/STOP. Recording starts. The dots disappear at a rate of quick shots resulting in a lively video. (1) While pressing OPEN, open the LCD panel. (2) Set START/...START/STOP mode •If you selected 5SEC, the tape counter disappears and five dots appear. Basic operations STA STA Camera recording Selecting the START/STOP mode Your camcorder has three modes. These modes enable you to take a series of one per second as illustrated below. 2 START/...
...then stops automatically. (3) Turn STANDBY up to the desired mode. : Recording starts when you press START/STOP, and stops when you press START/STOP. Recording starts. The dots disappear at a rate of quick shots resulting in a lively video. (1) While pressing OPEN, open the LCD panel. (2) Set START/...START/STOP mode •If you selected 5SEC, the tape counter disappears and five dots appear. Basic operations STA STA Camera recording Selecting the START/STOP mode Your camcorder has three modes. These modes enable you to take a series of one per second as illustrated below. 2 START/...

Operating Instructions (primary manual)
Page 17
... 1 2 Letting the subject monitor the shot (Mirror mode) You can let the subject monitor the shot while shooting with the viewfinder. otherwise, the camcorder body may be normal. 17 The indicator appears on the LCD screen (Mirror mode) and the date and remaining tape indicators disappear. To cancel mirror... Turn the LCD panel back toward the viewfinder. The STBY indicator appears as Pr and REC as a mirror-image while recording in mirror mode. Basic operations Camera recording Notes on the LCD panel •When closing the LCD panel, turn it vertically until it clicks, then turn it ...
... 1 2 Letting the subject monitor the shot (Mirror mode) You can let the subject monitor the shot while shooting with the viewfinder. otherwise, the camcorder body may be normal. 17 The indicator appears on the LCD screen (Mirror mode) and the date and remaining tape indicators disappear. To cancel mirror... Turn the LCD panel back toward the viewfinder. The STBY indicator appears as Pr and REC as a mirror-image while recording in mirror mode. Basic operations Camera recording Notes on the LCD panel •When closing the LCD panel, turn it vertically until it clicks, then turn it ...

Operating Instructions (primary manual)
Page 18
...frame as a guide to determine the horizontal plane. •You can also record in a low position or even in a low position to get better results by holding the camcorder according to the following suggestions: •Hold the camcorder firmly and secure it with your thumb. 1 2 3 •Place ...your left hand under the camcorder to support it. Lift the viewfinder up for better shooting For hand-held shots, you'll get an interesting angle. Be sure to not touch the built- Hints for recording from a low position [a]. •You can also record in a high position using the ...
...frame as a guide to determine the horizontal plane. •You can also record in a low position or even in a low position to get better results by holding the camcorder according to the following suggestions: •Hold the camcorder firmly and secure it with your thumb. 1 2 3 •Place ...your left hand under the camcorder to support it. Lift the viewfinder up for better shooting For hand-held shots, you'll get an interesting angle. Be sure to not touch the built- Hints for recording from a low position [a]. •You can also record in a high position using the ...

Operating Instructions (primary manual)
Page 19
...When attaching a non-Sony tripod, make sure that the length of the viewfinder may damage the camcorder. If you have a tripod for better shooting Place the camcorder on a flat surface or use it with the camcorder. Cautions on the viewfinder and the LCD •Do not pick up the camcorder by the viewfinder or...damaged. Be careful when placing the camcorder under sunlight or by the LCD panel [c]. •Do not place the camcorder so as to point the viewfinder or the LCD screen toward the sun. Hints for a still camera, you can also use a tripod Try placing the camcorder on a table top or any ...
...When attaching a non-Sony tripod, make sure that the length of the viewfinder may damage the camcorder. If you have a tripod for better shooting Place the camcorder on a flat surface or use it with the camcorder. Cautions on the viewfinder and the LCD •Do not pick up the camcorder by the viewfinder or...damaged. Be careful when placing the camcorder under sunlight or by the LCD panel [c]. •Do not place the camcorder so as to point the viewfinder or the LCD screen toward the sun. Hints for a still camera, you can also use a tripod Try placing the camcorder on a table top or any ...
Operating Instructions (primary manual)
Page 20
side of EDITSEARCH until the camcorder goes back to the scene you recorded on the POWER switch, set it to CAMERA. (2) Turn STANDBY up to the last recorded point after you want. To go forward, hold down the - Hold down the + side (Edit Search). 1 POWER CAMERA OFF VTR 3 EDITSEARCH STA 2 LOCK NDBY START/STOP EDITSEARCH EDITSEARCH...
side of EDITSEARCH until the camcorder goes back to the scene you recorded on the POWER switch, set it to CAMERA. (2) Turn STANDBY up to the last recorded point after you want. To go forward, hold down the - Hold down the + side (Edit Search). 1 POWER CAMERA OFF VTR 3 EDITSEARCH STA 2 LOCK NDBY START/STOP EDITSEARCH EDITSEARCH...

Operating Instructions (primary manual)
Page 21
...can monitor the playback picture on the LCD screen. (1) While pressing the small green button on a TV screen, after connecting the camcorder to a TV or VCR. 1 2 POWER CAMERA OFF VTR 4 REW 5 PLAY VOLUME LCD BRIGHT 6 3 To stop playback, press p. Adjust the angle of the LCD panel or...( to start playback. (6) Adjust the volume using VOLUME and adjust the brightness of the LCD screen using LCD BRIGHT. The video control buttons light up. (2) Insert the recorded tape with the window facing out. (3) While pressing OPEN, open the LCD panel. Basic operations Playing back a tape You ...
...can monitor the playback picture on the LCD screen. (1) While pressing the small green button on a TV screen, after connecting the camcorder to a TV or VCR. 1 2 POWER CAMERA OFF VTR 4 REW 5 PLAY VOLUME LCD BRIGHT 6 3 To stop playback, press p. Adjust the angle of the LCD panel or...( to start playback. (6) Adjust the volume using VOLUME and adjust the brightness of the LCD screen using LCD BRIGHT. The video control buttons light up. (2) Insert the recorded tape with the window facing out. (3) While pressing OPEN, open the LCD panel. Basic operations Playing back a tape You ...
Operating Instructions (primary manual)
Page 22
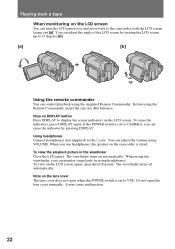
... POWER switch is silent. Note on the lens cover The lens cover does not open when the POWER switch is set to CAMERA, you use headphones, the speaker on the camcorder is set to VTR. You can turn the LCD panel over and move back to 15 degrees [b]. [a] [b] 15° Using the... screen You can adjust the volume using VOLUME. You can adjust the angle of the LCD screen by turning the LCD screen up to the camcorder with the LCD screen facing out [a]. When you can erase the indicator by using headphones. It may cause malfunction. 22 The viewfinder turns off automatically...
... POWER switch is silent. Note on the lens cover The lens cover does not open when the POWER switch is set to CAMERA, you use headphones, the speaker on the camcorder is set to VTR. You can turn the LCD panel over and move back to 15 degrees [b]. [a] [b] 15° Using the... screen You can adjust the volume using VOLUME. You can adjust the angle of the LCD screen by turning the LCD screen up to the camcorder with the LCD screen facing out [a]. When you can erase the indicator by using headphones. It may cause malfunction. 22 The viewfinder turns off automatically...

Operating Instructions (primary manual)
Page 23
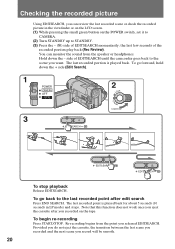
...Crystal-clear still/slow/picture search) To view a still picture (playback pause) Press P during playback. If slow playback lasts for 5 minutes, the camcorder automatically enters stop mode. 23 Basic operations Playing back a tape Various playback modes You can enjoy clear pictures on the Remote Commander during playback. To... in the various playback modes. •When playback pause mode lasts for about 1 minute, it shifts to play back the tape recorded in LP mode. •Streaks appear and the sound is muted in the menu system. To resume normal playback, release the button.
...Crystal-clear still/slow/picture search) To view a still picture (playback pause) Press P during playback. If slow playback lasts for 5 minutes, the camcorder automatically enters stop mode. 23 Basic operations Playing back a tape Various playback modes You can enjoy clear pictures on the Remote Commander during playback. To... in the various playback modes. •When playback pause mode lasts for about 1 minute, it shifts to play back the tape recorded in LP mode. •Streaks appear and the sound is muted in the menu system. To resume normal playback, release the button.

Operating Instructions (primary manual)
Page 25
...-F330 (supplied), NP-F530, NP-F550, NP-F730, NP-F730H, NP-F750, NP-F930, NP-F950 Supplied battery case (CCD-TRV75/TRV85/ TRV93 only) Sony car battery charger DC-V515A Notes on the camcorder. (2) Connect the power cord to the AC power adaptor. (3) Connect the power cord to a wall outlet. 1 2, 3 WARNING...alkaline batteries (CCD-TRV75/TRV85/TRV93 only) and 12/24 V car battery. Using the house current (1) Open the DC IN jack cover, and connect the AC power adaptor to the DC IN jack on power sources •Disconnecting the power source or removing the battery pack during recording or playback ...
...-F330 (supplied), NP-F530, NP-F550, NP-F730, NP-F730H, NP-F750, NP-F930, NP-F950 Supplied battery case (CCD-TRV75/TRV85/ TRV93 only) Sony car battery charger DC-V515A Notes on the camcorder. (2) Connect the power cord to the AC power adaptor. (3) Connect the power cord to a wall outlet. 1 2, 3 WARNING...alkaline batteries (CCD-TRV75/TRV85/TRV93 only) and 12/24 V car battery. Using the house current (1) Open the DC IN jack cover, and connect the AC power adaptor to the DC IN jack on power sources •Disconnecting the power source or removing the battery pack during recording or playback ...

Operating Instructions (primary manual)
Page 26
...alternative power sources Using alkaline batteries - CCD-TRV75/TRV85/TRV93 only Use the battery case (supplied) and six size AA (LR6) Sony Alkaline batteries (not supplied). (1) Remove the battery holder from the camcorder to be shorter depending on the storage condition of the camcorder in the correct direction. (3) Insert...may be sure the batteries are estimates. To remove the battery case The battery case is installed with the LCD screen. CCDContinuous recording time Typical recording time TRV75 265 min. 180 min. 140 min. 95 min. Notes •You may be sure to remove the battery...
...alternative power sources Using alkaline batteries - CCD-TRV75/TRV85/TRV93 only Use the battery case (supplied) and six size AA (LR6) Sony Alkaline batteries (not supplied). (1) Remove the battery holder from the camcorder to be shorter depending on the storage condition of the camcorder in the correct direction. (3) Insert...may be sure the batteries are estimates. To remove the battery case The battery case is installed with the LCD screen. CCDContinuous recording time Typical recording time TRV75 265 min. 180 min. 140 min. 95 min. Notes •You may be sure to remove the battery...


