Operating Instructions (primary manual)
Page 4
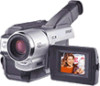
...zoom greater than 20×, select the digital zoom power in D ZOOM in the menu settings. ) D ZOOM [MENU] (p. 52) •Focusing manually Manual focus (p. 42) •Shooting distant subjects Landscape mode (p. 39) •Recording fast-moving subjects Sports lesson mode (p. 39) Functions...;Playing back the picture on a TV without connecting a cord •Recording with the date/time SUPER LASER LINK (p. 33) (CCD-TRV98 only) Date and time (p. 27) •Enhancing old tapes ORC [MENU] (p. 54) Functions to use after recording (in the playback mode) •Correcting jitter TBC [MENU...
...zoom greater than 20×, select the digital zoom power in D ZOOM in the menu settings. ) D ZOOM [MENU] (p. 52) •Focusing manually Manual focus (p. 42) •Shooting distant subjects Landscape mode (p. 39) •Recording fast-moving subjects Sports lesson mode (p. 39) Functions...;Playing back the picture on a TV without connecting a cord •Recording with the date/time SUPER LASER LINK (p. 33) (CCD-TRV98 only) Date and time (p. 27) •Enhancing old tapes ORC [MENU] (p. 54) Functions to use after recording (in the playback mode) •Correcting jitter TBC [MENU...
Operating Instructions (primary manual)
Page 6
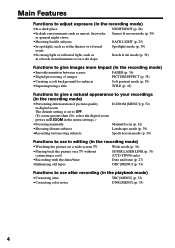
...cassette into the cassette compartment with its window facing out and the write-protect tab on the cassette compartment. Quick Start Guide 6 Connecting the power cord (p. 16) Use the battery pack when using your camcorder. Quick Start Guide This chapter introduces you to the basic features of the cassette ... the plug with its v mark facing up . 3 Close the cassette compartment by pressing the mark on the cassette up . AC power adaptor (supplied) Inserting a cassette (p. 19) 1 Open the lid of your camcorder outdoors (p. 11). Close the lid of the cassette compartment.
...cassette into the cassette compartment with its window facing out and the write-protect tab on the cassette compartment. Quick Start Guide 6 Connecting the power cord (p. 16) Use the battery pack when using your camcorder. Quick Start Guide This chapter introduces you to the basic features of the cassette ... the plug with its v mark facing up . 3 Close the cassette compartment by pressing the mark on the cassette up . AC power adaptor (supplied) Inserting a cassette (p. 19) 1 Open the lid of your camcorder outdoors (p. 11). Close the lid of the cassette compartment.
Operating Instructions (primary manual)
Page 10
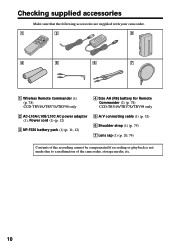
... 4 Size AA (R6) battery for Remote Commander (2) (p. 78) CCD-TRV49/TRV78/TRV98 only 2 AC-L10A/L10B/L10C AC power adaptor (1), Power cord (1) (p. 12) 3 NP-F330 battery pack (1) (p. 11, 12) 5 A/V connecting cable (1) (p. 32) 6 Shoulder strap (1) (p. 75) 7 Lens cap (1) (p. 20, 74) Contents of the recording cannot be compensated if recording or playback is not made due to a malfunction...
... 4 Size AA (R6) battery for Remote Commander (2) (p. 78) CCD-TRV49/TRV78/TRV98 only 2 AC-L10A/L10B/L10C AC power adaptor (1), Power cord (1) (p. 12) 3 NP-F330 battery pack (1) (p. 11, 12) 5 A/V connecting cable (1) (p. 32) 6 Shoulder strap (1) (p. 75) 7 Lens cap (1) (p. 20, 74) Contents of the recording cannot be compensated if recording or playback is not made due to a malfunction...
Operating Instructions (primary manual)
Page 12
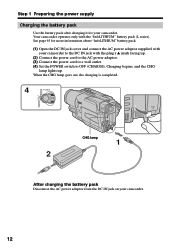
When the CHG lamp goes out, the charging is completed. 4 POWER PLAYER OFF (CHARGE) CAMERA CHG lamp 1 2 After charging the battery pack Disconnect the AC power adaptor from the DC IN jack on your camcorder to the DC IN jack with the plug's v mark facing up ...." battery pack. (1) Open the DC IN jack cover and connect the AC power adaptor supplied with the "InfoLITHIUM" battery pack (L series). Charging begins, and the CHG lamp lights up . (2) Connect the power cord to the AC power adaptor. (3) Connect the power cord to a wall outlet. (4) Set the POWER switch to OFF (CHARGE).
When the CHG lamp goes out, the charging is completed. 4 POWER PLAYER OFF (CHARGE) CAMERA CHG lamp 1 2 After charging the battery pack Disconnect the AC power adaptor from the DC IN jack on your camcorder to the DC IN jack with the plug's v mark facing up ...." battery pack. (1) Open the DC IN jack cover and connect the AC power adaptor supplied with the "InfoLITHIUM" battery pack (L series). Charging begins, and the CHG lamp lights up . (2) Connect the power cord to the AC power adaptor. (3) Connect the power cord to a wall outlet. (4) Set the POWER switch to OFF (CHARGE).

Operating Instructions (primary manual)
Page 16
...your camcorder. •The DC IN jack has "source priority". Notes •The AC power adaptor can supply power even if the battery pack is attached to cut off . Using a car battery Use Sony DC Adaptor/Charger (optional). 16 This means that you use your camcorder for a long...the plug's v mark facing up. (2) Connect the power cord to the AC power adaptor. (3) Connect the power cord to a wall outlet. 1 2, 3 PRECAUTION The set itself has been turned off the power. Step 1 Preparing the power supply Connecting to a wall outlet When you power it is connected to the DC IN jack, even ...
...your camcorder. •The DC IN jack has "source priority". Notes •The AC power adaptor can supply power even if the battery pack is attached to cut off . Using a car battery Use Sony DC Adaptor/Charger (optional). 16 This means that you use your camcorder for a long...the plug's v mark facing up. (2) Connect the power cord to the AC power adaptor. (3) Connect the power cord to a wall outlet. 1 2, 3 PRECAUTION The set itself has been turned off the power. Step 1 Preparing the power supply Connecting to a wall outlet When you power it is connected to the DC IN jack, even ...
Operating Instructions (primary manual)
Page 61
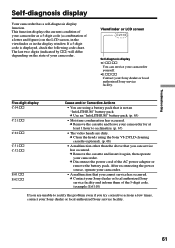
...to rectify the problem even if you can service your camcorder yourself. •E:ss:ss Contact your Sony dealer or local authorized Sony service facility. After reconnecting the power source, operate your camcorder. • A malfunction that you try corrective actions a few times, contact... heads using the Sony V8-25CLD cleaning cassette (optional). (p. 68) • A malfunction other than the above that you are unable to acclimatize. (p. 67) • The video heads are using a battery pack that is displayed, check the following code chart. c Disconnect the power cord of the 5-digit...
...to rectify the problem even if you can service your camcorder yourself. •E:ss:ss Contact your Sony dealer or local authorized Sony service facility. After reconnecting the power source, operate your camcorder. • A malfunction that you try corrective actions a few times, contact... heads using the Sony V8-25CLD cleaning cassette (optional). (p. 68) • A malfunction other than the above that you are unable to acclimatize. (p. 67) • The video heads are using a battery pack that is displayed, check the following code chart. c Disconnect the power cord of the 5-digit...
Operating Instructions (primary manual)
Page 70
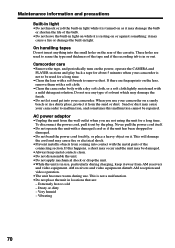
... been dropped or damaged. •Do not bend the power cord forcibly, or place a heavy object on it. AM receivers and video equipment disturb AM reception and video operation. •The unit becomes warm during use , ... soft cloth, or a soft cloth lightly moistened with the metal parts of the tape and if the recording tab is not a malfunction. •Do not place the unit in locations that are used for .... •Do not leave the built-in light on while it is resting on the power, operate the CAMERA and PLAYER sections and play back a tape for about 5 minutes when your camcorder to ...
... been dropped or damaged. •Do not bend the power cord forcibly, or place a heavy object on it. AM receivers and video equipment disturb AM reception and video operation. •The unit becomes warm during use , ... soft cloth, or a soft cloth lightly moistened with the metal parts of the tape and if the recording tab is not a malfunction. •Do not place the unit in locations that are used for .... •Do not leave the built-in light on while it is resting on the power, operate the CAMERA and PLAYER sections and play back a tape for about 5 minutes when your camcorder to ...

Operating Instructions (primary manual)
Page 72
.../16 × 2 7/8 in .) (w/h/d) Mass (approx.) CCD-TRV49/TRV58/TRV68/ TRV78: 910 g (2 lb) CCD-TRV88: 920 g (2 lb) CCD-TRV98: 930 g (2 lb) excluding the battery pack, cassette and shoulder strap 1.1 kg (2 lb 7 oz) including the battery pack NP-F330, cassette and shoulder strap Supplied accessories See page 8. Specifications Video camera recorder Output connectors S video output Storage temperature -20 °C to...
.../16 × 2 7/8 in .) (w/h/d) Mass (approx.) CCD-TRV49/TRV58/TRV68/ TRV78: 910 g (2 lb) CCD-TRV88: 920 g (2 lb) CCD-TRV98: 930 g (2 lb) excluding the battery pack, cassette and shoulder strap 1.1 kg (2 lb 7 oz) including the battery pack NP-F330, cassette and shoulder strap Supplied accessories See page 8. Specifications Video camera recorder Output connectors S video output Storage temperature -20 °C to...


