Operating Instructions
Page 2
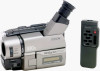
...are cautioned that interference will soon be of sufficient magnitude to correct the interference by turning the equipment off and on your nearest Sony Service Center or Factory Service Center. Connect the equipment into an outlet on a circuit different from that you can enjoy for ...user to radio or television reception, which the receiver is encouraged to try to constitute a risk of the FCC Rules. If this Sony Handycam VisionTM camcorder. Congratulations on , the user is connected. - Note: In some areas the disposal of this equipment does cause harmful interference to...
...are cautioned that interference will soon be of sufficient magnitude to correct the interference by turning the equipment off and on your nearest Sony Service Center or Factory Service Center. Connect the equipment into an outlet on a circuit different from that you can enjoy for ...user to radio or television reception, which the receiver is encouraged to try to constitute a risk of the FCC Rules. If this Sony Handycam VisionTM camcorder. Congratulations on , the user is connected. - Note: In some areas the disposal of this equipment does cause harmful interference to...
Operating Instructions
Page 3
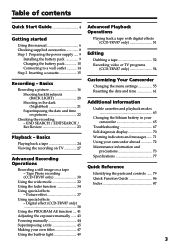
...messages ...... 71 Playing back a tape 24 Viewing the recording on TV 27 Using your camcorder 65 Troubleshooting 67 Self-diagnosis display 70 Playback - Tape Photo recording (CCD-TRV87 only 30 Using the wide mode 32 Using the fader function 34 Quick Reference Identifying...the exposure manually ...... 43 Focusing manually 44 Superimposing a title 45 Making your own titles 47 Using the built-in your camcorder abroad 72 Maintenance information and precautions 73 Advanced Recording Specifications 77 Operations Recording a still image on pictures 22 Checking the ...
...messages ...... 71 Playing back a tape 24 Viewing the recording on TV 27 Using your camcorder 65 Troubleshooting 67 Self-diagnosis display 70 Playback - Tape Photo recording (CCD-TRV87 only 30 Using the wide mode 32 Using the fader function 34 Quick Reference Identifying...the exposure manually ...... 43 Focusing manually 44 Superimposing a title 45 Making your own titles 47 Using the built-in your camcorder abroad 72 Maintenance information and precautions 73 Advanced Recording Specifications 77 Operations Recording a still image on pictures 22 Checking the ...
Operating Instructions
Page 4
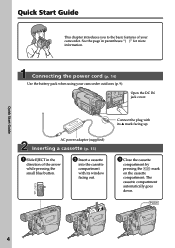
The cassette compartment automatically goes down. See the page in the direction of your camcorder outdoors (p. 9). Open the DC IN jack cover. EJECT AC power adaptor (supplied) Inserting a cassette (p. 15) 1 Slide EJECT in parentheses "( )" for more information. Quick Start Guide 4 ... out. 3 Close the cassette compartment by pressing the mark on the cassette compartment. Connecting the power cord (p. 14) Use the battery pack when using your camcorder.
The cassette compartment automatically goes down. See the page in the direction of your camcorder outdoors (p. 9). Open the DC IN jack cover. EJECT AC power adaptor (supplied) Inserting a cassette (p. 15) 1 Slide EJECT in parentheses "( )" for more information. Quick Start Guide 4 ... out. 3 Close the cassette compartment by pressing the mark on the cassette compartment. Connecting the power cord (p. 14) Use the battery pack when using your camcorder.
Operating Instructions
Page 5
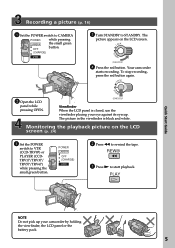
Your camcorder starts recording. Monitoring the playback picture on the LCD screen. LOCK STA 2 Open the LCD panel while pressing OPEN. POWER CAMERA OFF (CHARGE) VTR 2 Press m to VTR (CCD-TRV87) or PLAYER (CCDTRV17/TRV37/ TRV57/TRV67) while pressing the small green button. The picture ...appears on the LCD screen (p. 24) 1 Set the POWER switch to rewind the tape. REW 3 Press N to STANDBY. The picture in the viewfinder is closed, use the viewfinder placing your camcorder...
Your camcorder starts recording. Monitoring the playback picture on the LCD screen. LOCK STA 2 Open the LCD panel while pressing OPEN. POWER CAMERA OFF (CHARGE) VTR 2 Press m to VTR (CCD-TRV87) or PLAYER (CCDTRV17/TRV37/ TRV57/TRV67) while pressing the small green button. The picture ...appears on the LCD screen (p. 24) 1 Set the POWER switch to rewind the tape. REW 3 Press N to STANDBY. The picture in the viewfinder is closed, use the viewfinder placing your camcorder...
Operating Instructions
Page 6
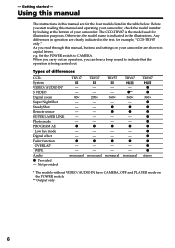
... of your camcorder are shown in capital letters. Set the POWER switch to indicate that the operation is indicated in the text, for example, "CCD-TRV87 only." monaural - z - - Using this manual The instructions in the table below. Not provided TRV17 TRV37 TRV57 TRV67 - - 80 z - - z - - Otherwise, the model name is being carried out. z z - - Before...
... of your camcorder are shown in capital letters. Set the POWER switch to indicate that the operation is indicated in the text, for example, "CCD-TRV87 only." monaural - z - - Using this manual The instructions in the table below. Not provided TRV17 TRV37 TRV57 TRV67 - - 80 z - - z - - Otherwise, the model name is being carried out. z z - - Before...
Operating Instructions
Page 7
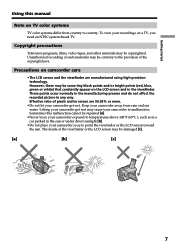
... •The LCD screen and the viewfinder are 99.99% or more. •Do not let your camcorder get wet may cause your camcorder to malfunction. Sometimes this manual Note on the LCD screen and in the viewfinder. However, there may be contrary to the provision of the viewfinder ...;C ), such as in a car parked in the sun or under direct sunlight [b]. •Do not place your camcorder so as to point the viewfinder or the LCD screen toward the sun. Letting your camcorder get wet. Effective ratio of such materials may be some tiny black points and/or bright points (red...
... •The LCD screen and the viewfinder are 99.99% or more. •Do not let your camcorder get wet may cause your camcorder to malfunction. Sometimes this manual Note on the LCD screen and in the viewfinder. However, there may be contrary to the provision of the viewfinder ...;C ), such as in a car parked in the sun or under direct sunlight [b]. •Do not place your camcorder so as to point the viewfinder or the LCD screen toward the sun. Letting your camcorder get wet. Effective ratio of such materials may be some tiny black points and/or bright points (red...
Operating Instructions
Page 8
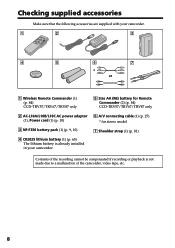
Contents of the recording cannot be compensated if recording or playback is already installed in your camcorder. 1 2 3 4 5 6 7 * or 1 Wireless Remote Commander (1) (p. 84) CCD-TRV57/TRV67/TRV87 only 5 Size AA (R6) battery for Remote Commander (2) (p. 84) CCD-TRV57/TRV67/TRV87 only 2 AC-L10A/L10B/L10C AC power adaptor 6 A/V connecting cable (1) (p. 27) (1), Power cord (1) (p. 10) * for stereo model...
Contents of the recording cannot be compensated if recording or playback is already installed in your camcorder. 1 2 3 4 5 6 7 * or 1 Wireless Remote Commander (1) (p. 84) CCD-TRV57/TRV67/TRV87 only 5 Size AA (R6) battery for Remote Commander (2) (p. 84) CCD-TRV57/TRV67/TRV87 only 2 AC-L10A/L10B/L10C AC power adaptor 6 A/V connecting cable (1) (p. 27) (1), Power cord (1) (p. 10) * for stereo model...
Operating Instructions
Page 9
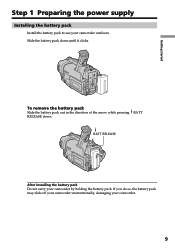
BATT RELEASE After installing the battery pack Do not carry your camcorder. 9 To remove the battery pack Slide the battery pack out in the direction of the arrow while pressing BATT RELEASE down until it clicks. Slide the battery pack down . If you do so, the battery pack may slide off your camcorder unintentionally, damaging your camcorder by holding the battery pack. Getting started Step 1 Preparing the power supply Installing the battery pack Install the battery pack to use your camcorder outdoors.
BATT RELEASE After installing the battery pack Do not carry your camcorder. 9 To remove the battery pack Slide the battery pack out in the direction of the arrow while pressing BATT RELEASE down until it clicks. Slide the battery pack down . If you do so, the battery pack may slide off your camcorder unintentionally, damaging your camcorder by holding the battery pack. Getting started Step 1 Preparing the power supply Installing the battery pack Install the battery pack to use your camcorder outdoors.
Operating Instructions
Page 10
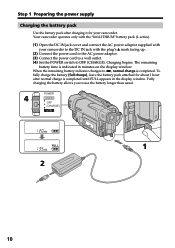
... begins. To fully charge the battery (full charge), leave the battery pack attached for about 1 hour after charging it for your camcorder to OFF (CHARGE). Step 1 Preparing the power supply Charging the battery pack Use the battery pack after normal charge is completed until...1 2 10 The remaining battery time is completed. Fully charging the battery allows you to u, normal charge is indicated in the display window. Your camcorder operates only with the "InfoLITHIUM" battery pack (L series). (1) Open the DC IN jack cover and connect the AC power adaptor supplied with the...
... begins. To fully charge the battery (full charge), leave the battery pack attached for about 1 hour after charging it for your camcorder to OFF (CHARGE). Step 1 Preparing the power supply Charging the battery pack Use the battery pack after normal charge is completed until...1 2 10 The remaining battery time is completed. Fully charging the battery allows you to u, normal charge is indicated in the display window. Your camcorder operates only with the "InfoLITHIUM" battery pack (L series). (1) Open the DC IN jack cover and connect the AC power adaptor supplied with the...
Operating Instructions
Page 11
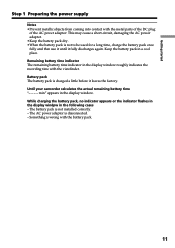
Keep the battery pack in the following cases - Until your camcorder calculates the actual remaining battery time "- - - - The battery pack is disconnected. - While charging the battery pack, no indicator appears or the indicator flashes in the ...
Keep the battery pack in the following cases - Until your camcorder calculates the actual remaining battery time "- - - - The battery pack is disconnected. - While charging the battery pack, no indicator appears or the indicator flashes in the ...
Operating Instructions
Page 12
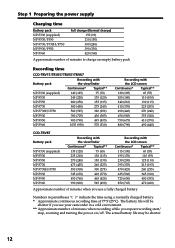
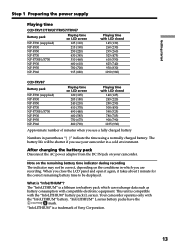
The actual battery life may be shorter if you use your camcorder in a cold environment. ** Approximate number of minutes when you repeat ... (240) 390 (330) 420 (360) Approximate number of minutes to charge an empty battery pack Recording time CCD-TRV17/TRV37/TRV57/TRV67 Battery pack Recording with the viewfinder Continuous* Typical** NP-F330 (supplied) NP-F530 NP-F550 NP-F730...490 (440) 270 (240) 650 (585) 355 (320) 750 (675) 410 (370) 880 (790) 490 (440) CCD-TRV87 Battery pack NP-F330 (supplied) NP-F530 NP-F550 NP-F730 NP-F730H/F750 NP-F930 NP-F950 NP-F960 Recording with...
The actual battery life may be shorter if you use your camcorder in a cold environment. ** Approximate number of minutes when you repeat ... (240) 390 (330) 420 (360) Approximate number of minutes to charge an empty battery pack Recording time CCD-TRV17/TRV37/TRV57/TRV67 Battery pack Recording with the viewfinder Continuous* Typical** NP-F330 (supplied) NP-F530 NP-F550 NP-F730...490 (440) 270 (240) 650 (585) 355 (320) 750 (675) 410 (370) 880 (790) 490 (440) CCD-TRV87 Battery pack NP-F330 (supplied) NP-F530 NP-F550 NP-F730 NP-F730H/F750 NP-F930 NP-F950 NP-F960 Recording with...
Operating Instructions
Page 13
...started Step 1 Preparing the power supply Playing time CCD-TRV17/TRV37/TRV57/TRV67 Battery pack NP-F330 (supplied) NP-F530... 280 (250) 500 (450) 580 (525) 780 (705) 900 (790) 1035 (930) Approximate number of Sony Corporation. 13 When you close the LCD panel and open it again, it takes about 1 minute for the correct ...is a trademark of minutes when you are recording. Your camcorder operates only with compatible electronic equipment. "InfoLITHIUM" is a lithium ion battery pack which you use your camcorder. Note on the remaining battery time indicator during recording ...
...started Step 1 Preparing the power supply Playing time CCD-TRV17/TRV37/TRV57/TRV67 Battery pack NP-F330 (supplied) NP-F530... 280 (250) 500 (450) 580 (525) 780 (705) 900 (790) 1035 (930) Approximate number of Sony Corporation. 13 When you close the LCD panel and open it again, it takes about 1 minute for the correct ...is a trademark of minutes when you are recording. Your camcorder operates only with compatible electronic equipment. "InfoLITHIUM" is a lithium ion battery pack which you use your camcorder. Note on the remaining battery time indicator during recording ...

Operating Instructions
Page 14
... the battery pack is not plugged into a wall outlet. This means that you use your camcorder for a long time, we recommend that the battery pack cannot supply any power if the power cord... is not disconnected from the AC power source (house current) as long as it is connected to your camcorder. • The DC IN jack has "source priority". Step 1 Preparing the power supply Connecting to ... (1) Open the DC IN jack cover, and connect the AC power adaptor to the DC IN jack on your camcorder with the plug's v mark facing up. (2) Connect the power cord to the AC power adaptor. (3) Connect the...
... the battery pack is not plugged into a wall outlet. This means that you use your camcorder for a long time, we recommend that the battery pack cannot supply any power if the power cord... is not disconnected from the AC power source (house current) as long as it is connected to your camcorder. • The DC IN jack has "source priority". Step 1 Preparing the power supply Connecting to ... (1) Open the DC IN jack cover, and connect the AC power adaptor to the DC IN jack on your camcorder with the plug's v mark facing up. (2) Connect the power cord to the AC power adaptor. (3) Connect the...
Operating Instructions
Page 16
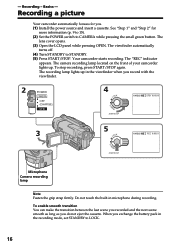
...as long as you . (1) Install the power source and insert a cassette. - To stop recording, press START/STOP again. Recording a picture Your camcorder automatically focuses for more information (p. 9 to 15). (2) Set the POWER switch to CAMERA while pressing the small green button. When you record with ...Note Fasten the grip strap firmly. Recording - See "Step 1" and "Step 2" for you do not eject the cassette. Basics - Your camcorder starts recording. Do not touch the built-in the viewfinder when you exchange the battery pack in the recording mode, set STANDBY to STANDBY. (5)...
...as long as you . (1) Install the power source and insert a cassette. - To stop recording, press START/STOP again. Recording a picture Your camcorder automatically focuses for more information (p. 9 to 15). (2) Set the POWER switch to CAMERA while pressing the small green button. When you record with ...Note Fasten the grip strap firmly. Recording - See "Step 1" and "Step 2" for you do not eject the cassette. Basics - Your camcorder starts recording. Do not touch the built-in the viewfinder when you exchange the battery pack in the recording mode, set STANDBY to STANDBY. (5)...

Operating Instructions
Page 17
... However, the picture will be normal when recorded. To resume the standby mode, turn the LCD panel over so that it into the camcorder body. Adjusting the LCD screen To adjust the brightness of the LCD screen, press either of the other way, the indicator appears in ...:00 Press COUNTER RESET (p. 82). After recording (1) Turn STANDBY down and up again. Indicators in the viewfinder and on the LCD is inserted Your camcorder automatically turns off . However, the date will be normal when recorded. 17 Recording - Picture in the mirror mode, the viewfinder automatically turns off ...
... However, the picture will be normal when recorded. To resume the standby mode, turn the LCD panel over so that it into the camcorder body. Adjusting the LCD screen To adjust the brightness of the LCD screen, press either of the other way, the indicator appears in ...:00 Press COUNTER RESET (p. 82). After recording (1) Turn STANDBY down and up again. Indicators in the viewfinder and on the LCD is inserted Your camcorder automatically turns off . However, the date will be normal when recorded. 17 Recording - Picture in the mirror mode, the viewfinder automatically turns off ...

Operating Instructions
Page 21
... The NightShot function enables you keep NIGHTSHOT set N.S.LIGHT to OFF. While your camcorder to malfunction. •When you to ON in the menu settings (p. 55). outdoors in the viewfinder. CCD-TRV87 only The Super NightShot mode makes subjects more than four times brighter than ...will be automatically changed depending on . To enable NightShot Light, set to ON in normal recording, the picture may cause your camcorder is difficult with the NightShot Light on the brightness of nocturnal animals for observation when you can satisfactorily record the environment of the...
... The NightShot function enables you keep NIGHTSHOT set N.S.LIGHT to OFF. While your camcorder to malfunction. •When you to ON in the menu settings (p. 55). outdoors in the viewfinder. CCD-TRV87 only The Super NightShot mode makes subjects more than four times brighter than ...will be automatically changed depending on . To enable NightShot Light, set to ON in normal recording, the picture may cause your camcorder is difficult with the NightShot Light on the brightness of nocturnal animals for observation when you can satisfactorily record the environment of the...
Operating Instructions
Page 24
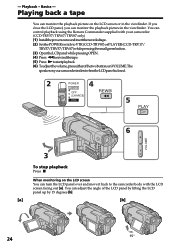
...camcorder. (CCD-TRV57/TRV67/TRV87 only) (1) Installthepowersourceandinserttherecordedtape. (2) SetthePOWERswitchtoVTR(CCD-TRV87)orPLAYER(CCD-TRV17/ TRV37/TRV57/TRV67) while pressing the small green button. (3) OpentheLCDpanelwhilepressingOPEN. (4) Press mtorewindthetape. (5) Press Ntostartplayback. (6) Toadjustthevolume,presseitherofthetwobuttonsonVOLUME.The speaker on the LCD screen You can turn the LCD panel over and move it back to the camcorder.... You can control playback using the Remote Commander supplied with your camcorder is silent when the LCD panel is closed. 2 POWER 4 ...
...camcorder. (CCD-TRV57/TRV67/TRV87 only) (1) Installthepowersourceandinserttherecordedtape. (2) SetthePOWERswitchtoVTR(CCD-TRV87)orPLAYER(CCD-TRV17/ TRV37/TRV57/TRV67) while pressing the small green button. (3) OpentheLCDpanelwhilepressingOPEN. (4) Press mtorewindthetape. (5) Press Ntostartplayback. (6) Toadjustthevolume,presseitherofthetwobuttonsonVOLUME.The speaker on the LCD screen You can turn the LCD panel over and move it back to the camcorder.... You can control playback using the Remote Commander supplied with your camcorder is silent when the LCD panel is closed. 2 POWER 4 ...
Operating Instructions
Page 25
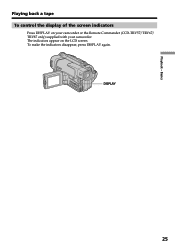
Basics Playing back a tape To control the display of the screen indicators Press DISPLAY on the LCD screen. Playback - The indicators appear on your camcorder or the Remote Commander (CCD-TRV57/TRV67/ TRV87 only) supplied with your camcorder. DISPLAY 25 To make the indicators disappear, press DISPLAY again.
Basics Playing back a tape To control the display of the screen indicators Press DISPLAY on the LCD screen. Playback - The indicators appear on your camcorder or the Remote Commander (CCD-TRV57/TRV67/ TRV87 only) supplied with your camcorder. DISPLAY 25 To make the indicators disappear, press DISPLAY again.
Operating Instructions
Page 26
...the recorded section plays back and stops. When the playback pause mode lasts for about 1 minute (CCD-TRV57/TRV67/TRV87 only) Your camcorder automatically returns to VTR (CCD-TRV87) or PLAYER (CCD-TRV17/TRV37/TRV57/TRV67 only). To resume playback, press X or N. To monitor the high-speed picture while ...during playback pause mode, slow playback (CCD-TRV57/TRV67/ TRV87 only) or picture search. The tapes recorded in the Hi8 format (CCD-TRV17/TRV37/TRV57 only) You can play back a tape recorded in the Hi8 video system on your camcorder. 26 CCD-TRV57/TRV67/TRV87 only Press yon the ...
...the recorded section plays back and stops. When the playback pause mode lasts for about 1 minute (CCD-TRV57/TRV67/TRV87 only) Your camcorder automatically returns to VTR (CCD-TRV87) or PLAYER (CCD-TRV17/TRV37/TRV57/TRV67 only). To resume playback, press X or N. To monitor the high-speed picture while ...during playback pause mode, slow playback (CCD-TRV57/TRV67/ TRV87 only) or picture search. The tapes recorded in the Hi8 format (CCD-TRV17/TRV37/TRV57 only) You can play back a tape recorded in the Hi8 video system on your camcorder. 26 CCD-TRV57/TRV67/TRV87 only Press yon the ...
Operating Instructions
Page 27
... in the same way as when you power your TV or VCR. Viewing the recording on TV Connect your camcorder to your TV or VCR with the A/V connecting cable supplied with your camcorder. Open the jack cover. CCD-TRV17/TRV37/TRV57/TRV67 Playback - Connect your camcorder to the TV using the AC power adaptor (p. 14).
... in the same way as when you power your TV or VCR. Viewing the recording on TV Connect your camcorder to your TV or VCR with the A/V connecting cable supplied with your camcorder. Open the jack cover. CCD-TRV17/TRV37/TRV57/TRV67 Playback - Connect your camcorder to the TV using the AC power adaptor (p. 14).


