
Operating Instructions
Page 1
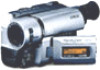
Refer to these numbers whenever you call upon your Sony dealer regarding this manual thoroughly, and retain it for future reference. Model No. AC-L Serial No. Owner's Record The model and serial numbers are located on the bottom. CCD-TRV Model No. CCD-TRV46 CCD-TRV36/TRV43/TRV46 CCD-TRV16 ©1998 by Sony Corporation Serial No. 3-865-333-13 (1) Video Camera Recorder Operating Instructions Before operating the unit, please read this product. Record the serial number in the space provided below.
Refer to these numbers whenever you call upon your Sony dealer regarding this manual thoroughly, and retain it for future reference. Model No. AC-L Serial No. Owner's Record The model and serial numbers are located on the bottom. CCD-TRV Model No. CCD-TRV46 CCD-TRV36/TRV43/TRV46 CCD-TRV16 ©1998 by Sony Corporation Serial No. 3-865-333-13 (1) Video Camera Recorder Operating Instructions Before operating the unit, please read this product. Record the serial number in the space provided below.
Operating Instructions
Page 2
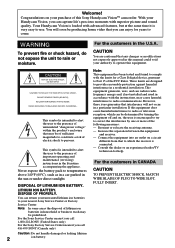
...and sound quality. You can enjoy for years to rain or moisture. Congratulations on a circuit different from that you call 416-499-SONY (Canada only) Caution: Do not handle damaged or leaking lithium 2 ion battery. Reorient or relocate the receiving antenna. - Connect ...the equipment into an outlet on your authority to which can be producing home video that to operate this Sony Handycam VisionTM camcorder. DISPOSAL OF LITHIUM ION BATTERY. These limits are cautioned that interference will soon be determined by one...
...and sound quality. You can enjoy for years to rain or moisture. Congratulations on a circuit different from that you call 416-499-SONY (Canada only) Caution: Do not handle damaged or leaking lithium 2 ion battery. Reorient or relocate the receiving antenna. - Connect ...the equipment into an outlet on your authority to which can be producing home video that to operate this Sony Handycam VisionTM camcorder. DISPOSAL OF LITHIUM ION BATTERY. These limits are cautioned that interference will soon be determined by one...
Operating Instructions
Page 3
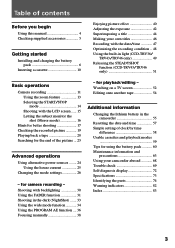
for camera recording - Before you begin Table of contents Before you begin Using this manual 4 Checking... ...... 15 Letting the subject monitor the shot (Mirror mode 16 Hints for better shooting 17 Checking the recorded picture 19 Playing back a tape 20 Searching for the end of clock by time difference 58 Usable cassettes...your own titles 46 Recording with the date/time 47 Optimizing the recording condition .. 48 Using the built-in light (CCD-TRV36/ TRV43/TRV46 only 49 Releasing the STEADYSHOT function (CCD-TRV43/TRV46 only 51 Basic operations Camera recording 11 Using the zoom...
for camera recording - Before you begin Table of contents Before you begin Using this manual 4 Checking... ...... 15 Letting the subject monitor the shot (Mirror mode 16 Hints for better shooting 17 Checking the recorded picture 19 Playing back a tape 20 Searching for the end of clock by time difference 58 Usable cassettes...your own titles 46 Recording with the date/time 47 Optimizing the recording condition .. 48 Using the built-in light (CCD-TRV36/ TRV43/TRV46 only 49 Releasing the STEADYSHOT function (CCD-TRV43/TRV46 only 51 Basic operations Camera recording 11 Using the zoom...
Operating Instructions
Page 4
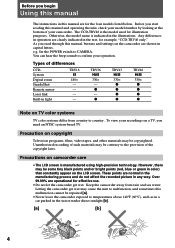
...CCD-TRV46...- Any differences in operation are operational for example, "CCD-TRV46 only." You can hear the beep sound to malfunction,... H 330× r r r r TRV46 H 330× r r r r Note on copyright Television programs, films, video tapes, and other materials may cause the unit...is manufactured using high-precision technology. Unauthorized recording of your operation. Otherwise, the model... process and do not affect the recorded picture in any way. Before you... letters. Types of the copyright laws. To view your recordings on the camcorder are shown in the sun or under ...
...CCD-TRV46...- Any differences in operation are operational for example, "CCD-TRV46 only." You can hear the beep sound to malfunction,... H 330× r r r r TRV46 H 330× r r r r Note on copyright Television programs, films, video tapes, and other materials may cause the unit...is manufactured using high-precision technology. Unauthorized recording of your operation. Otherwise, the model... process and do not affect the recorded picture in any way. Before you... letters. Types of the copyright laws. To view your recordings on the camcorder are shown in the sun or under ...
Operating Instructions
Page 5
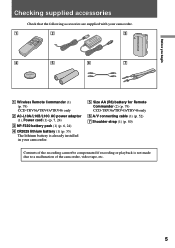
...supplied accessories Check that the following accessories are supplied with your camcorder. 1 2 3 4 5 6 7 1 Wireless Remote Commander (1) (p. 79) CCD-TRV36/TRV43/TRV46 only 2 AC-L10A/L10B/L10C AC power adaptor (1), Power cord (1) (p. 7, 24) 3 NP-F330 battery pack (1) (p. 6, 24) ... is already installed in your camcorder. 5 Size AA (R6) battery for Remote Commander (2) (p. 79) CCD-TRV36/TRV43/TRV46 only 6 A/V connecting cable (1) (p. 52) 7 Shoulder strap (1) (p. 80) Contents of the recording cannot be compensated if recording or playback is not made due to a malfunction of the camcorder...
...supplied accessories Check that the following accessories are supplied with your camcorder. 1 2 3 4 5 6 7 1 Wireless Remote Commander (1) (p. 79) CCD-TRV36/TRV43/TRV46 only 2 AC-L10A/L10B/L10C AC power adaptor (1), Power cord (1) (p. 7, 24) 3 NP-F330 battery pack (1) (p. 6, 24) ... is already installed in your camcorder. 5 Size AA (R6) battery for Remote Commander (2) (p. 79) CCD-TRV36/TRV43/TRV46 only 6 A/V connecting cable (1) (p. 52) 7 Shoulder strap (1) (p. 80) Contents of the recording cannot be compensated if recording or playback is not made due to a malfunction of the camcorder...
Operating Instructions
Page 6
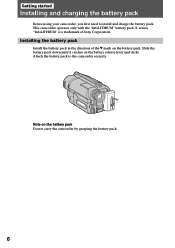
Installing the battery pack Install the battery pack in the direction of Sony Corporation. "InfoLITHIUM" is a trademark of the $ mark on the battery pack. Note on the battery release lever and clicks. Attach the battery pack to install ...
Installing the battery pack Install the battery pack in the direction of Sony Corporation. "InfoLITHIUM" is a trademark of the $ mark on the battery pack. Note on the battery release lever and clicks. Attach the battery pack to install ...

Operating Instructions
Page 7
... battery time. •Remaining battery time indication in the display window roughly indicates the recording time with the battery pack, unplug the AC power adaptor from the actual recording time. 7 Before using the camcorder with the viewfinder. POWER CAMERA OFF PPLLAYEERR Notes •"- - - For full charge, which allows you to use the battery...
... battery time. •Remaining battery time indication in the display window roughly indicates the recording time with the battery pack, unplug the AC power adaptor from the actual recording time. 7 Before using the camcorder with the viewfinder. POWER CAMERA OFF PPLLAYEERR Notes •"- - - For full charge, which allows you to use the battery...
Operating Instructions
Page 8
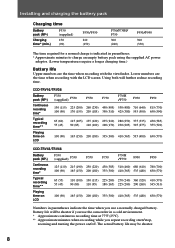
... life Upper numbers are the time when recording with the viewfinder. Lower numbers are the time when recording with the LCD screen. Battery life will further reduce recording time. Using both will be shorter. 8 CCD-TRV16/TRV36 Battery pack (NP-) Continuous recording time* F330 (supplied) F530 F550 F730... 200 (180) 335 (300) 410 (365) 535 (480) F950 815 (730) 650 (590) 430 (385) 355 (320) 630 (570) CCD-TRV43/TRV46 Battery pack (NP-) Continuous recording time* F330 (supplied) F530 F550 F730 F730H /F750 F930 F950 125 (110) 215 (190) 250 (220) 430 (385) 510 (460) 680 ...
... life Upper numbers are the time when recording with the viewfinder. Lower numbers are the time when recording with the LCD screen. Battery life will further reduce recording time. Using both will be shorter. 8 CCD-TRV16/TRV36 Battery pack (NP-) Continuous recording time* F330 (supplied) F530 F550 F730... 200 (180) 335 (300) 410 (365) 535 (480) F950 815 (730) 650 (590) 430 (385) 355 (320) 630 (570) CCD-TRV43/TRV46 Battery pack (NP-) Continuous recording time* F330 (supplied) F530 F550 F730 F730H /F750 F930 F950 125 (110) 215 (190) 250 (220) 430 (385) 510 (460) 680 ...
Operating Instructions
Page 9
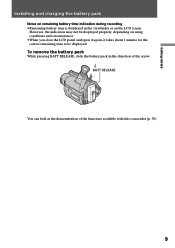
... about 1 minute for the correct remaining time to be displayed. Getting started Installing and charging the battery pack Notes on remaining battery time indication during recording •Remaining battery time is displayed in the direction of the functions available with this camcorder (p. 29). 9
... about 1 minute for the correct remaining time to be displayed. Getting started Installing and charging the battery pack Notes on remaining battery time indication during recording •Remaining battery time is displayed in the direction of the functions available with this camcorder (p. 29). 9
Operating Instructions
Page 10
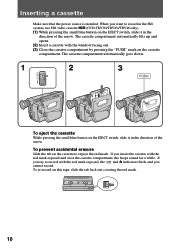
... the cassette compartment. If you try to record in the Hi8 system, use Hi8 video cassette H (CCD-TRV36/TRV43/TRV46 only). (1) While pressing the small blue button on the EJECT switch, slide it in the direction of the arrow. The cassette compartment automatically goes down. 1 2 ... and close the cassette compartment, the beeps sound for a while. Inserting a cassette Make sure that the power source is installed. When you want to record with the red mark exposed, the and 6 indicators flash, and you insert the cassette with the window facing out. (3) Close the cassette compartment by ...
... the cassette compartment. If you try to record in the Hi8 system, use Hi8 video cassette H (CCD-TRV36/TRV43/TRV46 only). (1) While pressing the small blue button on the EJECT switch, slide it in the direction of the arrow. The cassette compartment automatically goes down. 1 2 ... and close the cassette compartment, the beeps sound for a while. Inserting a cassette Make sure that the power source is installed. When you want to record with the red mark exposed, the and 6 indicators flash, and you insert the cassette with the window facing out. (3) Close the cassette compartment by ...
Operating Instructions
Page 11
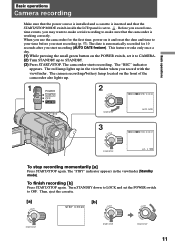
...is set the POWER switch to STANDBY. (3) Press START/STOP. Then, eject the cassette. To finish recording [b] Press START/STOP again. Basic operations STA Basic operations Camera recording Make sure that the power source is installed and a cassette is inserted and that the camcorder is ...automatically recorded for the first time, power on it to CAMERA. (2) Turn STANDBY up . 1 POWER CAMERA OFF PLAYER STA 2 LOCK NDBY START...
...is set the POWER switch to STANDBY. (3) Press START/STOP. Then, eject the cassette. To finish recording [b] Press START/STOP again. Basic operations STA Basic operations Camera recording Make sure that the power source is installed and a cassette is inserted and that the camcorder is ...automatically recorded for the first time, power on it to CAMERA. (2) Turn STANDBY up . 1 POWER CAMERA OFF PLAYER STA 2 LOCK NDBY START...
Operating Instructions
Page 12
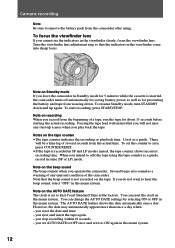
...clock is inserted, the camcorder turns off automatically for saving battery power as well as a guide, record in the menu system. Passing the tape lead will ensure that you will be a time lag...8226;If the tape is not recorded on the tape counter •The tape counter indicates the recording or playback time. You can reset the clock in the menu system. Camera recording Note Be sure to edit ...the tape using . Note on the beep sound The beep sounds when you do not want to ON again in SP and LP modes mixed, the tape counter shows incorrect recording...
...clock is inserted, the camcorder turns off automatically for saving battery power as well as a guide, record in the menu system. Passing the tape lead will ensure that you will be a time lag...8226;If the tape is not recorded on the tape counter •The tape counter indicates the recording or playback time. You can reset the clock in the menu system. Camera recording Note Be sure to edit ...the tape using . Note on the beep sound The beep sounds when you do not want to ON again in SP and LP modes mixed, the tape counter shows incorrect recording...
Operating Instructions
Page 13
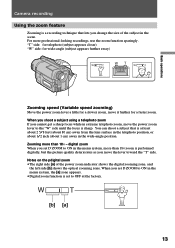
... in the telephoto position, or about 1/2 inch (about 1 cm) away in the wide-angle position. For more professional-looking recordings, use the zoom function sparingly. Zooming more than 18× zoom is performed digitally, but the picture quality deteriorates as you cannot...the size of the power zoom indicator shows the digital zooming zone, and the left side [b] shows the optical zooming zone. Camera recording Using the zoom feature Zooming is a recording technique that is at the factory. "T" side: for telephoto (subject appears closer) "W" side: for wide-angle (subject appears...
... in the telephoto position, or about 1/2 inch (about 1 cm) away in the wide-angle position. For more professional-looking recordings, use the zoom function sparingly. Zooming more than 18× zoom is performed digitally, but the picture quality deteriorates as you cannot...the size of the power zoom indicator shows the digital zooming zone, and the left side [b] shows the optical zooming zone. Camera recording Using the zoom feature Zooming is a recording technique that is at the factory. "T" side: for telephoto (subject appears closer) "W" side: for wide-angle (subject appears...
Operating Instructions
Page 14
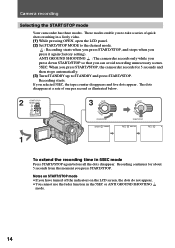
... then stops automatically. (3) Turn STANDBY up to the desired mode. : Recording starts when you press START/STOP, and stops when you press it again (factory setting). Recording starts. Camera recording Selecting the START/STOP mode Your camcorder has three modes. Notes on the... LCD screen, the dots do not appear. •You cannot use the fader function in 5SEC mode Press START/STOP again before all the dots disappear. The dots disappear at a rate of quick shots resulting in a lively video...
... then stops automatically. (3) Turn STANDBY up to the desired mode. : Recording starts when you press START/STOP, and stops when you press it again (factory setting). Recording starts. Camera recording Selecting the START/STOP mode Your camcorder has three modes. Notes on the... LCD screen, the dots do not appear. •You cannot use the fader function in 5SEC mode Press START/STOP again before all the dots disappear. The dots disappear at a rate of quick shots resulting in a lively video...
Operating Instructions
Page 15
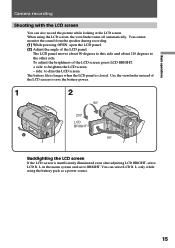
... battery life is longer when the LCD panel is insufficiently illuminated even after adjusting LCD BRIGHT, select LCD B. side: to the other side. Basic operations Camera recording Shooting with the LCD screen You can select LCD B. To adjust the brightness of the LCD panel. You can also... record the picture while looking at the LCD screen. You cannot monitor the sound from the speaker during recording. (1) While pressing OPEN, open the LCD panel. (2) Adjust the angle of the LCD screen, press ...
... battery life is longer when the LCD panel is insufficiently illuminated even after adjusting LCD BRIGHT, select LCD B. side: to the other side. Basic operations Camera recording Shooting with the LCD screen You can select LCD B. To adjust the brightness of the LCD panel. You can also... record the picture while looking at the LCD screen. You cannot monitor the sound from the speaker during recording. (1) While pressing OPEN, open the LCD panel. (2) Adjust the angle of the LCD screen, press ...
Operating Instructions
Page 16
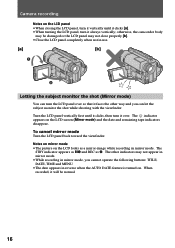
... the following buttons: TITLE, DATE, TIME and MENU. •The date appears in mirror mode. Camera recording Notes on . The STBY indicator appears as Pr and REC as a mirror-image while recording in reverse when the AUTO DATE feature is turned on the LCD panel •When closing the LCD...can let the subject monitor the shot while shooting with the viewfinder. To cancel mirror mode Turn the LCD panel back toward the viewfinder. When recorded, it always vertically; The indicator appears on the LCD looks as r. otherwise, the camcorder body may be normal. 16 Notes on mirror mode...
... the following buttons: TITLE, DATE, TIME and MENU. •The date appears in mirror mode. Camera recording Notes on . The STBY indicator appears as Pr and REC as a mirror-image while recording in reverse when the AUTO DATE feature is turned on the LCD panel •When closing the LCD...can let the subject monitor the shot while shooting with the viewfinder. To cancel mirror mode Turn the LCD panel back toward the viewfinder. When recorded, it always vertically; The indicator appears on the LCD looks as r. otherwise, the camcorder body may be normal. 16 Notes on mirror mode...
Operating Instructions
Page 17
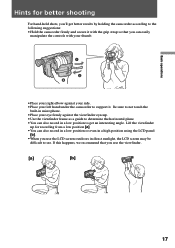
... your right elbow against the viewfinder eyecup. •Use the viewfinder frame as a guide to determine the horizontal plane. •You can also record in direct sunlight, the LCD screen may be difficult to see. Lift the viewfinder up for better shooting For hand-held shots, you'll get... an interesting angle. Basic operations Hints for recording from a low position [a]. •You can easily manipulate the controls with your thumb. •Place your left hand under the camcorder to ...
... your right elbow against the viewfinder eyecup. •Use the viewfinder frame as a guide to determine the horizontal plane. •You can also record in direct sunlight, the LCD screen may be difficult to see. Lift the viewfinder up for better shooting For hand-held shots, you'll get... an interesting angle. Basic operations Hints for recording from a low position [a]. •You can easily manipulate the controls with your thumb. •Place your left hand under the camcorder to ...
Operating Instructions
Page 18
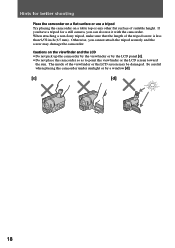
When attaching a non-Sony tripod, make sure that the length of suitable height. Be careful when placing the camcorder under sunlight or by the LCD panel [c]. •Do not ... by a window [d]. [c] [d] 18 Cautions on a table top or any other flat surface of the tripod screw is less than 9/32 inch (6.5 mm). Hints for a still camera, you cannot attach the tripod securely and the screw may be damaged.
When attaching a non-Sony tripod, make sure that the length of suitable height. Be careful when placing the camcorder under sunlight or by the LCD panel [c]. •Do not ... by a window [d]. [c] [d] 18 Cautions on a table top or any other flat surface of the tripod screw is less than 9/32 inch (6.5 mm). Hints for a still camera, you cannot attach the tripod securely and the screw may be damaged.
Operating Instructions
Page 19
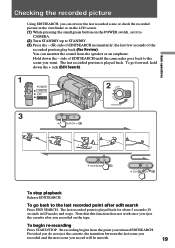
.../STOP. Provided you do not eject the cassette, the transition between the last scene you recorded and the next scene you record will be smooth. 19 Hold down the + side (Edit Search). 1 POWER CAMERA OFF PLAYER 3 EDITSEARCH 2 LOCK NDBY START/STOP EDITSEARCH EDITSEARCH To stop playback Release EDITSEARCH.... from the point you released EDITSEARCH. the last few seconds of EDITSEARCH until the camcorder goes back to the last recorded point after you recorded on the POWER switch, set it to CAMERA. (2) Turn STANDBY up to STANDBY. (3) Press the - (Œ) side of EDITSEARCH momentarily; Re...
.../STOP. Provided you do not eject the cassette, the transition between the last scene you recorded and the next scene you record will be smooth. 19 Hold down the + side (Edit Search). 1 POWER CAMERA OFF PLAYER 3 EDITSEARCH 2 LOCK NDBY START/STOP EDITSEARCH EDITSEARCH To stop playback Release EDITSEARCH.... from the point you released EDITSEARCH. the last few seconds of EDITSEARCH until the camcorder goes back to the last recorded point after you recorded on the POWER switch, set it to CAMERA. (2) Turn STANDBY up to STANDBY. (3) Press the - (Œ) side of EDITSEARCH momentarily; Re...
Operating Instructions
Page 20
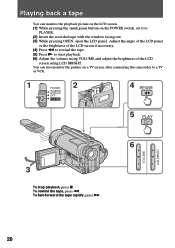
... picture on the LCD screen. (1) While pressing the small green button on a TV screen, after connecting the camcorder to a TV or VCR. 1 2 POWER CAMERA OFF PLAYER 4 REW 5 PLAY VOLUME LCD BRIGHT 6 3 To stop playback, press p. Playing back a tape You can also monitor the picture on the POWER switch..., set it to PLAYER. (2) Insert the recorded tape with the window facing out. (3) While pressing OPEN, open the LCD panel. Adjust the angle of the LCD panel or the brightness of the...
... picture on the LCD screen. (1) While pressing the small green button on a TV screen, after connecting the camcorder to a TV or VCR. 1 2 POWER CAMERA OFF PLAYER 4 REW 5 PLAY VOLUME LCD BRIGHT 6 3 To stop playback, press p. Playing back a tape You can also monitor the picture on the POWER switch..., set it to PLAYER. (2) Insert the recorded tape with the window facing out. (3) While pressing OPEN, open the LCD panel. Adjust the angle of the LCD panel or the brightness of the...