
Camera Operations Guide
Page 3
...Sony dealer or an experienced radio/TV technician for details. Notes on recording • Before starting to record, test the recording function to make sure the picture and sound are recorded without any problems. • Compensation for the contents of recordings cannot be provided, even if recording or playback is not possible due to a malfunction of your camcorder... approved in this manual could void your camcorder to malfunction. This may cause harmful interference to radio communications. CCD-TRV128: TRV128 CCD-TRV228: TRV228 CCD-TRV328: TRV328 CCD-TRV428: TRV428 DCR...
...Sony dealer or an experienced radio/TV technician for details. Notes on recording • Before starting to record, test the recording function to make sure the picture and sound are recorded without any problems. • Compensation for the contents of recordings cannot be provided, even if recording or playback is not possible due to a malfunction of your camcorder... approved in this manual could void your camcorder to malfunction. This may cause harmful interference to radio communications. CCD-TRV128: TRV128 CCD-TRV228: TRV228 CCD-TRV328: TRV328 CCD-TRV428: TRV428 DCR...
Camera Operations Guide
Page 7
...VIDEO EDIT, etc 59 Troubleshooting Troubleshooting 74 Warning indicators and messages .....79 Additional Information Using your computer cComputer Applications Guide 7 Advanced operations Customizing Your Camcorder Changing the menu settings 43 Using the (MANUAL SET) menu - Digital program editing ( TRV260/265 69 For TRV260/265: Refer also to other operating instructions supplied with your camcorder...TRV128/228/328/428) ........64 Recording pictures from a VCR ( TRV260/265 68 Dubbing selected scenes from a tape - PROGRAM AE/P EFFECT, etc 44 Using the (CAMERA SET) menu - 16:9 WIDE/...
...VIDEO EDIT, etc 59 Troubleshooting Troubleshooting 74 Warning indicators and messages .....79 Additional Information Using your computer cComputer Applications Guide 7 Advanced operations Customizing Your Camcorder Changing the menu settings 43 Using the (MANUAL SET) menu - Digital program editing ( TRV260/265 69 For TRV260/265: Refer also to other operating instructions supplied with your camcorder...TRV128/228/328/428) ........64 Recording pictures from a VCR ( TRV260/265 68 Dubbing selected scenes from a tape - PROGRAM AE/P EFFECT, etc 44 Using the (CAMERA SET) menu - 16:9 WIDE/...
Camera Operations Guide
Page 11
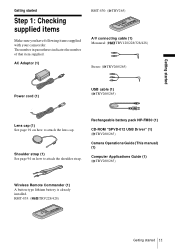
... started Getting started 11 RMT-833: ( TRV228/428) Getting started Step 1: Checking supplied items Make sure you have following items supplied with your camcorder. AC Adaptor (1) RMT-830: ( TRV265) A/V connecting cable (1) Monaural: ( TRV128/228/328/428) Stereo: ( TRV260/265) Power cord...to attach the shoulder strap. Rechargeable battery pack NP-FM30 (1) CD-ROM "SPVD-012 USB Driver" (1) ( TRV260/265) Camera Operations Guide (This manual) (1) Computer Applications Guide (1) ( TRV260/265) Wireless Remote Commander (1) A button-type lithium battery is already installed. The number...
... started Getting started 11 RMT-833: ( TRV228/428) Getting started Step 1: Checking supplied items Make sure you have following items supplied with your camcorder. AC Adaptor (1) RMT-830: ( TRV265) A/V connecting cable (1) Monaural: ( TRV128/228/328/428) Stereo: ( TRV260/265) Power cord...to attach the shoulder strap. Rechargeable battery pack NP-FM30 (1) CD-ROM "SPVD-012 USB Driver" (1) ( TRV260/265) Camera Operations Guide (This manual) (1) Computer Applications Guide (1) ( TRV260/265) Wireless Remote Commander (1) A button-type lithium battery is already installed. The number...
Camera Operations Guide
Page 17
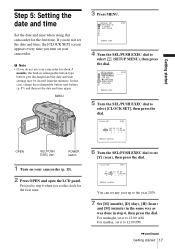
... up to 12:00 PM. ,continued Getting started Step 5: Setting the date and time Set the date and time when using this camcorder for the first time. MENU 3 Press MENU. MANUAL SET PROGRAM AE P EFFECT AUTO SHTR STBY [MENU] : END 4 Turn the SEL/PUSH EXEC dial to 12:00 AM. CLOCK...then press the dial. CLOCK SET STBY Y MD HM 2004 JAN 1 12 : 0 0 AM [MENU] : CANCEL OPEN SEL/PUSH EXEC dial POWER switch 1 Turn on your camcorder (p. 15). 2 Press OPEN and open the LCD panel. SETUP MENU CLOCK SET USB STREAM LTR SIZE LANGUAGE DEMO MODE RETURN STBY --:--:-- [MENU] : END 5 Turn the...
... up to 12:00 PM. ,continued Getting started Step 5: Setting the date and time Set the date and time when using this camcorder for the first time. MENU 3 Press MENU. MANUAL SET PROGRAM AE P EFFECT AUTO SHTR STBY [MENU] : END 4 Turn the SEL/PUSH EXEC dial to 12:00 AM. CLOCK...then press the dial. CLOCK SET STBY Y MD HM 2004 JAN 1 12 : 0 0 AM [MENU] : CANCEL OPEN SEL/PUSH EXEC dial POWER switch 1 Turn on your camcorder (p. 15). 2 Press OPEN and open the LCD panel. SETUP MENU CLOCK SET USB STREAM LTR SIZE LANGUAGE DEMO MODE RETURN STBY --:--:-- [MENU] : END 5 Turn the...
Camera Operations Guide
Page 19
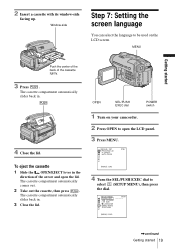
... DEMO MODE RETURN STBY --:--:-- [MENU] : END ,continued Getting started Push the center of the back of the arrow and open the LCD panel. 3 Press MENU. MANUAL SET PROGRAM AE P EFFECT AUTO SHTR STBY [MENU] : END 4 Turn the SEL/PUSH EXEC dial to open the lid. 2 Insert a cassette with its window-side... compartment automatically slides back in. 4 Close the lid. Window-side Step 7: Setting the screen language You can select the language to be used on your camcorder. 2 Press OPEN to select (SETUP MENU), then press the dial.
... DEMO MODE RETURN STBY --:--:-- [MENU] : END ,continued Getting started Push the center of the back of the arrow and open the LCD panel. 3 Press MENU. MANUAL SET PROGRAM AE P EFFECT AUTO SHTR STBY [MENU] : END 4 Turn the SEL/PUSH EXEC dial to open the lid. 2 Insert a cassette with its window-side... compartment automatically slides back in. 4 Close the lid. Window-side Step 7: Setting the screen language You can select the language to be used on your camcorder. 2 Press OPEN to select (SETUP MENU), then press the dial.

Camera Operations Guide
Page 25
... date and/or time displayed on the screen superimposed on the picture. Before recording, follow steps 1 to your camcorder, the clock is not set up yet. POWER switch 1 Remove the lens cap. Press TIME to the grip belt. To hide the date and ... images - b Note • The date and time indicators recorded manually cannot be deleted. z Tip • If you purchase your local time before starting actual recording. 2 Press OPEN and open the LCD panel. ,continued Recording 25 OPEN PHOTO DATE CCD-TRV428 TIME Press DATE to record the date and time. p. 19). Set the date and ...
... date and/or time displayed on the screen superimposed on the picture. Before recording, follow steps 1 to your camcorder, the clock is not set up yet. POWER switch 1 Remove the lens cap. Press TIME to the grip belt. To hide the date and ... images - b Note • The date and time indicators recorded manually cannot be deleted. z Tip • If you purchase your local time before starting actual recording. 2 Press OPEN and open the LCD panel. ,continued Recording 25 OPEN PHOTO DATE CCD-TRV428 TIME Press DATE to record the date and time. p. 19). Set the date and ...

Camera Operations Guide
Page 39
Refer also to the instruction manuals supplied with the devices to a TV using the supplied A/V connecting cable as shown in the following illustration. Yellow Black Playback Signal flow A/V connecting cable (supplied) ... Signal flow A/V connecting cable (supplied) VCRs or TVs ,continued Playback 39 Playing the picture on a TV For TRV128/228/328/428: A/V OUT jack Connect your camcorder to be connected. To copy to the wall outlet for the power supply (p. 12). Connect the supplied AC Adaptor to another tape, see page 63.
Refer also to the instruction manuals supplied with the devices to a TV using the supplied A/V connecting cable as shown in the following illustration. Yellow Black Playback Signal flow A/V connecting cable (supplied) ... Signal flow A/V connecting cable (supplied) VCRs or TVs ,continued Playback 39 Playing the picture on a TV For TRV128/228/328/428: A/V OUT jack Connect your camcorder to be connected. To copy to the wall outlet for the power supply (p. 12). Connect the supplied AC Adaptor to another tape, see page 63.
Camera Operations Guide
Page 43
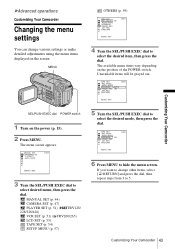
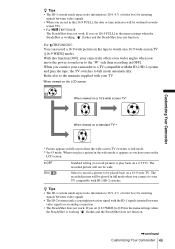
MANUAL SET (p. 44) CAMERA SET (p. 47) PLAYER SET (p. 51) ( TRV128/ 228/328/428) VCR SET (p. 51) ( TRV260/265) LCD SET (p. 53) TAPE SET (p. 54) SETUP MENU (p. 57) 5 Turn the ... the POWER switch. Customizing Your Camcorder 43 If you want to change various settings or make detailed adjustments using the menu items displayed on the screen. Unavailable items will be grayed out. TAPE SET REC MODE AUDIO MODE REMAIN ON FRAME REC I N T. The menu screen appears. MANUAL SET PROGRAM AE P EFFECT AUTO...
MANUAL SET (p. 44) CAMERA SET (p. 47) PLAYER SET (p. 51) ( TRV128/ 228/328/428) VCR SET (p. 51) ( TRV260/265) LCD SET (p. 53) TAPE SET (p. 54) SETUP MENU (p. 57) 5 Turn the ... the POWER switch. Customizing Your Camcorder 43 If you want to change various settings or make detailed adjustments using the menu items displayed on the screen. Unavailable items will be grayed out. TAPE SET REC MODE AUDIO MODE REMAIN ON FRAME REC I N T. The menu screen appears. MANUAL SET PROGRAM AE P EFFECT AUTO...
Camera Operations Guide
Page 44
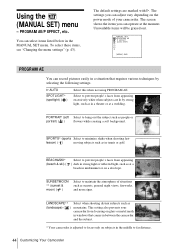
...the menu settings" (p. 43). The settings you can adjust vary depending on subjects in the MANUAL SET menu. Unavailable items will be grayed out. BEACH&SKI* (beach & ski) (... G. LANDSCAPE** Select when shooting distant subjects such as in between the camcorder and the subject. * Your camcorder is adjusted to focus only on the power mode of situations such as...such as at a wedding. lesson) ( ) moving subjects such as (landscape) ( ) mountains. You can record pictures easily in strong light or reflected light, such as people or portrait) ( ) flowers while creating a soft...
...the menu settings" (p. 43). The settings you can adjust vary depending on subjects in the MANUAL SET menu. Unavailable items will be grayed out. BEACH&SKI* (beach & ski) (... G. LANDSCAPE** Select when shooting distant subjects such as in between the camcorder and the subject. * Your camcorder is adjusted to focus only on the power mode of situations such as...such as at a wedding. lesson) ( ) moving subjects such as (landscape) ( ) mountains. You can record pictures easily in strong light or reflected light, such as people or portrait) ( ) flowers while creating a soft...
Camera Operations Guide
Page 48
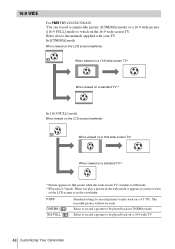
... TV** * Picture appears in full screen when the wide-screen TV switches to full mode. **Played in the viewfinder. GOFF Standard setting (to record pictures to play a picture in the wide mode, it appears as you play back on the 16:9 wide-screen TV. 16:9 WIDE For TRV128... TV). When you have seen on a 16:9 wide TV. 48 Customizing Your Camcorder CINEMA ( ) Select to record a picture to be played back in CINEMA mode. 16:9 FULL ( ) Select to record a picture to the manuals supplied with your TV. The recorded picture will not be played back on the LCD screen or in 4:3 mode.
... TV** * Picture appears in full screen when the wide-screen TV switches to full mode. **Played in the viewfinder. GOFF Standard setting (to record pictures to play a picture in the wide mode, it appears as you play back on the 16:9 wide-screen TV. 16:9 WIDE For TRV128... TV). When you have seen on a 16:9 wide TV. 48 Customizing Your Camcorder CINEMA ( ) Select to record a picture to be played back in CINEMA mode. 16:9 FULL ( ) Select to record a picture to the manuals supplied with your TV. The recorded picture will not be played back on the LCD screen or in 4:3 mode.
Camera Operations Guide
Page 49
... system sends a copyright protection signal with the ID-1 signals inserted between video signals. • When you record in the menu settings when the SteadyShot is working flashes and the SteadyShot does not function. ,continued Customizing Your Camcorder 49 If you connect to [ON] in the [16:9 FULL], the... mode when you set [16:9 WIDE] to your TV. The recorded picture will be widened on a standard TV** * Picture appears in an analog connection. • The SteadyShot does not work . Refer also to the manuals supplied with the ID-1/ID-2 system and play the tape, the...
... system sends a copyright protection signal with the ID-1 signals inserted between video signals. • When you record in the menu settings when the SteadyShot is working flashes and the SteadyShot does not function. ,continued Customizing Your Camcorder 49 If you connect to [ON] in the [16:9 FULL], the... mode when you set [16:9 WIDE] to your TV. The recorded picture will be widened on a standard TV** * Picture appears in an analog connection. • The SteadyShot does not work . Refer also to the manuals supplied with the ID-1/ID-2 system and play the tape, the...
Camera Operations Guide
Page 56
.... lights up to hide the menu settings. z Tips • If you adjust the focus manually, you may be able to [OFF] in recording time of flowers blooming, etc., with this function. INT.REC For TRV260/265: You can silence the beeps during the operation. [a] [a] [a] [b]...time. To cancel recording, set to record clear pictures even if the light changes (p. 29). • You can achieve excellent recordings of up during interval recording. flashes. 9 Press REC START/STOP. b Note • There may be a discrepancy in the menu settings. Connect your camcorder to the wall...
.... lights up to hide the menu settings. z Tips • If you adjust the focus manually, you may be able to [OFF] in recording time of flowers blooming, etc., with this function. INT.REC For TRV260/265: You can silence the beeps during the operation. [a] [a] [a] [b]...time. To cancel recording, set to record clear pictures even if the light changes (p. 29). • You can achieve excellent recordings of up during interval recording. flashes. 9 Press REC START/STOP. b Note • There may be a discrepancy in the menu settings. Connect your camcorder to the wall...
Camera Operations Guide
Page 76
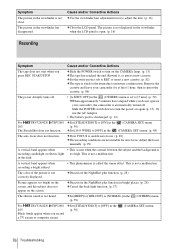
...or insert a new cassette. (p. 82) cThe tape is discharged. (p. 12) For TRV328/428/ TRV260/ cSet [STEADYSHOT] to [ON] in the (CAMERA SET) menu. 265: (p. 50) The SteadyShot does not function. Adjust the focus manually. (p. 29) A vertical band appears when • This occurs when the contrast ...is not a malfunction. Remove the cassette and leave your camcorder for auto focus. This is not correctly displayed. cSet [STEADYSHOT] to adjust the lens. (p. 16) cClose the LCD panel. This is open. (p. 16) Recording Symptom Cause and/or Corrective Actions The tape does not ...
...or insert a new cassette. (p. 82) cThe tape is discharged. (p. 12) For TRV328/428/ TRV260/ cSet [STEADYSHOT] to [ON] in the (CAMERA SET) menu. 265: (p. 50) The SteadyShot does not function. Adjust the focus manually. (p. 29) A vertical band appears when • This occurs when the contrast ...is not a malfunction. Remove the cassette and leave your camcorder for auto focus. This is not correctly displayed. cSet [STEADYSHOT] to adjust the lens. (p. 16) cClose the LCD panel. This is open. (p. 16) Recording Symptom Cause and/or Corrective Actions The tape does not ...
Camera Operations Guide
Page 97
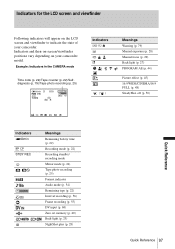
... for the LCD screen and viewfinder Following indicators will appear on your camcorder. Example: Indicators in the CAMERA mode Time code (p. 22)/Tape counter (p. 22)/Selfdiagnosis (p. 79)/Tape photo recording (p. 25) 60min STBY 0:00:00 Indicators Q E Z 9 . () Meanings Warning (p. 79) Manual exposure (p. 28) Manual focus (p. 29) Back light (p. 27) PROGRAM AE (p. 44) Picture effect (p. 45) 16...
... for the LCD screen and viewfinder Following indicators will appear on your camcorder. Example: Indicators in the CAMERA mode Time code (p. 22)/Tape counter (p. 22)/Selfdiagnosis (p. 79)/Tape photo recording (p. 25) 60min STBY 0:00:00 Indicators Q E Z 9 . () Meanings Warning (p. 79) Manual exposure (p. 28) Manual focus (p. 29) Back light (p. 27) PROGRAM AE (p. 44) Picture effect (p. 45) 16...
Marketing Specifications
Page 1
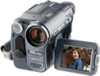
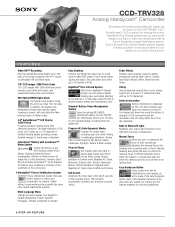
...8mm tapes. 1/6" CCD Imager, 320K Pixels Gross 1/6" CCD imager with 200K (effective) pixels provides great detail and clarity, with Sony's Picture Effect modes. End Search Advances the video tape to the last 5 seconds of minutes available on the LCD when charging and when the camera is charged in 10% increments and the recordable...8482; LCD is displayed on your personal videos by adjusting the cameras focus ring allowing more creativity and/or effects. ® CCD-TRV328 Analog Handycam® Camcorder Everything the budding camcorder user needs can be intimidating for some ...
...8mm tapes. 1/6" CCD Imager, 320K Pixels Gross 1/6" CCD imager with 200K (effective) pixels provides great detail and clarity, with Sony's Picture Effect modes. End Search Advances the video tape to the last 5 seconds of minutes available on the LCD when charging and when the camera is charged in 10% increments and the recordable...8482; LCD is displayed on your personal videos by adjusting the cameras focus ring allowing more creativity and/or effects. ® CCD-TRV328 Analog Handycam® Camcorder Everything the budding camcorder user needs can be intimidating for some ...
Marketing Specifications
Page 2
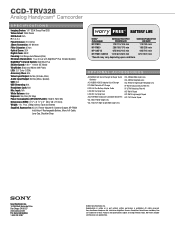
... reserved. CCD-TRV328 Analog Handycam® Camcorder S P E C I F I C AT I O N S Imaging Device: 1/6" 320K Gross Pixel CCD Video Actual: 200K Pixels Still Actual: N/A F: 1.6-2.4 Focal Distance: 2.5-50mm 35mm Conversion: 42-840mm Filter Diameter: 37mm Optical Zoom: 20X Digital Zoom: 990X Focusing: Full Range Auto/Manual (Dial)... Battery Supplied Accessories: AC-L15 Power Adapter/In Camera Charger, NP-FM30 InfoLithium® Rechargeable Battery, Mono A/V Cable, Lens Cap, Shoulder Strap TM BATTERY LIFE Battery* (Fully charged) Continuous Record Time VF/LCD/VF+LCD Continuous Playback Time LCD...
... reserved. CCD-TRV328 Analog Handycam® Camcorder S P E C I F I C AT I O N S Imaging Device: 1/6" 320K Gross Pixel CCD Video Actual: 200K Pixels Still Actual: N/A F: 1.6-2.4 Focal Distance: 2.5-50mm 35mm Conversion: 42-840mm Filter Diameter: 37mm Optical Zoom: 20X Digital Zoom: 990X Focusing: Full Range Auto/Manual (Dial)... Battery Supplied Accessories: AC-L15 Power Adapter/In Camera Charger, NP-FM30 InfoLithium® Rechargeable Battery, Mono A/V Cable, Lens Cap, Shoulder Strap TM BATTERY LIFE Battery* (Fully charged) Continuous Record Time VF/LCD/VF+LCD Continuous Playback Time LCD...


