Operating Instructions
Page 2
... will not occur in a particular installation. Connect the equipment into an outlet on the rear exterior of the unit. Properly shielded and grounded cables and connectors must be of sufficient ...and maintenance (servicing) instructions in accordance with battery-installed to meet FCC emission limits. 2US BDV-E280/BDV-T28 Serial No The following FCC statement applies only to the version of electric shock to ... radio frequency energy and, if not installed and used in this manual could void your Sony dealer regarding this Blu-ray Disc / DVD Home Theatre System is opened, so be ...
... will not occur in a particular installation. Connect the equipment into an outlet on the rear exterior of the unit. Properly shielded and grounded cables and connectors must be of sufficient ...and maintenance (servicing) instructions in accordance with battery-installed to meet FCC emission limits. 2US BDV-E280/BDV-T28 Serial No The following FCC statement applies only to the version of electric shock to ... radio frequency energy and, if not installed and used in this manual could void your Sony dealer regarding this Blu-ray Disc / DVD Home Theatre System is opened, so be ...
Operating Instructions
Page 14
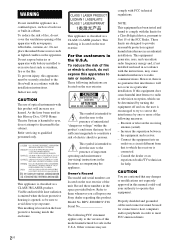
... ONLY FOR ONLY FOR SS-TSB105 SS-WSB103 SS-CTB102 FRONT R FRONT L SUBWOOFER CENTER SPEAKERS SUR R SUR L Gray (Surround right speaker (R)) Blue (Surround left speaker (L)) Rear panel of the other components to a wall outlet (mains) until it clicks. Connecting the speakers To connect speaker cords to the unit Connect the speaker...
... ONLY FOR ONLY FOR SS-TSB105 SS-WSB103 SS-CTB102 FRONT R FRONT L SUBWOOFER CENTER SPEAKERS SUR R SUR L Gray (Surround right speaker (R)) Blue (Surround left speaker (L)) Rear panel of the other components to a wall outlet (mains) until it clicks. Connecting the speakers To connect speaker cords to the unit Connect the speaker...
Operating Instructions
Page 15
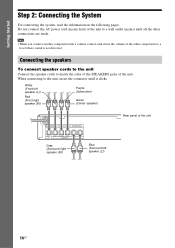
... optical cord (not supplied) Image quality TV HDMI IN VIDEO IN DIGITAL OUT OPTICAL Signal flow : Video signal : Audio signal Yellow A or B C 3) Rear panel of the unit Yellow OUT ARC IN 1 IN 2 VIDEO OUT DIGITAL IN OPTICAL TV 1)Audio Return Channel. For details, see "About Audio Return Channel... on your TV, select the connection method. • When your TV has an HDMI jack that is compatible with Mexican and Latin American models and BDV-T28 only. 3)Available only when your TV is marked "ARC1)": Connection A • When your TV has an HDMI jack: Connections A and C &#...
... optical cord (not supplied) Image quality TV HDMI IN VIDEO IN DIGITAL OUT OPTICAL Signal flow : Video signal : Audio signal Yellow A or B C 3) Rear panel of the unit Yellow OUT ARC IN 1 IN 2 VIDEO OUT DIGITAL IN OPTICAL TV 1)Audio Return Channel. For details, see "About Audio Return Channel... on your TV, select the connection method. • When your TV has an HDMI jack that is compatible with Mexican and Latin American models and BDV-T28 only. 3)Available only when your TV is marked "ARC1)": Connection A • When your TV has an HDMI jack: Connections A and C &#...
Operating Instructions
Page 17
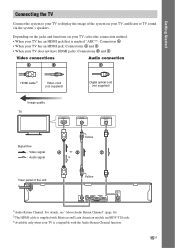
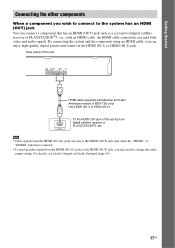
... to the HDMI (OUT) jack, you can send both video and audio signals. For details, see [Audio Output] in [Audio Settings] (page 49). 17US Rear panel of BDV-T28 only) Use HDMI (IN 1) or HDMI (IN 2). Getting Started Connecting the other components When a component you wish to connect to the system has...
... to the HDMI (OUT) jack, you can send both video and audio signals. For details, see [Audio Output] in [Audio Settings] (page 49). 17US Rear panel of BDV-T28 only) Use HDMI (IN 1) or HDMI (IN 2). Getting Started Connecting the other components When a component you wish to connect to the system has...

Operating Instructions
Page 18
Rear panel of the unit L AUDIO IN R AUDIO : Signal flow White Red Audio cord (not supplied) White Red L R AUDIO OUT To the audio out jacks of ...
Rear panel of the unit L AUDIO IN R AUDIO : Signal flow White Red Audio cord (not supplied) White Red L R AUDIO OUT To the audio out jacks of ...

Operating Instructions
Page 19
Getting Started Connecting the antenna (aerial) Rear panel of the unit ANTENNA FM COAXIAL 75 or FM wire antenna (aerial) (supplied) • Be sure to fully extend the FM wire antenna (aerial). • After connecting the FM wire antenna (aerial), keep it as horizontal as possible. • If you have poor FM reception, use a 75-ohm coaxial cable (not supplied) to connect the unit to an outdoor FM antenna (aerial). 19US
Getting Started Connecting the antenna (aerial) Rear panel of the unit ANTENNA FM COAXIAL 75 or FM wire antenna (aerial) (supplied) • Be sure to fully extend the FM wire antenna (aerial). • After connecting the FM wire antenna (aerial), keep it as horizontal as possible. • If you have poor FM reception, use a 75-ohm coaxial cable (not supplied) to connect the unit to an outdoor FM antenna (aerial). 19US

Operating Instructions
Page 20
... Adapter to the base and connecting the extension cable to the (USB) port (front or rear), turn the unit on the unit. 2 USB Wireless Setup Use a wireless LAN via the USB Wireless LAN Adapter (Sony UWA-BR100* only). Select the method based on your usage environment and components. The USB ...connect to the LAN (100) terminal on again. 20US Turn the unit off before connecting the extension cable or inserting the USB Wireless LAN Adapter. Rear panel of November 2010. Getting Started Step 3: Connecting to the Network • To connect the system to your network, you need to make ...
... Adapter to the base and connecting the extension cable to the (USB) port (front or rear), turn the unit on the unit. 2 USB Wireless Setup Use a wireless LAN via the USB Wireless LAN Adapter (Sony UWA-BR100* only). Select the method based on your usage environment and components. The USB ...connect to the LAN (100) terminal on again. 20US Turn the unit off before connecting the extension cable or inserting the USB Wireless LAN Adapter. Rear panel of November 2010. Getting Started Step 3: Connecting to the Network • To connect the system to your network, you need to make ...

Operating Instructions
Page 23
... (page 36) Component that is connected to the HDMI (IN 1) or HDMI (IN 2) jack on the rear panel (page 17) Component (TV, etc.) that is connected to the TV (DIGITAL IN OPTICAL) jack on the rear panel, or a TV compatible with the Audio Return Channel function that is connected to the HDMI... (OUT) jack on the rear panel (page 15) Component that is connected to the AUDIO (AUDIO IN L/R) jacks on the rear panel (page 17) 23US Getting Started Each time you press FUNCTION, the function changes as follows. "BD...
... (page 36) Component that is connected to the HDMI (IN 1) or HDMI (IN 2) jack on the rear panel (page 17) Component (TV, etc.) that is connected to the TV (DIGITAL IN OPTICAL) jack on the rear panel, or a TV compatible with the Audio Return Channel function that is connected to the HDMI... (OUT) jack on the rear panel (page 15) Component that is connected to the AUDIO (AUDIO IN L/R) jacks on the rear panel (page 17) 23US Getting Started Each time you press FUNCTION, the function changes as follows. "BD...
Operating Instructions
Page 27
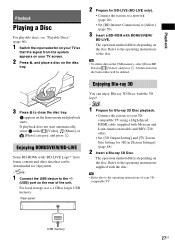
...TV screen. 2 Press Z, and place a disc on the disc tray. 2 Prepare for enjoyment. * 1 Connect the USB device to the (USB) port on the rear of your 3Dcompatible TV. All data stored in the [Video], [Music], or [Photo] category, and press . Playback Playback Playing a Disc For playable discs, see "...ray 3D Disc playback. • Connect the system to your 3Dcompatible TV using a High-Speed HDMI cable (supplied with Mexican and Latin American models and BDV-T28 only). • Set [3D Output Setting] and [TV Screen Size Setting for 3D] in [Video], and press . Refer to the operating ...
...TV screen. 2 Press Z, and place a disc on the disc tray. 2 Prepare for enjoyment. * 1 Connect the USB device to the (USB) port on the rear of your 3Dcompatible TV. All data stored in the [Video], [Music], or [Photo] category, and press . Playback Playback Playing a Disc For playable discs, see "...ray 3D Disc playback. • Connect the system to your 3Dcompatible TV using a High-Speed HDMI cable (supplied with Mexican and Latin American models and BDV-T28 only). • Set [3D Output Setting] and [TV Screen Size Setting for 3D] in [Video], and press . Refer to the operating ...
Operating Instructions
Page 28
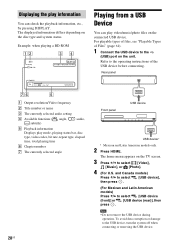
...music/photo files on the connected USB device. To avoid data corruption or damage to select [USB device (front)] or [USB device (rear)], then press . • Do not remove the USB device during operation. For playable types of files, see "Playable Types of the ... the TV screen. 3 Press C/c to the (USB) port on the disc type and system status. The displayed information differs depending on the unit. Rear panel A Output resolution/Video frequency B Title number or name C The currently selected audio setting D Available functions ( angle, audio, subtitle) E Playback ...
...music/photo files on the connected USB device. To avoid data corruption or damage to select [USB device (front)] or [USB device (rear)], then press . • Do not remove the USB device during operation. For playable types of files, see "Playable Types of the ... the TV screen. 3 Press C/c to the (USB) port on the disc type and system status. The displayed information differs depending on the unit. Rear panel A Output resolution/Video frequency B Title number or name C The currently selected audio setting D Available functions ( angle, audio, subtitle) E Playback ...
Operating Instructions
Page 29
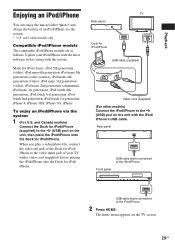
...Video cord (supplied) (For other models) Connect the iPod/iPhone to the video input jack of an iPod/iPhone via the system 1 (For U.S. TV Rear panel VIDEO IN Dock for iPod classic, iPod 5th generation (video), iPod nano 6th generation, iPod nano 5th generation (video camera), iPod nano 4th generation... generation, iPod touch 2nd generation, iPod touch 1st generation, iPhone 4, iPhone 3GS, iPhone 3G, iPhone To enjoy an iPod/iPhone via the system. * U.S. Rear panel USB cable that is connected to the iPod/iPhone Front panel USB cable that is connected to the (USB) port on the TV screen...
...Video cord (supplied) (For other models) Connect the iPod/iPhone to the video input jack of an iPod/iPhone via the system 1 (For U.S. TV Rear panel VIDEO IN Dock for iPod classic, iPod 5th generation (video), iPod nano 6th generation, iPod nano 5th generation (video camera), iPod nano 4th generation... generation, iPod touch 2nd generation, iPod touch 1st generation, iPhone 4, iPhone 3GS, iPhone 3G, iPhone To enjoy an iPod/iPhone via the system. * U.S. Rear panel USB cable that is connected to the iPod/iPhone Front panel USB cable that is connected to the (USB) port on the TV screen...
Operating Instructions
Page 30
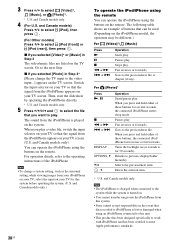
... models) Press X/x to the previous/next file. Switch the input selector on your TV so that the signal from this system. • Sony cannot accept responsibility in Step 3 The video/music files are listed on your TV screen. (U.S. For operation details, refer to select the file... play . For [Photo]* Press N, X x m or M . Fast reverses or forwards. Pauses play . Pauses play . Goes to select [iPod (front)] or [iPod (rear)], then press . The following table shows an example of these buttons for 30 seconds). Returns to play . When you selected [Video]* or [Music] in the...
... models) Press X/x to the previous/next file. Switch the input selector on your TV so that the signal from this system. • Sony cannot accept responsibility in Step 3 The video/music files are listed on your TV screen. (U.S. For operation details, refer to select the file... play . For [Photo]* Press N, X x m or M . Fast reverses or forwards. Pauses play . Pauses play . Goes to select [iPod (front)] or [iPod (rear)], then press . The following table shows an example of these buttons for 30 seconds). Returns to play . When you selected [Video]* or [Music] in the...
Operating Instructions
Page 60
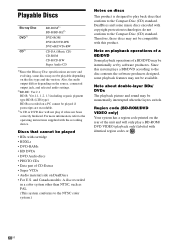
... source, connected output jack, and selected audio settings. 2)BD-RE: Ver.2.1 BD-R: Ver.1.1, 1.2, 1.3 including organic pigment type BD-R (LTH type) BD-Rs recorded on the rear of a BD/DVD may be intentionally set by software producers. DualDiscs and some music discs encoded with copyright protection technologies do not conform to the...
... source, connected output jack, and selected audio settings. 2)BD-RE: Ver.2.1 BD-R: Ver.1.1, 1.2, 1.3 including organic pigment type BD-R (LTH type) BD-Rs recorded on the rear of a BD/DVD may be intentionally set by software producers. DualDiscs and some music discs encoded with copyright protection technologies do not conform to the...
Operating Instructions
Page 65
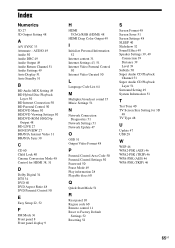
... 48 P Parental Control Area Code 50 Parental Control Settings 50 Password 50 Pause Mode 49 Play information 28 Playable discs 60 Q Quick Start Mode 51 R Rear panel 10 Region code 60 Remote control 11 Reset to Factory Default Settings 52 Resetting 52 S Screen Format 48 Screen Saver 51 Screen Settings 48...
... 48 P Parental Control Area Code 50 Parental Control Settings 50 Password 50 Pause Mode 49 Play information 28 Playable discs 60 Q Quick Start Mode 51 R Rear panel 10 Region code 60 Remote control 11 Reset to Factory Default Settings 52 Resetting 52 S Screen Format 48 Screen Saver 51 Screen Settings 48...


