
User Guide
Page 1
This is the Internet version of the user's guide © Print only for private use.
This is the Internet version of the user's guide © Print only for private use.
User Guide
Page 2
Contents Getting to know your phone 3 Assembling your phone 7 Navigating the phone menus 10 Calling 14 Phonebook 23 Messaging 25 Sounds & Alerts 31 Alarms 33 Games 34 Settings 35 Locks 38 Extras 41 Troubleshooting 42 Important information 51 Index 66 You can find more support and information at www.SonyEricsson.com/support. 1 This is the Internet version of the user's guide © Print only for private use.
Contents Getting to know your phone 3 Assembling your phone 7 Navigating the phone menus 10 Calling 14 Phonebook 23 Messaging 25 Sounds & Alerts 31 Alarms 33 Games 34 Settings 35 Locks 38 Extras 41 Troubleshooting 42 Important information 51 Index 66 You can find more support and information at www.SonyEricsson.com/support. 1 This is the Internet version of the user's guide © Print only for private use.
User Guide
Page 3
...No. 1,331,057; Hong Kong Standard Pat. HK0940329; Republic of the services in doubt whether you are in this user guide necessitated by Sony Ericsson Mobile Communications AB at any warranty. Euro. Any rights not expressly granted herein are for private use a particular service ... Pat. No. 2238414B; All illustrations are reserved. 2 This is licensed under one or more of this user guide. and additional patents are not supported by Sony Ericsson Mobile Communications AB, without any time and without notice. Other product and company names may be the trademarks ...
...No. 1,331,057; Hong Kong Standard Pat. HK0940329; Republic of the services in doubt whether you are in this user guide necessitated by Sony Ericsson Mobile Communications AB at any warranty. Euro. Any rights not expressly granted herein are for private use a particular service ... Pat. No. 2238414B; All illustrations are reserved. 2 This is licensed under one or more of this user guide. and additional patents are not supported by Sony Ericsson Mobile Communications AB, without any time and without notice. Other product and company names may be the trademarks ...
User Guide
Page 4
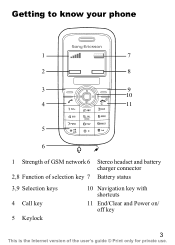
Getting to know your phone 1 7 2 8 3 9 10 4 11 5 6 1 Strength of GSM network 6 Stereo headset and battery charger connector 2,8 Function of selection key 7 Battery status 3,9 Selection keys 4 Call key 5 Keylock 10 Navigation key with shortcuts 11 End/Clear and Power on/ off key 3 This is the Internet version of the user's guide © Print only for private use.
Getting to know your phone 1 7 2 8 3 9 10 4 11 5 6 1 Strength of GSM network 6 Stereo headset and battery charger connector 2,8 Function of selection key 7 Battery status 3,9 Selection keys 4 Call key 5 Keylock 10 Navigation key with shortcuts 11 End/Clear and Power on/ off key 3 This is the Internet version of the user's guide © Print only for private use.

User Guide
Page 5
...; Print only for private use your phone you to a page with more information. 4 This is network-or subscription-dependent. User guide symbols The following instruction symbols appear in your network operator for more information. } Use the navigation key to : • Insert the SIM card. • Attach ... charge the battery. Note This symbol indicates that a service or function is the Internet version of this, all menus may not be available in this user guide: % This arrow points you need to scroll and select. Before you start Before you can use .
...; Print only for private use your phone you to a page with more information. 4 This is network-or subscription-dependent. User guide symbols The following instruction symbols appear in your network operator for more information. } Use the navigation key to : • Insert the SIM card. • Attach ... charge the battery. Note This symbol indicates that a service or function is the Internet version of this, all menus may not be available in this user guide: % This arrow points you need to scroll and select. Before you start Before you can use .

User Guide
Page 6
... to correct mistakes. To end a function or go back one level • Press to go to the phonebook. 5 This is the Internet version of the user's guide © Print only for private use. Shortcuts From standby, you can use the navigation keys to go directly to a function: • Press to write a text...
... to correct mistakes. To end a function or go back one level • Press to go to the phonebook. 5 This is the Internet version of the user's guide © Print only for private use. Shortcuts From standby, you can use the navigation keys to go directly to a function: • Press to write a text...

User Guide
Page 7
... a PIN (Personal Identification Number) from the other things. PIN (Personal Identification Number) You may need to correct mistakes. The SIM card keeps track of the user's guide © Print only for example 112.
... a PIN (Personal Identification Number) from the other things. PIN (Personal Identification Number) You may need to correct mistakes. The SIM card keeps track of the user's guide © Print only for example 112.

User Guide
Page 8
Make sure the SIM card is placed under the silvery holders. 3 Place the battery on your phone Insert the SIM card, attach and charge the battery and turn on the back of the phone with the label side up and the connectors facing each other. 4 Replace the cover as shown in the picture. 7 This is the Internet version of the user's guide © Print only for private use. Assembling your phone. Insert the SIM card and battery 1 Gently pull the cover away from the phone. 2 Insert the SIM card.
Make sure the SIM card is placed under the silvery holders. 3 Place the battery on your phone Insert the SIM card, attach and charge the battery and turn on the back of the phone with the label side up and the connectors facing each other. 4 Replace the cover as shown in the picture. 7 This is the Internet version of the user's guide © Print only for private use. Assembling your phone. Insert the SIM card and battery 1 Gently pull the cover away from the phone. 2 Insert the SIM card.
User Guide
Page 9
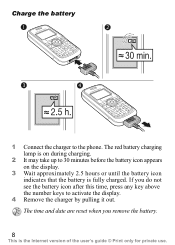
Charge the battery 1 Connect the charger to 30 minutes before the battery icon appears on during charging. 2 It may take up to the phone. The time and date are reset when you do not see the battery icon after this time, press any key above the number keys to activate the display. 4 Remove the charger by pulling it out. If you remove the battery. 8 This is fully charged. The red battery charging lamp is on the display. 3 Wait approximately 2.5 hours or until the battery icon indicates that the battery is the Internet version of the user's guide © Print only for private use.
Charge the battery 1 Connect the charger to 30 minutes before the battery icon appears on during charging. 2 It may take up to the phone. The time and date are reset when you do not see the battery icon after this time, press any key above the number keys to activate the display. 4 Remove the charger by pulling it out. If you remove the battery. 8 This is fully charged. The red battery charging lamp is on the display. 3 Wait approximately 2.5 hours or until the battery icon indicates that the battery is the Internet version of the user's guide © Print only for private use.

User Guide
Page 10
... or off 1 Press and hold to turn the phone on the display. Turn the phone on or off . 2 Enter your PIN, the name of the user's guide © Print only for details. 9 This is called standby mode -
... or off 1 Press and hold to turn the phone on the display. Turn the phone on or off . 2 Enter your PIN, the name of the user's guide © Print only for details. 9 This is called standby mode -
User Guide
Page 11
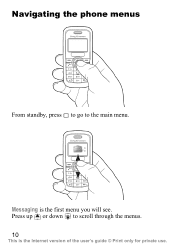
Messaging is the Internet version of the user's guide © Print only for private use. Navigating the phone menus From standby, press to go to scroll through the menus. 10 This is the first menu you will see. Press up or down to the main menu.
Messaging is the Internet version of the user's guide © Print only for private use. Navigating the phone menus From standby, press to go to scroll through the menus. 10 This is the first menu you will see. Press up or down to the main menu.

User Guide
Page 12
To turn the display light on Press any key above the number keys to avoid dialling a number by accident: • To lock the keypad, press } Lock. • To unlock the keypad, press } Unlock. % 38 Locks for more information. 11 This is the Internet version of the user's guide © Print only for private use. To lock or unlock the keypad Lock the keypad to turn the display light on.
To turn the display light on Press any key above the number keys to avoid dialling a number by accident: • To lock the keypad, press } Lock. • To unlock the keypad, press } Unlock. % 38 Locks for more information. 11 This is the Internet version of the user's guide © Print only for private use. To lock or unlock the keypad Lock the keypad to turn the display light on.
User Guide
Page 13
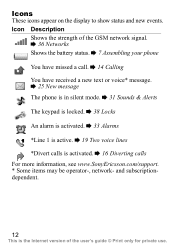
... is locked. % 38 Locks An alarm is activated. % 33 Alarms *Line 1 is active. % 19 Two voice lines *Divert calls is the Internet version of the user's guide © Print only for private use.
... is locked. % 38 Locks An alarm is activated. % 33 Alarms *Line 1 is active. % 19 Two voice lines *Divert calls is the Internet version of the user's guide © Print only for private use.

User Guide
Page 14
Menu overview Messaging Call list Sounds & alerts Alarms Write new Inbox Call voicemail Drafts Outbox Templates Area info Settings Missed calls Dialled calls Answered calls Ringtone Ring style Ring volume Key sound Message alert Alarm signal Alarms Games Settings Extras Ball Memory Display Time and date Language Locks Calls Network Master reset Calculator Stopwatch Phonebook Some additional operator-, network- and subscriptiondependent menus may occur. 13 This is the Internet version of the user's guide © Print only for private use.
Menu overview Messaging Call list Sounds & alerts Alarms Write new Inbox Call voicemail Drafts Outbox Templates Area info Settings Missed calls Dialled calls Answered calls Ringtone Ring style Ring volume Key sound Message alert Alarm signal Alarms Games Settings Extras Ball Memory Display Time and date Language Locks Calls Network Master reset Calculator Stopwatch Phonebook Some additional operator-, network- and subscriptiondependent menus may occur. 13 This is the Internet version of the user's guide © Print only for private use.

User Guide
Page 15
... ringtone when receiving a call Press left right up or down on or off the ringtone when receiving a call . If you are within range of the user's guide © Print only for private use.
... ringtone when receiving a call Press left right up or down on or off the ringtone when receiving a call . If you are within range of the user's guide © Print only for private use.

User Guide
Page 16
... the phone to your ear when using high ringtones as this can damage your missed calls 1 When Missed calls is the Internet version of the user's guide © Print only for private use. To put it on the display. 2 Enter the country code, area code (without the leading zero), phone number and...
... the phone to your ear when using high ringtones as this can damage your missed calls 1 When Missed calls is the Internet version of the user's guide © Print only for private use. To put it on the display. 2 Enter the country code, area code (without the leading zero), phone number and...

User Guide
Page 17
.... 16 This is the Internet version of the call list. 2 Select a number } More } Delete } Yes. To clear a number from standby and select one of the user's guide © Print only for example, your network operator may have saved additional local emergency numbers on the SIM card. When the Restrict calls function is...
.... 16 This is the Internet version of the call list. 2 Select a number } More } Delete } Yes. To clear a number from standby and select one of the user's guide © Print only for example, your network operator may have saved additional local emergency numbers on the SIM card. When the Restrict calls function is...
User Guide
Page 18
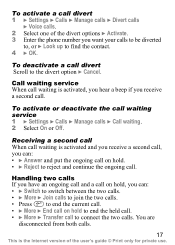
... to, or } Look up to connect the two calls. To activate a call divert 1 } Settings } Calls } Manage calls } Divert calls } Voice calls. 2 Select one of the user's guide © Print only for private use.
... to, or } Look up to connect the two calls. To activate a call divert 1 } Settings } Calls } Manage calls } Divert calls } Voice calls. 2 Select one of the user's guide © Print only for private use.

User Guide
Page 19
... call and a call on hold . 2 Call the next person. 3 } More } Join calls to add a new participant. 4 Repeat steps 1-3 to include more than one of the user's guide © Print only for private use. You then put the conference on hold to call and add up to six participants or just to make...
... call and a call on hold . 2 Call the next person. 3 } More } Join calls to add a new participant. 4 Repeat steps 1-3 to include more than one of the user's guide © Print only for private use. You then put the conference on hold to call and add up to six participants or just to make...

User Guide
Page 52
.... • A global network of Call Centers. • An extensive network of Sony Ericsson service partners. • A warranty period. If your network operator for more about the warranty conditions in this user guide. On www.SonyEricsson.com you need it . On www.SonyEricsson.com, under the ...product more efficiently. For a call to one of our service partners. Important information Sony Ericsson Consumer Web site On www.SonyEricsson.com/support there is the Internet version of the user's guide © Print only for the nearest Call Center in the list below were correct...
.... • A global network of Call Centers. • An extensive network of Sony Ericsson service partners. • A warranty period. If your network operator for more about the warranty conditions in this user guide. On www.SonyEricsson.com you need it . On www.SonyEricsson.com, under the ...product more efficiently. For a call to one of our service partners. Important information Sony Ericsson Consumer Web site On www.SonyEricsson.com/support there is the Internet version of the user's guide © Print only for the nearest Call Center in the list below were correct...


