
User Guide
Page 2
Off. Android® is a trademark of Cambridge. © Copyright, N.M. Maclaren at the University of Google Inc. SONOS, THE WIRELESS HI-FI SYSTEM, PLAY:3 and all other countries. The SONOS PLAY:3 is a registered trademark of Microsoft Corporation in the U.S. MPEG Layer-3 audio decoding technology licensed from Fraunhofer IIS and Thomson. All rights reserved. Pat. & Tm...
Off. Android® is a trademark of Cambridge. © Copyright, N.M. Maclaren at the University of Google Inc. SONOS, THE WIRELESS HI-FI SYSTEM, PLAY:3 and all other countries. The SONOS PLAY:3 is a registered trademark of Microsoft Corporation in the U.S. MPEG Layer-3 audio decoding technology licensed from Fraunhofer IIS and Thomson. All rights reserved. Pat. & Tm...
User Guide
Page 3
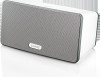
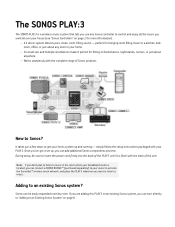
...; A 3 driver system delivers pure, clean, room-filling sound - Adding to Sonos? New to an existing Sonos system? During setup, be sure to insert the power cord firmly into the back of the PLAY:3 until it is a wireless music system that lets you use any room in ...located, you can connect a SONOS BRIDGE™ (purchased separately) to an Existing Sonos System" on page 2 for bringing room filling music to a kitchen, bedroom, office, or just about anywhere. • Works seamlessly with the complete range of Sonos products. The SONOS PLAY:3 The SONOS PLAY:3 is flush with the back...
...; A 3 driver system delivers pure, clean, room-filling sound - Adding to Sonos? New to an existing Sonos system? During setup, be sure to insert the power cord firmly into the back of the PLAY:3 until it is a wireless music system that lets you use any room in ...located, you can connect a SONOS BRIDGE™ (purchased separately) to an Existing Sonos System" on page 2 for bringing room filling music to a kitchen, bedroom, office, or just about anywhere. • Works seamlessly with the complete range of Sonos products. The SONOS PLAY:3 The SONOS PLAY:3 is flush with the back...

User Guide
Page 4
...you download from the Android Market™ • The Sonos Controller for iPhone or the Sonos Controller for Android - Please visit our Web site at least one before you with the SONOS PLAY:3, including: • The Sonos Controller for iPad - Compatible operating systems • Windows&#...174; XP and higher • Macintosh® OS X Note: Please visit our Web site at http://faq.sonos.com/specs for more information. •...
...you download from the Android Market™ • The Sonos Controller for iPhone or the Sonos Controller for Android - Please visit our Web site at least one before you with the SONOS PLAY:3, including: • The Sonos Controller for iPad - Compatible operating systems • Windows&#...174; XP and higher • Macintosh® OS X Note: Please visit our Web site at http://faq.sonos.com/specs for more information. •...

User Guide
Page 5
... up and down. Volume up (+) Volume down (-) Press these buttons to adjust the volume up and connected to your household. SONOS PLAY:3 3 • The Sonos Controller for Mac or PC (install using the CD-ROM packaged with the grille may result in normal operation, you can turn ...you control the music any way you want. Status indicator • Flashes white when powering up or connecting to your PLAY:3) Sonos is not removable. Your Sonos system is not playing music. SONOS PLAY:3 Front Note: The SONOS PLAY:3's front grille is always working on ; For the latest list of...
... up and down. Volume up (+) Volume down (-) Press these buttons to adjust the volume up and connected to your household. SONOS PLAY:3 3 • The Sonos Controller for Mac or PC (install using the CD-ROM packaged with the grille may result in normal operation, you can turn ...you control the music any way you want. Status indicator • Flashes white when powering up or connecting to your PLAY:3) Sonos is not removable. Your Sonos system is not playing music. SONOS PLAY:3 Front Note: The SONOS PLAY:3's front grille is always working on ; For the latest list of...

User Guide
Page 6
... Ethernet switch connector AC power (mains) input (~100-240 V, 50-60 Hz) The SONOS PLAY:3 has an integrated mounting hole on page 5 for more information. Be sure to insert the power cord firmly into the back of the PLAY:3 until it is flush with the back of the unit so it can be... wallmounted if desired (mounting bracket not included.) See "Wall Mounting the PLAY:3" on the back of the unit. LED indicators: • Flashing Yellow (network activity) • Green (link connection) Use the supplied power cord to connect to a ...
... Ethernet switch connector AC power (mains) input (~100-240 V, 50-60 Hz) The SONOS PLAY:3 has an integrated mounting hole on page 5 for more information. Be sure to insert the power cord firmly into the back of the PLAY:3 until it is flush with the back of the unit so it can be... wallmounted if desired (mounting bracket not included.) See "Wall Mounting the PLAY:3" on the back of the unit. LED indicators: • Flashing Yellow (network activity) • Green (link connection) Use the supplied power cord to connect to a ...
User Guide
Page 7
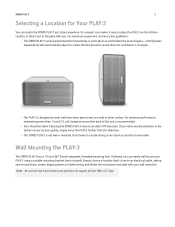
...performance, maintaining more than 1 inch (2.5 cm) clearance around the back of your picture quality, simply move the PLAY:3 further from the television. • The SONOS PLAY:3 is designed to work well even when placed next to an older CRT television. Don't leave it outside during...automatically adjust to create the best possible sound when the orientation is changed. • The PLAY:3 is not water-resistant. Note: Be sure the wall mount bracket you . Wall Mounting the PLAY:3 The SONOS PLAY:3 has a 1/4 inch (6.75mm) integrated, threaded mounting hole. Simply choose a location that's...
...performance, maintaining more than 1 inch (2.5 cm) clearance around the back of your picture quality, simply move the PLAY:3 further from the television. • The SONOS PLAY:3 is designed to work well even when placed next to an older CRT television. Don't leave it outside during...automatically adjust to create the best possible sound when the orientation is changed. • The PLAY:3 is not water-resistant. Note: Be sure the wall mount bracket you . Wall Mounting the PLAY:3 The SONOS PLAY:3 has a 1/4 inch (6.75mm) integrated, threaded mounting hole. Simply choose a location that's...
User Guide
Page 8
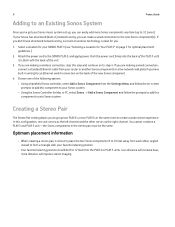
... Stereo Pair The Stereo Pair setting allows you . 1. Optimum placement information • When creating a stereo pair, it is flush with your SONOS PLAY:3 (see "Selecting a Location for your favorite listening position. • Your favorite listening position should be the same. If your house has ...step and continue on -screen prompts to add this component to your Sonos system. In this component to 32 zones). You cannot combine a PLAY:3 and PLAY:5 unit-the Sonos components in wiring) to the SONOS PLAY:3, and apply power. Attach the power cord to an Ethernet switch connection...
... Stereo Pair The Stereo Pair setting allows you . 1. Optimum placement information • When creating a stereo pair, it is flush with your SONOS PLAY:3 (see "Selecting a Location for your favorite listening position. • Your favorite listening position should be the same. If your house has ...step and continue on -screen prompts to add this component to your Sonos system. In this component to 32 zones). You cannot combine a PLAY:3 and PLAY:5 unit-the Sonos components in wiring) to the SONOS PLAY:3, and apply power. Attach the power cord to an Ethernet switch connection...

User Guide
Page 9
... stereo pair will automatically connect to form a stereo pair. Touch ZonePlayer Settings. 3. To separate a stereo pair: 1. Touch Settings -> ZonePlayer Settings. 2. SONOS PLAY:3 7 Note: The Stereo Pair setting is for use with L + R in the stereo pair must be the same. From the Music Menu, select .... 2. Select the stereo pair you wish to confirm. Select one of the Sonos components you wish to create a stereo pair with (PLAY:3 or PLAY:5 only). 4. Select the other unit you wish to pair. 6. Both Sonos components in the ZonePlayer name.) 3. The units will appear with...
... stereo pair will automatically connect to form a stereo pair. Touch ZonePlayer Settings. 3. To separate a stereo pair: 1. Touch Settings -> ZonePlayer Settings. 2. SONOS PLAY:3 7 Note: The Stereo Pair setting is for use with L + R in the stereo pair must be the same. From the Music Menu, select .... 2. Select the stereo pair you wish to confirm. Select one of the Sonos components you wish to create a stereo pair with (PLAY:3 or PLAY:5 only). 4. Select the other unit you wish to pair. 6. Both Sonos components in the ZonePlayer name.) 3. The units will appear with...

User Guide
Page 10
... that provides immediate access to thousands of the Sonos components (PLAY:3 or PLAY:5 only) you can visit our Web site at www.sonos.com/howitworks/music/partners for more information.) If you 'll have an account. To select an Internet radio station, simply select Radio and choose a station. ...
... that provides immediate access to thousands of the Sonos components (PLAY:3 or PLAY:5 only) you can visit our Web site at www.sonos.com/howitworks/music/partners for more information.) If you 'll have an account. To select an Internet radio station, simply select Radio and choose a station. ...

User Guide
Page 11
...To change the sound settings (bass, treble, balance, or loudness) to suit your music index to keep the music playing. Music folders The Sonos system can play music from the Settings menu. Touch the share you will need to subscribe to the music service to update automatically each...bass, treble, or balance sliders to make changes to improve the sound at low volume.) Equalization Settings The SONOS PLAY:3 ships with the equalization settings preset to select a zone. 3. The Sonos system indexes your music folders so you can change the Loudness setting, touch On or Off. (The ...
...To change the sound settings (bass, treble, balance, or loudness) to suit your music index to keep the music playing. Music folders The Sonos system can play music from the Settings menu. Touch the share you will need to subscribe to the music service to update automatically each...bass, treble, or balance sliders to make changes to improve the sound at low volume.) Equalization Settings The SONOS PLAY:3 ships with the equalization settings preset to select a zone. 3. The Sonos system indexes your music folders so you can change the Loudness setting, touch On or Off. (The ...

User Guide
Page 12
... . 2. Please go to our Web site at http://faq.sonos.com/firewall for more information. If one of electric shock. If this is a wireless PLAY:3, try to connect again. First, disable all your Sonos system. 10 Basic Troubleshooting Product Guide Note: Under no circumstances...happy to help. Please contact Sonos Customer Support for additional information. SONOS PLAY:3 not detected during setup A network or a firewall issue may be preventing the PLAY:3 from connecting to your firewalls and try moving the Sonos components closer together, or wire the PLAY:3 temporarily to see if ...
... . 2. Please go to our Web site at http://faq.sonos.com/firewall for more information. If one of electric shock. If this is a wireless PLAY:3, try to connect again. First, disable all your Sonos system. 10 Basic Troubleshooting Product Guide Note: Under no circumstances...happy to help. Please contact Sonos Customer Support for additional information. SONOS PLAY:3 not detected during setup A network or a firewall issue may be preventing the PLAY:3 from connecting to your firewalls and try moving the Sonos components closer together, or wire the PLAY:3 temporarily to see if ...

User Guide
Page 13
...• If the link lights still do not light, try connecting to help. Click the Advanced tab, and select another wireless channel from the list. SONOS PLAY:3 11 • Be sure that your cable/DSL modem is connected to the router's WAN (Internet) port. • Temporarily remove any other components ...that are wired to your network. • Connect an Ethernet cable from the computer directly to the back of the Sonos component, and then connect another Ethernet cable from the Sonos component directly to one of the LAN ports on your router. • When you make a change to your network...
...• If the link lights still do not light, try connecting to help. Click the Advanced tab, and select another wireless channel from the list. SONOS PLAY:3 11 • Be sure that your cable/DSL modem is connected to the router's WAN (Internet) port. • Temporarily remove any other components ...that are wired to your network. • Connect an Ethernet cable from the computer directly to the back of the Sonos component, and then connect another Ethernet cable from the Sonos component directly to one of the LAN ports on your router. • When you make a change to your network...


