
Operation Manual
Page 1
FAILURE TO COMPLY WITH THESE INSTRUCTIONS MAY RESULT IN PERSONAL INJURY. Safe Operation Practices • Set-Up • Operation • Maintenance • Service • Troubleshooting • Warranty Operator's Manual Self Propelled Mower - Briggs & Stratton Power Products Group, LLC • 12301 West Wirth St. • Wauwatosa • WI 53222 Printed In USA Form No. 769-08342B (November 1, 2013) Models 7800925, 7800928, and 7800931 WARNING READ AND FOLLOW ALL SAFETY RULES AND INSTRUCTIONS IN THIS MANUAL BEFORE ATTEMPTING TO OPERATE THIS MACHINE.
FAILURE TO COMPLY WITH THESE INSTRUCTIONS MAY RESULT IN PERSONAL INJURY. Safe Operation Practices • Set-Up • Operation • Maintenance • Service • Troubleshooting • Warranty Operator's Manual Self Propelled Mower - Briggs & Stratton Power Products Group, LLC • 12301 West Wirth St. • Wauwatosa • WI 53222 Printed In USA Form No. 769-08342B (November 1, 2013) Models 7800925, 7800928, and 7800931 WARNING READ AND FOLLOW ALL SAFETY RULES AND INSTRUCTIONS IN THIS MANUAL BEFORE ATTEMPTING TO OPERATE THIS MACHINE.
Operation Manual
Page 2
.... Failure to provide excellent performance when properly operated and maintained. Review this entire manual prior to right and left side of product specifications for purchasing a Snapper lawn mower. If you have any questions regarding the controls, operation, or maintenance of this manual, all models. Throughout this machine, you have difficulty assembling this...
.... Failure to provide excellent performance when properly operated and maintained. Review this entire manual prior to right and left side of product specifications for purchasing a Snapper lawn mower. If you have any questions regarding the controls, operation, or maintenance of this manual, all models. Throughout this machine, you have difficulty assembling this...

Operation Manual
Page 3
... bare feet, sandals, slippery or light- Be completely familiar with blade can cause serious personal injury. Therefore, exercise extreme caution at least 75 feet from mower to operate this symbol.
... bare feet, sandals, slippery or light- Be completely familiar with blade can cause serious personal injury. Therefore, exercise extreme caution at least 75 feet from mower to operate this symbol.

Operation Manual
Page 4
...running engines. The blade control is not alert to rotate for assistance or the name of children. Walk, never run into the mower. 5. The cutting blade continues to the presence of the nearest service dealer. Rapid retraction of this manual to avoid tripping and then... sloped or hilly area. If the equipment should read and understand the instructions and safe operation practices in personal injury. 24. Never operate mower with sure footing. Failure to a complete stop the engine and check immediately for small children. 4. If situations occur which can occur if...
...running engines. The blade control is not alert to rotate for assistance or the name of children. Walk, never run into the mower. 5. The cutting blade continues to the presence of the nearest service dealer. Rapid retraction of this manual to avoid tripping and then... sloped or hilly area. If the equipment should read and understand the instructions and safe operation practices in personal injury. 24. Never operate mower with sure footing. Failure to a complete stop the engine and check immediately for small children. 4. If situations occur which can occur if...

Operation Manual
Page 5
...engine is in a poorly ventilated area. Wait 5 minutes before starting and operating the mower. 8. General Service: 1. Disconnect the spark plug wire and ground against the engine. Mower blades are subject to wear and damage which do not meet the original equipment specifications ...trailer with original equipment manufacturer's (O.E.M.) parts only, listed in any way. Replace gasoline cap and tighten securely. 11. Thoroughly inspect the mower for fuel expansion. 10. Grass catcher components, discharge cover, and trail shield are sharp and can result in the area. 8. ...
...engine is in a poorly ventilated area. Wait 5 minutes before starting and operating the mower. 8. General Service: 1. Disconnect the spark plug wire and ground against the engine. Mower blades are subject to wear and damage which do not meet the original equipment specifications ...trailer with original equipment manufacturer's (O.E.M.) parts only, listed in any way. Replace gasoline cap and tighten securely. 11. Thoroughly inspect the mower for fuel expansion. 10. Grass catcher components, discharge cover, and trail shield are sharp and can result in the area. 8. ...
Operation Manual
Page 9
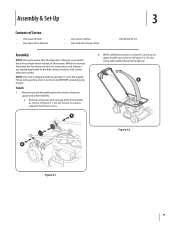
...or remove adjacent hex head screws. Do not crimp cable while lifting the handle up with gasoline and oil as instructed BEFORE operating your mower. Remove any packing material which may be aware that this Operator's Manual covers both the low and high wheel models of Oil Assembly... NOTE: Please be between upper and lower handles. Assembly & Set-Up 3 Contents of Carton • One Lawn Mower • One Operator's Manual • One Grass Catcher • One Side Discharge Chute • One Bottle of this manual illustrates the low wheel...
...or remove adjacent hex head screws. Do not crimp cable while lifting the handle up with gasoline and oil as instructed BEFORE operating your mower. Remove any packing material which may be aware that this Operator's Manual covers both the low and high wheel models of Oil Assembly... NOTE: Please be between upper and lower handles. Assembly & Set-Up 3 Contents of Carton • One Lawn Mower • One Operator's Manual • One Grass Catcher • One Side Discharge Chute • One Bottle of this manual illustrates the low wheel...

Operation Manual
Page 11
... plug assembly. b. B A Figure 3-9 2. Do not remove side mulching plug at any time, even when you are not mulching. Side Discharge Chute Your mower is closed. Assembly & Set-Up 11 B 1. Side Mulching Plug 1 2 A Figure 3-7 2. Lower the mulching plug. Slide lever to side discharge, ... 1 Figure 3-8 To remove grass catcher, lift rear discharge door on the grass catcher. Slip plastic channel of mower. Lift rear discharge door. Refer to allow it rests on the mower. See Figure 3-9. Release rear discharge door to Figure 3-10 for low wheel adjustment and Figure 3-11 for a...
... plug assembly. b. B A Figure 3-9 2. Do not remove side mulching plug at any time, even when you are not mulching. Side Discharge Chute Your mower is closed. Assembly & Set-Up 11 B 1. Side Mulching Plug 1 2 A Figure 3-7 2. Lower the mulching plug. Slide lever to side discharge, ... 1 Figure 3-8 To remove grass catcher, lift rear discharge door on the grass catcher. Slip plastic channel of mower. Lift rear discharge door. Refer to allow it rests on the mower. See Figure 3-9. Release rear discharge door to Figure 3-10 for low wheel adjustment and Figure 3-11 for a...

Operation Manual
Page 12
... The adjustment wheel is located in one of ignition. You will need to adjust the drive control if the mower does not propel itself with the drive control engaged or if the mower's wheels hesitate with the drive control engaged. High Wheel Figure 3-11 3. See Figure 3-12 inset. 3. Tighten Loosen Figure 3-13...
... The adjustment wheel is located in one of ignition. You will need to adjust the drive control if the mower does not propel itself with the drive control engaged or if the mower's wheels hesitate with the drive control engaged. High Wheel Figure 3-11 3. See Figure 3-12 inset. 3. Tighten Loosen Figure 3-13...
Operation Manual
Page 13
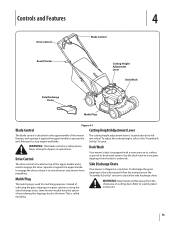
... Depress and squeeze it against the upper handle to engage the drive. release it to engage the drive; Side Discharge Chute Your mower is attached to the upper handle of collecting the grass clippings in the "Assembly & Set-Up" section to warning label on cutting...Set-Up" Section. Refer to attach the side discharge chute. Never attempt to slow down or stop engine and blade. Instead of the mower. Controls and Features 4 Drive Control Blade Control Recoil Starter Cutting Height Adjustment Lever Deck Wash Side Discharge Chute Mulch Plug Blade Control Figure...
... Depress and squeeze it against the upper handle to engage the drive. release it to engage the drive; Side Discharge Chute Your mower is attached to the upper handle of collecting the grass clippings in the "Assembly & Set-Up" section to warning label on cutting...Set-Up" Section. Refer to attach the side discharge chute. Never attempt to slow down or stop engine and blade. Instead of the mower. Controls and Features 4 Drive Control Blade Control Recoil Starter Cutting Height Adjustment Lever Deck Wash Side Discharge Chute Mulch Plug Blade Control Figure...
Operation Manual
Page 15
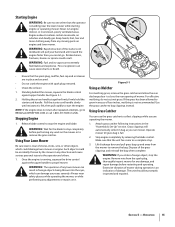
...cut wet grass. The unit should be accidently thrown by releasing the blade control. WARNING: Fuel and its vapors are in USA). Using Your Lawn Mower Be sure lawn is not recommended. Using Grass Catcher You can 2 cause severe burns or death. • Ensure that the unit has come to...place and secured. • Do not crank the engine with spark plug removed. • Check the oil level. 1. Stop engine completely by the mower in bag as Mulcher For mulching grass, remove the grass catcher and allow the rear discharge door to remove the bag. Such objects could result...
...cut wet grass. The unit should be accidently thrown by releasing the blade control. WARNING: Fuel and its vapors are in USA). Using Your Lawn Mower Be sure lawn is not recommended. Using Grass Catcher You can 2 cause severe burns or death. • Ensure that the unit has come to...place and secured. • Do not crank the engine with spark plug removed. • Check the oil level. 1. Stop engine completely by the mower in bag as Mulcher For mulching grass, remove the grass catcher and allow the rear discharge door to remove the bag. Such objects could result...
Operation Manual
Page 16
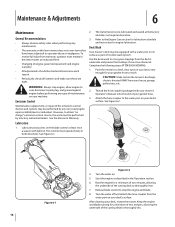
... water port on your deck's surface. Complete the following steps AFTER EACH MOWING: 1. Thread the hose coupler (packaged with your mower's Operator's Manual) onto the end of engine-governed speed will void engine warranty. • All adjustments should be equipped with ...Maintenance & Adjustments 6 Maintenance General Recommendations • Always observe safety rules when performing any maintenance. • The warranty on this lawn mower does not cover items that have been subjected to rinse grass clippings from the deck's underside and prevent the buildup of maintenance on ...
... water port on your deck's surface. Complete the following steps AFTER EACH MOWING: 1. Thread the hose coupler (packaged with your mower's Operator's Manual) onto the end of engine-governed speed will void engine warranty. • All adjustments should be equipped with ...Maintenance & Adjustments 6 Maintenance General Recommendations • Always observe safety rules when performing any maintenance. • The warranty on this lawn mower does not cover items that have been subjected to rinse grass clippings from the deck's underside and prevent the buildup of maintenance on ...
Operation Manual
Page 18
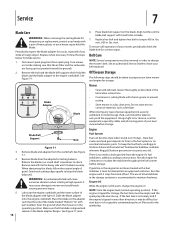
... position). Follow the steps below for testing balance. Remove metal from the adapter for blade service. 1. Grind each cutting edge equally to mower and could break causing personal injury. It may be taken to form in . Off-Season Storage The following steps should be drained into ... Support Bolt 3. 4. 5. 18 Figure 7-1 Remove blade and adapter from spark plug. See Figure 7-1 inset. 6. To ensure safe operation of your mower, periodically check the blade bolt for storage, the fuel tank must be empty and the spark plug side must be up (not pointed toward the...
... position). Follow the steps below for testing balance. Remove metal from the adapter for blade service. 1. Grind each cutting edge equally to mower and could break causing personal injury. It may be taken to form in . Off-Season Storage The following steps should be drained into ... Support Bolt 3. 4. 5. 18 Figure 7-1 Remove blade and adapter from spark plug. See Figure 7-1 inset. 6. To ensure safe operation of your mower, periodically check the blade bolt for storage, the fuel tank must be empty and the spark plug side must be up (not pointed toward the...

Operation Manual
Page 20
... again at desired height or make a narrower cutting path. 3. Troubleshooting Uneven cut . 2. Damaged or worn belt. 4. wait until later to cut Mower will not mulch grass Cause 1. Check belt for proper pulley installation and movement. 2. Dull blade. 1. Sharpen or replace blade. 1. Problem... Mower will not self propel 3. Do not mow when grass is wet; Inspect and replace belt. 4. Adjust drive control. (See Assembly & Set-up section)....
... again at desired height or make a narrower cutting path. 3. Troubleshooting Uneven cut . 2. Damaged or worn belt. 4. wait until later to cut Mower will not mulch grass Cause 1. Check belt for proper pulley installation and movement. 2. Dull blade. 1. Sharpen or replace blade. 1. Problem... Mower will not self propel 3. Do not mow when grass is wet; Inspect and replace belt. 4. Adjust drive control. (See Assembly & Set-up section)....

Operation Manual
Page 23
... emissions parts that are not original equipment B&S parts or to parts that are certified to 25 hours per year. For example, a typical walk-behind lawn mower is not liable for 125 hours of actual engine running time. Claims and Coverage Exclusions Warranty claims shall be emissions compliant, assuming proper maintenance in...
... emissions parts that are not original equipment B&S parts or to parts that are certified to 25 hours per year. For example, a typical walk-behind lawn mower is not liable for 125 hours of actual engine running time. Claims and Coverage Exclusions Warranty claims shall be emissions compliant, assuming proper maintenance in...


