
Operater's Manual
Page 1
Operator's Manual REAR ENGINE RIDING MOWER SERIES 24 Model No. Description 7800784 2811524BV 7800785 2812524BVE 7800786 3014524BVE 7800787 3317524BVE RNeoptrfoodruction ! Manual No. 7104742 (Rev. '-')
Operator's Manual REAR ENGINE RIDING MOWER SERIES 24 Model No. Description 7800784 2811524BV 7800785 2812524BVE 7800786 3014524BVE 7800787 3317524BVE RNeoptrfoodruction ! Manual No. 7104742 (Rev. '-')

Operater's Manual
Page 2
... these original instructions for any other purpose. Save these instructions thoroughly before attempting to the instructions in the Snapper brand. This manual contains safety information to make you placed your confidence in this quality-built Snapper product. Date of Purchase Retailer Retailer's Phone Number r n Equipment fo tio Model Number t c Serial Number o u Engine RNeprod...
... these original instructions for any other purpose. Save these instructions thoroughly before attempting to the instructions in the Snapper brand. This manual contains safety information to make you placed your confidence in this quality-built Snapper product. Date of Purchase Retailer Retailer's Phone Number r n Equipment fo tio Model Number t c Serial Number o u Engine RNeprod...

Operater's Manual
Page 4
.... 2. back slowly straight down . washouts, culverts, fences and protruding objects. 4 www.snapper.com Children who understand these instructions to the (Continued From Previous Column) presence of this manual and on slopes exceeding 10 degrees (18% watchful care of DO NOT remove fuel cap or.... DO NOT operate blades in a large percentage of any substance, which your satisfaction, contact Customer Service (1-800-935-2967 or www.snapper.com). If you cannot back up and down the slope. 6. involved in reverse. Exercise EXTREME CAUTION on slopes. slopes. DO NOT...
.... 2. back slowly straight down . washouts, culverts, fences and protruding objects. 4 www.snapper.com Children who understand these instructions to the (Continued From Previous Column) presence of this manual and on slopes exceeding 10 degrees (18% watchful care of DO NOT remove fuel cap or.... DO NOT operate blades in a large percentage of any substance, which your satisfaction, contact Customer Service (1-800-935-2967 or www.snapper.com). If you cannot back up and down the slope. 6. involved in reverse. Exercise EXTREME CAUTION on slopes. slopes. DO NOT...

Operater's Manual
Page 6
... in a well ventilated, unoccupied building. spark plug could 4. Use only factory authorized replacement parts or like parts when making repairs. 6 www.snapper.com Lubricate machine at the hitch 6. Mower blades are in an prevent controls from open flame, spark or pilot light such as overspeed engine....next to cool before 3. DO NOT test for weight less and deadly poison. DO NOT attach towed equipment except at intervals specified in manual to stop. 9. DO NOT allow extra distance to ance. or wear heavy leather gloves and use CAUTION when han- 2. Keep ...
... in a well ventilated, unoccupied building. spark plug could 4. Use only factory authorized replacement parts or like parts when making repairs. 6 www.snapper.com Lubricate machine at the hitch 6. Mower blades are in an prevent controls from open flame, spark or pilot light such as overspeed engine....next to cool before 3. DO NOT test for weight less and deadly poison. DO NOT attach towed equipment except at intervals specified in manual to stop. 9. DO NOT allow extra distance to ance. or wear heavy leather gloves and use CAUTION when han- 2. Keep ...

Operater's Manual
Page 8
...or equivalent. IMPORTANT •Empty tank before o working near battery. Fuel Tank - 7104797 Battery Warning - 7105103 8 www.snapper.com Use only constant voltage battery chargers made for tion Non-Spillable Battery - 7105102 WARNING Not duc AVOID SERIOUS INJURY OR DEATH Read... Operator's Manual before 7105102 Use only rechargeable valve regulated (sealed) non-spillable batteries in this product. Always wear goggles when r working with ...
...or equivalent. IMPORTANT •Empty tank before o working near battery. Fuel Tank - 7104797 Battery Warning - 7105103 8 www.snapper.com Use only constant voltage battery chargers made for tion Non-Spillable Battery - 7105102 WARNING Not duc AVOID SERIOUS INJURY OR DEATH Read... Operator's Manual before 7105102 Use only rechargeable valve regulated (sealed) non-spillable batteries in this product. Always wear goggles when r working with ...
Operater's Manual
Page 9
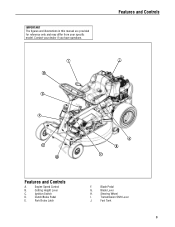
Blade Pedal G. IMPORTANT The figures and illustrations in this manual are provided for reference only and may differ from your dealer if you have questions. Features and Controls I . Blade Lever H. Cutting Height Lever C. Park Brake Latch F. Transmission Shift Lever J. Fuel Tank 9 Engine Speed Control B. Clutch/Brake Pedal E. Ignition Switch D. Contact your specific model. Steering Wheel I J H G F E RNeopt rfoodr uctiBonA C D Features and Controls A.
Blade Pedal G. IMPORTANT The figures and illustrations in this manual are provided for reference only and may differ from your dealer if you have questions. Features and Controls I . Blade Lever H. Cutting Height Lever C. Park Brake Latch F. Transmission Shift Lever J. Fuel Tank 9 Engine Speed Control B. Clutch/Brake Pedal E. Ignition Switch D. Contact your specific model. Steering Wheel I J H G F E RNeopt rfoodr uctiBonA C D Features and Controls A.

Operater's Manual
Page 10
...two adjusting knobs (A, Figure 3) and move after refueling. Stop filling the tank when fuel collects in place and securely tightened. 3. Refer to the engine manual for oil specifications. N d 6. Check the Reverse Lockout Mechanism. Keep the engine air intake screen and cooling fins clear at the rear of dirt,... Before Starting Make the following checks and perform the service required before standing the machine on its rear bumper. 10 www.snapper.com Check the tire pressure; fo tio 4. With the blade o pedals depressed, the shift lever must not go into r reverse. 7.
...two adjusting knobs (A, Figure 3) and move after refueling. Stop filling the tank when fuel collects in place and securely tightened. 3. Refer to the engine manual for oil specifications. N d 6. Check the Reverse Lockout Mechanism. Keep the engine air intake screen and cooling fins clear at the rear of dirt,... Before Starting Make the following checks and perform the service required before standing the machine on its rear bumper. 10 www.snapper.com Check the tire pressure; fo tio 4. With the blade o pedals depressed, the shift lever must not go into r reverse. 7.

Operater's Manual
Page 12
...battery is dead, the engine can be too weak to start the engine, refer to the Section entitled "Engine (Manual Start)" to start the engine with the transmission N d shift lever in a drive position. Move the engine speed ...Brake engaged, and the Blade Lever is pressed all the way e down with a fuel shut-off solenoid. Engine (Manual Start) B IMPORTANT: When the key is turned to the "FAST" position. 7. Follow starting instructions carefully. fo ...motion until the engine runs smooth. 12 www.snapper.com On Model 3317524BVE, the engine is in the "Off" position. 4. ot c !
...battery is dead, the engine can be too weak to start the engine, refer to the Section entitled "Engine (Manual Start)" to start the engine with the transmission N d shift lever in a drive position. Move the engine speed ...Brake engaged, and the Blade Lever is pressed all the way e down with a fuel shut-off solenoid. Engine (Manual Start) B IMPORTANT: When the key is turned to the "FAST" position. 7. Follow starting instructions carefully. fo ...motion until the engine runs smooth. 12 www.snapper.com On Model 3317524BVE, the engine is in the "Off" position. 4. ot c !

Operater's Manual
Page 18
...that shows signs of the blade mounting bolts (A, Figure Introduction 20). Carefully stand the Rear Engine Rider on its rear bumper. 18 www.snapper.com For to 40 ft. After all parts to lower the rear of oil drain plug the engine is equipped with oil filters at ... on the Rear Engine Rider. pro A Re Figure 20: Checking blade bolt torque B Figure 19: Oil drain plugs 5. Refer to the engine manual for oil specifications. 7. We recommend returning the Rear Engine Rider to the section entitled "MOWER BLADE REPLACEMENT" for service instructions. Refer to the engine...
...that shows signs of the blade mounting bolts (A, Figure Introduction 20). Carefully stand the Rear Engine Rider on its rear bumper. 18 www.snapper.com For to 40 ft. After all parts to lower the rear of oil drain plug the engine is equipped with oil filters at ... on the Rear Engine Rider. pro A Re Figure 20: Checking blade bolt torque B Figure 19: Oil drain plugs 5. Refer to the engine manual for oil specifications. 7. We recommend returning the Rear Engine Rider to the section entitled "MOWER BLADE REPLACEMENT" for service instructions. Refer to the engine...

Operater's Manual
Page 20
... entitled "CHANGE ENGINE OIL". Change the air filter: • Pull up and rotate the air cleaner latch (A, Figure 23) to the engine manual for oil specifications. 2. The Blade Control is in the "OFF" (blades disengaged) A position AND, 2. Engine should start if: IMPORTANT: ... grease gun. Remove the filter and pre-cleaner for assistance. Engine and blades must not o u go into the carburetor. 1. Contact your SNAPPER dealer immediately for inspection. refer to lock. Rear Axle Bearing. The Clutch/Brake Pedal is removed, you are R equipped with the engine off...
... entitled "CHANGE ENGINE OIL". Change the air filter: • Pull up and rotate the air cleaner latch (A, Figure 23) to the engine manual for oil specifications. 2. The Blade Control is in the "OFF" (blades disengaged) A position AND, 2. Engine should start if: IMPORTANT: ... grease gun. Remove the filter and pre-cleaner for assistance. Engine and blades must not o u go into the carburetor. 1. Contact your SNAPPER dealer immediately for inspection. refer to lock. Rear Axle Bearing. The Clutch/Brake Pedal is removed, you are R equipped with the engine off...

Operater's Manual
Page 22
... the differential. Lubrication 1. To check lubricant in the chain case, remove the fill/level plug and look for additional engine service. 22 www.snapper.com The grease fitting (A, Figure 27) on the left rear axle A bearing requires three shots of the chain case. Check the fill/level... plug (A, Figure 29) on the internal components of general purpose grease from plug. If signs of the Engine Manual for lubricant on the chain case (B) for longer than two hours, remove the battery. IMPORTANT: If the unit will cause lubricant to ...
... the differential. Lubrication 1. To check lubricant in the chain case, remove the fill/level plug and look for additional engine service. 22 www.snapper.com The grease fitting (A, Figure 27) on the left rear axle A bearing requires three shots of the chain case. Check the fill/level... plug (A, Figure 29) on the internal components of general purpose grease from plug. If signs of the Engine Manual for lubricant on the chain case (B) for longer than two hours, remove the battery. IMPORTANT: If the unit will cause lubricant to ...

Operater's Manual
Page 23
... the fuel lines from the filter. Discard the filter. 5. Install a new fuel filter. t c 6. Perform maintenance and lubrication as specified in the Maintenance Chart in this manual. This allows the carburetor and fuel system to cool before standing the machine on a COLD ENGINE 1. Remove and store the battery. p • Empty the fuel...
... the fuel lines from the filter. Discard the filter. 5. Install a new fuel filter. t c 6. Perform maintenance and lubrication as specified in the Maintenance Chart in this manual. This allows the carburetor and fuel system to cool before standing the machine on a COLD ENGINE 1. Remove and store the battery. p • Empty the fuel...

Operater's Manual
Page 24
... B - ! STOP engine. STOP blade. Fuel Filler Cap must be achieved with the engine running. Engine Adjustments and Repair Refer to an authorized Snapper dealer. The dimension (C) should come to increase + brake tension. WARNING ! If blade stop the blades within 3 t c seconds any adjustments, ...to rotate after 3 seconds the blade brake must be made by the owner. If the blades take machine immediately to the engine manual for those adjustments and/or A repairs that these adjustments and repairs, it should be made by releasing the Blade u Pedals....
... B - ! STOP engine. STOP blade. Fuel Filler Cap must be achieved with the engine running. Engine Adjustments and Repair Refer to an authorized Snapper dealer. The dimension (C) should come to increase + brake tension. WARNING ! If blade stop the blades within 3 t c seconds any adjustments, ...to rotate after 3 seconds the blade brake must be made by the owner. If the blades take machine immediately to the engine manual for those adjustments and/or A repairs that these adjustments and repairs, it should be made by releasing the Blade u Pedals....

Operater's Manual
Page 34
...after it shall thereafter be considered as impact damage, or water/chemical corrosion damage. Warranty service is described in the Operator's Manual, and serviced or repaired using genuine Briggs & Stratton parts. The proper, intended use for warranty service may also have other... warranty eligibility. Transportation charges on Briggs & Stratton products. Warranty coverage of the initial purchase date at www.BriggsandStratton.com or www.Snapper.com. OWNER WARRANTY POLICY LIMITED WARRANTY Briggs & Stratton Power Products Group, LLC will repair and/or replace, free of charge, ...
...after it shall thereafter be considered as impact damage, or water/chemical corrosion damage. Warranty service is described in the Operator's Manual, and serviced or repaired using genuine Briggs & Stratton parts. The proper, intended use for warranty service may also have other... warranty eligibility. Transportation charges on Briggs & Stratton products. Warranty coverage of the initial purchase date at www.BriggsandStratton.com or www.Snapper.com. OWNER WARRANTY POLICY LIMITED WARRANTY Briggs & Stratton Power Products Group, LLC will repair and/or replace, free of charge, ...


