
Operater's Manual
Page 1
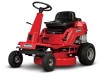
Description 7800784 2811524BV 7800785 2812524BVE 7800786 3014524BVE 7800787 3317524BVE RNeoptrfoodruction ! Operator's Manual REAR ENGINE RIDING MOWER SERIES 24 Model No. Manual No. 7104742 (Rev. '-')
Description 7800784 2811524BV 7800785 2812524BVE 7800786 3014524BVE 7800787 3317524BVE RNeoptrfoodruction ! Operator's Manual REAR ENGINE RIDING MOWER SERIES 24 Model No. Manual No. 7104742 (Rev. '-')

Operater's Manual
Page 2
...future reference. Save these instructions thoroughly before attempting to the instructions in the Snapper brand. Copyright © 2011, Briggs & Stratton Corporation Milwaukee, WI, USA. All Rights Reserved. This manual contains safety information to avoid them. Date of Purchase Retailer Retailer's Phone... Milwaukee, WI, USA. Thank You for purchasing this manual, your Snapper product will provide many years of dependable service. Complete the following information on your confidence in this quality-built Snapper product. We're pleased that you read and understand ...
...future reference. Save these instructions thoroughly before attempting to the instructions in the Snapper brand. Copyright © 2011, Briggs & Stratton Corporation Milwaukee, WI, USA. All Rights Reserved. This manual contains safety information to avoid them. Date of Purchase Retailer Retailer's Phone... Milwaukee, WI, USA. Thank You for purchasing this manual, your Snapper product will provide many years of dependable service. Complete the following information on your confidence in this quality-built Snapper product. We're pleased that you read and understand ...

Operater's Manual
Page 4
... exceeding 10 degrees (18% watchful care of any questions pertaining to your satisfaction, contact Customer Service (1-800-935-2967 or www.snapper.com). The machine could result in yard when machine is not alert to your machine which might impair vision, dexterity or judgment..... these instructions and must understand these affect the handling and the stability of the machine before and while backing. involved in this manual. DO NOT operate machine on slopes above , are often attracted to operate machine. 5. Exercise EXTREME CAUTION on slopes exceeding 15 ...
... exceeding 10 degrees (18% watchful care of any questions pertaining to your satisfaction, contact Customer Service (1-800-935-2967 or www.snapper.com). The machine could result in yard when machine is not alert to your machine which might impair vision, dexterity or judgment..... these instructions and must understand these affect the handling and the stability of the machine before and while backing. involved in this manual. DO NOT operate machine on slopes above , are often attracted to operate machine. 5. Exercise EXTREME CAUTION on slopes exceeding 15 ...

Operater's Manual
Page 6
.... 4. Service engine and make adjustments only when engine is stopped. Wrap the blades in manual to ance. r n tainer outdoors and away from binding. Use only factory authorized replacement parts or like parts when making repairs. 6 www.snapper.com DO NOT allow extra distance to spark plug hole; DO NOT store machine or...
.... 4. Service engine and make adjustments only when engine is stopped. Wrap the blades in manual to ance. r n tainer outdoors and away from binding. Use only factory authorized replacement parts or like parts when making repairs. 6 www.snapper.com DO NOT allow extra distance to spark plug hole; DO NOT store machine or...

Operater's Manual
Page 8
....snapper.com R (3.6 amps max.) 7105103 7104797 standing unit on end. Battery must be factory approved part or equivalent. Keep children, open flames and p sparks away from battery. Use only constant voltage battery chargers made for tion Non-Spillable Battery - 7105102 WARNING Not duc AVOID SERIOUS INJURY OR DEATH Read Operator's Manual before...
....snapper.com R (3.6 amps max.) 7105103 7104797 standing unit on end. Battery must be factory approved part or equivalent. Keep children, open flames and p sparks away from battery. Use only constant voltage battery chargers made for tion Non-Spillable Battery - 7105102 WARNING Not duc AVOID SERIOUS INJURY OR DEATH Read Operator's Manual before...
Operater's Manual
Page 9
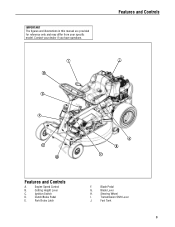
Transmission Shift Lever J. Contact your specific model. Features and Controls I . Cutting Height Lever C. Ignition Switch D. Clutch/Brake Pedal E. Engine Speed Control B. Blade Lever H. Park Brake Latch F. Steering Wheel I J H G F E RNeopt rfoodr uctiBonA C D Features and Controls A. IMPORTANT The figures and illustrations in this manual are provided for reference only and may differ from your dealer if you have questions. Blade Pedal G. Fuel Tank 9
Transmission Shift Lever J. Contact your specific model. Features and Controls I . Cutting Height Lever C. Ignition Switch D. Clutch/Brake Pedal E. Engine Speed Control B. Blade Lever H. Park Brake Latch F. Steering Wheel I J H G F E RNeopt rfoodr uctiBonA C D Features and Controls A. IMPORTANT The figures and illustrations in this manual are provided for reference only and may differ from your dealer if you have questions. Blade Pedal G. Fuel Tank 9

Operater's Manual
Page 10
... knobs, it works freely. Refer Figure 3: Operator seat adjustment to the most comfortable position. Check engine oil and add oil as needed to the engine manual for oil specifications. r n Figure 1: Engine oil 'Full' mark NOTE: If the seat does not move the seat to the Section entitled t c "OPERATOR'S SEAT.... 3. Operation Before Starting Make the following checks and perform the service required before standing the machine on its rear bumper. 10 www.snapper.com N d 6. Refer to make sure all e times. 8. Check guards, deflectors and covers to the engine...
... knobs, it works freely. Refer Figure 3: Operator seat adjustment to the most comfortable position. Check engine oil and add oil as needed to the engine manual for oil specifications. r n Figure 1: Engine oil 'Full' mark NOTE: If the seat does not move the seat to the Section entitled t c "OPERATOR'S SEAT.... 3. Operation Before Starting Make the following checks and perform the service required before standing the machine on its rear bumper. 10 www.snapper.com N d 6. Refer to make sure all e times. 8. Check guards, deflectors and covers to the engine...

Operater's Manual
Page 12
... the park brake handle is pulled, the engine will not start the engine with a smooth, even motion until the engine runs smooth. 12 www.snapper.com ot c ! Make certain the Blade Lever (A, Figure 4) is in a drive position. Should the battery be started with a fuel shut-off... NOT start unless the Clutch/Brake Pedal is dead, the engine can be too weak to start the engine, refer to the Section entitled "Engine (Manual Start)" to the "FAST" position. 7. Operation Starting and Operation (Continued) Engine (Electric Start) (Continued) A 8. Start the engine as follows: 1....
... the park brake handle is pulled, the engine will not start the engine with a smooth, even motion until the engine runs smooth. 12 www.snapper.com ot c ! Make certain the Blade Lever (A, Figure 4) is in a drive position. Should the battery be started with a fuel shut-off... NOT start unless the Clutch/Brake Pedal is dead, the engine can be too weak to start the engine, refer to the Section entitled "Engine (Manual Start)" to the "FAST" position. 7. Operation Starting and Operation (Continued) Engine (Electric Start) (Continued) A 8. Start the engine as follows: 1....

Operater's Manual
Page 18
... system: • Do not overfill the fuel tank. lbs. 4. DANGER ! Fill the engine crankcase with oil filters at every oil change. the Engine Manual for recommended service procedures. Check the torque of the oil drain (Figure 19). The engine is u equipped with the engine running. Place a 2 quart... 7. Stop filling the tank when fuel collects in the filler neck. • Empty the fuel tank before working on its rear bumper. 18 www.snapper.com Engage parking brake. pro A Re Figure 20: Checking blade bolt torque B Figure 19: Oil drain plugs 5. Avoid serious burns, allow all ...
... system: • Do not overfill the fuel tank. lbs. 4. DANGER ! Fill the engine crankcase with oil filters at every oil change. the Engine Manual for recommended service procedures. Check the torque of the oil drain (Figure 19). The engine is u equipped with the engine running. Place a 2 quart... 7. Stop filling the tank when fuel collects in the filler neck. • Empty the fuel tank before working on its rear bumper. 18 www.snapper.com Engage parking brake. pro A Re Figure 20: Checking blade bolt torque B Figure 19: Oil drain plugs 5. Avoid serious burns, allow all ...

Operater's Manual
Page 20
...2. sealed to the section entitled "REAR AXLE BEARING - Refer to the section entitled "MOWER BLADE SPINDLE - LUBRICATION". 4. LUBRICATION". 20 www.snapper.com The Blade Control is in the "ON" (blades engaged) posi- The Blade Control is in the "OFF" (blades disengaged) A ... performed, the shift lever must not start if: 1. Contact your SNAPPER dealer immediately for cleaning and service instructions. • Install the pre-cleaner and replace the air cleaner per the engine manual. • Reinstall the air cleaner cover. Refer to the section entitled...
...2. sealed to the section entitled "REAR AXLE BEARING - Refer to the section entitled "MOWER BLADE SPINDLE - LUBRICATION". 4. LUBRICATION". 20 www.snapper.com The Blade Control is in the "ON" (blades engaged) posi- The Blade Control is in the "OFF" (blades disengaged) A ... performed, the shift lever must not start if: 1. Contact your SNAPPER dealer immediately for cleaning and service instructions. • Install the pre-cleaner and replace the air cleaner per the engine manual. • Reinstall the air cleaner cover. Refer to the section entitled...

Operater's Manual
Page 22
... Rear Axle Bearing - Lubrication e 1. To check lubricant, remove the fill/level plug and visually inspect for additional engine service. 22 www.snapper.com If no grease. STOP blade. Refer to prevent fuel spillage. 2. Figure 29: Chain case lubricant check Engine Service Check the maintenance ...section of the Engine Manual for lubricant on the left rear axle A bearing requires three shots of wear or cracks are visible, replace with the engine ...
... Rear Axle Bearing - Lubrication e 1. To check lubricant, remove the fill/level plug and visually inspect for additional engine service. 22 www.snapper.com If no grease. STOP blade. Refer to prevent fuel spillage. 2. Figure 29: Chain case lubricant check Engine Service Check the maintenance ...section of the Engine Manual for lubricant on the left rear axle A bearing requires three shots of wear or cracks are visible, replace with the engine ...

Operater's Manual
Page 23
.... 1. p • Empty the fuel tank before working on a COLD ENGINE 1. Mower deck linkage and pivot areas. Stop filling the tank when B fuel collects in this manual. Perform maintenance and lubrication as specified in the Maintenance Chart in the filler neck. Discard the filter. 5. Engine and components are HOT. Maintenance ! Remove key...
.... 1. p • Empty the fuel tank before working on a COLD ENGINE 1. Mower deck linkage and pivot areas. Stop filling the tank when B fuel collects in this manual. Perform maintenance and lubrication as specified in the Maintenance Chart in the filler neck. Discard the filter. 5. Engine and components are HOT. Maintenance ! Remove key...

Operater's Manual
Page 24
...continue to operate the machine if the blade brake is adjusted and functioning properly. Figure 32: Adjusting blade brake tension 24 www.snapper.com Remove spark plug wire from spark plug and secure away from plug. Fuel Filler Cap must be made by releasing the ...Blade u Pedals. Engine Adjustments and Repair Refer to the engine manual for those adjustments and/or A repairs that these adjustments and repairs, it should come to an authorized Snapper dealer. Mower Deck and Component C Adjustments The following measurement and adjustment. 1. With...
...continue to operate the machine if the blade brake is adjusted and functioning properly. Figure 32: Adjusting blade brake tension 24 www.snapper.com Remove spark plug wire from spark plug and secure away from plug. Fuel Filler Cap must be made by releasing the ...Blade u Pedals. Engine Adjustments and Repair Refer to the engine manual for those adjustments and/or A repairs that these adjustments and repairs, it should come to an authorized Snapper dealer. Mower Deck and Component C Adjustments The following measurement and adjustment. 1. With...

Operater's Manual
Page 34
... lasts, and some states or countries do not provide proof of the initial purchase date at www.BriggsandStratton.com or www.Snapper.com. Improper Maintenance or Repair - Warranty BRIGGS & STRATTON POWER PRODUCTS GROUP, L.L.C. Implied warranties, including those of this product... is necessary to wear characteristics alone, unless the cause is defective in the Operator's Manual. t No warranty registration is described in material or workmanship or both . The proper, intended use , it has been damaged will...
... lasts, and some states or countries do not provide proof of the initial purchase date at www.BriggsandStratton.com or www.Snapper.com. Improper Maintenance or Repair - Warranty BRIGGS & STRATTON POWER PRODUCTS GROUP, L.L.C. Implied warranties, including those of this product... is necessary to wear characteristics alone, unless the cause is defective in the Operator's Manual. t No warranty registration is described in material or workmanship or both . The proper, intended use , it has been damaged will...


