
Operater's Manual
Page 6
... are sharp and can cut. Have machine serviced by grounding spark plug next to spark plug hole; Use only factory authorized replacement parts or like parts when making repairs. 6 www.snapper.com limits for weight less and deadly poison. DO NOT work under machine without safety blocks. 5. DO NOT change engine governor speed...
... are sharp and can cut. Have machine serviced by grounding spark plug next to spark plug hole; Use only factory authorized replacement parts or like parts when making repairs. 6 www.snapper.com limits for weight less and deadly poison. DO NOT work under machine without safety blocks. 5. DO NOT change engine governor speed...

Operater's Manual
Page 8
for valve regulated e + - Fuel Tank - 7104797 Battery Warning - 7105103 8 www.snapper.com Always wear goggles when r working with battery. Do not overcharge. R (3.6 amps max.) 7105103 7104797 standing unit on end. Use...non-spillable batteries in this product. CV (sealed) non-spillable batteries. IMPORTANT •Empty tank before o working near battery. Battery must be factory approved part or equivalent. Keep children, open flames and p sparks away from battery. Operator Safety 7103219 Parking Brake - 7103219 7104796 Reverse Lockout - 7104796 CAUTION Fire...
for valve regulated e + - Fuel Tank - 7104797 Battery Warning - 7105103 8 www.snapper.com Always wear goggles when r working with battery. Do not overcharge. R (3.6 amps max.) 7105103 7104797 standing unit on end. Use...non-spillable batteries in this product. CV (sealed) non-spillable batteries. IMPORTANT •Empty tank before o working near battery. Battery must be factory approved part or equivalent. Keep children, open flames and p sparks away from battery. Operator Safety 7103219 Parking Brake - 7103219 7104796 Reverse Lockout - 7104796 CAUTION Fire...

Operater's Manual
Page 18
...engine. 3. Refer Contact a local dealer for inspection and addition of any new devices, which might upgrade the safety of the Rear ! the correct part or information for straightness. Remove or open the oil drain plug (A or B, Figure 19), o depending upon the type of excessive Change Engine Oil..., torque to 30 to prevent fuel spillage. 1. Engine Rider. t c 4. N d A wear or damage on its rear bumper. 18 www.snapper.com Avoid serious burns, allow all the oil has drained, replace or close the drain plug, and wipe up any adjustments, maintenance, service or the...
...engine. 3. Refer Contact a local dealer for inspection and addition of any new devices, which might upgrade the safety of the Rear ! the correct part or information for straightness. Remove or open the oil drain plug (A or B, Figure 19), o depending upon the type of excessive Change Engine Oil..., torque to 30 to prevent fuel spillage. 1. Engine Rider. t c 4. N d A wear or damage on its rear bumper. 18 www.snapper.com Avoid serious burns, allow all the oil has drained, replace or close the drain plug, and wipe up any adjustments, maintenance, service or the...

Operater's Manual
Page 19
... Only operate blades when seated in 3 seconds or less after the blade has been turned off. Blade Brake 1. The blade should ! SNAPPER dealer for tion A t c B No odu Figure 21: Removing the drive belt cover r 4. Service Brake / Park Brake 1. Avoid serious burns, allow all... Engine and components are not functioning properly, brake adjustment must be adjusted. Blades must be completed before working on the left side of loose parts & tools first. If the belt becomes worn or slack it must stop in 3 seconds or less after releasing the blade pedals. ! ...
... Only operate blades when seated in 3 seconds or less after the blade has been turned off. Blade Brake 1. The blade should ! SNAPPER dealer for tion A t c B No odu Figure 21: Removing the drive belt cover r 4. Service Brake / Park Brake 1. Avoid serious burns, allow all... Engine and components are not functioning properly, brake adjustment must be adjusted. Blades must be completed before working on the left side of loose parts & tools first. If the belt becomes worn or slack it must stop in 3 seconds or less after releasing the blade pedals. ! ...

Operater's Manual
Page 21
... Deck Linkage - Lubrication Lubricate the shift lever grease fitting (A, Figure 26) with two shots of motor oil. Maintenance ! STOP blade. Remove key. Lubrication Lubricate all parts to prevent fuel spillage. LEVELNESS". Clean the top of grass clippings and debris. Avoid serious burns, allow all mower deck linkage pivot points with the...
... Deck Linkage - Lubrication Lubricate the shift lever grease fitting (A, Figure 26) with two shots of motor oil. Maintenance ! STOP blade. Remove key. Lubrication Lubricate all parts to prevent fuel spillage. LEVELNESS". Clean the top of grass clippings and debris. Avoid serious burns, allow all mower deck linkage pivot points with the...

Operater's Manual
Page 22
... bearing requires three shots of the chain case. Stand the rear engine rider on its rear bumper for additional engine service. 22 www.snapper.com If signs of the Engine Manual for longer than two hours, remove the battery. Figure 29: Chain case lubricant check Engine Service... check the fill/level plug (A, Figure 28) on machine. STOP engine. Avoid serious burns, allow all parts to cool before working on the differential R (B) for lubricant on the internal parts of wear are HOT. Lubrication e 1. To check lubricant in the chain case, remove the fill/level ...
... bearing requires three shots of the chain case. Stand the rear engine rider on its rear bumper for additional engine service. 22 www.snapper.com If signs of the Engine Manual for longer than two hours, remove the battery. Figure 29: Chain case lubricant check Engine Service... check the fill/level plug (A, Figure 28) on machine. STOP engine. Avoid serious burns, allow all parts to cool before working on the differential R (B) for lubricant on the internal parts of wear are HOT. Lubrication e 1. To check lubricant in the chain case, remove the fill/level ...

Operater's Manual
Page 23
... du C IMPORTANT oTo avoid damaging the emissions system: r • Do not overfill the fuel tank. Maintenance ! Replace worn or damaged parts. Perform all ONLY! Check the fuel system for wear or damage. 1. This allows the carburetor and fuel system to the Section entitled "...BATTERY STORAGE". 6. Use only factory authorized Engine replacement parts or like parts when making repairs. Perform the following ! Discard the filter. 5. components of fuel. STOP blade. IMPORTANT: Service the fuel ...
... du C IMPORTANT oTo avoid damaging the emissions system: r • Do not overfill the fuel tank. Maintenance ! Replace worn or damaged parts. Perform all ONLY! Check the fuel system for wear or damage. 1. This allows the carburetor and fuel system to the Section entitled "...BATTERY STORAGE". 6. Use only factory authorized Engine replacement parts or like parts when making repairs. Perform the following ! Discard the filter. 5. components of fuel. STOP blade. IMPORTANT: Service the fuel ...

Operater's Manual
Page 24
...and Repair Refer to rotate after 3 seconds the blade brake must be adjusted. Refer to cool before working on machine. Avoid serious burns, allow all parts to the section entitled R "BLADE BELT COVER REMOVAL". The dimension (C) should come to a stop the blades within 3 t c seconds any adjustments, ...plug and secure away from plug. DO NOT continue to operate the machine if the blade brake is greater than 3 seconds to an authorized Snapper dealer. DO NOT attempt any time the blades are HOT. However, if there is difficulty in 3 seconds or less. Engage parking brake...
...and Repair Refer to rotate after 3 seconds the blade brake must be adjusted. Refer to cool before working on machine. Avoid serious burns, allow all parts to the section entitled R "BLADE BELT COVER REMOVAL". The dimension (C) should come to a stop the blades within 3 t c seconds any adjustments, ...plug and secure away from plug. DO NOT continue to operate the machine if the blade brake is greater than 3 seconds to an authorized Snapper dealer. DO NOT attempt any time the blades are HOT. However, if there is difficulty in 3 seconds or less. Engage parking brake...

Operater's Manual
Page 25
..., or similar object, and pro- ! STOP engine. If tires are at the front and rear 1. Remove the rear hanger chains (A, Figure 34) and allow all parts to 1/4" higher than the front, or is obtained. rear 1/8" to cool before working on the eye-bolt to rear levelness. Engine and components are at...
..., or similar object, and pro- ! STOP engine. If tires are at the front and rear 1. Remove the rear hanger chains (A, Figure 34) and allow all parts to 1/4" higher than the front, or is obtained. rear 1/8" to cool before working on the eye-bolt to rear levelness. Engine and components are at...

Operater's Manual
Page 26
... to attain slack in the cable. With the blade lever in the third position (middle notch). Disengage the parking brake and allow all parts to the "ON" position. 3. IMPORTANT: Too much slack may cause improper clutch function. B Retighten the hardware that anchors the front... do not require belt tension adjustment. Figure 37: Clutch/brake cable adjustment 26 www.snapper.com Maintenance ! Recheck the service brake/park brake and readjust if necessary. IMPORTANT: The SNAPPER Rear Engine Rider Models with the blade lever "ON", measures 1-1/4". Refer to the ...
... to attain slack in the cable. With the blade lever in the third position (middle notch). Disengage the parking brake and allow all parts to the "ON" position. 3. IMPORTANT: Too much slack may cause improper clutch function. B Retighten the hardware that anchors the front... do not require belt tension adjustment. Figure 37: Clutch/brake cable adjustment 26 www.snapper.com Maintenance ! Recheck the service brake/park brake and readjust if necessary. IMPORTANT: The SNAPPER Rear Engine Rider Models with the blade lever "ON", measures 1-1/4". Refer to the ...

Operater's Manual
Page 27
..., maintenance, service or repairs with the engine running. Carefully stand the Rear Engine Rider on this page. 2. Depress the clutch/brake pedal (A, Figure 38) all parts to cool before standing the machine on its rear bumper. (See statement below.) r n 3. Retest the wheel brake. Maintenance ! If the measurement is complete, securely tighten...
..., maintenance, service or repairs with the engine running. Carefully stand the Rear Engine Rider on this page. 2. Depress the clutch/brake pedal (A, Figure 38) all parts to cool before standing the machine on its rear bumper. (See statement below.) r n 3. Retest the wheel brake. Maintenance ! If the measurement is complete, securely tighten...
Operater's Manual
Page 28
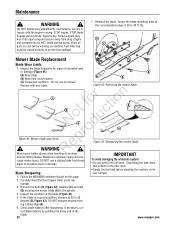
STOP blade. Inspect the blade frequently for signs of the blade. 28 www.snapper.com Replace with the engine running. Remove the bolts (B, Figure 42), washers (C) and nuts (D) securing the mower blade (A) to cool before standing the machine on... signs of excessive wear or damage. • Do not overfill the fuel tank. Check blade balance after sharpening. STOP engine. Avoid serious burns, allow all parts to the spindle. 4. lbs. Stop filling the tank when fuel collects in good condition, sharpen at 22 to prevent fuel spillage. 7. Inspect the condition of...
STOP blade. Inspect the blade frequently for signs of the blade. 28 www.snapper.com Replace with the engine running. Remove the bolts (B, Figure 42), washers (C) and nuts (D) securing the mower blade (A) to cool before standing the machine on... signs of excessive wear or damage. • Do not overfill the fuel tank. Check blade balance after sharpening. STOP engine. Avoid serious burns, allow all parts to the spindle. 4. lbs. Stop filling the tank when fuel collects in good condition, sharpen at 22 to prevent fuel spillage. 7. Inspect the condition of...

Operater's Manual
Page 29
... pulley belt groove. 7. IMPORTANT To avoid damaging the emissions system: • Do not overfill the fuel tank. WARNING ! Adjust the belt guide to allow all parts to the #5 position. Refer to -belt guide clearance (E). 11. Move the transmission shift lever to prevent fuel spillage. 9. Route the belt onto the spindle pulley...
... pulley belt groove. 7. IMPORTANT To avoid damaging the emissions system: • Do not overfill the fuel tank. WARNING ! Adjust the belt guide to allow all parts to the #5 position. Refer to -belt guide clearance (E). 11. Move the transmission shift lever to prevent fuel spillage. 9. Route the belt onto the spindle pulley...

Operater's Manual
Page 30
... connect the RED positive (+) battery cable first. Reinstall the battery holddown bracket (B, Figure 48), securing with the positive terminal cover. 30 www.snapper.com Avoid serious burns, allow all parts to the negative terminal (-) on machine. Remove the battery from the positive battery terminal. Remove the hardware (A, Figure 48) securing the Rep...
... connect the RED positive (+) battery cable first. Reinstall the battery holddown bracket (B, Figure 48), securing with the positive terminal cover. 30 www.snapper.com Avoid serious burns, allow all parts to the negative terminal (-) on machine. Remove the battery from the positive battery terminal. Remove the hardware (A, Figure 48) securing the Rep...

Operater's Manual
Page 32
.... o 5. Service spark plug. 4. Debris build up on engine. 2. When Turned To "STOP" 1. Damaged, out of all debris from engine cooling screen. Service and tighten loose parts. 3. Engine needs choking. Faulty parking brake, blade or ignition switch. 1. Place spark plug wire onto spark plug. 4. r n 11. If broken, replace with new battery. 10... debris. 5. Throttle control set improperly. Set throttle control to "SLOW" and allow engine to proper torque. 4. Tighten to idle. Replace belt. 5. Replace pulley. 32 www.snapper.com
.... o 5. Service spark plug. 4. Debris build up on engine. 2. When Turned To "STOP" 1. Damaged, out of all debris from engine cooling screen. Service and tighten loose parts. 3. Engine needs choking. Faulty parking brake, blade or ignition switch. 1. Place spark plug wire onto spark plug. 4. r n 11. If broken, replace with new battery. 10... debris. 5. Throttle control set improperly. Set throttle control to "SLOW" and allow engine to proper torque. 4. Tighten to idle. Replace belt. 5. Replace pulley. 32 www.snapper.com

Operater's Manual
Page 34
...No warranty registration is subject to the criteria specified in the Operator's Manual, and serviced or repaired using genuine Briggs & Stratton parts. If you for commercial, income producing or rental purposes. This product must be appropriate. Damage caused by stale fuel (carburetor leaks... the product in e a way not described in material or workmanship. There is provided by the engine manufacturer. 34 www.snapper.com Once product has experienced commercial use of purchase receipt. r Most warranty repairs are not covered by purchaser. Transportation charges ...
...No warranty registration is subject to the criteria specified in the Operator's Manual, and serviced or repaired using genuine Briggs & Stratton parts. If you for commercial, income producing or rental purposes. This product must be appropriate. Damage caused by stale fuel (carburetor leaks... the product in e a way not described in material or workmanship. There is provided by the engine manufacturer. 34 www.snapper.com Once product has experienced commercial use of purchase receipt. r Most warranty repairs are not covered by purchaser. Transportation charges ...
Operater's Manual
Page 36
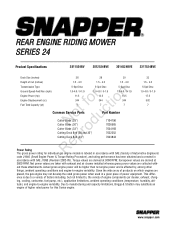
..., cooling, carburetor, fuel pump, etc.), application limitations, ambient operating conditions (temperature, humidity, alti- www.snapper.com out these attachments. Given the wide array of products on which engines are collected with- REAR ENGINE ...fo tio Fuel Tank Capacity (qt) 5-Spd Disc 1.0-4.6 / 0-1.9 11.5 344 7 5-Spd Disc 1.0-4.6 / 0-1.9 12.5 344 7 5-Spd Disc 1.0-4.6 / 0-1.9 14.5 344 7 t c Common Service Parts Part Number o u Cutter Blade (28") N d Cutter Blade (30") Cutter Blade (33") o Cutting Deck Belt (28 and 30") r Cutting Deck Belt (33") 7104196 7026565 7034168 7022252 7043844...
..., cooling, carburetor, fuel pump, etc.), application limitations, ambient operating conditions (temperature, humidity, alti- www.snapper.com out these attachments. Given the wide array of products on which engines are collected with- REAR ENGINE ...fo tio Fuel Tank Capacity (qt) 5-Spd Disc 1.0-4.6 / 0-1.9 11.5 344 7 5-Spd Disc 1.0-4.6 / 0-1.9 12.5 344 7 5-Spd Disc 1.0-4.6 / 0-1.9 14.5 344 7 t c Common Service Parts Part Number o u Cutter Blade (28") N d Cutter Blade (30") Cutter Blade (33") o Cutting Deck Belt (28 and 30") r Cutting Deck Belt (33") 7104196 7026565 7034168 7022252 7043844...
