

Operater's Manual
Page 1
No. 7800632 Description RZT26520, 26HP Snapper Zero-Turn Rider with 52" Mower 7104441 Revision B Operator's Manual ! RNeopt rfoodr uction 285Z Series Zero Turn Rider Mfg.
No. 7800632 Description RZT26520, 26HP Snapper Zero-Turn Rider with 52" Mower 7104441 Revision B Operator's Manual ! RNeopt rfoodr uction 285Z Series Zero Turn Rider Mfg.

Operater's Manual
Page 2
...and understand these instructions thoroughly before attempting to the instructions in the SNAPPER brand. fication numbers, and engine serial numbers in the locations shown. Mower Deck MFG Number Dealer Name Mower Deck SERIAL Number Date Purchased p NOTE: For location of the .... PRODUCT REFERENCE DATA Model Description Name/Number Unit MFG Number Unit SERIAL Number N du Record your confidence in this quality-built SNAPPER mower. When operated and maintained according to start or operate this equipment. Copyright © 2010, Briggs & Stratton Corporation Milwaukee, WI...
...and understand these instructions thoroughly before attempting to the instructions in the SNAPPER brand. fication numbers, and engine serial numbers in the locations shown. Mower Deck MFG Number Dealer Name Mower Deck SERIAL Number Date Purchased p NOTE: For location of the .... PRODUCT REFERENCE DATA Model Description Name/Number Unit MFG Number Unit SERIAL Number N du Record your confidence in this quality-built SNAPPER mower. When operated and maintained according to start or operate this equipment. Copyright © 2010, Briggs & Stratton Corporation Milwaukee, WI...

Operater's Manual
Page 3
... Lever Adjustment 23 Operation 15 Speed Balancing Adjustment 23 General Operating Safety 15 Cutting Height Adjustment 24 Checks Before Starting 15 Mower Removal and Installation 24 Starting the Engine 16 PTO Clutch Adjustment 26 Stopping the Rider and Engine 16 Check... Mower Blade Stoppping Time 26 Mowing 16 Mower Deck Leveling 27 Pushing the Rider by Hand 16 Servicing the Mower Blades 28 Zero Turn Driving Practice 17 Lubrication 29 Attaching a Trailer 19 Cleaning the...
... Lever Adjustment 23 Operation 15 Speed Balancing Adjustment 23 General Operating Safety 15 Cutting Height Adjustment 24 Checks Before Starting 15 Mower Removal and Installation 24 Starting the Engine 16 PTO Clutch Adjustment 26 Stopping the Rider and Engine 16 Check... Mower Blade Stoppping Time 26 Mowing 16 Mower Deck Leveling 27 Pushing the Rider by Hand 16 Servicing the Mower Blades 28 Zero Turn Driving Practice 17 Lubrication 29 Attaching a Trailer 19 Cleaning the...
Operater's Manual
Page 5
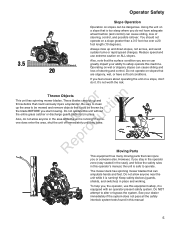
...Operating on a slope greater than a 3.5 foot rise over a 20 foot length (10 degrees). Do not operate on ALL slopes. Thrown Objects r n This unit has spinning mower blades. Be sure to clean up the area to be mowed and remove objects that could seriously injure a bystander. The... mower deck has spinning mower blades that can amputate hands and feet. Do NOT attempt to safely operate this manual 5 o u Also, do not allow anyone in place and working. See...
...Operating on a slope greater than a 3.5 foot rise over a 20 foot length (10 degrees). Do not operate on ALL slopes. Thrown Objects r n This unit has spinning mower blades. Be sure to clean up the area to be mowed and remove objects that could seriously injure a bystander. The... mower deck has spinning mower blades that can amputate hands and feet. Do NOT attempt to safely operate this manual 5 o u Also, do not allow anyone in place and working. See...
Operater's Manual
Page 6
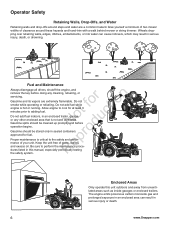
... system. Operator Safety Retaining Walls, Drop-Offs, and Water Retaining walls and drop-offs around these hazards and hand-trim with a walk behind mower or string trimmer. Allow engine to perform the maintenance proce- Wheels dropping over retaining walls, edges, ditches, embankments, or into water can result...as inside garages or enclosed trailers. Keep the unit free of your unit. dures listed in serious injury or death. 6 www.Snapper.com Give yourself a minimum of two mower widths of clearance around steps and water are extremely flammable. Be sure to cool for fuel.
... system. Operator Safety Retaining Walls, Drop-Offs, and Water Retaining walls and drop-offs around these hazards and hand-trim with a walk behind mower or string trimmer. Allow engine to perform the maintenance proce- Wheels dropping over retaining walls, edges, ditches, embankments, or into water can result...as inside garages or enclosed trailers. Keep the unit free of your unit. dures listed in serious injury or death. 6 www.Snapper.com Give yourself a minimum of two mower widths of clearance around steps and water are extremely flammable. Be sure to cool for fuel.
Operater's Manual
Page 7
...even with BLADES OFF to ride on the ground to try to t operate machine. Read, understand, and follow instructions and warn- operate the mower safely enough to stop or shift on the slope, DO R NOT mow it. Use only an approved fuel con- Clean spilled fuel from ... is capable of amputating hands and feet and can throw objects that operators age 60 and above, are involved in a large percentage of mower-related inju- Each person operating the machine must be under any substance, which your satisfaction, contact the Customer Service Department. DO 1. with...
...even with BLADES OFF to ride on the ground to try to t operate machine. Read, understand, and follow instructions and warn- operate the mower safely enough to stop or shift on the slope, DO R NOT mow it. Use only an approved fuel con- Clean spilled fuel from ... is capable of amputating hands and feet and can throw objects that operators age 60 and above, are involved in a large percentage of mower-related inju- Each person operating the machine must be under any substance, which your satisfaction, contact the Customer Service Department. DO 1. with...
Operater's Manual
Page 8
...control during speed and directional changes. 14. doors. 12. Slow down before removing grass catcher or iately STOP blades, STOP engine, and STOP unclogging mower to prevent loss of ignition. t c 1. Extinguish all cigarettes, cigars, pipes and other reproductive harm. 8. DO NOT remove fuel cap or ...On slopes, the weight of the towed equipment may ricochet back towards the operator. 18. Engine exhaust from this is set. 8 www.Snapper.com birth defects, or other sources of fingers or hand. ten securely. Keep clear of accessories. DO NOT operate machine unless properly ...
...control during speed and directional changes. 14. doors. 12. Slow down before removing grass catcher or iately STOP blades, STOP engine, and STOP unclogging mower to prevent loss of ignition. t c 1. Extinguish all cigarettes, cigars, pipes and other reproductive harm. 8. DO NOT remove fuel cap or ...On slopes, the weight of the towed equipment may ricochet back towards the operator. 18. Engine exhaust from this is set. 8 www.Snapper.com birth defects, or other sources of fingers or hand. ten securely. Keep clear of accessories. DO NOT operate machine unless properly ...
Operater's Manual
Page 9
... from spark Maintenance plug(s). 1. On slopes, the weight of p woven fabric, and are sharp and can cut. engine. r n 3. adjust, repair or replace as necessary. 16. Mower blades are subject to reduce fire hazard and engine overheating. The Grass Catcher is stopped. Operator Safety Towing Maintenance 1. DO NOT attach towed equipment except...
... from spark Maintenance plug(s). 1. On slopes, the weight of p woven fabric, and are sharp and can cut. engine. r n 3. adjust, repair or replace as necessary. 16. Mower blades are subject to reduce fire hazard and engine overheating. The Grass Catcher is stopped. Operator Safety Towing Maintenance 1. DO NOT attach towed equipment except...
Operater's Manual
Page 11
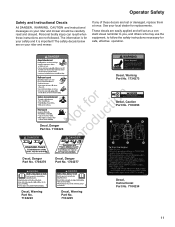
...No. 7104225 Decal, Instructional Part No. 7104234 11 The information is important! If any of these instructions are on your rider and mower. These decals are lost or damaged, replace them at once. Operator Safety Safety and Instructional Decals All DANGER, WARNING, CAUTION and ...instructional messages on your rider and mower should be carefully read and obeyed. Personal bodily injury can result when these decals are easily applied and will act as a constant...
...No. 7104225 Decal, Instructional Part No. 7104234 11 The information is important! If any of these instructions are on your rider and mower. These decals are lost or damaged, replace them at once. Operator Safety Safety and Instructional Decals All DANGER, WARNING, CAUTION and ...instructional messages on your rider and mower should be carefully read and obeyed. Personal bodily injury can result when these decals are easily applied and will act as a constant...

Operater's Manual
Page 12
...ground speed levers not locked in their START/PARK positions in order to start the engine. Decal, Weight Limit Part No. 7101940 12 www.Snapper.com Part No. 7104227 • PTO switch is engaged, OR • Parking brake is disengaged, OR • Ground speed levers ...complete stop within five seconds after the electric PTO switch is turned off (or operator rises off seat). TEST 2 - CHECK MOWER BLADE STOPPING TIME The mower blades and mower drive belt should come to bypass or tamper with a Safety Interlock System. ENGINE SHOULD NOT CRANK IF: Decal, Ground Speed ...
...ground speed levers not locked in their START/PARK positions in order to start the engine. Decal, Weight Limit Part No. 7101940 12 www.Snapper.com Part No. 7104227 • PTO switch is engaged, OR • Parking brake is disengaged, OR • Ground speed levers ...complete stop within five seconds after the electric PTO switch is turned off (or operator rises off seat). TEST 2 - CHECK MOWER BLADE STOPPING TIME The mower blades and mower drive belt should come to bypass or tamper with a Safety Interlock System. ENGINE SHOULD NOT CRANK IF: Decal, Ground Speed ...

Operater's Manual
Page 14
... Release Levers r n The transmission release levers deactivate the transmissions so that the operator must be pushed by hand fo tio (see Seat Adjustments). 14 www.Snapper.com RUN Allows the engine to disengage. See Cutting Height Adjustment. Parking Brake Moving the parking brake lever forward and to the left and back... cap, turn counterclockwise. Moving the lever to the right engages the parking brake. PTO Switch The PTO (Power Take-Off) switch engages and disengages the mower blade clutch. Operation Ignition Switch The ignition switch starts and stops the engine...
... Release Levers r n The transmission release levers deactivate the transmissions so that the operator must be pushed by hand fo tio (see Seat Adjustments). 14 www.Snapper.com RUN Allows the engine to disengage. See Cutting Height Adjustment. Parking Brake Moving the parking brake lever forward and to the left and back... cap, turn counterclockwise. Moving the lever to the right engages the parking brake. PTO Switch The PTO (Power Take-Off) switch engages and disengages the mower blade clutch. Operation Ignition Switch The ignition switch starts and stops the engine...
Operater's Manual
Page 15
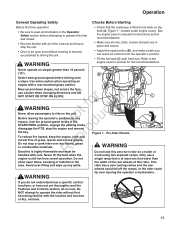
... open area without first becoming familiar with the location and function of this rider. r To reduce fire hazard, keep the engine, rider and p mower free of the controls and how to stop the unit. • Drive in the N d START/PARK position, engage the parking brake, disengage ... slow ground speed before attempting to operate this zero-turn rider on slopes with fresh fuel. Pre-Start Checks Do not load this rider and mower. • Become familiar with care. o Before leaving the operator's position for any spills. Avoid over injuring the operator or bystanders. rider ...
... open area without first becoming familiar with the location and function of this rider. r To reduce fire hazard, keep the engine, rider and p mower free of the controls and how to stop the unit. • Drive in the N d START/PARK position, engage the parking brake, disengage ... slow ground speed before attempting to operate this zero-turn rider on slopes with fresh fuel. Pre-Start Checks Do not load this rider and mower. • Become familiar with care. o Before leaving the operator's position for any spills. Avoid over injuring the operator or bystanders. rider ...
Operater's Manual
Page 16
...ground speed levers into the PUSH position. 5. Return the ground speed levers to the middle (or neutral 'N') position to START. 1. Set the mower cutting height (see Starting the Engine). 3. Insert the key into the ignition switch and turn the ignition key to disengage the transmissions unless machine motion...of the engine, up the engine by Hand 3. After moving the parking r brake lever forward and to the neutral 'N' position. 16 www.Snapper.com Set the engine speed control to the CHOKE position. Warm up into their START/PARK positions, and the operator is off the PTO. 10...
...ground speed levers into the PUSH position. 5. Return the ground speed levers to the middle (or neutral 'N') position to START. 1. Set the mower cutting height (see Starting the Engine). 3. Insert the key into the ignition switch and turn the ignition key to disengage the transmissions unless machine motion...of the engine, up the engine by Hand 3. After moving the parking r brake lever forward and to the neutral 'N' position. 16 www.Snapper.com Set the engine speed control to the CHOKE position. Warm up into their START/PARK positions, and the operator is off the PTO. 10...

Operater's Manual
Page 20
... Every 25 Hours or Annually * Check tire pressure Clean engine air filter and pre-cleaner ** Check mower blade stopping time Every 50 Hours or Annually * Check rider and mower for loose hardware Change engine oil Every 50 Hours or Annually * Replace oil filter Check rider brakes ... ** Clean more often in dusty conditions or when airborne debris is present. 20 www.Snapper.com See Dealer Annually to Replace air filter Lubricate rider and mower Replace pre-cleaner Clean battery and cables Check mower blades ** r n * Whichever comes first fo tio ** Check blades more often in...
... Every 25 Hours or Annually * Check tire pressure Clean engine air filter and pre-cleaner ** Check mower blade stopping time Every 50 Hours or Annually * Check rider and mower for loose hardware Change engine oil Every 50 Hours or Annually * Replace oil filter Check rider brakes ... ** Clean more often in dusty conditions or when airborne debris is present. 20 www.Snapper.com See Dealer Annually to Replace air filter Lubricate rider and mower Replace pre-cleaner Clean battery and cables Check mower blades ** r n * Whichever comes first fo tio ** Check blades more often in...
Operater's Manual
Page 22
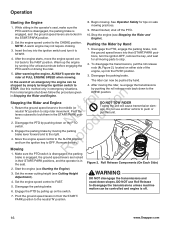
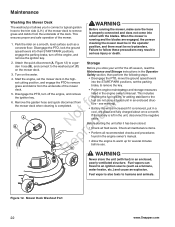
... -season, read the Maintenance and Storage instructions in a cool, dry place and fully charged about once a month. Never store the unit (with the blades. Mower Deck Washout Port 22 www.Snapper.com Storage den hose (B), and connect to a gar- fo tio 6. Safety section, then perform the following steps: 4. WARNING Before running the...
... -season, read the Maintenance and Storage instructions in a cool, dry place and fully charged about once a month. Never store the unit (with the blades. Mower Deck Washout Port 22 www.Snapper.com Storage den hose (B), and connect to a gar- fo tio 6. Safety section, then perform the following steps: 4. WARNING Before running the...
Operater's Manual
Page 24
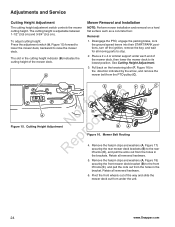
...flat surface such as a concrete floor. Adjustments and Service Cutting Height Adjustment The cutting height adjustment switch controls the mower cutting height. B Mower Removal and Installation NOTE: Perform mower installation and removal on the tensioning idler (F, Figure 16) in the brackets. Place a 2 x 4 or ...similiar support under the unit. 24 www.Snapper.com Retain all removed hardware. 6. A Figure 15. Remove the hairpin clips and washers (A, Figure 17) securing the rear mower deck brackets (B) to the rear R lift arms (C), and pull the arms out ...
...flat surface such as a concrete floor. Adjustments and Service Cutting Height Adjustment The cutting height adjustment switch controls the mower cutting height. B Mower Removal and Installation NOTE: Perform mower installation and removal on the tensioning idler (F, Figure 16) in the brackets. Place a 2 x 4 or ...similiar support under the unit. 24 www.Snapper.com Retain all removed hardware. 6. A Figure 15. Remove the hairpin clips and washers (A, Figure 17) securing the rear mower deck brackets (B) to the rear R lift arms (C), and pull the arms out ...
Operater's Manual
Page 25
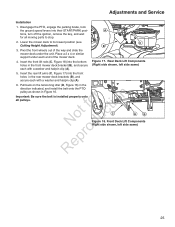
... hairpin clip (A). 6. Pivot the front wheels out of the way and slide the mower deck under each end of the mower deck. 4. Insert the rear lift arms (C, Figure 17) into the front holes in the front mower deck bracket (B), and secure each with a washer and hairpin clip (A). Front Deck ...Rear Deck Lift Components (Right side shown, left side same) 25 Insert the front lift rods (C, Figure 18) into their START/PARK posi- Lower the mower deck to stop. 2. Figure 17. r n Important: Be sure the belt is installed properly onto all moving parts to its lowest position (see C ...
... hairpin clip (A). 6. Pivot the front wheels out of the way and slide the mower deck under each end of the mower deck. 4. Insert the rear lift arms (C, Figure 17) into the front holes in the front mower deck bracket (B), and secure each with a washer and hairpin clip (A). Front Deck ...Rear Deck Lift Components (Right side shown, left side same) 25 Insert the front lift rods (C, Figure 18) into their START/PARK posi- Lower the mower deck to stop. 2. Figure 17. r n Important: Be sure the belt is installed properly onto all moving parts to its lowest position (see C ...

Operater's Manual
Page 26
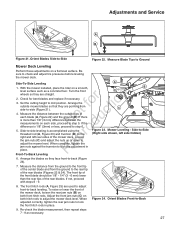
... r through the opening between the rotor and armature may vary even after electric PTO switch is turned off . 1. e 4. If the mower drive belt does not stop . 3. Remove key from ignition switch and disconnect spark plug wires to a complete stop within 5 seconds after ...the electric PTO switch is turned off . 26 www.Snapper.com Note the position of operation. Adjustments and Service A B B B C Figure 20. o 3. Check Mower Blade Stopping Time Mower blades and mower drive belt should come to dimensional variations on level ground. Have an ...
... r through the opening between the rotor and armature may vary even after electric PTO switch is turned off . 1. e 4. If the mower drive belt does not stop . 3. Remove key from ignition switch and disconnect spark plug wires to a complete stop within 5 seconds after ...the electric PTO switch is turned off . 26 www.Snapper.com Note the position of operation. Adjustments and Service A B B B C Figure 20. o 3. Check Mower Blade Stopping Time Mower blades and mower drive belt should come to dimensional variations on level ground. Have an ...
Operater's Manual
Page 27
... adjustments on a smooth, level surface such as necessary. 27 r n 2. Set the cutting height to check and adjust tire pressures before leveling the mower deck. Side-to step 5. If not, proceed with steps 8 - 9. 8. When adjusted correctly, tighten the rear jam nuts to lock the adjustment...a concrete floor. Loosen p the jam nuts (C) and adjust the nuts up or down to -Side Figure 22. Adjustments and Service A B Figure 21. Mower Leveling - The front hitch rods (A, Figure 25) are pointing from the ground to -back leveling. Side-To-Side Leveling A 1. Check for bent blades ...
... adjustments on a smooth, level surface such as necessary. 27 r n 2. Set the cutting height to check and adjust tire pressures before leveling the mower deck. Side-to step 5. If not, proceed with steps 8 - 9. 8. When adjusted correctly, tighten the rear jam nuts to lock the adjustment...a concrete floor. Loosen p the jam nuts (C) and adjust the nuts up or down to -Side Figure 22. Adjustments and Service A B Figure 21. Mower Leveling - The front hitch rods (A, Figure 25) are pointing from the ground to -back leveling. Side-To-Side Leveling A 1. Check for bent blades ...
Operater's Manual
Page 28
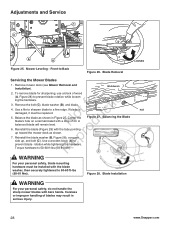
...Reinstall the blade washer (B, Figure 28), concave p side up toward the mower deck as shown in serious injury. 28 www.Snapper.com Balancing the Blade Nail WARNING For your personal safety, do not handle the sharp mower blades with the tabs pointing o up , and bolt (C). Adjustments and ...hole on a nail lubricated with the blade washer, then securely tightened to prevent blade rotation while loosen- Front-to a fine edge. Remove mower deck (see Mower Removal and Workbench Installation). 2. ing the hardware. If blade is t c damaged, it must be replaced. o 5. r 7. Use...
...Reinstall the blade washer (B, Figure 28), concave p side up toward the mower deck as shown in serious injury. 28 www.Snapper.com Balancing the Blade Nail WARNING For your personal safety, do not handle the sharp mower blades with the tabs pointing o up , and bolt (C). Adjustments and ...hole on a nail lubricated with the blade washer, then securely tightened to prevent blade rotation while loosen- Front-to a fine edge. Remove mower deck (see Mower Removal and Workbench Installation). 2. ing the hardware. If blade is t c damaged, it must be replaced. o 5. r 7. Use...


