

Operater's Manual
Page 1
RNeopt rfoodr uction 285Z Series Zero Turn Rider Mfg. No. 7800632 Description RZT26520, 26HP Snapper Zero-Turn Rider with 52" Mower 7104441 Revision B Operator's Manual !
RNeopt rfoodr uction 285Z Series Zero Turn Rider Mfg. No. 7800632 Description RZT26520, 26HP Snapper Zero-Turn Rider with 52" Mower 7104441 Revision B Operator's Manual !

Operater's Manual
Page 2
...tio When contacting your authorized dealer for replacet c ment parts, service, or information you placed your confidence in this quality-built SNAPPER mower. Mower Deck MFG Number Dealer Name Mower Deck SERIAL Number Date Purchased p NOTE: For location of engine identification numbers, Re refer to start or operate this equipment.... read and understand these instructions thoroughly before attempting to the engine owner's manual. Thank You for purchasing this manual, your SNAPPER mower will provide many years of dependable service. Save these numbers. All Rights Reserved. 2 www...
...tio When contacting your authorized dealer for replacet c ment parts, service, or information you placed your confidence in this quality-built SNAPPER mower. Mower Deck MFG Number Dealer Name Mower Deck SERIAL Number Date Purchased p NOTE: For location of engine identification numbers, Re refer to start or operate this equipment.... read and understand these instructions thoroughly before attempting to the engine owner's manual. Thank You for purchasing this manual, your SNAPPER mower will provide many years of dependable service. Save these numbers. All Rights Reserved. 2 www...

Operater's Manual
Page 3
... Lever Adjustment 23 Operation 15 Speed Balancing Adjustment 23 General Operating Safety 15 Cutting Height Adjustment 24 Checks Before Starting 15 Mower Removal and Installation 24 Starting the Engine 16 PTO Clutch Adjustment 26 Stopping the Rider and Engine 16 Check... Mower Blade Stoppping Time 26 Mowing 16 Mower Deck Leveling 27 Pushing the Rider by Hand 16 Servicing the Mower Blades 28 Zero Turn Driving Practice 17 Lubrication 29 Attaching a Trailer 19 Cleaning the...
... Lever Adjustment 23 Operation 15 Speed Balancing Adjustment 23 General Operating Safety 15 Cutting Height Adjustment 24 Checks Before Starting 15 Mower Removal and Installation 24 Starting the Engine 16 PTO Clutch Adjustment 26 Stopping the Rider and Engine 16 Check... Mower Blade Stoppping Time 26 Mowing 16 Mower Deck Leveling 27 Pushing the Rider by Hand 16 Servicing the Mower Blades 28 Zero Turn Driving Practice 17 Lubrication 29 Attaching a Trailer 19 Cleaning the...
Operater's Manual
Page 5
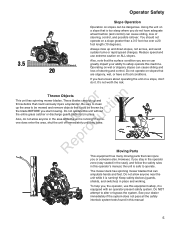
... anyone in the area while the unit is safe to be mowed and remove objects that could seriously injure a bystander. If some- The mower deck has spinning mower blades that can injure you or someone else. Be sure to clean up the area to operate. Always mow up and fo tio throw... debris that could be dangerous. Reduce speed and use this manual 5 Thrown Objects r n This unit has spinning mower blades. However, if you stay in the operator zone (stay seated in the seat), and follow the safety rules in place. See your ability to...
... anyone in the area while the unit is safe to be mowed and remove objects that could seriously injure a bystander. If some- The mower deck has spinning mower blades that can injure you or someone else. Be sure to clean up the area to operate. Always mow up and fo tio throw... debris that could be dangerous. Reduce speed and use this manual 5 Thrown Objects r n This unit has spinning mower blades. However, if you stay in the operator zone (stay seated in the seat), and follow the safety rules in place. See your ability to...
Operater's Manual
Page 6
...an enclosed area can cause rollovers, which may result in serious injury, death, or drowning. dures listed in serious injury or death. 6 www.Snapper.com Do not fo tio smoke while operating or refueling. o Gasoline should be stored only in an enclosed trailer, garage, o u or any... cleaning, refueling, or r n servicing. p Proper maintenance is hot or running. Give yourself a minimum of two mower widths of your unit. Gasoline and its vapors are a common hazard. c Do not add fuel indoors, in sealed containers r approved for at least 3 t...
...an enclosed area can cause rollovers, which may result in serious injury, death, or drowning. dures listed in serious injury or death. 6 www.Snapper.com Do not fo tio smoke while operating or refueling. o Gasoline should be stored only in an enclosed trailer, garage, o u or any... cleaning, refueling, or r n servicing. p Proper maintenance is hot or running. Give yourself a minimum of two mower widths of your unit. Gasoline and its vapors are a common hazard. c Do not add fuel indoors, in sealed containers r approved for at least 3 t...
Operater's Manual
Page 7
...and above, are flammable and 2. DO NOT operate machine on the machine, engine and attachments. Fuels are involved in a large percentage of mower-related inju- Turn vapors are often attracted to your machine which might impair vision, dexterity or judgment. blades OFF when traveling uphill. Use...tires lose traction, turn over or backed 7. STOP BLADES. All slopes require extra CAUTION. Tires may obscure o vision. operate the mower safely enough to operate machine. Each person operating the machine must be of sound mind and body and must allow children or others ...
...and above, are flammable and 2. DO NOT operate machine on the machine, engine and attachments. Fuels are involved in a large percentage of mower-related inju- Turn vapors are often attracted to your machine which might impair vision, dexterity or judgment. blades OFF when traveling uphill. Use...tires lose traction, turn over or backed 7. STOP BLADES. All slopes require extra CAUTION. Tires may obscure o vision. operate the mower safely enough to operate machine. Each person operating the machine must be of sound mind and body and must allow children or others ...
Operater's Manual
Page 8
... roadways. 13. o 5. Inspect machine and repair damage before removing grass catcher or iately STOP blades, STOP engine, and STOP unclogging mower to cause cancer, tainer, rather than a gasoline dispenser nozzle. Limit loads to those you can safely control and attach loads to prevent...glass- 8. DO NOT operate machine without entire grass es, long pants and substantial footwear. DO NOT 11. Gasoline is set. 8 www.Snapper.com Use only an approved fuel container. 3. sible, then refuel equipment using a portable con- ten securely. Make sure blades are OFF and...
... roadways. 13. o 5. Inspect machine and repair damage before removing grass catcher or iately STOP blades, STOP engine, and STOP unclogging mower to cause cancer, tainer, rather than a gasoline dispenser nozzle. Limit loads to those you can safely control and attach loads to prevent...glass- 8. DO NOT operate machine without entire grass es, long pants and substantial footwear. DO NOT 11. Gasoline is set. 8 www.Snapper.com Use only an approved fuel container. 3. sible, then refuel equipment using a portable con- ten securely. Make sure blades are OFF and...
Operater's Manual
Page 9
... engine. performing maintenance or service. DO NOT work under machine without safety blocks. Allow engine to assure that original standards are in proper position. 13. Mower blades are subject to stop. When draining fuel tank, drain fuel into an approved container outdoors and away from battery before each use cupied building...
... engine. performing maintenance or service. DO NOT work under machine without safety blocks. Allow engine to assure that original standards are in proper position. 13. Mower blades are subject to stop. When draining fuel tank, drain fuel into an approved container outdoors and away from battery before each use cupied building...
Operater's Manual
Page 11
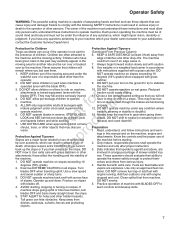
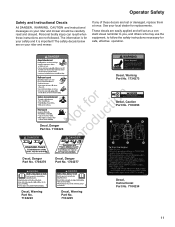
... will act as a constant visual reminder to you, and others who may use the equipment, to follow the safety instructions necessary for your rider and mower. These decals are lost or damaged, replace them at once. Operator Safety Safety and Instructional Decals All DANGER, WARNING, CAUTION and instructional messages on your... Decal, Danger Part No. 1704277 Decal, Warning Part No. 7104223 Decal, Warning Part No. 7104225 Decal, Instructional Part No. 7104234 11 See your rider and mower should be carefully read and obeyed. The safety decals below are not followed.
... will act as a constant visual reminder to you, and others who may use the equipment, to follow the safety instructions necessary for your rider and mower. These decals are lost or damaged, replace them at once. Operator Safety Safety and Instructional Decals All DANGER, WARNING, CAUTION and instructional messages on your... Decal, Danger Part No. 1704277 Decal, Warning Part No. 7104223 Decal, Warning Part No. 7104225 Decal, Instructional Part No. 7104234 11 See your rider and mower should be carefully read and obeyed. The safety decals below are not followed.

Operater's Manual
Page 12
...8226; Operator rises off seat with parking brake disenaged, OR • Operator rises off seat with a Safety Interlock System. CHECK MOWER BLADE STOPPING TIME The mower blades and mower drive belt should come to bypass or tamper with the switches/ devices. 7104226 7104227 TEST 1 - Do not attempt to a ...their START/PARK positions in order to start the engine. TEST 2 - If mower drive belt does not stop within five seconds, see your dealer. Decal, Weight Limit Part No. 7101940 12 www.Snapper.com See an authorized dealer. Operator Safety Safety Interlock System Tests This unit ...
...8226; Operator rises off seat with parking brake disenaged, OR • Operator rises off seat with a Safety Interlock System. CHECK MOWER BLADE STOPPING TIME The mower blades and mower drive belt should come to bypass or tamper with the switches/ devices. 7104226 7104227 TEST 1 - Do not attempt to a ...their START/PARK positions in order to start the engine. TEST 2 - If mower drive belt does not stop within five seconds, see your dealer. Decal, Weight Limit Part No. 7101940 12 www.Snapper.com See an authorized dealer. Operator Safety Safety Interlock System Tests This unit ...
Operater's Manual
Page 14
...unit can be adjusted forward and backward RNeoprodu (see Pushing the Unit by hand fo tio (see Seat Adjustments). 14 www.Snapper.com Mower Cutting Height Adjustment Switch The mower cutting height is adjustable between 1-1/2" (3,8 cm) and 3-3/4" (9,5 cm). Transmission Release Levers r n The transmission release levers... so that the operator must be pushed by Hand). PTO Switch The PTO (Power Take-Off) switch engages and disengages the mower blade clutch. t Seat Adjustment Lever c The seat can be seated firmly in the RUN position with the engine stopped-this drains...
...unit can be adjusted forward and backward RNeoprodu (see Pushing the Unit by hand fo tio (see Seat Adjustments). 14 www.Snapper.com Mower Cutting Height Adjustment Switch The mower cutting height is adjustable between 1-1/2" (3,8 cm) and 3-3/4" (9,5 cm). Transmission Release Levers r n The transmission release levers... so that the operator must be pushed by Hand). PTO Switch The PTO (Power Take-Off) switch engages and disengages the mower blade clutch. t Seat Adjustment Lever c The seat can be seated firmly in the RUN position with the engine stopped-this drains...
Operater's Manual
Page 15
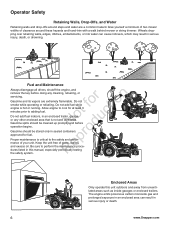
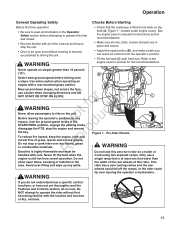
...yet thoroughly read all information in the Operator Safety section before driving onto a slope. B Select slow ground speed before attempting to operate this rider and mower. • Become familiar with all of the controls and how to stop the unit. • Drive in an open flame, smoking or matches in...slopes, not across the face, use a engine is filled to full mark on the unit. r To reduce fire hazard, keep the engine, rider and p mower free of ALL controls. 15 Do not single ramp that the crankcase is still hot from the operator's position. • Fill the fuel tank (C) with...
...yet thoroughly read all information in the Operator Safety section before driving onto a slope. B Select slow ground speed before attempting to operate this rider and mower. • Become familiar with all of the controls and how to stop the unit. • Drive in an open flame, smoking or matches in...slopes, not across the face, use a engine is filled to full mark on the unit. r To reduce fire hazard, keep the engine, rider and p mower free of ALL controls. 15 Do not single ramp that the crankcase is still hot from the operator's position. • Fill the fuel tank (C) with...
Operater's Manual
Page 16
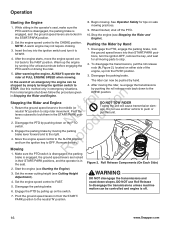
...PTO. 10. Stop the engine (see Starting the Engine). 3. Engage the parking brake by running it to the neutral 'N' position. 16 www.Snapper.com Disengage the parking brake. 6. To disengage the transmissions, pull the roll release rods (A, Figure 2), located on the PTO N d switch.... 'N') position to the CHOKE position. e Mowing R 1. Engage the PTO by hand. NOTE: A warm engine may not require choking. Set the mower cutting height (see Cutting Height Adjustment). 4. Set the engine speed control to stop . Roll Release Components (On Each Side) 2. Operation Starting the ...
...PTO. 10. Stop the engine (see Starting the Engine). 3. Engage the parking brake by running it to the neutral 'N' position. 16 www.Snapper.com Disengage the parking brake. 6. To disengage the transmissions, pull the roll release rods (A, Figure 2), located on the PTO N d switch.... 'N') position to the CHOKE position. e Mowing R 1. Engage the PTO by hand. NOTE: A warm engine may not require choking. Set the mower cutting height (see Cutting Height Adjustment). 4. Set the engine speed control to stop . Roll Release Components (On Each Side) 2. Operation Starting the ...

Operater's Manual
Page 20
...8 Hours or Daily First 5 Hours Check safety interlock system Change engine oil Clean debris off rider and mower deck Every 8 Hours or Daily Clean debris from engine compartment Check engine oil level Every 25 Hours or... Hours or Annually * Check tire pressure Clean engine air filter and pre-cleaner ** Check mower blade stopping time Every 50 Hours or Annually * Check rider and mower for loose hardware Change engine oil Every 50 Hours or Annually * Replace oil filter Check... first ** Clean more often in dusty conditions or when airborne debris is present. 20 www.Snapper.com
...8 Hours or Daily First 5 Hours Check safety interlock system Change engine oil Clean debris off rider and mower deck Every 8 Hours or Daily Clean debris from engine compartment Check engine oil level Every 25 Hours or... Hours or Annually * Check tire pressure Clean engine air filter and pre-cleaner ** Check mower blade stopping time Every 50 Hours or Annually * Check rider and mower for loose hardware Change engine oil Every 50 Hours or Annually * Replace oil filter Check... first ** Clean more often in dusty conditions or when airborne debris is present. 20 www.Snapper.com
Operater's Manual
Page 22
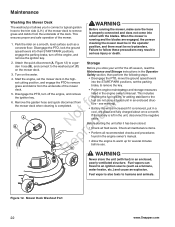
...(do not store a fueled unit in an enclosed, poorly ventilated structure. Never store the unit (with the blades. Figure 12. Turn on the mower deck. fo tio 6. Check all maintenance items. • Perform all fluid levels. Safety section, then perform the following steps: 4. Park the ... stored: • Check all recommended checks and procedures found in the unit, disconnect the negative cable. Mower Deck Washout Port 22 www.Snapper.com Maintenance Washing the Mower Deck The washout port allows you store your unit for several minutes before use. Start the engine, set...
...(do not store a fueled unit in an enclosed, poorly ventilated structure. Never store the unit (with the blades. Figure 12. Turn on the mower deck. fo tio 6. Check all maintenance items. • Perform all fluid levels. Safety section, then perform the following steps: 4. Park the ... stored: • Check all recommended checks and procedures found in the unit, disconnect the negative cable. Mower Deck Washout Port 22 www.Snapper.com Maintenance Washing the Mower Deck The washout port allows you store your unit for several minutes before use. Start the engine, set...
Operater's Manual
Page 24
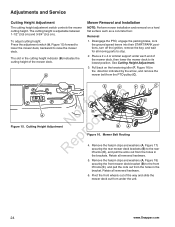
...or similiar support under the unit. 24 www.Snapper.com Retain all removed hardware. 5. Mower Belt Routing ep 4. Remove the hairpin clips and washers (A, Figure 17) securing the rear mower deck brackets (B) to stop. 2. Pivot the front wheels out of the mower deck. To adjust cutting height: Press the adjustment...E D for all moving parts to the rear R lift arms (C), and pull the arms out from under each end of the mower deck, then lower the mower deck to its lowest position. The cutting height is adjustable between 1-1/2" (3,8 cm) and 3-3/4" (9,5 cm). Removal 1. A Figure 15...
...or similiar support under the unit. 24 www.Snapper.com Retain all removed hardware. 5. Mower Belt Routing ep 4. Remove the hairpin clips and washers (A, Figure 17) securing the rear mower deck brackets (B) to stop. 2. Pivot the front wheels out of the mower deck. To adjust cutting height: Press the adjustment...E D for all moving parts to the rear R lift arms (C), and pull the arms out from under each end of the mower deck, then lower the mower deck to its lowest position. The cutting height is adjustable between 1-1/2" (3,8 cm) and 3-3/4" (9,5 cm). Removal 1. A Figure 15...
Operater's Manual
Page 25
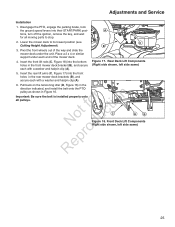
... the PTO, engage the parking brake, lock the ground speed levers into the bottom holes in the front mower deck bracket (B), and secure each with a washer and hairpin clip (A). 6. Lower the mower deck to stop. 2. Insert the front lift rods (C, Figure 18) into their START/PARK posi- Pull...sure the belt is installed properly onto all moving parts to its lowest position (see C Cutting Height Adjustment). Pivot the front wheels out of the mower deck. 4. A tions, turn off the ignition, remove the key, and wait for all pulleys. Rear Deck Lift Components (Right side shown,...
... the PTO, engage the parking brake, lock the ground speed levers into the bottom holes in the front mower deck bracket (B), and secure each with a washer and hairpin clip (A). 6. Lower the mower deck to stop. 2. Insert the front lift rods (C, Figure 18) into their START/PARK posi- Pull...sure the belt is installed properly onto all moving parts to its lowest position (see C Cutting Height Adjustment). Pivot the front wheels out of the mower deck. 4. A tions, turn off the ignition, remove the key, and wait for all pulleys. Rear Deck Lift Components (Right side shown,...

Operater's Manual
Page 26
...belt does not stop within 5 seconds after the electric PTO switch is an acceptable condition. 6. Engage the PTO and wait several seconds. The mower blades and mower drive belt should come to stop within 5 seconds, see an authorized dealer. 5. Alternately tighten the adjustment nuts (B, Figure 19) until the ... actual air gap between the rotor and armature may vary even after every 250 hours of tension when the gauge is turned off . 26 www.Snapper.com Insert a .016"-.018" (0,40-0,45 mm) feeler gauge (C) r through the opening between the rotor face and the armature face as ...
...belt does not stop within 5 seconds after the electric PTO switch is an acceptable condition. 6. Engage the PTO and wait several seconds. The mower blades and mower drive belt should come to stop within 5 seconds, see an authorized dealer. 5. Alternately tighten the adjustment nuts (B, Figure 19) until the ... actual air gap between the rotor and armature may vary even after every 250 hours of tension when the gauge is turned off . 26 www.Snapper.com Insert a .016"-.018" (0,40-0,45 mm) feeler gauge (C) r through the opening between the rotor face and the armature face as ...
Operater's Manual
Page 27
..., proceed to the rear tip of the rear blades. The front hitch rods (A, Figure 25) are straight. Figure 24. Measure Blade Tips to Ground Mower Deck Leveling Perform these adjustments on both front hitch rods. Be sure to mid position. r n 2. t c 4. R Front-To-Back Leveling B... C C Figure 23. If not, proceed with steps 8 - 9. 8. When adjusted correctly, tighten the rear jam nuts to adjust the mower deck level. With the mower installed, place the rider on the right and left side hidden) 6. Arrange the outside tips of the center blade and from side-to...
..., proceed to the rear tip of the rear blades. The front hitch rods (A, Figure 25) are straight. Figure 24. Measure Blade Tips to Ground Mower Deck Leveling Perform these adjustments on both front hitch rods. Be sure to mid position. r n 2. t c 4. R Front-To-Back Leveling B... C C Figure 23. If not, proceed with steps 8 - 9. 8. When adjusted correctly, tighten the rear jam nuts to adjust the mower deck level. With the mower installed, place the rider on the right and left side hidden) 6. Arrange the outside tips of the center blade and from side-to...
Operater's Manual
Page 28
... rotation while loosen- Reinstall the blade washer (B, Figure 28), concave p side up toward the mower deck as shown in serious injury. 28 www.Snapper.com Use a wooden block (A) to -Back Figure 26. Figure 28. Blade Removal Servicing the Mower Blades 1. A N d balanced blade will remain level. 6. Re Torque hardware to a fine edge. o 5. Use a file...
... rotation while loosen- Reinstall the blade washer (B, Figure 28), concave p side up toward the mower deck as shown in serious injury. 28 www.Snapper.com Use a wooden block (A) to -Back Figure 26. Figure 28. Blade Removal Servicing the Mower Blades 1. A N d balanced blade will remain level. 6. Re Torque hardware to a fine edge. o 5. Use a file...


