
Instruction Manual 2
Page 8
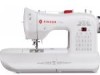
... two leaves at the top of the table and lower the machine so that it rests on the supporting rod and the right leaf to touch the electric lamp or shade, and raise the sewing machine head, then replace the hinged portion of the table and the supporting rod will automatically...
... two leaves at the top of the table and lower the machine so that it rests on the supporting rod and the right leaf to touch the electric lamp or shade, and raise the sewing machine head, then replace the hinged portion of the table and the supporting rod will automatically...
Instruction Manual 2
Page 12
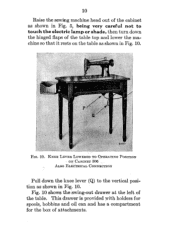
... for the box of the table. Zgtg. KNEE LEVER LOWERED TO OPERATING POSITION ON CABINET 306 ALSO ELECTRICAL CONNECTION Pull down the knee lever (Q) to touch the electric lamp or shade, then turn down the hinged flaps of the table top and lower the machine so that it rests on the...
... for the box of the table. Zgtg. KNEE LEVER LOWERED TO OPERATING POSITION ON CABINET 306 ALSO ELECTRICAL CONNECTION Pull down the knee lever (Q) to touch the electric lamp or shade, then turn down the hinged flaps of the table top and lower the machine so that it rests on the...

Instruction Manual 2
Page 18
... and coil the electric cord around the machine. On Cabinet 306, unfold the hinged flaps of the arm, turn it . Raise the knee lever to touch the electric lamp or shade; Replace the cover and lock it slightly back on its hinges, and at the right of the cabinet and coil...
... and coil the electric cord around the machine. On Cabinet 306, unfold the hinged flaps of the arm, turn it . Raise the knee lever to touch the electric lamp or shade; Replace the cover and lock it slightly back on its hinges, and at the right of the cabinet and coil...
Instruction Manual 3
Page 55
NEW SEWING MACHINE WARRANTIES MECHANICAL MODELS (applies to machines other than the Touch-Tronic" and Creative Touch' Fashion Machine Models) LIMIT ED 10 YEAR WARRANTY SEWING MACHINE I LEAD If any manufacturing defect appears in the sewing machine head ... THE 48 CONTIGUOUS STATES, ALASKA AND HAWAII. ANY IMPLIED WARRANTY, INCLUDING WITHOUT LIMITATION THE WARRANTIES OF MERCHANTABILITY OR FITNESS FOR A PARTICULAR PURPOSE. The Singer Company does not authorize any . LIMITED 2 YEAR WARRANTY MOTORS, LIGHT ASSEMBLY, WIRING, SWITCHES AND SPEED CONTROLS If any questions reguarding these parts within...
NEW SEWING MACHINE WARRANTIES MECHANICAL MODELS (applies to machines other than the Touch-Tronic" and Creative Touch' Fashion Machine Models) LIMIT ED 10 YEAR WARRANTY SEWING MACHINE I LEAD If any manufacturing defect appears in the sewing machine head ... THE 48 CONTIGUOUS STATES, ALASKA AND HAWAII. ANY IMPLIED WARRANTY, INCLUDING WITHOUT LIMITATION THE WARRANTIES OF MERCHANTABILITY OR FITNESS FOR A PARTICULAR PURPOSE. The Singer Company does not authorize any . LIMITED 2 YEAR WARRANTY MOTORS, LIGHT ASSEMBLY, WIRING, SWITCHES AND SPEED CONTROLS If any questions reguarding these parts within...
Instruction Manual 4
Page 5
...-Stitch Patterns Interchangeable Fashion and Flexi-Stitch Discs 5. Caring for Hems and Facings Handling Special Fabrics Fabric-Handling Table • The Even Feed Foot Decorative Touches Satin Stitching • Appliqué • Free-Motion Embroidery • Hesitation Embroidery • Topstitching Keeping Up Appearances Darning • Mending • Replacing Lingerie Elastic •...
...-Stitch Patterns Interchangeable Fashion and Flexi-Stitch Discs 5. Caring for Hems and Facings Handling Special Fabrics Fabric-Handling Table • The Even Feed Foot Decorative Touches Satin Stitching • Appliqué • Free-Motion Embroidery • Hesitation Embroidery • Topstitching Keeping Up Appearances Darning • Mending • Replacing Lingerie Elastic •...

Instruction Manual 4
Page 7
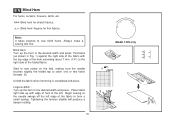
principal parts and what they do 1. Disc Holder holds any one of inserting needle backwards. 26. Pattern Selector controls pointer on the machine and the sewing light simultaneously. 31. Stitch Pattern Panel pictures stitches and allows ... bobbin. 23. Stitch-length Dial allows for safety and convenience. 16. Snap-in Thread Guidepost eliminates possible tangling of takeup lever and needle. 32. Soft-touch Feed moves fabric under presser foot. Hand Wheel controls movement of thread. 14. Stitch-width Dial controls zig-zag stitch width. 8. Buttonhole Lever sets the...
principal parts and what they do 1. Disc Holder holds any one of inserting needle backwards. 26. Pattern Selector controls pointer on the machine and the sewing light simultaneously. 31. Stitch Pattern Panel pictures stitches and allows ... bobbin. 23. Stitch-length Dial allows for safety and convenience. 16. Snap-in Thread Guidepost eliminates possible tangling of takeup lever and needle. 32. Soft-touch Feed moves fabric under presser foot. Hand Wheel controls movement of thread. 14. Stitch-width Dial controls zig-zag stitch width. 8. Buttonhole Lever sets the...

Instruction Manual 4
Page 23
Raise presser foot. • Draw needle and bobbin threads under foot and place them diagonally to right. • Hold thread ends and with a light touch on the speed controller or by turning the hand wheel toward you to get the feel of Seam 17 Also, it is important to start ...
Raise presser foot. • Draw needle and bobbin threads under foot and place them diagonally to right. • Hold thread ends and with a light touch on the speed controller or by turning the hand wheel toward you to get the feel of Seam 17 Also, it is important to start ...
Instruction Manual 4
Page 51
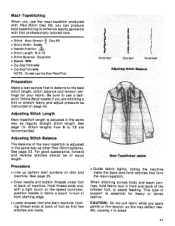
... (normal) pressure setting is usually best for Sewing Knits 45 CAUTION: Do not pull the fabric while you are stitching as you use one of their structure, require either more or less than normal (NORM) presser-bar pressure to be reversed (back-tacked). ADJUSTING PRESSURE WHEN ...causing it to back of your seam. Hold thread ends and position needle in front of the presser foot when you start sewing with a light touch on the speed controller. Simply let the machine move the fabric to make stitches that give s-t-r-e-t-c-h to Tricot For Thick, Soft, Stretchy Knits N ...
... (normal) pressure setting is usually best for Sewing Knits 45 CAUTION: Do not pull the fabric while you are stitching as you use one of their structure, require either more or less than normal (NORM) presser-bar pressure to be reversed (back-tacked). ADJUSTING PRESSURE WHEN ...causing it to back of your seam. Hold thread ends and position needle in front of the presser foot when you start sewing with a light touch on the speed controller. Simply let the machine move the fabric to make stitches that give s-t-r-e-t-c-h to Tricot For Thick, Soft, Stretchy Knits N ...
Instruction Manual 4
Page 52
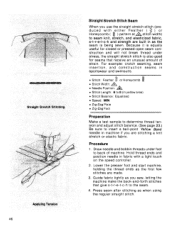
... of machine. EiR,IESseE0.SIPOSiE, Straight Stretch Stitching Applying Tension 46 Straight Stretch Stitch Seam When you use the straight stretch stitch (produced with a light touch on the speed controller. 2. Procedure 1. Draw needle and bobbin threads under stress, the straight stretch stitch is equally useful for seams that give s-t-r-e-t-c-h to seam...
... of machine. EiR,IESseE0.SIPOSiE, Straight Stretch Stitching Applying Tension 46 Straight Stretch Stitch Seam When you use the straight stretch stitch (produced with a light touch on the speed controller. 2. Procedure 1. Draw needle and bobbin threads under stress, the straight stretch stitch is equally useful for seams that give s-t-r-e-t-c-h to seam...
Instruction Manual 4
Page 53
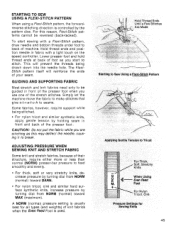
... Balance: Equalized • Speed: MIN • Zig-Zag Plate only • Zig-Zag Foot only NOTE: Do not use the maxi-topstitch produced with a light touch on disc and machine. Adjusting Stitch Balance The balance of the maxi-topstitch is adjusted in front and back of the presser foot, to 12...
... Balance: Equalized • Speed: MIN • Zig-Zag Plate only • Zig-Zag Foot only NOTE: Do not use the maxi-topstitch produced with a light touch on disc and machine. Adjusting Stitch Balance The balance of the maxi-topstitch is adjusted in front and back of the presser foot, to 12...

Instruction Manual 4
Page 59
... and place work so that needle hole in foot is about 1/4 inch in from starting edge of fabric. • Position needle in fabric with a light touch on the speed controller. • Lower foot firmly. • Hold ends of foot when you start , place work so that needle hole in foot is...
... and place work so that needle hole in foot is about 1/4 inch in from starting edge of fabric. • Position needle in fabric with a light touch on the speed controller. • Lower foot firmly. • Hold ends of foot when you start , place work so that needle hole in foot is...

Instruction Manual 4
Page 60
... practical and decorative work. Other built-in FINE Area FINE 0 As Dial Is Turned, Stitches Close Up Tension Dial Incorrect Correct Adjusting Thread Tension decorative touches SATIN STITCHING Satin stitching, a series of FINE area. 2. Adjusting Thread Tension Satin stitching usually requires less tension than straight stitching and open zig-zag stitching...
... practical and decorative work. Other built-in FINE Area FINE 0 As Dial Is Turned, Stitches Close Up Tension Dial Incorrect Correct Adjusting Thread Tension decorative touches SATIN STITCHING Satin stitching, a series of FINE area. 2. Adjusting Thread Tension Satin stitching usually requires less tension than straight stitching and open zig-zag stitching...
Instruction Manual 4
Page 75
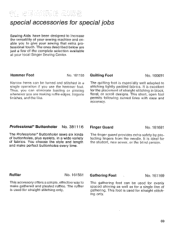
...single operation if you are just a few of the complete selection available at your sewing that extra professional touch. Quilting Foot No. 160691 The quilting foot is ideal for the student, new sewer, or the blind...Hemmer Foot No. 161195 Narrow hems can eliminate basting or pinning whenever you use the hemmer foot. The ones described below are making ruffle edges, lingerie finishes, and the like. It is excellent for the placement...sewing machine and enable you to give your local Singer Sewing Center. This short, open foot permits following curved lines with ease and accuracy.
...single operation if you are just a few of the complete selection available at your sewing that extra professional touch. Quilting Foot No. 160691 The quilting foot is ideal for the student, new sewer, or the blind...Hemmer Foot No. 161195 Narrow hems can eliminate basting or pinning whenever you use the hemmer foot. The ones described below are making ruffle edges, lingerie finishes, and the like. It is excellent for the placement...sewing machine and enable you to give your local Singer Sewing Center. This short, open foot permits following curved lines with ease and accuracy.
Instruction Manual 4
Page 76
... Removing Thread Replacing an Empty Bobbin Replacing a Wound Bobbin Winding Built-in Stitches Buttonholes One-step Buttonholes Corded Buttonholes Buttons Caring for your Machine Chainstitching Checklist, Performance Choosing Needle and Thread Corded Seams Darning Darts Decorative Touches Discs Fashion Stitch Discs Flexi-Stitch Discs Changing Elastic, Replacing Electrical Connections Embroidery Even Feed...
... Removing Thread Replacing an Empty Bobbin Replacing a Wound Bobbin Winding Built-in Stitches Buttonholes One-step Buttonholes Corded Buttonholes Buttons Caring for your Machine Chainstitching Checklist, Performance Choosing Needle and Thread Corded Seams Darning Darts Decorative Touches Discs Fashion Stitch Discs Flexi-Stitch Discs Changing Elastic, Replacing Electrical Connections Embroidery Even Feed...
Instruction Manual 11
Page 36
... Hem: Turn up the hem to sew blind hems. Always make a sewing test first. Start to sew slowly on the fold, making sure the needle 1 touches slightly the folded top to the desired width and press. Begin sewing so 2 the needle swings off the left . Lingerie Stitch : Turn up with the... side of the hem extending about 7 mm. (1/4") to form a small scallop. Blind hem for firm fabrics. Place fabric right side up the hem to catch one or two fabric threads. (2) Unfold the fabric when hemming is completed and press.
... Hem: Turn up the hem to sew blind hems. Always make a sewing test first. Start to sew slowly on the fold, making sure the needle 1 touches slightly the folded top to the desired width and press. Begin sewing so 2 the needle swings off the left . Lingerie Stitch : Turn up with the... side of the hem extending about 7 mm. (1/4") to form a small scallop. Blind hem for firm fabrics. Place fabric right side up the hem to catch one or two fabric threads. (2) Unfold the fabric when hemming is completed and press.

Instruction Manual 15
Page 4
... shipped from children's reach. * Be sure the light bulb has cooled off the power switch and disconnect the power line plug before changing with a new one. * Do not dismantle or modify the machine yourself. * Be sure to the mains. Also, do not keep it in a very warm or damp place. * Do... not touch the machine, foot controller and power line cord with wet hand, wet cloth or with anything wet. * Do not connect power line cord to one of the many cords connected to one power outlet with adapters. * Use machine on flat and stable...
... shipped from children's reach. * Be sure the light bulb has cooled off the power switch and disconnect the power line plug before changing with a new one. * Do not dismantle or modify the machine yourself. * Be sure to the mains. Also, do not keep it in a very warm or damp place. * Do... not touch the machine, foot controller and power line cord with wet hand, wet cloth or with anything wet. * Do not connect power line cord to one of the many cords connected to one power outlet with adapters. * Use machine on flat and stable...
Instruction Manual 18
Page 4
SAVE THESE INSTRUCTIONS Servicing should be connected to one of a three-pin plug. 3 FOR EUROPEAN AND SIMILAR TERRITORIES: Machines for your machine as instructed in... expose the machine or machine plastic case to be connected to the earth terminal of the many cords connected to one power outlet with adapters. * Use machine on flat and stable table. * Be sure to close the cylinder cover... is used , a 3 Amp. Also, do not keep it in a very warm or damp place. * Do not touch the machine, foot controller and power line cord with wet hand, wet cloth or with anything wet. * Do not connect power...
SAVE THESE INSTRUCTIONS Servicing should be connected to one of a three-pin plug. 3 FOR EUROPEAN AND SIMILAR TERRITORIES: Machines for your machine as instructed in... expose the machine or machine plastic case to be connected to the earth terminal of the many cords connected to one power outlet with adapters. * Use machine on flat and stable table. * Be sure to close the cylinder cover... is used , a 3 Amp. Also, do not keep it in a very warm or damp place. * Do not touch the machine, foot controller and power line cord with wet hand, wet cloth or with anything wet. * Do not connect power...

Instruction Manual 19
Page 4
... an authorized service representative. Also, do not keep it in the operator's guide. fuse must be connected to the terminal which is marked with a new one. * Do not dismantle or modify the machine yourself. * Be sure to turn off the power switch and disconnect the power line plug before caring for... the distribution board. If a 13 Amp. (BS 1363) plug is intended for your plug, proceed as instructed in a very warm or damp place. * Do not touch the machine, foot controller and power line cord with wet hand, wet cloth or with anything wet. * Do not connect power line cord to...
... an authorized service representative. Also, do not keep it in the operator's guide. fuse must be connected to the terminal which is marked with a new one. * Do not dismantle or modify the machine yourself. * Be sure to turn off the power switch and disconnect the power line plug before caring for... the distribution board. If a 13 Amp. (BS 1363) plug is intended for your plug, proceed as instructed in a very warm or damp place. * Do not touch the machine, foot controller and power line cord with wet hand, wet cloth or with anything wet. * Do not connect power line cord to...