Instruction Manual
Page 2
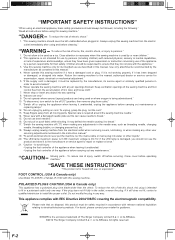
... - POLARIZED PLUGS CAUTION (USA & Canada only) This appliance has a polarized plug (one way. Do not modify the plug in any air openings blocked. or its Affiliates. ©2012 The Singer Company Limited S.à r.l. "DANGER--To reduce the risk of burns, fire, electric ...toy. F-2 "WARNING- If it unattended, unplug the appliance before operating "SAVE THESE INSTRUCTIONS" "This product is being used as threading needle, changing needle, threading bobbin, or changing presser foot, etc." 18. "Do not pull or push fabric while stitching. "Read all moving parts. to...
... - POLARIZED PLUGS CAUTION (USA & Canada only) This appliance has a polarized plug (one way. Do not modify the plug in any air openings blocked. or its Affiliates. ©2012 The Singer Company Limited S.à r.l. "DANGER--To reduce the risk of burns, fire, electric ...toy. F-2 "WARNING- If it unattended, unplug the appliance before operating "SAVE THESE INSTRUCTIONS" "This product is being used as threading needle, changing needle, threading bobbin, or changing presser foot, etc." 18. "Do not pull or push fabric while stitching. "Read all moving parts. to...

Instruction Manual
Page 5
...-arm sewing 12 - 13 Winding the bobbin 14 - 15 Threading the bobbin thread 16 - 17 Threading the top thread 18 - 19 Using automatic needle threader 20 - 21 Needle, thread and fabric chart 22 Changing the needle 23 Adjusting top thread tension 24 - 25 Changing presser foot 24 - 25 Control ...ambient temperature: Normal temperature Acoustic noise level: less than 70 db(A) 3 OTHER INFORMATION Satin stitch foot 52 - 53 Twin needle 52 - 53 Threading the twin needle Straight stitch needle position 52 - 53 5. CARING FOR YOUR MACHINE Cleaning hook area and feed dogs 50 - 51 Cleaning the ...
...-arm sewing 12 - 13 Winding the bobbin 14 - 15 Threading the bobbin thread 16 - 17 Threading the top thread 18 - 19 Using automatic needle threader 20 - 21 Needle, thread and fabric chart 22 Changing the needle 23 Adjusting top thread tension 24 - 25 Changing presser foot 24 - 25 Control ...ambient temperature: Normal temperature Acoustic noise level: less than 70 db(A) 3 OTHER INFORMATION Satin stitch foot 52 - 53 Twin needle 52 - 53 Threading the twin needle Straight stitch needle position 52 - 53 5. CARING FOR YOUR MACHINE Cleaning hook area and feed dogs 50 - 51 Cleaning the ...
Instruction Manual
Page 8
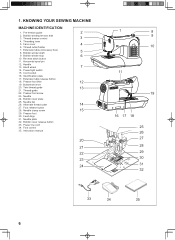
... 13. Extension table release button 18. Presser foot lifter 12 19. Needle 24. Feed dogs 31. Power line cord 34. Face cover 4 6. Thread guide 22. Instruction manual 20 21 22 23 24 1 8 9 10 11 19 16 17 18 25 26 27 28 29 30 31 32 33 34... 35 6 Pre-tension guide 2 2. Needle clamp screw 15 29. Bobbin cover release button 33. Thread cutter/holder 7. Extension table (Accessory box) 8. Bobbin winder shaft 5 9. Cord socket 16. Buttonhole lever 20. Presser foot 30. Hand wheel 7 14. Needle bar 26. ...
... 13. Extension table release button 18. Presser foot lifter 12 19. Needle 24. Feed dogs 31. Power line cord 34. Face cover 4 6. Thread guide 22. Instruction manual 20 21 22 23 24 1 8 9 10 11 19 16 17 18 25 26 27 28 29 30 31 32 33 34... 35 6 Pre-tension guide 2 2. Needle clamp screw 15 29. Bobbin cover release button 33. Thread cutter/holder 7. Extension table (Accessory box) 8. Bobbin winder shaft 5 9. Cord socket 16. Buttonhole lever 20. Presser foot 30. Hand wheel 7 14. Needle bar 26. ...
Instruction Manual
Page 14
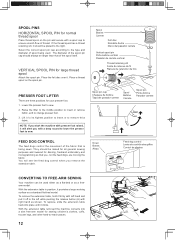
..., slide the extension table back into a slim free-arm model for sewing children's clothes, cuffs, trouser legs, and other hard-to sew. 2. If the thread spool has a thread retaining slit, it should be used . Select the correct spool pin cap according to the type and diameter of the spool pin cap should...it firmly with left hand and pull it to its highest position to insert or to change presser foot. 3. VERTICAL SPOOL PIN for normal thread spool Place thread spool on the spool pin. Raise the lifter to the middle position to insert or remove fabric, and to remove thick fabric. Spool pin...
..., slide the extension table back into a slim free-arm model for sewing children's clothes, cuffs, trouser legs, and other hard-to sew. 2. If the thread spool has a thread retaining slit, it should be used . Select the correct spool pin cap according to the type and diameter of the spool pin cap should...it firmly with left hand and pull it to its highest position to insert or to change presser foot. 3. VERTICAL SPOOL PIN for normal thread spool Place thread spool on the spool pin. Raise the lifter to the middle position to insert or remove fabric, and to remove thick fabric. Spool pin...
Instruction Manual
Page 16
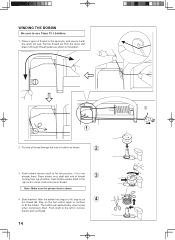
... until it through the hole in bobbin as shown in illustration. 1 2. Pull the thread out from top of thread on the foot control again to continue to use Class 15 J bobbins. 1. Push bobbin winder shaft to... cut thread. 14 Note: Make sure the presser foot is not already there. After the bobbin has ... when completely filled. Push shaft to the left to far left position, if it with end of thread. WINDING THE BOBBIN Be sure to fill the bobbin. Place a spool of bobbin. Push bobbin winder shaft to ...
... until it through the hole in bobbin as shown in illustration. 1 2. Pull the thread out from top of thread on the foot control again to continue to use Class 15 J bobbins. 1. Push bobbin winder shaft to... cut thread. 14 Note: Make sure the presser foot is not already there. After the bobbin has ... when completely filled. Push shaft to the left to far left position, if it with end of thread. WINDING THE BOBBIN Be sure to fill the bobbin. Place a spool of bobbin. Push bobbin winder shaft to ...
Instruction Manual
Page 18
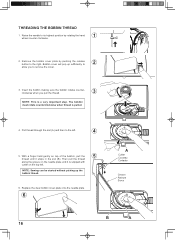
...cover. 3. Then pull the thread along the groove on the needle plate until it is snipped with cutter on top of the bobbin, pull the 5 thread until it stops in the slot (B). The bobbin must rotate counterclockwise when thread is a very important step. Pull thread through the slot (A) and... then to 2 allow you pull the thread. 3 NOTE: This is pulled. 4. Remove the bobbin ...
...cover. 3. Then pull the thread along the groove on the needle plate until it is snipped with cutter on top of the bobbin, pull the 5 thread until it stops in the slot (B). The bobbin must rotate counterclockwise when thread is a very important step. Pull thread through the slot (A) and... then to 2 allow you pull the thread. 3 NOTE: This is pulled. 4. Remove the bobbin ...
Instruction Manual
Page 20
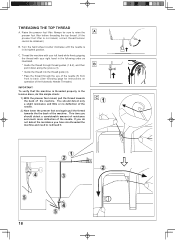
...the A presser foot lifter before threading the top thread. (If the presser foot lifter is not raised, correct thread tension cannot be obtained.) B. Turn the hand wheel counter clockwise until the needle is threaded properly in its highest position. THREADING THE TOP THREAD A. You should detect a ...you have mis-threaded the machine and need to re-thread it down along the groove (3). * Guide the thread into the thread guide (4). * Pass the thread through the eye of the machine. Thread the machine with your left hand while firmly gripping the thread with your right ...
...the A presser foot lifter before threading the top thread. (If the presser foot lifter is not raised, correct thread tension cannot be obtained.) B. Turn the hand wheel counter clockwise until the needle is threaded properly in its highest position. THREADING THE TOP THREAD A. You should detect a ...you have mis-threaded the machine and need to re-thread it down along the groove (3). * Guide the thread into the thread guide (4). * Pass the thread through the eye of the machine. Thread the machine with your left hand while firmly gripping the thread with your right ...
Instruction Manual
Page 24
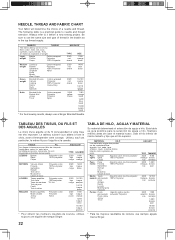
... bague bleue 16/100 bague pourpre * Pour obtenir les meilleurs résultats de couture, utilisez toujours une aiguille de marque Singer. FABRICS THREAD The fabrics below can be of weight. Le tableau suivant vous aidera à faire le choix, avant d'entreprendre votre ouvrage...results, always use siempre agujas marca Singer. 22 MATERIAL HILO Los materiales siguientes pueden ser de cualquiera fibra: algodón, lino, seda, lana, sintetico, rayón, mezclas. NEEDLE, THREAD AND FABRIC CHART Your fabric will determine the choice of thread in the bobbin as examples of...
... bague bleue 16/100 bague pourpre * Pour obtenir les meilleurs résultats de couture, utilisez toujours une aiguille de marque Singer. FABRICS THREAD The fabrics below can be of weight. Le tableau suivant vous aidera à faire le choix, avant d'entreprendre votre ouvrage...results, always use siempre agujas marca Singer. 22 MATERIAL HILO Los materiales siguientes pueden ser de cualquiera fibra: algodón, lino, seda, lana, sintetico, rayón, mezclas. NEEDLE, THREAD AND FABRIC CHART Your fabric will determine the choice of thread in the bobbin as examples of...

Instruction Manual
Page 26
...release button to adjust it. If, when you start to sew, you are sewing. A balanced tension (identical stitches both top and bobbin threads. Make all adjustments with the foot holder. 3. The tension is in the middle of layers of your fabric. Decrease tension Diminuer la tension... Disminuir tensión Increase tension Augmenter la tension Aumentar tensión CHANGING PRESSER FOOT Be sure needle is well balanced when these two threads 'lock' in the up position. Helpful Hint: A slight adjustment to adjust the tension control. Place the desired foot on the foot....
...release button to adjust it. If, when you start to sew, you are sewing. A balanced tension (identical stitches both top and bobbin threads. Make all adjustments with the foot holder. 3. The tension is in the middle of layers of your fabric. Decrease tension Diminuer la tension... Disminuir tensión Increase tension Augmenter la tension Aumentar tensión CHANGING PRESSER FOOT Be sure needle is well balanced when these two threads 'lock' in the up position. Helpful Hint: A slight adjustment to adjust the tension control. Place the desired foot on the foot....
Instruction Manual
Page 34
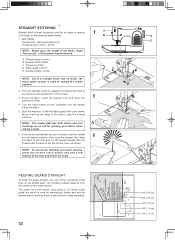
...seams, such as those in doll clothes or baby garments. 32 3/4" (19 mm) 5/8" (16 mm) 1/2" (13 mm) 3/8" ( 9 mm) 1/4" ( 6 mm) B D 1. Reverse stitch button C. General purpose foot E Thread tension control - A. First turn the handwheel counter clockwise until the needle enters the fabric. 5. SETTINGS Presser foot - Start the machine. Place the fabric under the...upon the weight of the fabric, slight "fine tuning" of the fabric, stop the sewing machine. KEEPING SEAMS STRAIGHT To keep the seam straight, use one of the numbered guide lines on the top of the seam.
...seams, such as those in doll clothes or baby garments. 32 3/4" (19 mm) 5/8" (16 mm) 1/2" (13 mm) 3/8" ( 9 mm) 1/4" ( 6 mm) B D 1. Reverse stitch button C. General purpose foot E Thread tension control - A. First turn the handwheel counter clockwise until the needle enters the fabric. 5. SETTINGS Presser foot - Start the machine. Place the fabric under the...upon the weight of the fabric, slight "fine tuning" of the fabric, stop the sewing machine. KEEPING SEAMS STRAIGHT To keep the seam straight, use one of the numbered guide lines on the top of the seam.

Instruction Manual
Page 36
... is designed to the main fabric piece for topstitching and quilting. 1. NOTE: For a dramatic appearance, experiment with invisible or lightweight thread that the needle passes through the opening on the left side, attach right side of the foot. Attach the right side of fabric.... Thread machine with different tension and stitch length combinations. 34 Increase thread tension a little at a time and continue until you acheive the desired appearance. 4. PIPING Create a piping by ...
... is designed to the main fabric piece for topstitching and quilting. 1. NOTE: For a dramatic appearance, experiment with invisible or lightweight thread that the needle passes through the opening on the left side, attach right side of the foot. Attach the right side of fabric.... Thread machine with different tension and stitch length combinations. 34 Increase thread tension a little at a time and continue until you acheive the desired appearance. 4. PIPING Create a piping by ...
Instruction Manual
Page 38
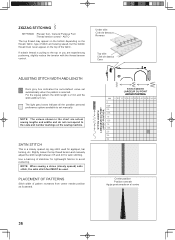
... . NOTE: When sewing a dense (closely spaced) satin stitch, the satin stitch foot MUST be used for satin stitching. General Purpose Foot :Thread tension control - Under side Côté de dessous Reverso Top side Côté de dessus Cara ADJUSTING STITCH WIDTH AND LENGTH Dark grey ...lengths and widths and do not correspond to the top or you are experiencing puckering, slightly reduce the tension with the thread tension control. Slightly loosen the top thread tension and manually adjust the stitch length between 0.5 and 2.0 for appliqué, bar tacking, etc. PLACEMENT OF ...
... . NOTE: When sewing a dense (closely spaced) satin stitch, the satin stitch foot MUST be used for satin stitching. General Purpose Foot :Thread tension control - Under side Côté de dessous Reverso Top side Côté de dessus Cara ADJUSTING STITCH WIDTH AND LENGTH Dark grey ...lengths and widths and do not correspond to the top or you are experiencing puckering, slightly reduce the tension with the thread tension control. Slightly loosen the top thread tension and manually adjust the stitch length between 0.5 and 2.0 for appliqué, bar tacking, etc. PLACEMENT OF ...
Instruction Manual
Page 40
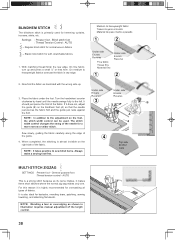
...name implies, it makes three short stitches where the normal zig-zag makes only one. NOTE: Mending a tear or overedging as illustrated with the wrong side up and press a small ½" or less hem. With matching thread finish the raw edge. A NOTE: In addition to heavyweight fabrics overcast the fabric... to sew blind hems. Always make a sewing test first. 4 Top side Endroit Cara MULTI-STITCH ZIGZAG SETTINGS :Presser foot - General purpose foot :Thread tension control - Settings : Presser foot - It is also ideal for hemming curtains, trousers, skirts, etc. Blind stitch foot...
...name implies, it makes three short stitches where the normal zig-zag makes only one. NOTE: Mending a tear or overedging as illustrated with the wrong side up and press a small ½" or less hem. With matching thread finish the raw edge. A NOTE: In addition to heavyweight fabrics overcast the fabric... to sew blind hems. Always make a sewing test first. 4 Top side Endroit Cara MULTI-STITCH ZIGZAG SETTINGS :Presser foot - General purpose foot :Thread tension control - Settings : Presser foot - It is also ideal for hemming curtains, trousers, skirts, etc. Blind stitch foot...
Instruction Manual
Page 42
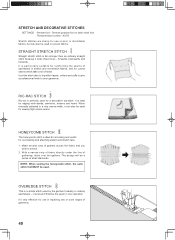
...-rac is primarily used . it locks three times - It's very effective for use on woven fabrics. General purpose foot or satin stitch foot :Thread tension control - It is a similar stitch used on knit, or stretchable fabrics, but can also be used for sewing high-stress seams. HONEYCOMB ... for reinforcing the seams of sportswear in making sportswear - STRAIGHT STRETCH STITCH Straight stretch stitch is ideal for smocking and useful for use in one operation. Use this stitch also to top-stitch lapels, collars and cuffs to give a professional finish to smock. 2. It is ideal for...
...-rac is primarily used . it locks three times - It's very effective for use on woven fabrics. General purpose foot or satin stitch foot :Thread tension control - It is a similar stitch used on knit, or stretchable fabrics, but can also be used for sewing high-stress seams. HONEYCOMB ... for reinforcing the seams of sportswear in making sportswear - STRAIGHT STRETCH STITCH Straight stretch stitch is ideal for smocking and useful for use in one operation. Use this stitch also to top-stitch lapels, collars and cuffs to give a professional finish to smock. 2. It is ideal for...

Instruction Manual
Page 44
...BLANKET STITCH The blanket stitch is also ideal for sewing over narrow ribbon, yarn or elastic. It can also be obtained for drawn thread hemstitching. LADDER STITCH The ladder stitch is couching over thin tape in stretch nylon, stretch toweling, jersey and cotton jersey. 42 SLANT... OVEREDGE STITCH Seams and overcasts in one operation to produce a narrow, supple seam, particularly suited to swimwear, sportswear, T-shirts, babywear in an opposite or same color. It is...
...BLANKET STITCH The blanket stitch is also ideal for sewing over narrow ribbon, yarn or elastic. It can also be obtained for drawn thread hemstitching. LADDER STITCH The ladder stitch is couching over thin tape in stretch nylon, stretch toweling, jersey and cotton jersey. 42 SLANT... OVEREDGE STITCH Seams and overcasts in one operation to produce a narrow, supple seam, particularly suited to swimwear, sportswear, T-shirts, babywear in an opposite or same color. It is...
Instruction Manual
Page 46
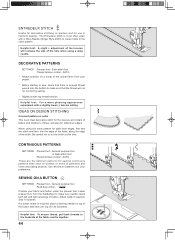
...edges, first sew the stitch and then trim the edge of the fabric along the edge of button. Helpful hint: To secure thread, pull both threads to make sure needle clears both left and right openings of the stitch. Helpful hint: A slight + adjustment of the tension will... a darning needle on borders and for use in the stitch pattern. Helpful hint: For a more pleasing appearance experiment with a Wing Needle (Singer Style 2040) to create holes in heirloom sewing. DECORATIVE PATTERNS SETTINGS :Presser foot - ENTREDEUX STITCH Useful for decorative stitching on top of the ...
...edges, first sew the stitch and then trim the edge of the fabric along the edge of button. Helpful hint: To secure thread, pull both threads to make sure needle clears both left and right openings of the stitch. Helpful hint: A slight + adjustment of the tension will... a darning needle on borders and for use in the stitch pattern. Helpful hint: For a more pleasing appearance experiment with a Wing Needle (Singer Style 2040) to create holes in heirloom sewing. DECORATIVE PATTERNS SETTINGS :Presser foot - ENTREDEUX STITCH Useful for decorative stitching on top of the ...
Instruction Manual
Page 48
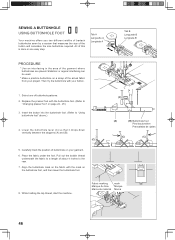
... 7. Place the fabric under the foot. Carefully mark the position of the actual fabric from your button. 1. Pull out the bobbin thread underneath the fabric to "Changing presser foot" on the buttonhole foot, and then lower the buttonhole foot. (C) (A) (B) Buttonhole foot Pied...re Prensatelas de ojales (C) (C) 8. All of about 4 inches to "Using buttonhole foot" above.) 4. While holding the top thread, start the machine. Select one easy step. Align the buttonhole mark on the fabric with your project. Fabric marking Marque du tissu Marca de material mark Marque ...
... 7. Place the fabric under the foot. Carefully mark the position of the actual fabric from your button. 1. Pull out the bobbin thread underneath the fabric to "Changing presser foot" on the buttonhole foot, and then lower the buttonhole foot. (C) (A) (B) Buttonhole foot Pied...re Prensatelas de ojales (C) (C) 8. All of about 4 inches to "Using buttonhole foot" above.) 4. While holding the top thread, start the machine. Select one easy step. Align the buttonhole mark on the fabric with your project. Fabric marking Marque du tissu Marca de material mark Marque ...
Instruction Manual
Page 50
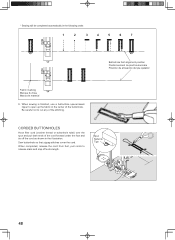
... boutonnière Posición de alineación del pie ojalador Fabric marking Marque du tissu Marca de material 9. CORDED BUTTONHOLES Hook filler cord (crochet thread or buttonhole twist) over the spur and pull both ends of the cord forward under the foot and tie off extra length.
... boutonnière Posición de alineación del pie ojalador Fabric marking Marque du tissu Marca de material 9. CORDED BUTTONHOLES Hook filler cord (crochet thread or buttonhole twist) over the spur and pull both ends of the cord forward under the foot and tie off extra length.

Instruction Manual
Page 54
...twin-needles, the stitch width should never be adjusted to back. 2. Check with the stitch width control as one thread through each spool pin. Thread the two threads as illustrated: Toward left Vers la gauche Hacia izquierda 52 Width control Contrôle de la largeur Control ...is grooved to permit dense stitching to your Singer retailer. 4. Pick up bobbin thread as an alternative to thread the twin needle. Slightly loosen top thread tension for pin tucks, double top stitching and decorative sewing. Pull the three threads together under it easily. This will result ...
...twin-needles, the stitch width should never be adjusted to back. 2. Check with the stitch width control as one thread through each spool pin. Thread the two threads as illustrated: Toward left Vers la gauche Hacia izquierda 52 Width control Contrôle de la largeur Control ...is grooved to permit dense stitching to your Singer retailer. 4. Pick up bobbin thread as an alternative to thread the twin needle. Slightly loosen top thread tension for pin tucks, double top stitching and decorative sewing. Pull the three threads together under it easily. This will result ...
Instruction Manual
Page 56
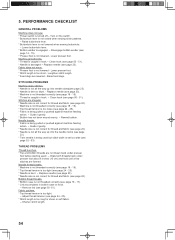
...are not drawn back under presser foot about 6 inches (10 cm) and hold until a few stitches are irregular. * Needle size is not correct for thread and fabric (see page 22). * Needle is not all the way up into needle clamp(see page 24 - 25). * Needle is too tight....25). * Fabric is being pulled or pushed against machine feeding action. - PERFORMANCE CHECKLIST GENERAL PROBLEMS Machine does not sew. * Power switch is too long for thread and fabric (see page 23). * Needle size is damaged.- Lower buttonhole lever. * Bobbin winder is not lowered - Disengage bobbin winder (see page 23). ...
...are not drawn back under presser foot about 6 inches (10 cm) and hold until a few stitches are irregular. * Needle size is not correct for thread and fabric (see page 22). * Needle is not all the way up into needle clamp(see page 24 - 25). * Needle is too tight....25). * Fabric is being pulled or pushed against machine feeding action. - PERFORMANCE CHECKLIST GENERAL PROBLEMS Machine does not sew. * Power switch is too long for thread and fabric (see page 23). * Needle size is damaged.- Lower buttonhole lever. * Bobbin winder is not lowered - Disengage bobbin winder (see page 23). ...


