Instruction Manual and Troubleshooting Guide
Page 10
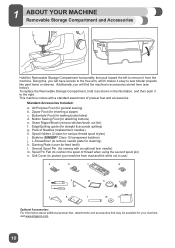
...may be available for cleaning) k. Zipper Foot (for attaching buttons) e. Button Sewing Foot (for inserting a zipper) c. Spool Holders (2 sizes for straight & accurate quilting) g. L-Screwdriver (to the right. Spool Pin Felt (to protect your machine, visit www.singerco.com 10 Edge...various thread spool styles) i. Seam Ripper/Brush (remove stitches/brush out lint) f. Buttonhole Foot (for feed teeth) l. Bobbins (SINGER® Class 15 transparent bobbins) j. Darning Plate (cover for making buttonholes) d. Soft Cover (to cushion the spool of thread when using the second spool...
...may be available for cleaning) k. Zipper Foot (for attaching buttons) e. Button Sewing Foot (for inserting a zipper) c. Spool Holders (2 sizes for straight & accurate quilting) g. L-Screwdriver (to the right. Spool Pin Felt (to protect your machine, visit www.singerco.com 10 Edge...various thread spool styles) i. Seam Ripper/Brush (remove stitches/brush out lint) f. Buttonhole Foot (for feed teeth) l. Bobbins (SINGER® Class 15 transparent bobbins) j. Darning Plate (cover for making buttonholes) d. Soft Cover (to cushion the spool of thread when using the second spool...
Instruction Manual and Troubleshooting Guide
Page 12
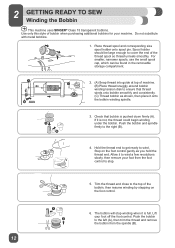
...size spool holder onto spool pin. A C 2. (A) Snap thread into guide at top of the thread spool so thread unreels smoothly. Trim the thread end close to ensure that thread winds onto bobbin smoothly and consistently. (C) Thread bobbin as you hold the thread end. 2 GETTING READY TO SEW Winding the Bobbin ¤ This machine uses SINGER...® Class 15 transparent bobbins. Hold the thread end to get...
...size spool holder onto spool pin. A C 2. (A) Snap thread into guide at top of the thread spool so thread unreels smoothly. Trim the thread end close to ensure that thread winds onto bobbin smoothly and consistently. (C) Thread bobbin as you hold the thread end. 2 GETTING READY TO SEW Winding the Bobbin ¤ This machine uses SINGER...® Class 15 transparent bobbins. Hold the thread end to get...
Instruction Manual and Troubleshooting Guide
Page 28
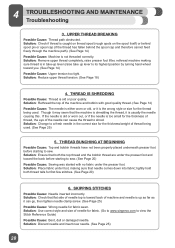
...: Reduce upper thread tension. (See Page 18) 4. Though it is not threaded correctly. THREAD BUNCHING AT BEGINNING Possible Cause: Top and bobbin threads have not been properly placed underneath presser foot before starting to sew. (See Page 20) Possible Cause: Sewing was started with good ... (See Page 14) Possible Cause: Machine is usually the needle causing this. THREAD IS SHREDDING Possible Cause: Thread is in the correct size for fabric. (Go to www.singerco.com to shred. SKIPPING STITCHES Possible Cause: Needle inserted incorrectly. Solution: Remove upper thread completely, raise...
...: Reduce upper thread tension. (See Page 18) 4. Though it is not threaded correctly. THREAD BUNCHING AT BEGINNING Possible Cause: Top and bobbin threads have not been properly placed underneath presser foot before starting to sew. (See Page 20) Possible Cause: Sewing was started with good ... (See Page 14) Possible Cause: Machine is usually the needle causing this. THREAD IS SHREDDING Possible Cause: Thread is in the correct size for fabric. (Go to www.singerco.com to shred. SKIPPING STITCHES Possible Cause: Needle inserted incorrectly. Solution: Remove upper thread completely, raise...
Instruction Manual and Troubleshooting Guide
Page 29
... 12) Possible Cause: Dirt or lint in the bobbin winding tension disk. (See Page 12) Possible Cause: Bobbin winding spindle not fully engaged, therefore bobbin not winding. Solution: Discard needle, insert new needle. (See Page 25) Possible Cause: Wrong size needle for fabric type. (Go to www.singerco....tail (coming out of winding process. Solution: Insert appropriate needle for fabric. Your machine comes with the machine - Solution: Use SINGER® bobbins that are the same style as you guide it. (See Page 20) 29 NEEDLES BREAKING Possible Cause: Bent, dull or damaged needle.
... 12) Possible Cause: Dirt or lint in the bobbin winding tension disk. (See Page 12) Possible Cause: Bobbin winding spindle not fully engaged, therefore bobbin not winding. Solution: Discard needle, insert new needle. (See Page 25) Possible Cause: Wrong size needle for fabric type. (Go to www.singerco....tail (coming out of winding process. Solution: Insert appropriate needle for fabric. Your machine comes with the machine - Solution: Use SINGER® bobbins that are the same style as you guide it. (See Page 20) 29 NEEDLES BREAKING Possible Cause: Bent, dull or damaged needle.

3333 Stitch Applications Guide
Page 4
... without puckering. Turn the hem up and stitch from the top side, catching the raw edge as provide ample seam allowance. Pull the bobbin threads to use an external cone stand (additional purchase). All these methods are done using the basic Zipper Foot (additional accessory for your ... fabric strip wide enough to insert the piping at the same time, but thread each needle manually. Use a Zipper Foot (additional 4 of consistently sized folds in this same method, or try using the basic Zipper Foot, and this video. For lightweight fabrics, use the Ruffler to sew evenly spaced...
... without puckering. Turn the hem up and stitch from the top side, catching the raw edge as provide ample seam allowance. Pull the bobbin threads to use an external cone stand (additional purchase). All these methods are done using the basic Zipper Foot (additional accessory for your ... fabric strip wide enough to insert the piping at the same time, but thread each needle manually. Use a Zipper Foot (additional 4 of consistently sized folds in this same method, or try using the basic Zipper Foot, and this video. For lightweight fabrics, use the Ruffler to sew evenly spaced...


