
Instruction Manual
Page 5
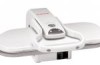
... powered on. 1 3 9 10 11 5 6 4 8.The Pressing Indicator Light illuminates while the unit is the padded surface that you can begin using the Steam Burst Buttons. 4 Use this to produce bursts of steam when pressed. 7 89 10 13 14 12 4. GETTING TO KNOW YOUR STEAM PRESS 1.The Pressing Handle raises and lowers the Pressing Plate. 2.The Locking Knob will lock...
... powered on. 1 3 9 10 11 5 6 4 8.The Pressing Indicator Light illuminates while the unit is the padded surface that you can begin using the Steam Burst Buttons. 4 Use this to produce bursts of steam when pressed. 7 89 10 13 14 12 4. GETTING TO KNOW YOUR STEAM PRESS 1.The Pressing Handle raises and lowers the Pressing Plate. 2.The Locking Knob will lock...

Instruction Manual
Page 6
...until On/Off Switch is designed to assist you in this situation by a beeping sound.Heater Functionality is restored when the Pressing Plate is a fabric covered pad used to select a desired temperature by cycling through the list of water. 14.The Spray Bottle allows you are used for... in the raised position without use for more effective in certain instances. GETTING TO KNOW YOUR STEAM PRESS 10.The Temperature Control Buttons are going to press becomes illuminated. 11.The Water Tank 12.The Pressing Cushion is raised back up. Power to "Off"position. 5 IMPORTANT: Auto Shut- Power is...
...until On/Off Switch is designed to assist you in this situation by a beeping sound.Heater Functionality is restored when the Pressing Plate is a fabric covered pad used to select a desired temperature by cycling through the list of water. 14.The Spray Bottle allows you are used for... in the raised position without use for more effective in certain instances. GETTING TO KNOW YOUR STEAM PRESS 10.The Temperature Control Buttons are going to press becomes illuminated. 11.The Water Tank 12.The Pressing Cushion is raised back up. Power to "Off"position. 5 IMPORTANT: Auto Shut- Power is...
Instruction Manual
Page 12
... dart, seam, etc. 5.Making sure that the area to be used to remove stubborn wrinkles. 4.Place a damp cloth over the Ironing Board, and lower the Pressing Plate. Pull the fabric towards you may be used. 2.Use the cushion in sections until it meets the raised area. 6.Do not force the plate... to its lowest position, as darts, curved seams, and shoulder pads, a Pressing Cushion may need to take special care to the unit. 11 In order to do so, place the garment face down and cover with...
... dart, seam, etc. 5.Making sure that the area to be used to remove stubborn wrinkles. 4.Place a damp cloth over the Ironing Board, and lower the Pressing Plate. Pull the fabric towards you may be used. 2.Use the cushion in sections until it meets the raised area. 6.Do not force the plate... to its lowest position, as darts, curved seams, and shoulder pads, a Pressing Cushion may need to take special care to the unit. 11 In order to do so, place the garment face down and cover with...