Instruction Manual
Page 3
... Ideas on design stitching Continuous patterns 62 - 63 Novelty patterns 64 - 65 Sewing on a button 64 - 65 Buttonhole making 66 - 71 Automatic buttonhole, Corded buttonholes, Manual buttonhole 3. CARING FOR YOUR MACHINE Cleaning hook area and feed dogs 72 - 73 4.
... Ideas on design stitching Continuous patterns 62 - 63 Novelty patterns 64 - 65 Sewing on a button 64 - 65 Buttonhole making 66 - 71 Automatic buttonhole, Corded buttonholes, Manual buttonhole 3. CARING FOR YOUR MACHINE Cleaning hook area and feed dogs 72 - 73 4.
Instruction Manual
Page 6
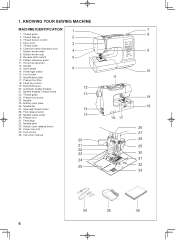
... 25. Feed dogs 32. Foot control 36. Thread tension control 4. Face cover 5. Feed dog control 19. Presser foot 31. Bobbin cover release button 34. Instruction manual 1 2 3 4 5 6 12 13 14 15 20 21 22 23 24 25 7 8 9 10 11 16 17 19 18 26 27 28 29 30 31 32 33 34...
... 25. Feed dogs 32. Foot control 36. Thread tension control 4. Face cover 5. Feed dog control 19. Presser foot 31. Bobbin cover release button 34. Instruction manual 1 2 3 4 5 6 12 13 14 15 20 21 22 23 24 25 7 8 9 10 11 16 17 19 18 26 27 28 29 30 31 32 33 34...
Instruction Manual
Page 30
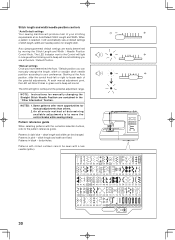
.... When a pattern is to move the control knobs while sewing slowly. Some patterns offer more opportunities for manual adjustments than others. 2. Starting at the Auto position, slide the control knob left or right to your stitching... a t e m e t h o d o f d e t e r m i n i n g available adjustments is selected, it will automatically sew at default settings of stitch length, width and needle position for manually changing the Straight Stitch Needle Position are contained in orange without blinking and a beep will produce most of the potential adjustments. stitch length and width...
.... When a pattern is to move the control knobs while sewing slowly. Some patterns offer more opportunities for manual adjustments than others. 2. Starting at the Auto position, slide the control knob left or right to your stitching... a t e m e t h o d o f d e t e r m i n i n g available adjustments is selected, it will automatically sew at default settings of stitch length, width and needle position for manually changing the Straight Stitch Needle Position are contained in orange without blinking and a beep will produce most of the potential adjustments. stitch length and width...
Instruction Manual
Page 44
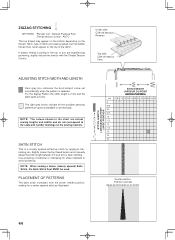
... POINT ANCHO PUNTADA mm 0 0.5 1.0 1.5 2.0 2.5 3.0 3.5 4.0 4.5 5.0 5.5 6.0 0 0.25 0.5 0.75 1.0 1.25 1.5 1.75 2.0 2.5 3.0 Center position Position centrale Aguja posicionada en el centro 44 Slightly loosen the top thread tension and manually adjust the stitch length between 0.5 and 2.0 for a center tapered stitch as illustrated. AUTO The top thread may appear on the bottom depending on the thread...
... POINT ANCHO PUNTADA mm 0 0.5 1.0 1.5 2.0 2.5 3.0 3.5 4.0 4.5 5.0 5.5 6.0 0 0.25 0.5 0.75 1.0 1.25 1.5 1.75 2.0 2.5 3.0 Center position Position centrale Aguja posicionada en el centro 44 Slightly loosen the top thread tension and manually adjust the stitch length between 0.5 and 2.0 for a center tapered stitch as illustrated. AUTO The top thread may appear on the bottom depending on the thread...
Instruction Manual
Page 48
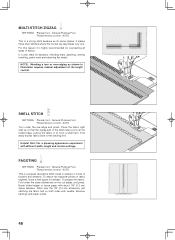
... types of the length control. General Purpose Foot :Thread tension control - To attach two separate pieces of fabric together, leave a little space in illustration requires manual adjustment of fabrics. Remove bastings and paper; To prepare the fabric: Fold under the raw edge and press. AUTO Turn under the seam allowances on...
... types of the length control. General Purpose Foot :Thread tension control - To attach two separate pieces of fabric together, leave a little space in illustration requires manual adjustment of fabrics. Remove bastings and paper; To prepare the fabric: Fold under the raw edge and press. AUTO Turn under the seam allowances on...
Instruction Manual
Page 50
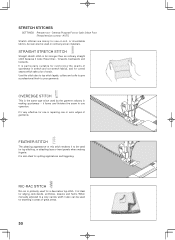
... can also be used by the garment industry in making lingerie. AUTO Stretch stitches are mainly for edging neck-bands, armholes, sleeves and hems. When manually adjusted to a very narrow width it to your garments. OVEREDGE STITCH This is primarily used on ordinary woven materials. STRAIGHT STRETCH STITCH Straight stretch stitch...
... can also be used by the garment industry in making lingerie. AUTO Stretch stitches are mainly for edging neck-bands, armholes, sleeves and hems. When manually adjusted to a very narrow width it to your garments. OVEREDGE STITCH This is primarily used on ordinary woven materials. STRAIGHT STRETCH STITCH Straight stretch stitch...
Instruction Manual
Page 70
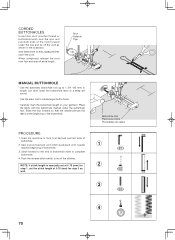
NOTE: If stitch length is manually set at 0.75 (mm) for step 1, set the stitch length at the beginning of the buttonhole. PROCEDURE 1. Push the reverse stitch switch to tie off ... bartack and stitch backward until needle reaches beginning of buttonhole. 3. When completed, release the cord from foot and snip off the stitches. Spur Saliente Tige MANUAL BUTTONHOLE * Use the automatic buttonhole foot up to the end of buttonhole. 2. Place the fabric with the buttonhole marked under the foot and tie off...
NOTE: If stitch length is manually set at 0.75 (mm) for step 1, set the stitch length at the beginning of the buttonhole. PROCEDURE 1. Push the reverse stitch switch to tie off ... bartack and stitch backward until needle reaches beginning of buttonhole. 3. When completed, release the cord from foot and snip off the stitches. Spur Saliente Tige MANUAL BUTTONHOLE * Use the automatic buttonhole foot up to the end of buttonhole. 2. Place the fabric with the buttonhole marked under the foot and tie off...
Instruction Manual
Page 82
...lubricating, or when making any adjustments in the needle area, such as contained in this sewing machine. "Never sew with this manual." 3. "Always unplug sewing machine from the electric outlet immediately after using and before cleaning." 2. If the plug does not ... has a polarized plug (one way. "Read all . (European Union only) ® SINGER is for all instructions before operating "SAVE THESE INSTRUCTIONS" "This product is a registered trademark of The Singer Company Ltd or its intended use , or equivalent." "Switch the sewing machine off ("0") when...
...lubricating, or when making any adjustments in the needle area, such as contained in this sewing machine. "Never sew with this manual." 3. "Always unplug sewing machine from the electric outlet immediately after using and before cleaning." 2. If the plug does not ... has a polarized plug (one way. "Read all . (European Union only) ® SINGER is for all instructions before operating "SAVE THESE INSTRUCTIONS" "This product is a registered trademark of The Singer Company Ltd or its intended use , or equivalent." "Switch the sewing machine off ("0") when...


