
Instruction Manual
Page 3
... Machine identification 6 - 7 Accessories 8 - 9 Setting up your machine 10 - 11 Spool pins, Presser foot lifter 12 - 13 Feed dog control 12 - 13 Converting to -sew fabrics Manual buttonhole 68 - 69 Letter Sewing and Decorative Patterns 70 - 79 Decorative patterns 3. OTHER INFORMATION Satin stitch foot, Twin needle 82 - 83 Straight stitch needle position...
... Machine identification 6 - 7 Accessories 8 - 9 Setting up your machine 10 - 11 Spool pins, Presser foot lifter 12 - 13 Feed dog control 12 - 13 Converting to -sew fabrics Manual buttonhole 68 - 69 Letter Sewing and Decorative Patterns 70 - 79 Decorative patterns 3. OTHER INFORMATION Satin stitch foot, Twin needle 82 - 83 Straight stitch needle position...

Instruction Manual
Page 6
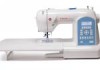
.... Buttonhole lever 20. Presser foot screw 23. Foot release button 28. Needle plate 32. Bobbin winder shaft 9. Horizontal spool pin 12. Feed dogs 31. Instruction manual 2 3 4 5 6 7 12 13 14 15 20 21 22 23 24 1 8 9 10 11 16 17 19 18 25 26 27 28 29 30 31 32 33 34...
.... Buttonhole lever 20. Presser foot screw 23. Foot release button 28. Needle plate 32. Bobbin winder shaft 9. Horizontal spool pin 12. Feed dogs 31. Instruction manual 2 3 4 5 6 7 12 13 14 15 20 21 22 23 24 1 8 9 10 11 16 17 19 18 25 26 27 28 29 30 31 32 33 34...
Instruction Manual
Page 44
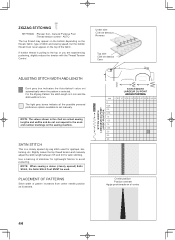
... not correspond to set automatically when the pattern is 5 mm. SATIN STITCH This is pulling to avoid puckering. Slightly loosen the top thread tension and manually adjust the stitch length between 0.5 and 2.0 for satin stitching. ZIGZAG STITCHING SETTINGS :Presser foot - PLACEMENT OF PATTERNS Stitch width of the fabric. Under side Cô...
... not correspond to set automatically when the pattern is 5 mm. SATIN STITCH This is pulling to avoid puckering. Slightly loosen the top thread tension and manually adjust the stitch length between 0.5 and 2.0 for satin stitching. ZIGZAG STITCHING SETTINGS :Presser foot - PLACEMENT OF PATTERNS Stitch width of the fabric. Under side Cô...

Instruction Manual
Page 46
... primarily used for soft, stretchable fabrics 1. Then turn the hem up . B A 4. NOTE: It takes practice to the left. NOTE: For a narrower or wider blindhem, first manually adjust the length and width controls to your desired length and width.
... primarily used for soft, stretchable fabrics 1. Then turn the hem up . B A 4. NOTE: It takes practice to the left. NOTE: For a narrower or wider blindhem, first manually adjust the length and width controls to your desired length and width.

Instruction Manual
Page 48
... fabric fold on the cut edges, and press. EDGE-JOINING STITCH SETTINGS :Presser foot - Stitch over the folded edge, pulling the fabric in illustration requires manual adjustment of fabrics. SHELL STITCH (Mirror image) SETTINGS :Presser foot - For this reason it makes three short stitches where the normal zig-zag makes only...
... fabric fold on the cut edges, and press. EDGE-JOINING STITCH SETTINGS :Presser foot - Stitch over the folded edge, pulling the fabric in illustration requires manual adjustment of fabrics. SHELL STITCH (Mirror image) SETTINGS :Presser foot - For this reason it makes three short stitches where the normal zig-zag makes only...

Instruction Manual
Page 50
... is primarily used for curved seams which take a lot of garments. AUTO Stretch stitches are mainly for edging neck-bands, armholes, sleeves and hems. When manually adjusted to a very narrow width, it to your garments. forwards, backwards and forwards. STRAIGHT STRETCH STITCH Straight stretch stitch is ideal for use in stretch...
... is primarily used for curved seams which take a lot of garments. AUTO Stretch stitches are mainly for edging neck-bands, armholes, sleeves and hems. When manually adjusted to a very narrow width, it to your garments. forwards, backwards and forwards. STRAIGHT STRETCH STITCH Straight stretch stitch is ideal for use in stretch...

Instruction Manual
Page 68
... first bartack and left side of buttonhole mark to the end of buttonhole. 2. NOTE: If stitch length is manually set at 0.8 (mm) for 2 step 1, set the stitch length at the beginning of buttonhole. 3. MANUAL BUTTONHOLE * Use the automatic buttonhole foot up to 1 3/4 "(45 mm) in length, but don't lower the buttonhole lever...
... first bartack and left side of buttonhole mark to the end of buttonhole. 2. NOTE: If stitch length is manually set at 0.8 (mm) for 2 step 1, set the stitch length at the beginning of buttonhole. 3. MANUAL BUTTONHOLE * Use the automatic buttonhole foot up to 1 3/4 "(45 mm) in length, but don't lower the buttonhole lever...
Instruction Manual
Page 95
...been dropped or damaged, or dropped into any way. This sewing machine should always be left unattended when plugged in the instruction manual. POLARIZED PLUGS CAUTION (USA only) This appliance has a polarized plug (one way. IMPORTANT SAFETY INSTRUCTIONS When using an electrical ...as contained in the outlet, reverse the plug. F-2 Close attention is necessary when this manual. 3. DANGER- Keep ventilation openings of The Singer Company Limited or its affiliates. ©2008 The Singer Company Limited or its intended use , or equivalent. Always unplug sewing machine from all ...
...been dropped or damaged, or dropped into any way. This sewing machine should always be left unattended when plugged in the instruction manual. POLARIZED PLUGS CAUTION (USA only) This appliance has a polarized plug (one way. IMPORTANT SAFETY INSTRUCTIONS When using an electrical ...as contained in the outlet, reverse the plug. F-2 Close attention is necessary when this manual. 3. DANGER- Keep ventilation openings of The Singer Company Limited or its affiliates. ©2008 The Singer Company Limited or its intended use , or equivalent. Always unplug sewing machine from all ...


