Singer 1234 Case
Related Manual Pages

Similar Questions

How Can I Find A Bobbin Case For My Pixie Plus Craft Machine?
(Posted by srheilek 3 years ago)

Positioning Of The Black Bobbin Case
The black bobbin case came out and I can not figure out the correct positioning of it now. There are...
The black bobbin case came out and I can not figure out the correct positioning of it now. There are...
(Posted by Xavier04 7 years ago)

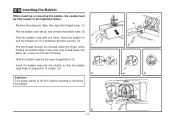
Bobbin Case
How do I get the bobbin out of its case I just bought this model help
How do I get the bobbin out of its case I just bought this model help
(Posted by Joanneniemann 9 years ago)