

Operation Manual
Page 1
Important For assistance in reporting the theft or loss of this operation manual carefully before using the camcorder. Operation References Preparation Basic Operations Useful Features LIQUID CRYSTAL DISPLAY CAMCORDER MODEL VL-NZ50U OPERATION MANUAL Please read this product, record on the line below the model number and serial number which are located on the bottom of the unit. Advanced Features Appendix Model No.: Serial No.: • See page 57 for use of Demo mode. Please retain this information.
Important For assistance in reporting the theft or loss of this operation manual carefully before using the camcorder. Operation References Preparation Basic Operations Useful Features LIQUID CRYSTAL DISPLAY CAMCORDER MODEL VL-NZ50U OPERATION MANUAL Please read this product, record on the line below the model number and serial number which are located on the bottom of the unit. Advanced Features Appendix Model No.: Serial No.: • See page 57 for use of Demo mode. Please retain this information.

Operation Manual
Page 2
... to environmental considerations. BATTERY DISPOSAL CONTAINS LITHIUM-ION RECHARGEABLE BATTERY. Important Information for purchasing this camcorder from a SHARP service center of adapter from SHARP. NO USER-SERVICEABLE PARTS INSIDE. For disposal or recycling information, please contact your video world... U.S. This symbol warns the user of mercury. CAUTION (applies to capture those special moments. i Please read this camcorder offers, and expand your local authorities or the Electronics Industries Alliance: www.eiae.org. PRODUCT DISPOSAL This Product utilizes tin...
... to environmental considerations. BATTERY DISPOSAL CONTAINS LITHIUM-ION RECHARGEABLE BATTERY. Important Information for purchasing this camcorder from a SHARP service center of adapter from SHARP. NO USER-SERVICEABLE PARTS INSIDE. For disposal or recycling information, please contact your video world... U.S. This symbol warns the user of mercury. CAUTION (applies to capture those special moments. i Please read this camcorder offers, and expand your local authorities or the Electronics Industries Alliance: www.eiae.org. PRODUCT DISPOSAL This Product utilizes tin...

Operation Manual
Page 3
... interference to which can be determined by turning the equipment off and on, the user is connected. DECLARATION OF CONFORMITY Sharp Camcorder This device complies with the copyright laws of the FCC Rules. This has happened when young children install batteries backwards. This... equipment generates, uses, and can overheat and rupture. CConsult the dealer or an experienced radio/TV technician for a Class B digital device, pursuant to take out batteries or install them. Occasionally, a pixel may appear on a circuit different from copyright owners whenever ...
... interference to which can be determined by turning the equipment off and on, the user is connected. DECLARATION OF CONFORMITY Sharp Camcorder This device complies with the copyright laws of the FCC Rules. This has happened when young children install batteries backwards. This... equipment generates, uses, and can overheat and rupture. CConsult the dealer or an experienced radio/TV technician for a Class B digital device, pursuant to take out batteries or install them. Occasionally, a pixel may appear on a circuit different from copyright owners whenever ...

Operation Manual
Page 6
Attaching the Battery Pack Power switch Charging the Battery Pack 1 Attach the battery pack on the camcorder, and make sure that the Power switch is set to OFF. 2 Plug the AC adapter into a power outlet (1), then insert the DC plug into place (2). &#... jack (2). • The charge indicator lights up. Quick Operation Guide Please consult this operation manual further for details on the camcorder (1), and slide the battery pack in the direction of your camcorder. DC input jack 1 Make sure that the Power switch is charged. 3 Remove the DC plug from the DC input jack...
Attaching the Battery Pack Power switch Charging the Battery Pack 1 Attach the battery pack on the camcorder, and make sure that the Power switch is set to OFF. 2 Plug the AC adapter into a power outlet (1), then insert the DC plug into place (2). &#... jack (2). • The charge indicator lights up. Quick Operation Guide Please consult this operation manual further for details on the camcorder (1), and slide the battery pack in the direction of your camcorder. DC input jack 1 Make sure that the Power switch is charged. 3 Remove the DC plug from the DC input jack...

Operation Manual
Page 7
...angle Turn the LCD monitor so that the screen faces upward. 4 Wait for the cassette holder to prevent a shaky image. Holding the camcorder Place your finger. vi Close the compartment door by pressing the center until the cassette holder clicks into place. Erasure protect tab Take ...care not to cover the lens or microphone with your right thumb close to the camcorder, then slide the cassette compartment door release and open the cassette compartment door. • After confirmation sound, the cassette holder extends and...
...angle Turn the LCD monitor so that the screen faces upward. 4 Wait for the cassette holder to prevent a shaky image. Holding the camcorder Place your finger. vi Close the compartment door by pressing the center until the cassette holder clicks into place. Erasure protect tab Take ...care not to cover the lens or microphone with your right thumb close to the camcorder, then slide the cassette compartment door release and open the cassette compartment door. • After confirmation sound, the cassette holder extends and...
Operation Manual
Page 8
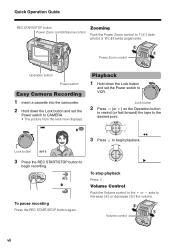
... fast forward) the tape to the desired point. 3 Press m to VCR. Power Zoom control Operation button Power switch Easy Camera Recording 1 Insert a cassette into the camcorder. 2 Hold down the Lock button and set the Power switch to begin playback.
... fast forward) the tape to the desired point. 3 Press m to VCR. Power Zoom control Operation button Power switch Easy Camera Recording 1 Insert a cassette into the camcorder. 2 Hold down the Lock button and set the Power switch to begin playback.

Operation Manual
Page 9
... it in a different direction until the picture returns to use , remember to 80% relative humidity. You can use your camcorder. Using the camcorder near strong fluorescent lights, motors, televisions, or other magnetic sources may cause buzzing or picture deterioration. • Avoid shocks and...often appears less bright immediately after the power is not a malfunction. Be sure to normal. • Avoid magnetic sources. To prevent the camcorder from becoming too cold, wrap it to hard shocks or strong vibrations. Be sure to keep the unit in a wellventilated location. •...
... it in a different direction until the picture returns to use , remember to 80% relative humidity. You can use your camcorder. Using the camcorder near strong fluorescent lights, motors, televisions, or other magnetic sources may cause buzzing or picture deterioration. • Avoid shocks and...often appears less bright immediately after the power is not a malfunction. Be sure to normal. • Avoid magnetic sources. To prevent the camcorder from becoming too cold, wrap it to hard shocks or strong vibrations. Be sure to keep the unit in a wellventilated location. •...

Operation Manual
Page 10
If this camcorder are valid only in the U.S. and Latin America. ix Please refer to the part numbers printed on the labels of these areas, the part numbers may be different. Supplied Accessories Battery pack BT-L225n* AC adapter UADP-0339TAZZ* CR2025 type lithium battery Audio/video cable QCNW-1979TAZZ Lens cap GCOVH1296TASA Lens hood GCOVA1870TASA Wrist strap UBNDT0145TASA Tripod adapter GDAI-A001WJZZ * The part numbers for the AC adapter and battery pack supplied with this camcorder was purchased outside of the supplied AC adapter and battery pack.
If this camcorder are valid only in the U.S. and Latin America. ix Please refer to the part numbers printed on the labels of these areas, the part numbers may be different. Supplied Accessories Battery pack BT-L225n* AC adapter UADP-0339TAZZ* CR2025 type lithium battery Audio/video cable QCNW-1979TAZZ Lens cap GCOVH1296TASA Lens hood GCOVA1870TASA Wrist strap UBNDT0145TASA Tripod adapter GDAI-A001WJZZ * The part numbers for the AC adapter and battery pack supplied with this camcorder was purchased outside of the supplied AC adapter and battery pack.
Operation Manual
Page 12
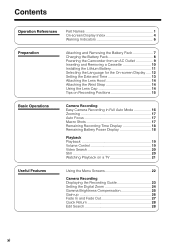
...References Part Names 1 On-screen Display Index 4 Warning Indicators 6 Preparation Attaching and Removing the Battery Pack 7 Charging the Battery Pack 8 Powering the Camcorder from an AC Outlet 9 Inserting and Removing a Cassette 10 Installing the Lithium Battery 11 Selecting the Language for the On-screen Display ..... 12 ... Watching Playback on a TV 21 Useful Features Using the Menu Screens 22 Camera Recording Displaying the Recording Guide 23 Setting the Digital Zoom 24 Gamma Brightness Compensation 25 Gain-up 26 Fade In and Fade Out 27 Quick Return 28 Edit Search 28 xi
...References Part Names 1 On-screen Display Index 4 Warning Indicators 6 Preparation Attaching and Removing the Battery Pack 7 Charging the Battery Pack 8 Powering the Camcorder from an AC Outlet 9 Inserting and Removing a Cassette 10 Installing the Lithium Battery 11 Selecting the Language for the On-screen Display ..... 12 ... Watching Playback on a TV 21 Useful Features Using the Menu Screens 22 Camera Recording Displaying the Recording Guide 23 Setting the Digital Zoom 24 Gamma Brightness Compensation 25 Gain-up 26 Fade In and Fade Out 27 Quick Return 28 Edit Search 28 xi
Operation Manual
Page 13
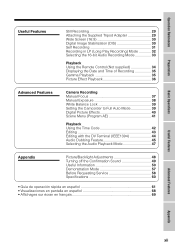
Operation References Preparation Basic Operations Useful Features Still Recording 29 Attaching the Supplied Tripod Adapter 29 Wide Screen (16:9 30 Digital Image Stabilization (DIS 30 Self Recording 31 Recording in LP (Long Play Recording) Mode 32 Selecting the 16-bit Audio Recording Mode... 35 Picture Effect Playback 36 Advanced Features Camera Recording Manual Focus 37 Manual Exposure 38 White Balance Lock 39 Setting the Camcorder to Full Auto Mode 39 Digital Picture Effects 40 Scene Menu (Program AE 41 Playback Using the Time Code 42 Editing 43 Editing with the DV Terminal...
Operation References Preparation Basic Operations Useful Features Still Recording 29 Attaching the Supplied Tripod Adapter 29 Wide Screen (16:9 30 Digital Image Stabilization (DIS 30 Self Recording 31 Recording in LP (Long Play Recording) Mode 32 Selecting the 16-bit Audio Recording Mode... 35 Picture Effect Playback 36 Advanced Features Camera Recording Manual Focus 37 Manual Exposure 38 White Balance Lock 39 Setting the Camcorder to Full Auto Mode 39 Digital Picture Effects 40 Scene Menu (Program AE 41 Playback Using the Time Code 42 Editing 43 Editing with the DV Terminal...

Operation Manual
Page 19
...A CASSE TTE. Wait a few hours for the first 3 seconds Displayed after this warning appears, the camcorder automatically turns off. About 10 seconds after 3 seconds Description of its service life. Displayed for the dew ...battery is defective and should be removed (see page 52). Dew has formed inside the camcorder. Replace it with a fully charged battery pack (see page 10). The fluorescent lamp behind... on the video cassette has been slid to end. The tape is no video cassette in the camcorder. THE TAPE ENDS SOON. CHANGE THE CAS SE T T E . The erasure protect tab on...
...A CASSE TTE. Wait a few hours for the first 3 seconds Displayed after this warning appears, the camcorder automatically turns off. About 10 seconds after 3 seconds Description of its service life. Displayed for the dew ...battery is defective and should be removed (see page 52). Dew has formed inside the camcorder. Replace it with a fully charged battery pack (see page 10). The fluorescent lamp behind... on the video cassette has been slid to end. The tape is no video cassette in the camcorder. THE TAPE ENDS SOON. CHANGE THE CAS SE T T E . The erasure protect tab on...

Operation Manual
Page 20
...and Removing the Battery Pack Attaching Power switch Removing 1 Make sure that the Power switch is set to OFF. 2 Rotate the monitor section of the camcorder (1), then press the battery release (2). Slide the battery pack in the direction of the poor contact pressure. • To prevent damage to the ...pack when removing, be sure to firmly hold the battery pack while pressing the release. • Use only SHARP model BT-L225 or BT-L445 battery packs with the = mark on the camcorder (1), and slide the battery pack in the direction of the arrow and take it locks into place (2). Use...
...and Removing the Battery Pack Attaching Power switch Removing 1 Make sure that the Power switch is set to OFF. 2 Rotate the monitor section of the camcorder (1), then press the battery release (2). Slide the battery pack in the direction of the poor contact pressure. • To prevent damage to the ...pack when removing, be sure to firmly hold the battery pack while pressing the release. • Use only SHARP model BT-L225 or BT-L445 battery packs with the = mark on the camcorder (1), and slide the battery pack in the direction of the arrow and take it locks into place (2). Use...

Operation Manual
Page 21
...pack time recording time playback time BT-L225 approx. 2hr. approx. 1hr. 30min. Battery Charging Max. continuous Max. Caution: • Charge only SHARP model BT-L225 or BT-L445 battery packs. approx. 3hr. 8 This may result in a decrease in the actual recording time compared to perform ...deteriorate over time. Extending battery pack life Even when the battery pack is not used, the capacity of the capacity, it on the camcorder, and make sure that the Power switch is recommended to the maximum continuous recording time listed above. • The charging time and...
...pack time recording time playback time BT-L225 approx. 2hr. approx. 1hr. 30min. Battery Charging Max. continuous Max. Caution: • Charge only SHARP model BT-L225 or BT-L445 battery packs. approx. 3hr. 8 This may result in a decrease in the actual recording time compared to perform ...deteriorate over time. Extending battery pack life Even when the battery pack is not used, the capacity of the capacity, it on the camcorder, and make sure that the Power switch is recommended to the maximum continuous recording time listed above. • The charging time and...

Operation Manual
Page 22
... long period of time. Caution: • The supplied AC adapter is specially designed for use the camcorder for other camcorders. 1 Make sure that the Power switch is set the Power switch to power the camcorder, the battery pack is supplied power. Cautions: • BEFORE REMOVING THE DC PLUG, ALWAYS STOP ...the DC plug while shooting or during playback may damage the tape by causing it to wrap around the video head drum. • Disconnect the camcorder from a power outlet by using the AC adapter to CAMERA or VCR. To power outlet 3 Hold down the Lock button and set to OFF...
... long period of time. Caution: • The supplied AC adapter is specially designed for use the camcorder for other camcorders. 1 Make sure that the Power switch is set the Power switch to power the camcorder, the battery pack is supplied power. Cautions: • BEFORE REMOVING THE DC PLUG, ALWAYS STOP ...the DC plug while shooting or during playback may damage the tape by causing it to wrap around the video head drum. • Disconnect the camcorder from a power outlet by using the AC adapter to CAMERA or VCR. To power outlet 3 Hold down the Lock button and set to OFF...

Operation Manual
Page 23
... available cassette fully with the window facing outwards, and with this happens, repeat the insertion procedure. • Do not attempt to the camcorder, then slide the cassette compartment door release and open the cassette compartment door. • After confirmation sound, the cassette holder extends and opens... automatically. "W" mark 4 Wait for a long period of the camcorder might eject the cassette. It may not be able to fully retract. Cautions: • Do not try to close it. • Do...
... available cassette fully with the window facing outwards, and with this happens, repeat the insertion procedure. • Do not attempt to the camcorder, then slide the cassette compartment door release and open the cassette compartment door. • After confirmation sound, the cassette holder extends and opens... automatically. "W" mark 4 Wait for a long period of the camcorder might eject the cassette. It may not be able to fully retract. Cautions: • Do not try to close it. • Do...

Operation Manual
Page 24
... supplied lithium battery is used to store the memory of the date and time settings. 1 Slide the cassette compartment door release and open when the camcorder is connected to the next step (see page 10). 2 Pull out the lithium battery holder using a pointed object such as the tip of the Lithium...
... supplied lithium battery is used to store the memory of the date and time settings. 1 Slide the cassette compartment door release and open when the camcorder is connected to the next step (see page 10). 2 Pull out the lithium battery holder using a pointed object such as the tip of the Lithium...

Operation Manual
Page 25
... . Preparation Selecting the Language for the first time, select your on-screen display language by following sections are based on using the camcorder for the On-screen Display This camcorder allows you to choose English, French or Spanish as the on-screen display language. T I E MP O SAL I S ESPAÑOL 4 Press l or m to...
... . Preparation Selecting the Language for the first time, select your on-screen display language by following sections are based on using the camcorder for the On-screen Display This camcorder allows you to choose English, French or Spanish as the on-screen display language. T I E MP O SAL I S ESPAÑOL 4 Press l or m to...

Operation Manual
Page 27
Caution: • Do not swing the camcorder by the strap. Turn the lens hood in the direction of the lens hood. (Continued on the top of the arrow to the wrist strap ... recording outdoors on the screen. • The menu screen automatically turns off the menu screen. Attaching the Wrist Strap Attach the wrist strap to the camcorder.
Caution: • Do not swing the camcorder by the strap. Turn the lens hood in the direction of the lens hood. (Continued on the top of the arrow to the wrist strap ... recording outdoors on the screen. • The menu screen automatically turns off the menu screen. Attaching the Wrist Strap Attach the wrist strap to the camcorder.

Operation Manual
Page 28
... Turn the LCD monitor so that the screen faces upward. 15 Preparation Preparation Always attach the lens cap over the lens when not using the camcorder. Place your elbows against your finger. Basic posture When recording, hang the lens cap on the left thumb on the thumb rest on the ...wrist strap to prevent a shaky image. Holding the camcorder Place your weight on Recording Positions To create images that are easy to watch during playback, try to the REC START/STOP button and Power...
... Turn the LCD monitor so that the screen faces upward. 15 Preparation Preparation Always attach the lens cap over the lens when not using the camcorder. Place your elbows against your finger. Basic posture When recording, hang the lens cap on the left thumb on the thumb rest on the ...wrist strap to prevent a shaky image. Holding the camcorder Place your weight on Recording Positions To create images that are easy to watch during playback, try to the REC START/STOP button and Power...

Operation Manual
Page 29
...Camera Recording Easy Camera Recording in Full Auto Mode • Before you will not be recording again soon. • If the camcorder remains in Recording Standby mode for recording. Turn off the power if you start recording, perform the operations described on and off... is left in Recording Standby mode for about 4 minutes.) Maximum continuous recording and actual recording times Battery Max. Recording pauses, and the camcorder enters Recording Standby mode. To resume recording, set the Power switch to CAMERA. • The picture from being damaged. REC START/STOP...
...Camera Recording Easy Camera Recording in Full Auto Mode • Before you will not be recording again soon. • If the camcorder remains in Recording Standby mode for recording. Turn off the power if you start recording, perform the operations described on and off... is left in Recording Standby mode for about 4 minutes.) Maximum continuous recording and actual recording times Battery Max. Recording pauses, and the camcorder enters Recording Standby mode. To resume recording, set the Power switch to CAMERA. • The picture from being damaged. REC START/STOP...


