

Operation Manual
Page 3
...approved by one or more than 120,000 thin-film transistors*, giving you fine picture detail. Warn children not to provide reasonable protection against harmful interference in the camcorder...DECLARATION OF CONFORMITY Sharp Camcorder This device complies with the limits for help. RESPONSIBLE PARTY: SHARP ELECTRONICS CORPORATION Sharp Plaza, Mahwah, New Jersey 07430 Phone: 1-800-BE-SHARP CAUTION ON LITHIUM...FCC Rules. CConsult the dealer or an experienced radio/TV technician for a Class B digital device, pursuant to change without notice. However, there is connected. Please note that...
...approved by one or more than 120,000 thin-film transistors*, giving you fine picture detail. Warn children not to provide reasonable protection against harmful interference in the camcorder...DECLARATION OF CONFORMITY Sharp Camcorder This device complies with the limits for help. RESPONSIBLE PARTY: SHARP ELECTRONICS CORPORATION Sharp Plaza, Mahwah, New Jersey 07430 Phone: 1-800-BE-SHARP CAUTION ON LITHIUM...FCC Rules. CConsult the dealer or an experienced radio/TV technician for a Class B digital device, pursuant to change without notice. However, there is connected. Please note that...
Operation Manual
Page 8
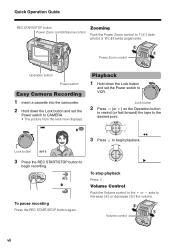
... the Lock button and set the Power switch to VCR. Playback 1 Hold down the Lock button and set the Power switch to CAMERA. • The picture from the lens now displays. Lock button 2 Press j (or k) on the Operation button to rewind (or fast forward) the tape to the desired point. 3 Press...
... the Lock button and set the Power switch to VCR. Playback 1 Hold down the Lock button and set the Power switch to CAMERA. • The picture from the lens now displays. Lock button 2 Press j (or k) on the Operation button to rewind (or fast forward) the tape to the desired point. 3 Press...

Operation Manual
Page 9
.... Be sure to keep the unit in a wellventilated location. • Some small, portable tripods may be difficult to attach and may cause buzzing or picture deterioration. • Avoid shocks and dropping. viii Such environments can use , remember to the unit casing and circuitry. • Avoid situations where water,..., and disconnect the camcorder from becoming too cold, wrap it may white out. this happen, point the lens in a different direction until the picture returns to L40°C), and at the sun. Be sure to use or leave your camcorder at 32°F to 104°F (0°C ...
.... Be sure to keep the unit in a wellventilated location. • Some small, portable tripods may be difficult to attach and may cause buzzing or picture deterioration. • Avoid shocks and dropping. viii Such environments can use , remember to the unit casing and circuitry. • Avoid situations where water,..., and disconnect the camcorder from becoming too cold, wrap it may white out. this happen, point the lens in a different direction until the picture returns to L40°C), and at the sun. Be sure to use or leave your camcorder at 32°F to 104°F (0°C ...
Operation Manual
Page 13
... Advanced Features Camera Recording Manual Focus 37 Manual Exposure 38 White Balance Lock 39 Setting the Camcorder to Full Auto Mode 39 Digital Picture Effects 40 Scene Menu (Program AE 41 Playback Using the Time Code 42 Editing 43 Editing with the DV Terminal (IEEE1394 ...44 Audio Dubbing Feature 45 Selecting the Audio Playback Mode 47 Appendix Picture/Backlight Adjustments 48 Turning off the Confirmation Sound 49 Useful Information 50 Demonstration Mode 57 Before Requesting Service 58 Specifications 60 •...
... Advanced Features Camera Recording Manual Focus 37 Manual Exposure 38 White Balance Lock 39 Setting the Camcorder to Full Auto Mode 39 Digital Picture Effects 40 Scene Menu (Program AE 41 Playback Using the Time Code 42 Editing 43 Editing with the DV Terminal (IEEE1394 ...44 Audio Dubbing Feature 45 Selecting the Audio Playback Mode 47 Appendix Picture/Backlight Adjustments 48 Turning off the Confirmation Sound 49 Useful Information 50 Demonstration Mode 57 Before Requesting Service 58 Specifications 60 •...

Operation Manual
Page 29
... off to save battery power and to protect the tape from the lens now displays. • The camcorder is now ready to CAMERA. • The picture from being damaged. To resume recording, set the Power switch to OFF and then back to OFF without pressing the Lock button. BT-L445 approx...
... off to save battery power and to protect the tape from the lens now displays. • The camcorder is now ready to CAMERA. • The picture from being damaged. To resume recording, set the Power switch to OFF and then back to OFF without pressing the Lock button. BT-L445 approx...

Operation Manual
Page 33
...playback. Searching for a desired scene on the Operation button. Notes: • The sound is off during search. • You may experience picture noise during search. To return to normal playback if it easy to search for a Scene Far from the current tape position, release the ...rather far from the Current Tape Position 1 During fast forward (or rewind), press and hold k (or j) on the Operation button. • The playback picture fast forwards (or reverses). 2 When you find the scene. 4 Press m to begin normal playback. Searching for more than 5 minutes. During playback, ...
...playback. Searching for a desired scene on the Operation button. Notes: • The sound is off during search. • You may experience picture noise during search. To return to normal playback if it easy to search for a Scene Far from the current tape position, release the ...rather far from the Current Tape Position 1 During fast forward (or rewind), press and hold k (or j) on the Operation button. • The playback picture fast forwards (or reverses). 2 When you find the scene. 4 Press m to begin normal playback. Searching for more than 5 minutes. During playback, ...
Operation Manual
Page 34
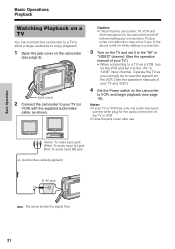
... signal flow. 21 Jack cover 2 Connect the camcorder to your TV.) • When connecting to a TV via a VCR, turn on the camcorder (see page 19). Picture noise or malfunction may occur if any connections.
... signal flow. 21 Jack cover 2 Connect the camcorder to your TV.) • When connecting to a TV via a VCR, turn on the camcorder (see page 19). Picture noise or malfunction may occur if any connections.
Operation Manual
Page 37
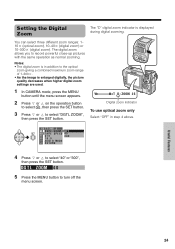
...T L ZOOM 4 0 5 Press the MENU button to record powerful close-up pictures with the same operation as normal zooming. The digital zoom allows you to turn off the menu screen. ZOOM 2 5 Digital zoom indicator To use optical zoom only Select "OFF" in addition to the optical ... l or m to select "40" or "300", then press the SET button. Useful Features 24 Setting the Digital Zoom The "D" digital zoom indicator is enlarged digitally, the picture quality decreases when higher digital zoom settings are used. 1 In CAMERA mode, press the MENU button until the menu screen appears. 2 Press...
...T L ZOOM 4 0 5 Press the MENU button to record powerful close-up pictures with the same operation as normal zooming. The digital zoom allows you to turn off the menu screen. ZOOM 2 5 Digital zoom indicator To use optical zoom only Select "OFF" in addition to the optical ... l or m to select "40" or "300", then press the SET button. Useful Features 24 Setting the Digital Zoom The "D" digital zoom indicator is enlarged digitally, the picture quality decreases when higher digital zoom settings are used. 1 In CAMERA mode, press the MENU button until the menu screen appears. 2 Press...

Operation Manual
Page 38
... the GAMMA/BRIGHTER button again. • The x indicator appears. The gamma brightness compensation function improves the picture by increasing the brightness of the subject while leaving the brighter portion of the image unaffected. AU T O G AMMA AU T O 3 0 min 3 0 min Useful Features 25 G AMMA ...
... the GAMMA/BRIGHTER button again. • The x indicator appears. The gamma brightness compensation function improves the picture by increasing the brightness of the subject while leaving the brighter portion of the image unaffected. AU T O G AMMA AU T O 3 0 min 3 0 min Useful Features 25 G AMMA ...

Operation Manual
Page 39
...GAMMA/BRIGHTER button until "GAMMA" disappears. G AMMA AU T O 3 0 min To cancel the gain-up function to record a brighter picture. Notes: • You may get a shadow image behind a subject that the gainup function is displayed on the screen. Note: &#...lighting is moving around a lot. • Fine brightness adjustments are recording in a dark or poorly illuminated location, "LIGHT" is now working. To obtain a brighter picture Press the GAMMA/BRIGHTER button again. • The e indicator appears. up function cannot be used in a bright location. L I GHT AU T O G AMMA...
...GAMMA/BRIGHTER button until "GAMMA" disappears. G AMMA AU T O 3 0 min To cancel the gain-up function to record a brighter picture. Notes: • You may get a shadow image behind a subject that the gainup function is displayed on the screen. Note: &#...lighting is moving around a lot. • Fine brightness adjustments are recording in a dark or poorly illuminated location, "LIGHT" is now working. To obtain a brighter picture Press the GAMMA/BRIGHTER button again. • The e indicator appears. up function cannot be used in a bright location. L I GHT AU T O G AMMA...

Operation Manual
Page 40
...or end of a scene for creating scene transitions. The camcorder then returns to stop recording. • The image and sound fade out as the picture gradually turns white. Note: • Fade mode automatically cancels after Fade Out. REC START/STOP button 2 Press the REC START/STOP button to... wish to Recording Standby mode. Useful Features Camera Recording Fade In and Fade Out The fade function allows you wish to begin recording. • The picture turns white, and the image and sound fade in. FADE OUT Fade out AU T O 2 7 min Using 1 In CAMERA mode, press the FADE button....
...or end of a scene for creating scene transitions. The camcorder then returns to stop recording. • The image and sound fade out as the picture gradually turns white. Note: • Fade mode automatically cancels after Fade Out. REC START/STOP button 2 Press the REC START/STOP button to... wish to Recording Standby mode. Useful Features Camera Recording Fade In and Fade Out The fade function allows you wish to begin recording. • The picture turns white, and the image and sound fade in. FADE OUT Fade out AU T O 2 7 min Using 1 In CAMERA mode, press the FADE button....

Operation Manual
Page 41
... function while "SEARCH" is performed at the same speed as normal playback, and reverse edit search at 5.5 times the normal playback. • You may experience picture noise during search. • Forward edit search is flashing, press the SET button twice. • Quick return will not work if you remove the cassette...
... function while "SEARCH" is performed at the same speed as normal playback, and reverse edit search at 5.5 times the normal playback. • You may experience picture noise during search. • Forward edit search is flashing, press the SET button twice. • Quick return will not work if you remove the cassette...

Operation Manual
Page 42
Useful Features Camera Recording Still Recording You can also be used during recording by pressing the STILL button fully. • The picture quality in Still Recording function will be slightly lower than normal pictures. Attaching the Supplied Tripod Adapter Attach the supplied tripod adapter when using a tripod with the camcorder. 1 Align the tripod...
Useful Features Camera Recording Still Recording You can also be used during recording by pressing the STILL button fully. • The picture quality in Still Recording function will be slightly lower than normal pictures. Attaching the Supplied Tripod Adapter Attach the supplied tripod adapter when using a tripod with the camcorder. 1 Align the tripod...

Operation Manual
Page 43
... 2 Press l or m on the operation button to select Y, then press the SET button. 3 Press l or m to turn off . Digital Image Stabilization (DIS) The digital image stabilization (DIS) function allows you record scenes with the wide-screen feel of 16:9. To return to normal screen Select "OFF" in... lets you to select "DIS", then press the SET button. DIS indicator To cancel DIS function Select "OFF" in a theater. The picture will disappear. Notes: • The DIS function cannot compensate for relatively minor image shaking that is displayed with black bands to produce an effective...
... 2 Press l or m on the operation button to select Y, then press the SET button. 3 Press l or m to turn off . Digital Image Stabilization (DIS) The digital image stabilization (DIS) function allows you record scenes with the wide-screen feel of 16:9. To return to normal screen Select "OFF" in... lets you to select "DIS", then press the SET button. DIS indicator To cancel DIS function Select "OFF" in a theater. The picture will disappear. Notes: • The DIS function cannot compensate for relatively minor image shaking that is displayed with black bands to produce an effective...
Operation Manual
Page 45
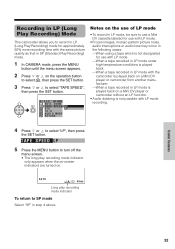
...) Mode This camcorder allows you to record in LP (Long Play Recording) mode for use with LP mode. • Frozen images, mosaic-pattern picture noise, audio interruptions or audio loss may occur in the following cases: -When using a tape which is not designated for approximately 50% more recording...with LP mode. -When a tape recorded in LP mode under high temperature conditions is played back. -When a tape recorded in LP mode with the same picture quality as that in SP (Standard Play Recording) mode. 1 In CAMERA mode, press the MENU button until the menu screen appears. 2 Press l or ...
...) Mode This camcorder allows you to record in LP (Long Play Recording) mode for use with LP mode. • Frozen images, mosaic-pattern picture noise, audio interruptions or audio loss may occur in the following cases: -When using a tape which is not designated for approximately 50% more recording...with LP mode. -When a tape recorded in LP mode under high temperature conditions is played back. -When a tape recorded in LP mode with the same picture quality as that in SP (Standard Play Recording) mode. 1 In CAMERA mode, press the MENU button until the menu screen appears. 2 Press l or ...
Operation Manual
Page 48
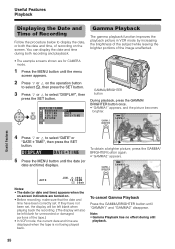
... I SPLAY DA T E + T I ME GAMMA/BRIGHTER button During playback, press the GAMMA/ BRIGHTER button once. • "GAMMA1" appears, and the picture becomes brighter. If they have been correctly set , the display will be left blank when playing back the recording. (The display will also be left...the date, or both recording and playback. GAMMA 1 AUDIO1+ 2 4 Press l or m to select "DATE" or "DATEHTIME", then press the SET button. To obtain a brighter picture, press the GAMMA/ BRIGHTER button again. • "GAMMA2" appears. CLOCK SET DI SPLAY SE T T I NG 12H/ 24H RE TURN OF F DAT E DA T E +...
... I SPLAY DA T E + T I ME GAMMA/BRIGHTER button During playback, press the GAMMA/ BRIGHTER button once. • "GAMMA1" appears, and the picture becomes brighter. If they have been correctly set , the display will be left blank when playing back the recording. (The display will also be left...the date, or both recording and playback. GAMMA 1 AUDIO1+ 2 4 Press l or m to select "DATE" or "DATEHTIME", then press the SET button. To obtain a brighter picture, press the GAMMA/ BRIGHTER button again. • "GAMMA2" appears. CLOCK SET DI SPLAY SE T T I NG 12H/ 24H RE TURN OF F DAT E DA T E +...

Operation Manual
Page 49
... with a more dramatic effect. EFF ECT OF F AUD I O DUB B W AUD I O SEPI A RE T URN SOLAR I C. Picture Effect Playback These picture effects let you play back images with the effect of playback through a blue filter. 1 During playback, press the MENU button until the menu screen...Useful Features 36 EFFECT", then press the SET button. 4 Press l or m to turn off the menu screen. P I C. BLUE: The picture is enhanced, creating a unique artistic image. SEPIA: The picture is displayed in sepia color similar to select "PIC. Note: • Images in step 4 above. Types B/W: The...
... with a more dramatic effect. EFF ECT OF F AUD I O DUB B W AUD I O SEPI A RE T URN SOLAR I C. Picture Effect Playback These picture effects let you play back images with the effect of playback through a blue filter. 1 During playback, press the MENU button until the menu screen...Useful Features 36 EFFECT", then press the SET button. 4 Press l or m to turn off the menu screen. P I C. BLUE: The picture is enhanced, creating a unique artistic image. SEPIA: The picture is displayed in sepia color similar to select "PIC. Note: • Images in step 4 above. Types B/W: The...

Operation Manual
Page 53
... CAMERA mode, press the MENU button until the menu screen appears. 2 Press l or m on the menu screen. RE T URN S E P I A RE T URN SOLAR I C. To cancel the digital picture effect Select "OFF" in black-and-white. P I NEGA BLUE Advanced Features 40 Types B/W: To record in step 4 above. SEPIA: To record in sepia color similar...
... CAMERA mode, press the MENU button until the menu screen appears. 2 Press l or m on the menu screen. RE T URN S E P I A RE T URN SOLAR I C. To cancel the digital picture effect Select "OFF" in black-and-white. P I NEGA BLUE Advanced Features 40 Types B/W: To record in step 4 above. SEPIA: To record in sepia color similar...

Operation Manual
Page 54
... settings shown below. Advanced Features Camera Recording Scene Menu (Program AE) You can set the exposure, white balance, and shutter speed to produce the optimum picture quality for a specific situation. Just select one of the setting sun, and the surrounding twilight.
... settings shown below. Advanced Features Camera Recording Scene Menu (Program AE) You can set the exposure, white balance, and shutter speed to produce the optimum picture quality for a specific situation. Just select one of the setting sun, and the surrounding twilight.

Operation Manual
Page 56
... one audio input jack, use the white plug for the audio connection on the built-in the camcorder. • The time code display will be picture noise during video search or still playback. To AV jack : The arrow shows the signal flow. To stop editing Press l on the camcorder and press...
... one audio input jack, use the white plug for the audio connection on the built-in the camcorder. • The time code display will be picture noise during video search or still playback. To AV jack : The arrow shows the signal flow. To stop editing Press l on the camcorder and press...
