Operation Manual
Page 12
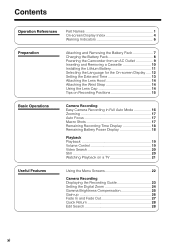
... the Lens Hood 14 Attaching the Wrist Strap 14 Using the Lens Cap 14 Tips on Recording Positions 15 Basic Operations Camera Recording Easy Camera Recording in Full Auto Mode 16 Zooming 17 Auto Focus 17 Macro Shots 17 Remaining Recording Time Display 18 Remaining Battery ...Power Display 18 Playback Playback 19 Volume Control 19 Video Search 20 Still 20 Watching Playback on a TV 21 Useful Features Using the Menu Screens 22 Camera Recording Displaying the Recording Guide 23 Setting the Digital Zoom 24 Gamma Brightness Compensation 25 Gain-up 26 Fade ...
... the Lens Hood 14 Attaching the Wrist Strap 14 Using the Lens Cap 14 Tips on Recording Positions 15 Basic Operations Camera Recording Easy Camera Recording in Full Auto Mode 16 Zooming 17 Auto Focus 17 Macro Shots 17 Remaining Recording Time Display 18 Remaining Battery ...Power Display 18 Playback Playback 19 Volume Control 19 Video Search 20 Still 20 Watching Playback on a TV 21 Useful Features Using the Menu Screens 22 Camera Recording Displaying the Recording Guide 23 Setting the Digital Zoom 24 Gamma Brightness Compensation 25 Gain-up 26 Fade ...

Operation Manual
Page 22
...9 Preparation Preparation Powering the Camcorder from an AC Outlet You can also power the camcorder from a power outlet by causing it to wrap around the video head drum. • Disconnect the camcorder from the AC adapter if you will not use with this camcorder, and should not be used as a... PLAYBACK AND TURN THE POWER OFF. Removing the DC plug while shooting or during playback may damage the tape by using the AC adapter to CAMERA or VCR. Caution: • The supplied AC adapter is specially designed for use the camcorder for other camcorders. 1 Make sure that the Power switch...
...9 Preparation Preparation Powering the Camcorder from an AC Outlet You can also power the camcorder from a power outlet by causing it to wrap around the video head drum. • Disconnect the camcorder from the AC adapter if you will not use with this camcorder, and should not be used as a... PLAYBACK AND TURN THE POWER OFF. Removing the DC plug while shooting or during playback may damage the tape by using the AC adapter to CAMERA or VCR. Caution: • The supplied AC adapter is specially designed for use the camcorder for other camcorders. 1 Make sure that the Power switch...
Operation Manual
Page 30
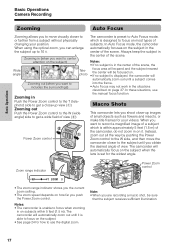
Basic Operations Basic Operations Camera Recording Zooming Auto Focus Zooming allows you to move the camcorder closer to the subject until you obtain the desired angle of the camcorder, do ... focus when zooming in Push the Power Zoom control to the T (telephoto) side to or farther from a subject without physically changing your videos. In these situations, use the digital zoom. Instead, zoom out all the way by pushing the Power Zoom control to the W side, and then move visually closer to get...
Basic Operations Basic Operations Camera Recording Zooming Auto Focus Zooming allows you to move the camcorder closer to the subject until you obtain the desired angle of the camcorder, do ... focus when zooming in Push the Power Zoom control to the T (telephoto) side to or farther from a subject without physically changing your videos. In these situations, use the digital zoom. Instead, zoom out all the way by pushing the Power Zoom control to the W side, and then move visually closer to get...
Operation Manual
Page 71
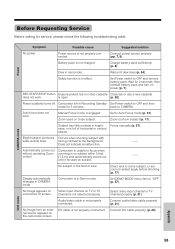
...7). Power suddenly turns off. Set DEMO MODE menu item to Auto Focus mode (p. 37). Connect audio/video cable properly (p. 21). Set Power switch to CAMERA. back to OFF and remove battery pack. Manual Focus mode is not properly connected. Bright subject produces ...mode. Wait for 2 seconds, then reinstall battery pack and turn on subject. -- Power CAMERA mode Symptom Possible cause Suggested solution No power. Zoom out from an exter- Audio/video cable is in camcorder. Camcorder is in bright- Camcorder is not properly connected. Charge ...
...7). Power suddenly turns off. Set DEMO MODE menu item to Auto Focus mode (p. 37). Connect audio/video cable properly (p. 21). Set Power switch to CAMERA. back to OFF and remove battery pack. Manual Focus mode is not properly connected. Bright subject produces ...mode. Wait for 2 seconds, then reinstall battery pack and turn on subject. -- Power CAMERA mode Symptom Possible cause Suggested solution No power. Zoom out from an exter- Audio/video cable is in camcorder. Camcorder is in bright- Camcorder is not properly connected. Charge ...

Operation Manual
Page 73
...standard Recording System: 2 rotary heads, helical scanning system Cassette: Digital VCR Mini DV video cassette Recording/Playback Time: 90 minutes (DVM60, LP mode) Tape... standard) (with gain-up, F1.8) Power Requirement: DC 7.4 V Power Consumption: 4.3 W (during camera recording in Full Auto mode with zoom motor off and backlight in normal mode) Operating Temperature: 32°... accessories, supplies or customer assistance, please call 1-800-BE SHARP (1-800-237-4277) or visit SHARP's website (http://www.sharp-usa.com). 60 Appendix SERVICE INFORMATION (For the U.S.) For the location of the nearest...
...standard Recording System: 2 rotary heads, helical scanning system Cassette: Digital VCR Mini DV video cassette Recording/Playback Time: 90 minutes (DVM60, LP mode) Tape... standard) (with gain-up, F1.8) Power Requirement: DC 7.4 V Power Consumption: 4.3 W (during camera recording in Full Auto mode with zoom motor off and backlight in normal mode) Operating Temperature: 32°... accessories, supplies or customer assistance, please call 1-800-BE SHARP (1-800-237-4277) or visit SHARP's website (http://www.sharp-usa.com). 60 Appendix SERVICE INFORMATION (For the U.S.) For the location of the nearest...


