
VLNZ100U|VLNZ150U Operation Manual
Page 1
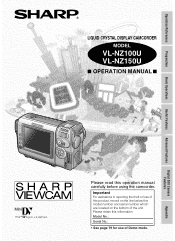
Please retain this operation manual carefully before using the camcorder. Important For assistance in reporting the theft or loss of this product, record on the line below the model number and serial number which are located on the bottom of Demo mode. Model No.: Serial No.: • See page 79 for use of the unit. Advanced Features Digital Still Camera Features Appendix Operation References Preparation Basic Operations Useful Features LIQUID CRYSTAL DISPLAY CAMCORDER MODEL VL-NZ100U VL-NZ150U OPERATION MANUAL Please read this information.
Please retain this operation manual carefully before using the camcorder. Important For assistance in reporting the theft or loss of this product, record on the line below the model number and serial number which are located on the bottom of Demo mode. Model No.: Serial No.: • See page 79 for use of the unit. Advanced Features Digital Still Camera Features Appendix Operation References Preparation Basic Operations Useful Features LIQUID CRYSTAL DISPLAY CAMCORDER MODEL VL-NZ100U VL-NZ150U OPERATION MANUAL Please read this information.

VLNZ100U|VLNZ150U Operation Manual
Page 2
Thank you for Consumers in the literature accompanying this camcorder from a SHARP service center of these materials may be regulated due to the supplied AC adapter) TO PREVENT ELECTRIC SHOCK, MATCH WIDE BLADE OF PLUG TO WIDE SLOT, FULLY INSERT. Please read this camcorder offers, and expand your dealer. REFER SERVICING TO QUALIFIED SERVICE...
Thank you for Consumers in the literature accompanying this camcorder from a SHARP service center of these materials may be regulated due to the supplied AC adapter) TO PREVENT ELECTRIC SHOCK, MATCH WIDE BLADE OF PLUG TO WIDE SLOT, FULLY INSERT. Please read this camcorder offers, and expand your dealer. REFER SERVICING TO QUALIFIED SERVICE...

VLNZ100U|VLNZ150U Operation Manual
Page 3
... equipment has been tested and found to comply with the instructions, may not cause harmful interference, and (2) this does not affect your camcorder's performance. *Specifications are designed to take out batteries or install them. CConnect the equipment into an outlet on a circuit different from ...by one or more than 120,000 thin-film transistors*, giving you fine picture detail. tions to change without notice. DECLARATION OF CONFORMITY Sharp Camcorder This device complies with more of the FCC Rules. Occasionally, a pixel may appear on , the user is subject to radio or ...
... equipment has been tested and found to comply with the instructions, may not cause harmful interference, and (2) this does not affect your camcorder's performance. *Specifications are designed to take out batteries or install them. CConnect the equipment into an outlet on a circuit different from ...by one or more than 120,000 thin-film transistors*, giving you fine picture detail. tions to change without notice. DECLARATION OF CONFORMITY Sharp Camcorder This device complies with more of the FCC Rules. Occasionally, a pixel may appear on , the user is subject to radio or ...

VLNZ100U|VLNZ150U Operation Manual
Page 6
... switch is set to OFF. v To power outlet Charge indicator 2 Align the = mark on the side of the battery pack with the = mark on the camcorder, and make sure that the Power switch is set to OFF. 2 Plug the AC adapter into a power outlet (1), then insert the DC plug into place..., then remove the AC adapter from the power outlet. Attaching the Battery Pack Power switch Charging the Battery Pack 1 Attach the battery pack on the camcorder (1), and slide the battery pack in the direction of your...
... switch is set to OFF. v To power outlet Charge indicator 2 Align the = mark on the side of the battery pack with the = mark on the camcorder, and make sure that the Power switch is set to OFF. 2 Plug the AC adapter into a power outlet (1), then insert the DC plug into place..., then remove the AC adapter from the power outlet. Attaching the Battery Pack Power switch Charging the Battery Pack 1 Attach the battery pack on the camcorder (1), and slide the battery pack in the direction of your...

VLNZ100U|VLNZ150U Operation Manual
Page 7
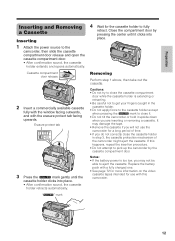
Inserting a Cassette Inserting a Card 1 Attach the power source to the camcorder, then slide the cassette compartment door release and open the card slot cover in as far as it will go. vi REC SAVE Write-protect ...
Inserting a Cassette Inserting a Card 1 Attach the power source to the camcorder, then slide the cassette compartment door release and open the card slot cover in as far as it will go. vi REC SAVE Write-protect ...

VLNZ100U|VLNZ150U Operation Manual
Page 8
... button to rewind (or fast forward) the tape to the desired point. 4 Press m to VCR. Lock button 3 Press j (or k) on Tape 1 Insert a cassette into the camcorder. 2 Set the Media Selection switch to TAPE. 3 Hold down the Lock button and set the Power switch to begin playback. To pause recording Press the...
... button to rewind (or fast forward) the tape to the desired point. 4 Press m to VCR. Lock button 3 Press j (or k) on Tape 1 Insert a cassette into the camcorder. 2 Set the Media Selection switch to TAPE. 3 Hold down the Lock button and set the Power switch to begin playback. To pause recording Press the...

VLNZ100U|VLNZ150U Operation Manual
Page 9
... switch to frame the subject as you will hear a sound and see T mark, then the camcorder locks the focus. displayed in fullscreen. Card Recording Card Playback 1 Insert a card into the camcorder. 1 Set the Media Selection 2 Set the Media Selection switch to focus on the subject. •...; The camcorder automatically focuses on the subject. switch to CARD. 2 Hold down the Lock button and set ...
... switch to frame the subject as you will hear a sound and see T mark, then the camcorder locks the focus. displayed in fullscreen. Card Recording Card Playback 1 Insert a card into the camcorder. 1 Set the Media Selection 2 Set the Media Selection switch to focus on the subject. •...; The camcorder automatically focuses on the subject. switch to CARD. 2 Hold down the Lock button and set ...

VLNZ100U|VLNZ150U Operation Manual
Page 10
ix If this camcorder are valid only in the U.S. Supplied Accessories For VL-NZ100 For VL-NZ150 Standard-life battery pack BT-L225n* Standard-... cap GCOVH1296TASA Lens hood GCOVA1870TASA Wrist strap UBNDT0145TASA Tripod adapter GDAI-A001WJZZ SD Memory Card VL-NZ100: 8 MB VL-NZ150: 16 MB USB driver CDSKA0081TA01 USB cable QCNW-A338WJZZ Remote control RRMCG0084TASA * The... part numbers for the AC adapter and battery pack supplied with this camcorder was purchased outside of ...
ix If this camcorder are valid only in the U.S. Supplied Accessories For VL-NZ100 For VL-NZ150 Standard-life battery pack BT-L225n* Standard-... cap GCOVH1296TASA Lens hood GCOVA1870TASA Wrist strap UBNDT0145TASA Tripod adapter GDAI-A001WJZZ SD Memory Card VL-NZ100: 8 MB VL-NZ150: 16 MB USB driver CDSKA0081TA01 USB cable QCNW-A338WJZZ Remote control RRMCG0084TASA * The... part numbers for the AC adapter and battery pack supplied with this camcorder was purchased outside of ...

VLNZ100U|VLNZ150U Operation Manual
Page 12
... the sun. Do not store the unit in an unventilated car in the summer, in close proximity to 80% relative humidity. Using the camcorder near strong fluorescent lights, motors, televisions, or other magnetic sources may damage the CCD sensor or LCD screen surface. This is not in ...sources, such as it to malfunction. • Always respect prohibitions or restrictions on the use only a strong, stable tripod. • When using your camcorder at 32°F to 104°F (0°C to L40°C), and at the sun. Be particularly careful when recording outside. • When shooting in...
... the sun. Do not store the unit in an unventilated car in the summer, in close proximity to 80% relative humidity. Using the camcorder near strong fluorescent lights, motors, televisions, or other magnetic sources may damage the CCD sensor or LCD screen surface. This is not in ...sources, such as it to malfunction. • Always respect prohibitions or restrictions on the use only a strong, stable tripod. • When using your camcorder at 32°F to 104°F (0°C to L40°C), and at the sun. Be particularly careful when recording outside. • When shooting in...

VLNZ100U|VLNZ150U Operation Manual
Page 13
... Names 1 On-screen Display Index 4 Warning Indicators 7 Preparation Attaching and Removing the Battery Pack 9 Charging the Battery Pack 10 Powering the Camcorder from an AC Outlet 11 Inserting and Removing a Cassette 12 Inserting and Removing a Card 13 Installing the Lithium Battery 14 Selecting the Language ... the Wrist Strap 17 Using the Lens Cap 17 Tips on Recording Positions 18 Basic Operations Useful Features Camera Recording Selecting the Camcorder Mode 19 Easy Camera Recording on Tape in Full Auto Mode 20 Zooming 21 Auto Focus 21 Macro Shots 21 Remaining Recording ...
... Names 1 On-screen Display Index 4 Warning Indicators 7 Preparation Attaching and Removing the Battery Pack 9 Charging the Battery Pack 10 Powering the Camcorder from an AC Outlet 11 Inserting and Removing a Cassette 12 Inserting and Removing a Card 13 Installing the Lithium Battery 14 Selecting the Language ... the Wrist Strap 17 Using the Lens Cap 17 Tips on Recording Positions 18 Basic Operations Useful Features Camera Recording Selecting the Camcorder Mode 19 Easy Camera Recording on Tape in Full Auto Mode 20 Zooming 21 Auto Focus 21 Macro Shots 21 Remaining Recording ...

VLNZ100U|VLNZ150U Operation Manual
Page 14
... an Image from Tape to Card 40 Picture Effect Playback 41 Camera Recording Manual Focus 42 Manual Exposure 43 White Balance Lock 44 Setting the Camcorder to Full Auto Mode 44 Digital Picture Effects 45 Scene Menu (Program AE 46 Playback Using the Time Code 47 Editing 48 Recording from an... External Source 49 Using the Camcorder as a Converter 50 Editing with the DV Terminal (IEEE1394 51 Selecting the Audio Playback Mode 52 Audio Dubbing Feature 53 xiii
... an Image from Tape to Card 40 Picture Effect Playback 41 Camera Recording Manual Focus 42 Manual Exposure 43 White Balance Lock 44 Setting the Camcorder to Full Auto Mode 44 Digital Picture Effects 45 Scene Menu (Program AE 46 Playback Using the Time Code 47 Editing 48 Recording from an... External Source 49 Using the Camcorder as a Converter 50 Editing with the DV Terminal (IEEE1394 51 Selecting the Audio Playback Mode 52 Audio Dubbing Feature 53 xiii

VLNZ100U|VLNZ150U Operation Manual
Page 22
... Replace it with a fully charged battery pack (see page 12). Dew has formed inside the camcorder. The battery is no video cassette in the camcorder. Call your local authorized Sharp dealer to the record-protect position, preventing recording (see page 76). Insert a cassette (see ...(see page 12). Prepare a new cassette (see page 77). Wait a few hours for the first 3 seconds Displayed after this warning appears, the camcorder automatically turns off. About 10 seconds after 3 seconds Description of its service life. E JECT THE CASSE TTE. CHANGE THE CAS SE T T ...
... Replace it with a fully charged battery pack (see page 12). Dew has formed inside the camcorder. The battery is no video cassette in the camcorder. Call your local authorized Sharp dealer to the record-protect position, preventing recording (see page 76). Insert a cassette (see ...(see page 12). Prepare a new cassette (see page 77). Wait a few hours for the first 3 seconds Displayed after this warning appears, the camcorder automatically turns off. About 10 seconds after 3 seconds Description of its service life. E JECT THE CASSE TTE. CHANGE THE CAS SE T T ...

VLNZ100U|VLNZ150U Operation Manual
Page 23
...: • N indicates a flashing display. 8 Delete unnecessary images (see page 61) or replace the card with this camcorder (see page 58). The images in the format the camcorder can recognize. Replace the card (see page 60). Operation References Displayed for 5 seconds Description of the card is full and...data due to use it is properly inserted (see page 13). The card has not been formatted with this camcorder (see page 13). Format the card to a problem with this camcorder. MEMORY C ARD PROT ECTED The card is inserted improperly. Check that it with a new one (see...
...: • N indicates a flashing display. 8 Delete unnecessary images (see page 61) or replace the card with this camcorder (see page 58). The images in the format the camcorder can recognize. Replace the card (see page 60). Operation References Displayed for 5 seconds Description of the card is full and...data due to use it is properly inserted (see page 13). The card has not been formatted with this camcorder (see page 13). Format the card to a problem with this camcorder. MEMORY C ARD PROT ECTED The card is inserted improperly. Check that it with a new one (see...

VLNZ100U|VLNZ150U Operation Manual
Page 24
... Attaching and Removing the Battery Pack Attaching Power switch Removing 1 Make sure that the Power switch is not, the battery pack may come off or camcorder operation may fall because of the poor contact pressure. • To prevent damage to the battery pack when removing, be sure to firmly hold the... battery pack while pressing the release. • Use only SHARP model BT-L225 or BT-L445 battery packs with the = mark on the side of the battery pack with this camcorder. If it is set to OFF. 2 Align the = mark on the camcorder (1), and slide the battery pack in the direction of the...
... Attaching and Removing the Battery Pack Attaching Power switch Removing 1 Make sure that the Power switch is not, the battery pack may come off or camcorder operation may fall because of the poor contact pressure. • To prevent damage to the battery pack when removing, be sure to firmly hold the... battery pack while pressing the release. • Use only SHARP model BT-L225 or BT-L445 battery packs with the = mark on the side of the battery pack with this camcorder. If it is set to OFF. 2 Align the = mark on the camcorder (1), and slide the battery pack in the direction of the...

VLNZ100U|VLNZ150U Operation Manual
Page 25
... the camcorder power automatically turns off when the battery is charged. 3 Remove the DC plug from the DC input jack, then remove the AC adapter from the power outlet. continuous Max. Caution: • Charge only SHARP model BT-L225 or BT-L445 battery packs. approx. 1hr. 30min. Preparation ...Charging the Battery Pack 1 Attach the battery pack on the camcorder, and make sure that the Power switch is set the Power switch to ...
... the camcorder power automatically turns off when the battery is charged. 3 Remove the DC plug from the DC input jack, then remove the AC adapter from the power outlet. continuous Max. Caution: • Charge only SHARP model BT-L225 or BT-L445 battery packs. approx. 1hr. 30min. Preparation ...Charging the Battery Pack 1 Attach the battery pack on the camcorder, and make sure that the Power switch is set the Power switch to ...

VLNZ100U|VLNZ150U Operation Manual
Page 26
... wrap around the video head drum or destroy the card, rendering it unreadble and unwritable. • Disconnect the camcorder from a power outlet by using the AC adapter to power the camcorder, the battery pack is not charged. Cautions: • BEFORE REMOVING THE DC PLUG, ALWAYS STOP RECORDING OR ...PLAYBACK AND TURN THE POWER OFF. Caution: • The supplied AC adapter is specially designed for use the camcorder for other camcorders. 1 Make sure that the Power switch is supplied power. To power outlet 3 Hold down the Lock button and set to OFF. 2 ...
... wrap around the video head drum or destroy the card, rendering it unreadble and unwritable. • Disconnect the camcorder from a power outlet by using the AC adapter to power the camcorder, the battery pack is not charged. Cautions: • BEFORE REMOVING THE DC PLUG, ALWAYS STOP RECORDING OR ...PLAYBACK AND TURN THE POWER OFF. Caution: • The supplied AC adapter is specially designed for use the camcorder for other camcorders. 1 Make sure that the Power switch is supplied power. To power outlet 3 Hold down the Lock button and set to OFF. 2 ...
VLNZ100U|VLNZ150U Operation Manual
Page 27
...8226; Do not apply force to the cassette holder except when pressing the W mark to close it. • Do not tilt the camcorder or hold it clicks into place. • After confirmation sound, the cassette holder retracts automatically. Cassette compartment door release 2 Insert a ...available cassette fully with the window facing outwards, and with this happens, repeat the insertion procedure. • Do not attempt to the camcorder, then slide the cassette compartment door release and open the cassette compartment door. • After confirmation sound, the cassette holder extends and ...
...8226; Do not apply force to the cassette holder except when pressing the W mark to close it. • Do not tilt the camcorder or hold it clicks into place. • After confirmation sound, the cassette holder retracts automatically. Cassette compartment door release 2 Insert a ...available cassette fully with the window facing outwards, and with this happens, repeat the insertion procedure. • Do not attempt to the camcorder, then slide the cassette compartment door release and open the cassette compartment door. • After confirmation sound, the cassette holder extends and ...

VLNZ100U|VLNZ150U Operation Manual
Page 28
...card straight out (2) as shown below , and push it in the direction of the arrow. Caution: • Do not remove the card from the camcorder while recording data on the cards intended for use an SD Memory Card or a MultiMediaCard for more information on the card (S indicator flashes during recording...record/delete data or format the card. Set it will go. Locked position 13 Card slot cover release Notes: • You can use with this camcorder. This may delete the recorded image or damage the card. 3 Insert a card into the slot as it to the unlocked position to record/ ...
...card straight out (2) as shown below , and push it in the direction of the arrow. Caution: • Do not remove the card from the camcorder while recording data on the cards intended for use an SD Memory Card or a MultiMediaCard for more information on the card (S indicator flashes during recording...record/delete data or format the card. Set it will go. Locked position 13 Card slot cover release Notes: • You can use with this camcorder. This may delete the recorded image or damage the card. 3 Insert a card into the slot as it to the unlocked position to record/ ...

VLNZ100U|VLNZ150U Operation Manual
Page 29
... supplied lithium battery is used to store the memory of the date and time settings. 1 Slide the cassette compartment door release and open when the camcorder is connected to a power source.
... supplied lithium battery is used to store the memory of the date and time settings. 1 Slide the cassette compartment door release and open when the camcorder is connected to a power source.

VLNZ100U|VLNZ150U Operation Manual
Page 30
...; The language selection screen appears. L ANGUAGE ENGL I SH FRANÇ A I DA CT MODO D EMO . I D I SH Setting When using the camcorder for the On-screen Display Available modes: TAPE-CAMERA, CARD-CAMERA This camcorder allows you to select the desired language, then press the SET button. • The menu screen displays in the...
...; The language selection screen appears. L ANGUAGE ENGL I SH FRANÇ A I DA CT MODO D EMO . I D I SH Setting When using the camcorder for the On-screen Display Available modes: TAPE-CAMERA, CARD-CAMERA This camcorder allows you to select the desired language, then press the SET button. • The menu screen displays in the...


